
Table of Contents
1. Introduction
Microsoft Azure now features quite solid Java support.
In this tutorial, we’ll demonstrate how to make our Spring Boot application work on the Azure platform, step by step.
2. Maven Dependency and Configuration
First, we do need an Azure subscription to make use of the cloud services there; currently, we can sign up a free account here.
Next, login to the platform and create a service principal using the Azure CLI:
> az login
To sign in, use a web browser to open the page \
https://microsoft.com/devicelogin and enter the code XXXXXXXX to authenticate.
> az ad sp create-for-rbac --name "app-name" --password "password"
{
    "appId": "aaaaaaaa-aaaa-aaaa-aaaa-aaaaaaaaaaaa",
    "displayName": "app-name",
    "name": "http://app-name",
    "password": "password",
    "tenant": "tttttttt-tttt-tttt-tttt-tttttttttttt"
}
Now we configure Azure service principal authentication settings in our Maven settings.xml, with the help of the following section, under <servers>:
<server>
    <id>azure-auth</id>
    <configuration>
        <client>aaaaaaaa-aaaa-aaaa-aaaa-aaaaaaaaaaaa</client>
        <tenant>tttttttt-tttt-tttt-tttt-tttttttttttt</tenant>
        <key>password</key>
        <environment>AZURE</environment>
    </configuration>
</server>
We’ll rely on the authentication configuration above when uploading our Spring Boot application to the Microsoft platform, using azure-webapp-maven-plugin.
Let’s add the following Maven plugin to the pom.xml:
<plugin>
    <groupId>com.microsoft.azure</groupId>
    <artifactId>azure-webapp-maven-plugin</artifactId>
    <version>1.1.0</version>
    <configuration>
        <!-- ... -->
    </configuration>
</plugin>
We can check the latest release version here.
There are a number of configurable properties for this plugin that will be covered in the following introduction.
3. Deploy a Spring Boot App to Azure
Now that we’ve set up the environment, let’s try to deploy our Spring Boot application to Azure.
Our application replies with “hello azure!” when we access “/hello“:
@GetMapping("/hello")
public String hello() {
    return "hello azure!";
}
The platform now allows Java Web App deployment for both Tomcat and Jetty. With azure-webapp-maven-plugin, we can deploy our application directly to supported web containers as the default(ROOT) application, or deploy via FTP.
Note that as we’re going to deploy the application to web containers, we should package it as a WAR archive. As a quick reminder, we’ve got an article introducing how to deploy a Spring Boot WAR into Tomcat.
3.1. Web Container Deployment
We’ll use the following configuration for azure-webapp-maven-plugin if we intend to deploy to Tomcat on a Windows instance:
<configuration>
    <javaVersion>1.8</javaVersion>
    <javaWebContainer>tomcat 8.5</javaWebContainer>
    <!-- ... -->
</configuration>
For a Linux instance, try the following configuration:
<configuration>
    <linuxRuntime>tomcat 8.5-jre8</linuxRuntime>
    <!-- ... -->
</configuration>
Let’s not forget the Azure authentication:
<configuration>
    <authentication>
        <serverId>azure-auth</serverId>
    </authentication>
    <appName>spring-azure</appName>
    <resourceGroup>maixuanviet</resourceGroup>
    <!-- ... -->
</configuration>
When we deploy our application to Azure, we’ll see it appear as an App Service. So here we specified the property <appName> to name the App Service. Also, the App Service, as a resource, needs to be held by a resource group container, so <resourceGroup> is also required.
Now we’re ready to pull the trigger using the azure-webapp:deploy Maven target, and we’ll see the output:
> mvn clean package azure-webapp:deploy
...
[INFO] Start deploying to Web App spring-maixuanviet...
[INFO] Authenticate with ServerId: azure-auth
[INFO] [Correlation ID: cccccccc-cccc-cccc-cccc-cccccccccccc] \
Instance discovery was successful
[INFO] Target Web App doesn't exist. Creating a new one...
[INFO] Creating App Service Plan 'ServicePlanssssssss-bbbb-0000'...
[INFO] Successfully created App Service Plan.
[INFO] Successfully created Web App.
[INFO] Starting to deploy the war file...
[INFO] Successfully deployed Web App at \
https://spring-maixuanviet.azurewebsites.net
...
Now we can access https://spring-maixuanviet.azurewebsites.net/hello and see the response: ‘hello azure!’.
During the deployment process, Azure automatically created an App Service Plan for us. Check out the official document for details about Azure App Service plans. If we already have an App Service plan, we can set property <appServicePlanName> to avoid creating a new one:
<configuration>
    <!-- ... -->
    <appServicePlanName>ServicePlanssssssss-bbbb-0000</appServicePlanName>
</configuration>
3.2. FTP Deployment
To deploy via FTP, we can use the configuration:
<configuration>
    <authentication>
        <serverId>azure-auth</serverId>
    </authentication>
    <appName>spring-maixuanviet</appName>
    <resourceGroup>maixuanviet</resourceGroup>
    <javaVersion>1.8</javaVersion>

    <deploymentType>ftp</deploymentType>
    <resources>
        <resource>
            <directory>${project.basedir}/target</directory>
            <targetPath>webapps</targetPath>
            <includes>
                <include>*.war</include>
            </includes>
        </resource>
    </resources>
</configuration>
In the configuration above, we make the plugin locate the WAR file in directory ${project.basedir}/target, and deploy it to Tomcat container’s webapps directory.
Say our final artifact is named azure-0.1.war, we’ll see output like the following once we commence the deployment:
> mvn clean package azure-webapp:deploy
...
[INFO] Start deploying to Web App spring-maixuanviet...
[INFO] Authenticate with ServerId: azure-auth
[INFO] [Correlation ID: cccccccc-cccc-cccc-cccc-cccccccccccc] \
Instance discovery was successful
[INFO] Target Web App doesn't exist. Creating a new one...
[INFO] Creating App Service Plan 'ServicePlanxxxxxxxx-xxxx-xxxx'...
[INFO] Successfully created App Service Plan.
[INFO] Successfully created Web App.
...
[INFO] Finished uploading directory: \
/xxx/.../target/azure-webapps/spring-maixuanviet--> /site/wwwroot
[INFO] Successfully uploaded files to FTP server: \
xxxx-xxxx-xxx-xxx.ftp.azurewebsites.windows.net
[INFO] Successfully deployed Web App at \
https://spring-maixuanviet.azurewebsites.net
Note that here we didn’t deploy our application as the default Web App for Tomcat, so we can only access it through ‘https://spring-maixuanviet.azurewebsites.net/azure-0.1/hello’. The server will respond ‘hello azure!’ as expected.
4. Deploy with Custom Application Settings
Most of the time, our Spring Boot application requires data access to provide services. Azure now supports databases such as SQL Server, MySQL, and PostgreSQL.
For the sake of simplicity, we’ll use its In-App MySQL as our data source, as its configuration is quite similar to other Azure database services.
4.1. Enable In-App MySQL on Azure
Since there isn’t a one-liner to create a web app with In-App MySQL enabled, we have to first create the web app using the CLI:
az group create --location japanwest --name bealdung-group
az appservice plan create --name maixuanviet-plan --resource-group bealdung-group --sku B1
az webapp create --name maixuanviet-webapp --resource-group maixuanviet-group \
  --plan maixuanviet-plan --runtime java|1.8|Tomcat|8.5
Then enable MySQL in App in the portal:
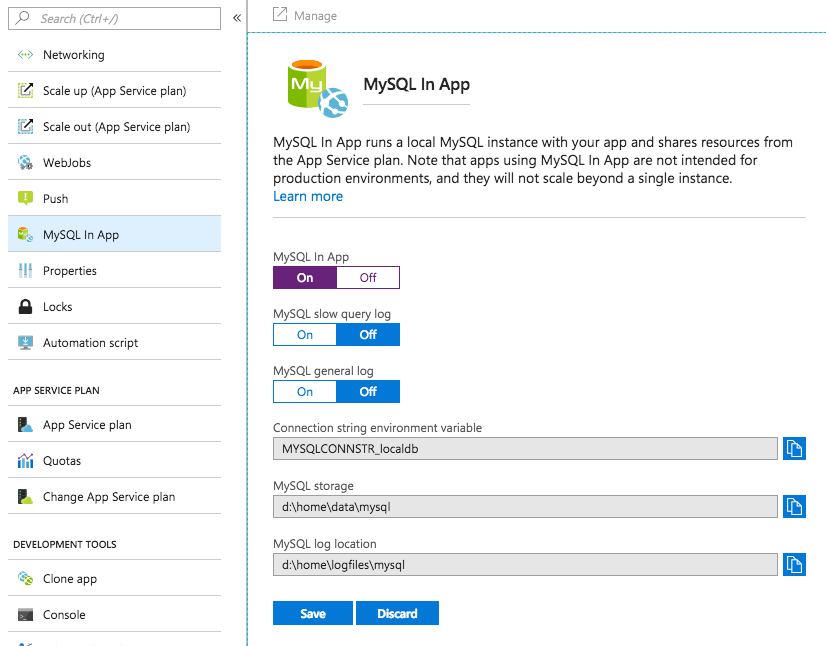
After the In-App MySQL is enabled, we can find the default database, data source URL, and default account information in a file named MYSQLCONNSTR_xxx.txt under the /home/data/mysql directory of the filesystem.
4.2. Spring Boot Application Using Azure In-App MySQL
Here, for demonstration needs, we create a User entity and two endpoints used to register and list Users:
@PostMapping("/user")
public String register(@RequestParam String name) {
    userRepository.save(userNamed(name));
    return "registered";
}

@GetMapping("/user")
public Iterable<User> userlist() {
    return userRepository.findAll();
}
We’re going to use an H2 database in our local environment, and switch it to MySQL on Azure. Generally, we configure data source properties in the application.properties file:
spring.datasource.url=jdbc:h2:file:~/test
spring.datasource.username=sa
spring.datasource.password=
While for Azure deployment, we need to configure azure-webapp-maven-plugin in <appSettings>:
<configuration>
    <authentication>
        <serverId>azure-auth</serverId>
    </authentication>
    <javaVersion>1.8</javaVersion>
    <resourceGroup>maixuanviet-group</resourceGroup>
    <appName>maixuanviet-webapp</appName>
    <appServicePlanName>bealdung-plan</appServicePlanName>
    <appSettings>
        <property>
            <name>spring.datasource.url</name>
            <value>jdbc:mysql://127.0.0.1:55738/localdb</value>
        </property>
        <property>
            <name>spring.datasource.username</name>
            <value>uuuuuu</value>
        </property>
        <property>
            <name>spring.datasource.password</name>
            <value>pppppp</value>
        </property>
    </appSettings>
</configuration>
Now we can start to deploy:
> mvn clean package azure-webapp:deploy
...
[INFO] Start deploying to Web App custom-webapp...
[INFO] Authenticate with ServerId: azure-auth
[INFO] [Correlation ID: cccccccc-cccc-cccc-cccc-cccccccccccc] \
Instance discovery was successful
[INFO] Updating target Web App...
[INFO] Successfully updated Web App.
[INFO] Starting to deploy the war file...
[INFO] Successfully deployed Web App at \
https://maixuanviet-webapp.azurewebsites.net
We can see from the log that the deployment is finished.
Let’s test our new endpoints:
> curl -d "" -X POST https://maixuanviet-webapp.azurewebsites.net/user\?name\=maixuanviet
registered

> curl https://maixuanviet-webapp.azurewebsites.net/user
[{"id":1,"name":"maixuanviet"}]
The server’s response says it all. It works!
5. Deploy a Containerized Spring Boot App to Azure
In the previous sections, we’ve shown how to deploy applications to servlet containers (Tomcat in this case). How about deploying as a standalone runnable jar?
For now, we may need to containerize our Spring Boot application. Specifically, we can dockerize it and upload the image to Azure.
We already have an article about how to dockerize a Spring Boot App, but here we’re about to make use of another maven plugin: docker-maven-plugin, to automate dockerization for us:
<plugin>
    <groupId>com.spotify</groupId>
    <artifactId>docker-maven-plugin</artifactId>
    <version>1.1.0</version>
    <configuration>
        <!-- ... -->
    </configuration>
</plugin>
The latest version can be found here.
5.1. Azure Container Registry
First, we need a Container Registry on Azure to upload our docker image.
So let’s create one:
az acr create --admin-enabled --resource-group maixuanviet-group \
  --location japanwest --name maixuanvietadr--sku Basic
We’ll also need the Container Registry’s authentication information, and this can be queried using:
> az acr credential show --name maixuanvietadr --query passwords[0]
{
  "additionalProperties": {},
  "name": "password",
  "value": "xxxxxxxxxxxxxxxxxxxxxxxxxxxxxxxx"
}
Then add the following server authentication configuration in Maven’s settings.xml:
<server>
    <id>maixuanvietadr</id>
    <username>maixuanvietadr</username>
    <password>xxxxxxxxxxxxxxxxxxxxxxxxxxxxxxxx</password>
</server>
5.2. Maven Plugin Configuration
Let’s add the following Maven plugin configuration to the pom.xml:
<properties>
    <!-- ... -->
    <azure.containerRegistry>maixuanvietadr</azure.containerRegistry>
    <docker.image.prefix>${azure.containerRegistry}.azurecr.io</docker.image.prefix>
</properties>

<build>
    <plugins>
        <plugin>
            <groupId>com.spotify</groupId>
            <artifactId>docker-maven-plugin</artifactId>
            <version>1.0.0</version>
            <configuration>
                <imageName>${docker.image.prefix}/${project.artifactId}</imageName>
                <registryUrl>https://${docker.image.prefix}</registryUrl>
                <serverId>${azure.containerRegistry}</serverId>
                <dockerDirectory>docker</dockerDirectory>
                <resources>
                    <resource>
                        <targetPath>/</targetPath>
                        <directory>${project.build.directory}</directory>
                        <include>${project.build.finalName}.jar</include>
                    </resource>
                </resources>
            </configuration>
        </plugin>
        <!-- ... -->
    </plugins>
</build>
In the configuration above, we specified the docker image name, registry URL and some properties similar to that of FTP deployment.
Note that the plugin will use values in <dockerDirectory> to locate the Dockerfile. We put the Dockerfile in the docker directory, and its content is:
FROM frolvlad/alpine-oraclejdk8:slim
VOLUME /tmp
ADD azure-0.1.jar app.jar
RUN sh -c 'touch /app.jar'
EXPOSE 8080
ENTRYPOINT [ "sh", "-c", "java -Djava.security.egd=file:/dev/./urandom -jar /app.jar" ]
5.3. Run Spring Boot App in a Docker Instance
Now we can build a Docker image and push it to the Azure registry:
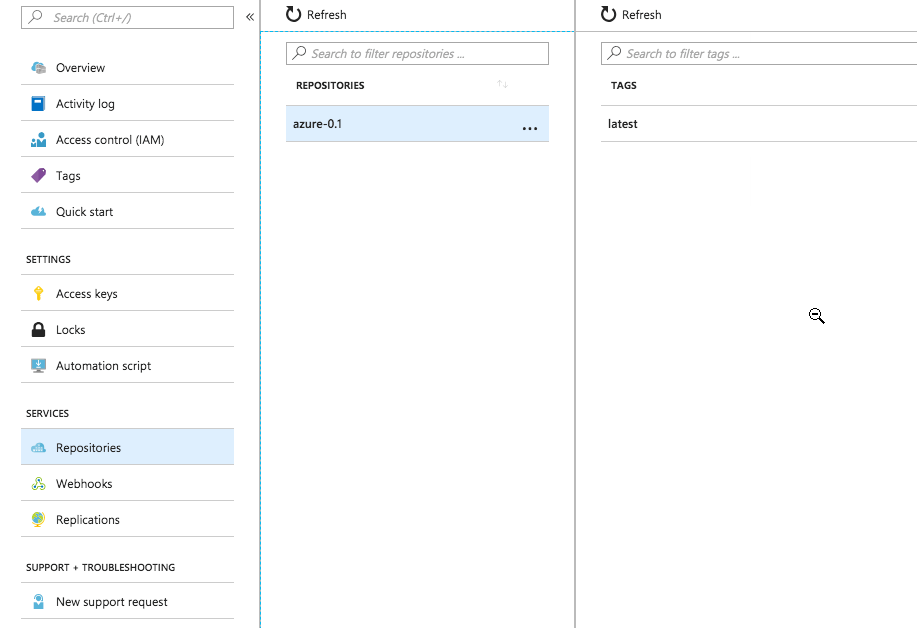
> mvn docker:build -DpushImage
...
[INFO] Building image maixuanvietadr.azurecr.io/azure-0.1
...
Successfully built aaaaaaaaaaaa
Successfully tagged maixuanvietadr.azurecr.io/azure-0.1:latest
[INFO] Built maixuanvietadr.azurecr.io/azure-0.1
[INFO] Pushing maixuanvietadr.azurecr.io/azure-0.1
The push refers to repository [maixuanvietadr.azurecr.io/azure-0.1]
...
latest: digest: sha256:0f0f... size: 1375
After the upload is finished, let’s check the maixuanvietadr registry. We shall see the image in the repository list:
Now we are ready to run an instance of the image:
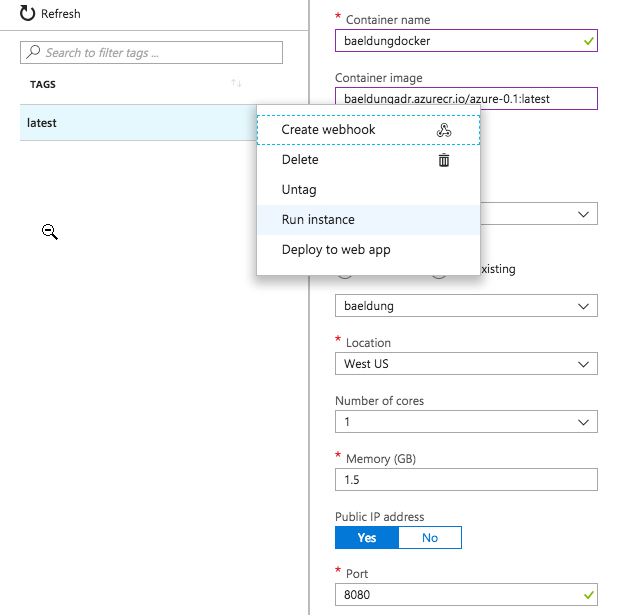
Once the instance is booted, we can access services provided by our application via its public IP address:
> curl http://a.x.y.z:8080/hello
hello azure!
5.4. Docker Container Deployment
Suppose we have a container registry, no matter it’s from Azure, Docker Hub, or our private registry.
With the help of the following configuration of azure-webapp-maven-plugin, we can also deploy our Spring Boot web app to the containers:
<configuration>
    <containerSettings>
        <imageName>${docker.image.prefix}/${project.artifactId}</imageName>
        <registryUrl>https://${docker.image.prefix}</registryUrl>
        <serverId>${azure.containerRegistry}</serverId>
    </containerSettings>
    <!-- ... -->
</configuration>
Once we run mvn azure-webapp:deploy, the plugin will help deploy our web app archive to an instance of the specified image.
Then we can access web services via the instance’s IP address or Azure App Service’s URL.
6. Conclusion
In this article, we introduced how to deploy a Spring Boot application to Azure, as a deployable WAR or a runnable JAR in a container. Though we’ve covered most of the features of azure-webapp-maven-plugin, there are some rich features yet to be explored. Please check out here for more details.
As always, the full implementation of the code samples can be found over on Github.