Spring Cloud Configuration Server is a centralized application that manages all the application related configuration properties. In this chapter, you will learn in detail about how to create Spring Cloud Configuration server.
1. Creating Spring Cloud Configuration Server
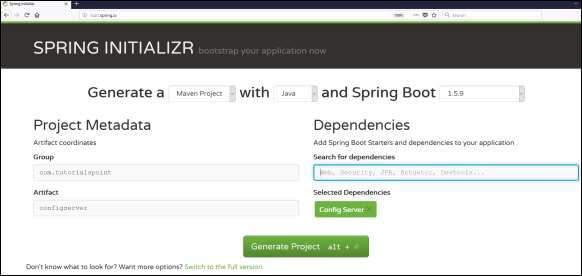
First, download the Spring Boot project from the Spring Initializer page and choose the Spring Cloud Config Server dependency. Observe the screenshot given below −
Now, add the Spring Cloud Config server dependency in your build configuration file as explained below −
Maven users can add the below dependency into the pom.xml file.
<dependency>
   <groupId>org.springframework.cloud</groupId>
   <artifactId>spring-cloud-config-server</artifactId>
</dependency>
Gradle users can add the below dependency in your build.gradle file.
compile('org.springframework.cloud:spring-cloud-config-server')
Now, add the @EnableConfigServer annotation in your main Spring Boot application class file. The @EnableConfigServer annotation makes your Spring Boot application act as a Configuration Server.
The main Spring Boot application class file is given below −
package com.maixuanviet.configserver;

import org.springframework.boot.SpringApplication;
import org.springframework.boot.autoconfigure.SpringBootApplication;
import org.springframework.cloud.config.server.EnableConfigServer;

@SpringBootApplication
@EnableConfigServer
public class ConfigserverApplication {
   public static void main(String[] args) {
      SpringApplication.run(ConfigserverApplication.class, args);
   }
}
Now, add the below configuration to your properties file and replace the application.properties file into bootstrap.properties file. Observe the code given below −
server.port = 8888
spring.cloud.config.server.native.searchLocations=file:///C:/configprop/
SPRING_PROFILES_ACTIVE=native
Configuration Server runs on the Tomcat port 8888 and application configuration properties are loaded from native search locations.
Now, in file:///C:/configprop/, place your client application – application.properties file. For example, your client application name is config-client, then rename your application.properties file as config-client.properties and place the properties file on the path file:///C:/configprop/.
The code for config-client properties file is given below −
welcome.message = Welcome to Spring cloud config server
The complete build configuration file is given below −
Maven users can use pom.xml given below −
<?xml version = "1.0" encoding = "UTF-8"?>
<project xmlns = "http://maven.apache.org/POM/4.0.0"
   xmlns:xsi = "http://www.w3.org/2001/XMLSchema-instance"
   xsi:schemaLocation = "http://maven.apache.org/POM/4.0.0
   http://maven.apache.org/xsd/maven-4.0.0.xsd">

   <modelVersion>4.0.0</modelVersion>
   <groupId>com.maixuanviet</groupId>
   <artifactId>configserver</artifactId>
   <version>0.0.1-SNAPSHOT</version>
   <packaging>jar</packaging>

   <name>configserver</name>
   <description>Demo project for Spring Boot</description>
   <parent>
      <groupId>org.springframework.boot</groupId>
      <artifactId>spring-boot-starter-parent</artifactId>
      <version>1.5.9.RELEASE</version>
      <relativePath/> <!-- lookup parent from repository -->
   </parent>

   <properties>
      <project.build.sourceEncoding>UTF-8</project.build.sourceEncoding>
      <project.reporting.outputEncoding>UTF-8</project.reporting.outputEncoding>
      <java.version>1.8</java.version>
      <spring-cloud.version>Edgware.RELEASE</spring-cloud.version>
   </properties>

   <dependencies>
      <dependency>
         <groupId>org.springframework.cloud</groupId>
         <artifactId>spring-cloud-config-server</artifactId>
      </dependency>
      <dependency>
         <groupId>org.springframework.boot</groupId>
         <artifactId>spring-boot-starter-test</artifactId>
         <scope>test</scope>
      </dependency>
   </dependencies>

   <dependencyManagement>
      <dependencies>
         <dependency>
            <groupId>org.springframework.cloud</groupId>
            <artifactId>spring-cloud-dependencies</artifactId>
            <version>${spring-cloud.version}</version>
            <type>pom</type>
            <scope>import</scope>
         </dependency>
      </dependencies>
   </dependencyManagement>

   <build>
      <plugins>
         <plugin>
            <groupId>org.springframework.boot</groupId>
            <artifactId>spring-boot-maven-plugin</artifactId>
         </plugin>
      </plugins>
   </build>

</project>
Gradle users can use the build.gradle file given below −
<scope>import</scope>
</dependency>
</dependencies>
buildscript {
   ext {
      springBootVersion = '1.5.9.RELEASE'
   }
   repositories {
      mavenCentral()
   }
   dependencies {
      classpath("org.springframework.boot:spring-boot-gradle-plugin:${springBootVersion}")
   }
}
apply plugin: 'java'
apply plugin: 'eclipse'
apply plugin: 'org.springframework.boot'

group = 'com.maixuanviet'
version = '0.0.1-SNAPSHOT'
sourceCompatibility = 1.8

repositories {
   mavenCentral()
}
ext {
   springCloudVersion = 'Edgware.RELEASE'
}
dependencies {
   compile('org.springframework.cloud:spring-cloud-config-server')
   testCompile('org.springframework.boot:spring-boot-starter-test')
}
dependencyManagement {
   imports {
      mavenBom "org.springframework.cloud:spring-cloud-dependencies:${springCloudVersion}"
   }
}
Now, create an executable JAR file, and run the Spring Boot application by using the following Maven or Gradle commands −
For Maven, use the command given below −
mvn clean install
After “BUILD SUCCESS”, you can find the JAR file under the target directory.
For Gradle, use the command given below −
gradle clean build
After “BUILD SUCCESSFUL”, you can find the JAR file under the build/libs directory.
Run the JAR file by using the following command −
java –jar <JARFILE>
Now, the application has started on the Tomcat port 8888 as shown here −

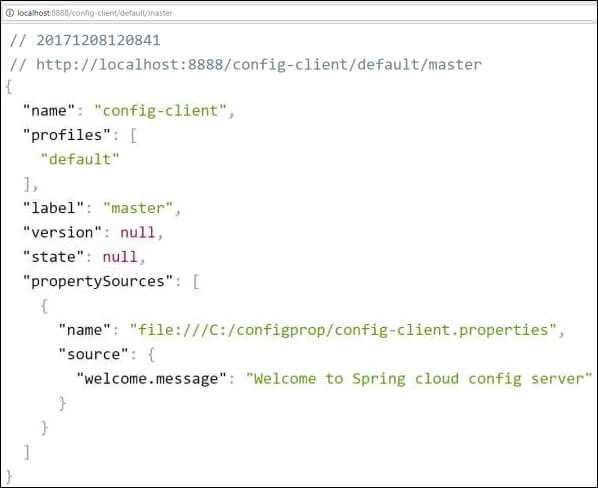
Now hit the URL http://localhost:8888/config-client/default/master on your web browser and you can see your config-client application configuration properties as shown here.