
Table of Contents
1. Overview
In this article, we will add a “Remember Me” functionality to an OAuth 2 secured application, by leveraging the OAuth 2 Refresh Token.
This article is a continuation of our series on using OAuth 2 to secure a Spring REST API, which is accessed through an AngularJS Client. For setting up the Authorization Server, Resource Server, and front-end Client, you can follow the introductory article.
Note: this article is using the Spring OAuth legacy project.
2. OAuth 2 Access Token and Refresh Token
First, let’s do a quick recap on the OAuth 2 tokens and how they can be used.
On a first authentication attempt using the password grant type, the user needs to send a valid username and password, as well as the client id and secret. If the authentication request is successful, the server sends back a response of the form:
{
    "access_token": "2e17505e-1c34-4ea6-a901-40e49ba786fa",
    "token_type": "bearer",
    "refresh_token": "e5f19364-862d-4212-ad14-9d6275ab1a62",
    "expires_in": 59,
    "scope": "read write",
}
We can see the server response contains both an access token, as well as a refresh token. The access token will be used for subsequent API calls that require authentication, while the purpose of the refresh token is to obtain a new valid access token or just revoke the previous one.
To receive a new access token using the refresh_token grant type, the user no longer needs to enter their credentials, but only the client id, secret and of course the refresh token.
The goal of using two types of tokens is to enhance user security. Typically the access token has a shorter validity period so that if an attacker obtains the access token, they have a limited time in which to use it. On the other hand, if the refresh token is compromised, this is useless as the client id and secret are also needed.
Another benefit of refresh tokens is that it allows revoking the access token, and not sending another one back if the user displays unusual behavior such as logging in from a new IP.
3. Remember-Me Functionality With Refresh Tokens
Users usually find it useful to have the option to preserve their session, as they don’t need to enter their credentials every time they access the application.
Since the Access Token has a shorter validity time, we can instead make use of refresh tokens to generate new access tokens and avoid having to ask the user for their credentials every time an access token expires.
In the next sections, we’ll discuss two ways of implementing this functionality:
- first, by intercepting any user request that returns a 401 status code, which means the access token is invalid. When this occurs, if the user has checked the “remember me” option, we’ll automatically issue a request for a new access token using refresh_token grant type, then execute the initial request again.
- second, we can refresh the Access Token proactively – we’ll send a request to refresh the token a few seconds before it expires
The second option has the advantage that the user’s requests will not be delayed.
4. Storing the Refresh Token
In the previous article on Refresh Tokens, we added a CustomPostZuulFilter which intercepts requests to the OAuth server, extracts the refresh token sent back on authentication, and stores it in a server-side cookie:
@Component
public class CustomPostZuulFilter extends ZuulFilter {

    @Override
    public Object run() {
        //...
        Cookie cookie = new Cookie("refreshToken", refreshToken);
        cookie.setHttpOnly(true);
        cookie.setPath(ctx.getRequest().getContextPath() + "/oauth/token");
        cookie.setMaxAge(2592000); // 30 days
        ctx.getResponse().addCookie(cookie);
        //...
    }
}
Next, let’s add a checkbox on our login form that has a data binding to the loginData.remember variable:
<input type="checkbox"  ng-model="loginData.remember" id="remember"/>
<label for="remember">Remeber me</label>
Our login form will now display an additional checkbox:
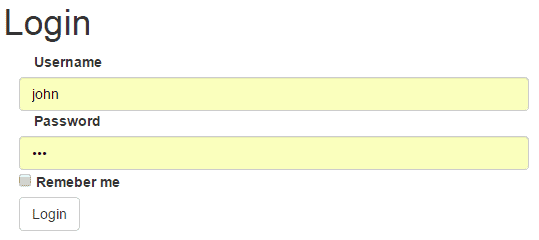
The loginData object is sent with the authentication request, so it will include the remember parameter. Before the authentication request is sent, we will set a cookie named remember based on the parameter:
function obtainAccessToken(params){
    if (params.username != null){
        if (params.remember != null){
            $cookies.put("remember","yes");
        }
        else {
            $cookies.remove("remember");
        }
    }
    //...
}
As a consequence, we’ll check this cookie to determine whether we should attempt to refresh the access token or not, depending on whether the user wishes to be remembered or not.
5. Refreshing Tokens by Intercepting 401 Responses
To intercept requests that come back with a 401 response, let’s modify our AngularJS application to add an interceptor with a responseError function:
app.factory('rememberMeInterceptor', ['$q', '$injector', '$httpParamSerializer',
  function($q, $injector, $httpParamSerializer) {
    var interceptor = {
        responseError: function(response) {
            if (response.status == 401){

                // refresh access token

                // make the backend call again and chain the request
                return deferred.promise.then(function() {
                    return $http(response.config);
                });
            }
            return $q.reject(response);
        }
    };
    return interceptor;
}]);
Our function checks if the status is 401 – which means the Access Token is invalid, and if so, attempts to use the Refresh Token in order to obtain a new valid Access Token.
If this is successful, the function continues to re-try the initial request which resulted in the 401 error. This ensures a seamless experience for the user.
Let’s take a closer look at the process of refreshing the access token. First, we will initialize the necessary variables:
var $http = $injector.get('$http');
var $cookies = $injector.get('$cookies');
var deferred = $q.defer();

var refreshData = {grant_type:"refresh_token"};

var req = {
    method: 'POST',
    url: "oauth/token",
    headers: {"Content-type": "application/x-www-form-urlencoded; charset=utf-8"},
    data: $httpParamSerializer(refreshData)
}
You can see the req variable which we will use to send a POST request to the /oauth/token endpoint, with parameter grant_type=refresh_token.
Next, let’s use the $http module we have injected to send the request. If the request is successful, we will set a new Authentication header with the new access token value, as well as a new value for the access_token cookie. If the request fails, which may happen if the refresh token also eventually expires, then the user is redirected to the login page:
$http(req).then(
    function(data){
        $http.defaults.headers.common.Authorization= 'Bearer ' + data.data.access_token;
        var expireDate = new Date (new Date().getTime() + (1000 * data.data.expires_in));
        $cookies.put("access_token", data.data.access_token, {'expires': expireDate});
        window.location.href="index";
    },function(){
        console.log("error");
        $cookies.remove("access_token");
        window.location.href = "login";
    }
);
The Refresh Token is added to the request by the CustomPreZuulFilter we implemented in the previous article:
@Component
public class CustomPreZuulFilter extends ZuulFilter {

    @Override
    public Object run() {
        //...
        String refreshToken = extractRefreshToken(req);
        if (refreshToken != null) {
            Map<String, String[]> param = new HashMap<String, String[]>();
            param.put("refresh_token", new String[] { refreshToken });
            param.put("grant_type", new String[] { "refresh_token" });

            ctx.setRequest(new CustomHttpServletRequest(req, param));
        }
        //...
    }
}
In addition to defining the interceptor, we need to register it with the $httpProvider:
app.config(['$httpProvider', function($httpProvider) {
    $httpProvider.interceptors.push('rememberMeInterceptor');
}]);
6. Refreshing Tokens Proactively
Another way to implement the “remember-me” functionality is by requesting a new access token before the current one expires.
When receiving an access token, the JSON response contains an expires_in value that specifies the number of seconds that the token will be valid for.
Let’s save this value in a cookie for each authentication:
$cookies.put("validity", data.data.expires_in);
Then, to send a refresh request, let’s use the AngularJS $timeout service to schedule a refresh call 10 seconds before the token expires:
if ($cookies.get("remember") == "yes"){
    var validity = $cookies.get("validity");
    if (validity >10) validity -= 10;
    $timeout( function(){ $scope.refreshAccessToken(); }, validity * 1000);
}
7. Conclusion
In this tutorial, we’ve explored two ways we can implement “Remember Me” functionality with an OAuth2 application and an AngularJS front-end.
The full source code of the examples can be found over on GitHub. You can access the login page with “remember me” functionality at the URL /login_remember.