
Table of Contents
1. Introduction
In this article we’ll focus on a core concept in Spring MVC – Controllers.
2. Overview
Let’s start by taking a step back and having a look at the concept of the Front Controller in the typical Spring Model View Controller architecture.
At a very high level, here are the main responsibilities we’re looking at:
- Intercepts incoming requests
- Converts the payload of the request to the internal structure of the data
- Sends the data to Model for further processing
- Gets processed data from the Model and advances that data to the View for rendering
Here’s a quick diagram for the high level flow in Spring MVC:
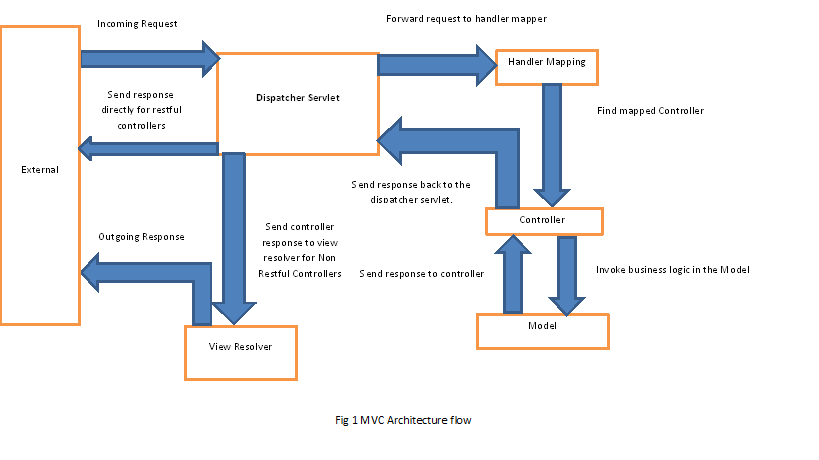
As you can see, the DispatcherServlet plays the role of the Front Controller in the architecture.
The diagram is applicable both to typical MVC controllers as well as RESTful controllers – with some small differences (described below).
In the traditional approach, MVC applications are not service-oriented hence there is a View Resolver that renders final views based on data received from a Controller.
RESTful applications are designed to be service-oriented and return raw data (JSON/XML typically). Since these applications do not do any view rendering, there are no View Resolvers – the Controller is generally expected to send data directly via the HTTP response.
Let’s start with the MVC0-style controllers.
3. Maven Dependencies
In order to be able to work with Spring MVC, let’s deal with the Maven dependencies first:
<dependency>
    <groupId>org.springframework</groupId>
    <artifactId>spring-webmvc</artifactId>
    <version>5.0.6.RELEASE</version>
<dependency>
To get the latest version of the library, have a look at spring-webmvc on Maven Central.
4. Project Web Config
Now, before looking at the controllers themselves, we first need to set up a simple web project and do a quick Servlet configuration.
Lets first see how the DispatcherServlet can be set up without using web.xml – but instead using an initializer:
public class StudentControllerConfig implements WebApplicationInitializer {

    @Override
    public void onStartup(ServletContext sc) throws ServletException {
        AnnotationConfigWebApplicationContext root =
          new AnnotationConfigWebApplicationContext();
        root.register(WebConfig.class);

        root.refresh();
        root.setServletContext(sc);

        sc.addListener(new ContextLoaderListener(root));

        DispatcherServlet dv =
          new DispatcherServlet(new GenericWebApplicationContext());

        ServletRegistration.Dynamic appServlet = sc.addServlet("test-mvc", dv);
        appServlet.setLoadOnStartup(1);
        appServlet.addMapping("/test/*");
    }
}
To set things up with no XML, make sure to have servlet-api 3.1.0 on your classpath.
Here’s how the web.xml would look like:
<servlet>
    <servlet-name>test-mvc</servlet-name>
    <servlet-class>
      org.springframework.web.servlet.DispatcherServlet
    </servlet-class>
    <load-on-startup>1</load-on-startup>
    <init-param>
        <param-name>contextConfigLocation</param-name>
        <param-value>/WEB-INF/test-mvc.xml</param-value>
    </init-param>
</servlet>
We’re setting the contextConfigLocation property here – pointing to the XML file used to load the Spring context. If the property is not there, Spring will search for a file named {servlet_name}-servlet.xml.
In our case the servlet_name is test-mvc and so, in this example the DispatcherServlet would search for a file called test-mvc-servlet.xml.
Finally, let’s set the DispatcherServlet up and map it to a particular URL – to finish our Front Controller based system here:
<servlet-mapping>
    <servlet-name>test-mvc</servlet-name>
    <url-pattern>/test/*</url-pattern>
</servlet-mapping>
Thus in this case the DispatcherServlet would intercept all requests within the pattern /test/* .
5. Spring MVC Web Config
Lets now look at how the Dispatcher Servlet can be setup using Spring Config:
@Configuration
@EnableWebMvc
@ComponentScan(basePackages= {
  "com.maixuanviet.controller.controller",
  "com.maixuanviet.controller.config" })
public class WebConfig implements WebMvcConfigurer {

    @Override
    public void configureDefaultServletHandling(
      DefaultServletHandlerConfigurer configurer) {
        configurer.enable();
    }

    @Bean
    public ViewResolver viewResolver() {
        InternalResourceViewResolver bean =
          new InternalResourceViewResolver();
        bean.setPrefix("/WEB-INF/");
        bean.setSuffix(".jsp");
        return bean;
    }
}
Let’s now look at setting up the Dispatcher Servlet using XML . A snapshot of the DispatcherServlet XML file – the XML file which the DispatcherServlet uses for loading custom controllers and other Spring entities is shown below:
<context:component-scan base-package="com.baledung.controller" />
<mvc:annotation-driven />
<bean class="org.springframework.web.servlet.view.InternalResourceViewResolver">
    <property name="prefix">
        <value>/WEB-INF/</value>
    </property>
    <property name="suffix">
        <value>.jsp</value>
    </property>
</bean>
Based on this simple configuration, the framework will of course initialize any controller bean that it will find on the classpath.
Notice that we’re also defining the View Resolver, responsible for view rendering – we’ll be using Spring’s InternalResourceViewResolver here. This expects a name of a view to be resolved, which means finding a corresponding page by using prefix and suffix (both defined in the XML configuration).
So for example if the Controller returns a view named “welcome”, the view resolver will try to resolve a page called “welcome.jsp” in the WEB-INF folder.
6. The MVC Controller
Let’s now finally implement the MVC style controller.
Notice how we’re returning a ModelAndView object – which contains a model map and a view object; both will be used by the View Resolver for data rendering:
@Controller
@RequestMapping(value = "/test")
public class TestController {

    @GetMapping
    public ModelAndView getTestData() {
        ModelAndView mv = new ModelAndView();
        mv.setViewName("welcome");
        mv.getModel().put("data", "Welcome home man");

        return mv;
    }
}
So, what exactly did we set up here.
First, we created a controller called TestController and mapped it to the “/test” path. In the class we have created a method which returns a ModelAndView object and is mapped to a GET request thus any URL call ending with “test” would be routed by the DispatcherServlet to the getTestData method in the TestController.
And of course we’re returning the ModelAndView object with some model data for good measure.
The view object has a name set to “welcome“. As discussed above, the View Resolver will search for a page in the WEB-INF folder called “welcome.jsp“.
Below you can see the result of an example GET operation:
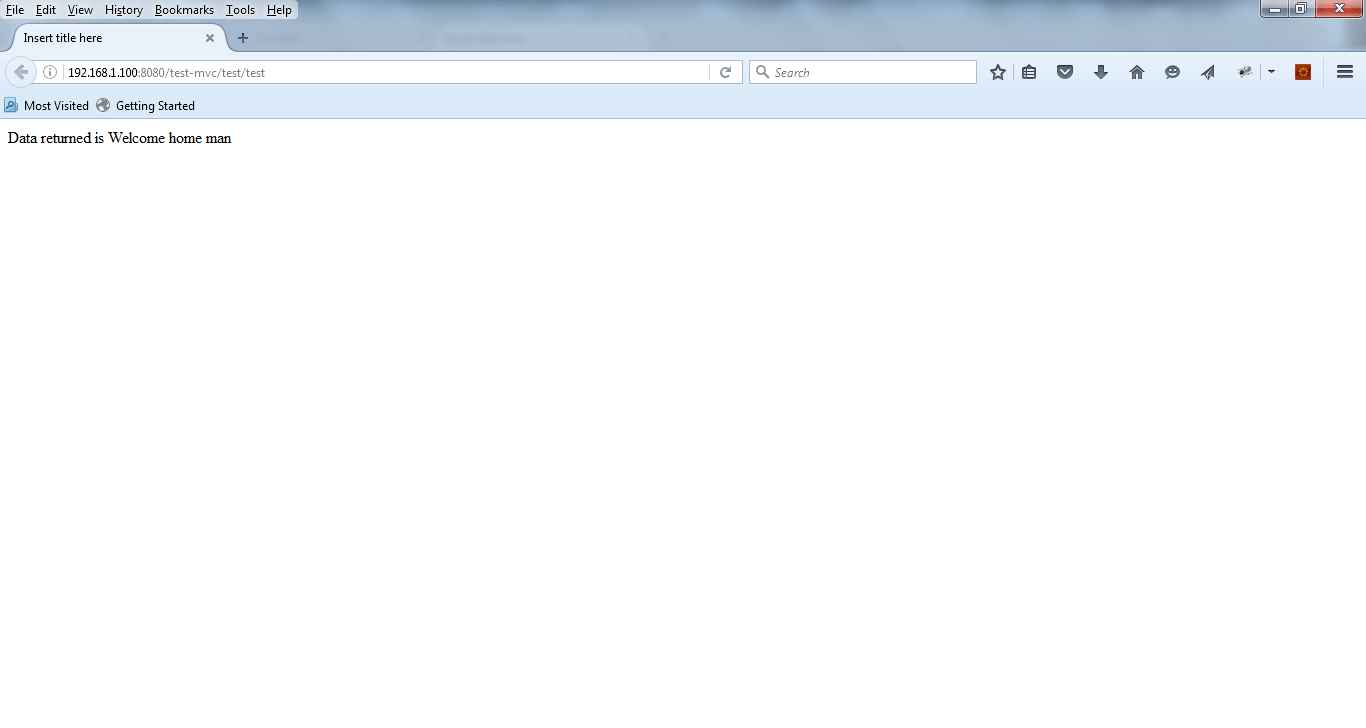
Note that the URL ends with “test”. The pattern of the URL is “/test/test“.
The first “/test” comes from the Servlet, and the second one comes from the mapping of the controller.
7. More Spring Dependencies for REST
Let’s now start looking at a RESTful controller. Of course, a good place to start is the extra Maven dependencies we need for it:
<dependencies>
    <dependency>
        <groupId>org.springframework</groupId>
        <artifactId>spring-webmvc</artifactId>
        <version>5.0.6.RELEASE</version>
    </dependency>
    <dependency>
        <groupId>org.springframework</groupId>
        <artifactId>spring-web</artifactId>
        <version>5.0.6.RELEASE</version>
    </dependency>
    <dependency>
        <groupId>com.fasterxml.jackson.core</groupId>
        <artifactId>jackson-databind</artifactId>
        <version>2.9.5</version>
    </dependency>
</dependencies>
Please refer to jackson-core, spring-webmvc and spring-web links for the newest versions of those dependencies.
Jackson is of course not mandatory here, but it’s certainly a good way to enable JSON support. If you’re interested to dive deeper into that support, have a look at the message converters article here.
8. The REST Controller
The setup for a Spring RESTful application is the same as the one for the MVC application with the only difference being that there is no View Resolvers and no model map.
The API will generally simply return raw data back to the client – XML and JSON representations usually – and so the DispatcherServlet bypasses the view resolvers and returns the data right in the HTTP response body.
Let’s have a look at a simple RESTful controller implementation:
@Controller
public class RestController {

    @GetMapping(value = "/student/{studentId}")
    public @ResponseBody Student getTestData(@PathVariable Integer studentId) {
        Student student = new Student();
        student.setName("Peter");
        student.setId(studentId);

        return student;
    }
}
Note the @ResponseBody annotation on the method – which instructs Spring to bypass the view resolver and essentially write out the output directly to the body of the HTTP response.
A quick snapshot of the output is displayed below:

The above output is a result of sending the GET request to the API with the student id of 1.
One quick note here is – the @RequestMapping annotation is one of those central annotations that you’ll really have to explore in order to use to its full potential.
9. Spring Boot and the @RestController Annotation
The @RestController annotation from Spring Boot is basically a quick shortcut that saves us from always having to define @ResponseBody.
Here’s the previous example controller using this new annotation:
@RestController
public class RestAnnotatedController {
    @GetMapping(value = "/annotated/student/{studentId}")
    public Student getData(@PathVariable Integer studentId) {
        Student student = new Student();
        student.setName("Peter");
        student.setId(studentId);

        return student;
    }
}
10. Conclusion
In this guide, we explore the basics of using controllers in Spring, both from the point of view of a typical MVC application as well as a RESTful API.
Of course all the code in the article is available over on GitHub.