
Table of Contents
- 1. Overview
- 2. Setting up the Scenario
- 3. Spring Security 5 Under the Hood
- 4. Spring Security 5 Support – the Client Credentials Flow
- 5. Spring Security 5 Support – Implementation Using the Authorization Code Flow
- 6. An Alternative – Client Registration in the Call
- 7. Avoiding the OAuth2 Login Features
- 8. Spring Framework Support – Manual Approach
- 9. Conclusion
1. Overview
Spring Security 5 provides OAuth2 support for Spring Webflux’s non-blocking WebClient class.
In this tutorial, we’ll analyze different approaches to access secured resources using this class.
Also, we’ll have a look under the hood to understand how Spring handles the OAuth2 authorization process.
2. Setting up the Scenario
Inline with the OAuth2 specification, apart from our Client – which is our focus subject in this article – we naturally need an Authorization Server and a Resource Server.
We can use well-known authorization providers like Google or Github. To better understand the role of the OAuth2 Client, we can also use our own servers, with an implementation available in here. We won’t show the full configuration since it’s not the topic of this tutorial, it’s enough knowing that:
- the Authorization Server will be:
- running on port 8081
- exposing the /oauth/authorize, /oauth/token and oauth/check_token endpoints to carry out the desired functionality
- configured with sample users (e.g. john/123) and a single OAuth client (fooClientIdPassword/secret)
- the Resource Server will be separated from the Authentication Server and will be:
- running on port 8082
- serving a simple Foo object secured resource accessible using the /foos/{id} endpoint
Note: it’s important to understand that several Spring projects are offering different OAuth-related features and implementations. We can examine what each library provides in this Spring Projects matrix.
The WebClient and all the reactive Webflux related functionality is part of the Spring Security 5 project. Therefore, we’ll mainly be using this framework throughout this article.
3. Spring Security 5 Under the Hood
In order to fully understand the examples coming ahead, it’s good to know how Spring Security manages the OAuth2 features internally.
This framework offers capabilities to:
- rely on an OAuth2 provider account to login users into the application
- configure our service as an OAuth2 Client
- manage the authorization procedures for us
- refresh tokens automatically
- store the credentials if necessary
Some of the fundamental concepts of the Spring Security’s OAuth2 world are described in the following diagram:
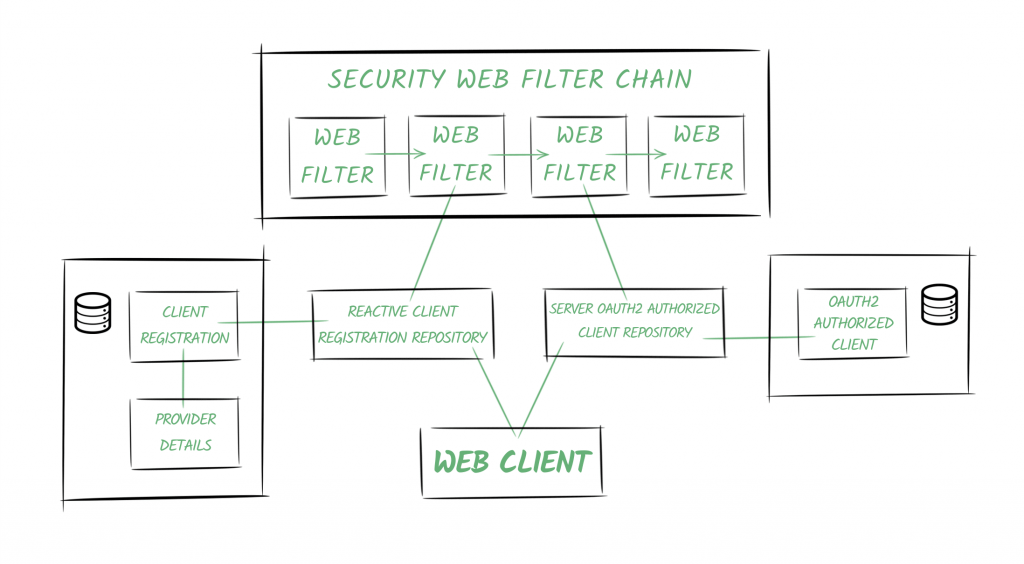
3.1. Providers
Spring defines the OAuth2 Provider role, responsible for exposing OAuth 2.0 protected resources.
In our example, our Authentication Service will be the one offering the Provider capabilities.
3.2. Client Registrations
A ClientRegistration is an entity containing all the relevant information of a specific client registered in an OAuth2 (or an OpenID) provider.
In our scenario, it’ll be the client registered in the Authentication Server, identified by the bael-client-id id.
3.3. Authorized Clients
Once the end-user (aka the Resource Owner) grants permissions to the client to access its resources, an OAuth2AuthorizedClient entity is created.
It’ll be responsible for associating access tokens to client registrations and resource owners (represented by Principal objects).
3.4. Repositories
Furthermore, Spring Security also offers repository classes to access the entities mentioned above.
Particularly, the ReactiveClientRegistrationRepository and the ServerOAuth2AuthorizedClientRepository classes are used in reactive stacks, and they use the in-memory storage by default.
Spring Boot 2.x creates beans of these repository classes and adds them automatically to the context.
3.5. Security Web Filter Chain
One of the key concepts in Spring Security 5 is the reactive SecurityWebFilterChain entity.
As its name indicates, it represents a chained collection of WebFilter objects.
When we enable the OAuth2 features in our application, Spring Security adds two filters to the chain:
- One filter responds to authorization requests (the /oauth2/authorization/{registrationId} URI) or throws a ClientAuthorizationRequiredException. It contains a reference to the ReactiveClientRegistrationRepository, and it’s in charge of creating the authorization request to redirect the user-agent.
- The second filter differs depending on which feature we’re adding (OAuth2 Client capabilities or the OAuth2 Login functionality). In both cases, the main responsibility of this filter is to create the OAuth2AuthorizedClient instance and store it using the ServerOAuth2AuthorizedClientRepository.
3.6. Web Client
The web client will be configured with an ExchangeFilterFunction containing references to the repositories.
It’ll use them to obtain the access token to add it automatically to the request.
4. Spring Security 5 Support – the Client Credentials Flow
Spring Security allows configuring our application as an OAuth2 Client.
In this write-up, we’ll use a WebClient instance to retrieve resources using the ‘Client Credentials’grant type first, and then using the ‘Authorization Code’ flow.
The first thing we’ll have to do is configure the client registration and the provider that we’ll use to obtain the access token.
4.1. Client and Provider Configurations
As we’ve seen in the OAuth2 Login article, we can either configure it programmatically or rely on the Spring Boot auto-configuration by using properties to define our registration:
spring.security.oauth2.client.registration.bael.authorization-grant-type=client_credentials
spring.security.oauth2.client.registration.bael.client-id=bael-client-id
spring.security.oauth2.client.registration.bael.client-secret=bael-secret
spring.security.oauth2.client.provider.bael.token-uri=http://localhost:8085/oauth/token
These are all the configurations that we need to retrieve the resource using the client_credentials flow.
4.2. Using the WebClient
We use this grant type in machine-to-machine communications where there’s no end-user interacting with our application.
For example, let’s imagine we have a cron job trying to obtain a secured resource using a WebClient in our application:
@Autowired
private WebClient webClient;

@Scheduled(fixedRate = 5000)
public void logResourceServiceResponse() {

    webClient.get()
      .uri("http://localhost:8084/retrieve-resource")
      .retrieve()
      .bodyToMono(String.class)
      .map(string
        -> "Retrieved using Client Credentials Grant Type: " + string)
      .subscribe(logger::info);
}
4.3. Configuring the WebClient
Next, let’s set the webClient instance that we’ve autowired in our scheduled task:
@Bean
WebClient webClient(ReactiveClientRegistrationRepository clientRegistrations) {
    ServerOAuth2AuthorizedClientExchangeFilterFunction oauth =
      new ServerOAuth2AuthorizedClientExchangeFilterFunction(
        clientRegistrations,
        new UnAuthenticatedServerOAuth2AuthorizedClientRepository());
    oauth.setDefaultClientRegistrationId("bael");
    return WebClient.builder()
      .filter(oauth)
      .build();
}
As we said, the client registration repository is automatically created and added to the context by Spring Boot.
The next thing to notice here is that we’re using a UnAuthenticatedServerOAuth2AuthorizedClientRepository instance. This is due to the fact that no end-user will take part in the process since it’s a machine-to-machine communication. Finally, we stated that we’d use the bael client registration by default.
Otherwise, we’d have to specify it by the time we define the request in the cron job:
webClient.get()
  .uri("http://localhost:8084/retrieve-resource")
  .attributes(
    ServerOAuth2AuthorizedClientExchangeFilterFunction
      .clientRegistrationId("bael"))
  .retrieve()
  // ...
4.4. Testing
If we run our application with the DEBUG logging level enabled, we’ll be able to see the calls that Spring Security is doing for us:
o.s.w.r.f.client.ExchangeFunctions:
  HTTP POST http://localhost:8085/oauth/token
o.s.http.codec.json.Jackson2JsonDecoder:
  Decoded [{access_token=89cf72cd-183e-48a8-9d08-661584db4310,
    token_type=bearer,
    expires_in=41196,
    scope=read
    (truncated)...]
o.s.w.r.f.client.ExchangeFunctions:
  HTTP GET http://localhost:8084/retrieve-resource
o.s.core.codec.StringDecoder:
  Decoded "This is the resource!"
c.b.w.c.service.WebClientChonJob:
  We retrieved the following resource using Client Credentials Grant Type: This is the resource!
We’ll also notice that the second time the task runs, the application requests the resource without asking for a token first since the last one hasn’t expired.
5. Spring Security 5 Support – Implementation Using the Authorization Code Flow
This grant type is usually used in cases where less-trusted third-party applications need to access resources.
5.1. Client and Provider Configurations
In order to execute the OAuth2 process using the Authorization Code flow, we’ll need to define several more properties for our client registration and the provider:
spring.security.oauth2.client.registration.bael.client-name=bael
spring.security.oauth2.client.registration.bael.client-id=bael-client-id
spring.security.oauth2.client.registration.bael.client-secret=bael-secret
spring.security.oauth2.client.registration.bael
  .authorization-grant-type=authorization_code
spring.security.oauth2.client.registration.bael
  .redirect-uri=http://localhost:8080/login/oauth2/code/bael

spring.security.oauth2.client.provider.bael.token-uri=http://localhost:8085/oauth/token
spring.security.oauth2.client.provider.bael
  .authorization-uri=http://localhost:8085/oauth/authorize
spring.security.oauth2.client.provider.bael.user-info-uri=http://localhost:8084/user
spring.security.oauth2.client.provider.bael.user-name-attribute=name
Apart from the properties, we used in the previous section, this time we also need to include:
- An endpoint to authenticate on the Authentication Server
- The URL of an endpoint containing user information
- The URL of an endpoint in our application to which the user-agent will be redirected after authenticating
Of course, for well-known providers, the first two points don’t need to be specified.
The redirect endpoint is created automatically by Spring Security.
By default, the URL configured for it is /[action]/oauth2/code/[registrationId], with only authorize and login actions permitted (in order to avoid an infinite loop).
This endpoint is in charge of:
- receiving the authentication code as a query param
- using it to obtain an access token
- creating the Authorized Client instance
- redirecting the user-agent back to the original endpoint
5.2. HTTP Security Configurations
Next, we’ll need to configure the SecurityWebFilterChain.
The most common scenario is using Spring Security’s OAuth2 Login capabilities to authenticate users and give them access to our endpoints and resources.
If that’s our case, then just including the oauth2Login directive in the ServerHttpSecurity definition will be enough for our application to work as an OAuth2 Client too:
@Bean
public SecurityWebFilterChain springSecurityFilterChain(ServerHttpSecurity http) {
    http.authorizeExchange()
      .anyExchange()
      .authenticated()
      .and()
      .oauth2Login();
    return http.build();
}
5.3. Configuring the WebClient
Now it’s time to put in place our WebClient instance:
@Bean
WebClient webClient(
  ReactiveClientRegistrationRepository clientRegistrations,
  ServerOAuth2AuthorizedClientRepository authorizedClients) {
    ServerOAuth2AuthorizedClientExchangeFilterFunction oauth =
      new ServerOAuth2AuthorizedClientExchangeFilterFunction(
        clientRegistrations,
        authorizedClients);
    oauth.setDefaultOAuth2AuthorizedClient(true);
    return WebClient.builder()
      .filter(oauth)
      .build();
}
This time we’re injecting both the client registration repository and the authorized client repository from the context.
We’re also enabling the setDefaultOAuth2AuthorizedClient option. With it, the framework will try to obtain the client information from the current Authentication object managed in Spring Security.
We have to take into account that with it, all HTTP requests will include the access token, which might not be the desired behavior.
Later we’ll analyze alternatives to indicate the client that a specific WebClient transaction will use.
5.4. Using the WebClient
The Authorization Code requires a user-agent that can work out redirections (e.g., a browser) to execute the procedure.
Therefore, we make use of this grant type when the user is interacting with our application, usually calling an HTTP endpoint:
@RestController
public class ClientRestController {

    @Autowired
    WebClient webClient;

    @GetMapping("/auth-code")
    Mono<String> useOauthWithAuthCode() {
        Mono<String> retrievedResource = webClient.get()
          .uri("http://localhost:8084/retrieve-resource")
          .retrieve()
          .bodyToMono(String.class);
        return retrievedResource.map(string ->
          "We retrieved the following resource using Oauth: " + string);
    }
}
5.5. Testing
Finally, we’ll call the endpoint and analyze what’s going on by checking the log entries.
After we call the endpoint, the application verifies that we’re not yet authenticated in the application:
o.s.w.s.adapter.HttpWebHandlerAdapter: HTTP GET "/auth-code"
...
HTTP/1.1 302 Found
Location: /oauth2/authorization/bael
The application redirects to the Authorization Service’s endpoint to authenticate using credentials existing in the Provider’s registries (in our case, we’ll use the bael-user/bael-password):
HTTP/1.1 302 Found
Location: http://localhost:8085/oauth/authorize
  ?response_type=code
  &client_id=bael-client-id
  &state=...
  &redirect_uri=http%3A%2F%2Flocalhost%3A8080%2Flogin%2Foauth2%2Fcode%2Fbael
After authenticating, the user-agent is sent back to the Redirect URI, together with the code as a query param and the state value that was first sent (to avoid CSRF attacks):
o.s.w.s.adapter.HttpWebHandlerAdapter:HTTP GET "/login/oauth2/code/bael?code=...&state=...
The application then uses the code to obtain an access token:
o.s.w.r.f.client.ExchangeFunctions:HTTP POST http://localhost:8085/oauth/token
It obtains users information:
o.s.w.r.f.client.ExchangeFunctions:HTTP GET http://localhost:8084/user
And it redirects the user-agent to the original endpoint:
HTTP/1.1 302 Found
Location: /auth-code
Finally, our WebClient instance can request the secured resource successfully:
o.s.w.r.f.client.ExchangeFunctions:HTTP GET http://localhost:8084/retrieve-resource
o.s.w.r.f.client.ExchangeFunctions:Response 200 OK
o.s.core.codec.StringDecoder :Decoded "This is the resource!"
6. An Alternative – Client Registration in the Call
Earlier, we saw that using the setDefaultOAuth2AuthorizedClientimplies that the application will include the access token in any call we realize with the client.
If we remove this command from the configuration, we’ll need to specify the client registration explicitly by the time we define the request.
One way, of course, is by using the clientRegistrationId as we did before when working in the client credentials flow.
Since we associated the Principal with authorized clients, we can obtain the OAuth2AuthorizedClient instance using the @RegisteredOAuth2AuthorizedClient annotation:
@GetMapping("/auth-code-annotated")
Mono<String> useOauthWithAuthCodeAndAnnotation(
  @RegisteredOAuth2AuthorizedClient("bael") OAuth2AuthorizedClient authorizedClient) {
    Mono<String> retrievedResource = webClient.get()
      .uri("http://localhost:8084/retrieve-resource")
      .attributes(
        ServerOAuth2AuthorizedClientExchangeFilterFunction.oauth2AuthorizedClient(authorizedClient))
      .retrieve()
      .bodyToMono(String.class);
    return retrievedResource.map(string ->
      "Resource: " + string
        + " - Principal associated: " + authorizedClient.getPrincipalName()
        + " - Token will expire at: " + authorizedClient.getAccessToken()
          .getExpiresAt());
}
7. Avoiding the OAuth2 Login Features
As we said, the most common scenario is relying on the OAuth2 authorization provider to login users in our application.
But what if we want to avoid this, but still be able to access secured resources using the OAuth2 protocol? Then we’ll need to make some changes in our configuration.
For starters, and just to be clear across the board, we can use the authorize action instead of the login one when defining the redirect URI property:
spring.security.oauth2.client.registration.bael
  .redirect-uri=http://localhost:8080/login/oauth2/code/bael
We can also drop the user-related properties since we won’t be using them to create the Principal in our application.
Now, we’ll configure the SecurityWebFilterChain without including the oauth2Login command, and instead, we’ll include the oauth2Client one.
Even though we don’t want to rely on the OAuth2 Login, we still want to authenticate users before accessing our endpoint. For this reason, we’ll also include the formLogin directive here:
@Bean
public SecurityWebFilterChain springSecurityFilterChain(ServerHttpSecurity http) {
    http.authorizeExchange()
      .anyExchange()
      .authenticated()
      .and()
      .oauth2Client()
      .and()
      .formLogin();
    return http.build();
}
Let’s now run the application and check out what happens when we use the /auth-code-annotated endpoint.
We’ll first have to log in to our application using the form login.
Afterward, the application will redirect us to the Authorization Service login, to grant access to our resources.
Note: after doing this, we should be redirected back to the original endpoint that we called. Nevertheless, Spring Security seems to be redirecting back to the root path “/” instead, which seems to be a bug. The following requests after the one triggering the OAuth2 dance will run successfully.
We can see in the endpoint response that the authorized client this time is associated with a principal named bael-client-id instead of the bael-user, named after the user configured in the Authentication Service.
8. Spring Framework Support – Manual Approach
Out of the box, Spring 5 provides just one OAuth2-related service method to add a Bearer token header to the request easily. It’s the HttpHeaders#setBearerAuth method.
We’ll now see an example to understand what it would take to obtain our secured resource by performing an OAuth2 dance manually.
Simply put, we’ll need to chain two HTTP requests: one to get an authentication token from the Authorization Server, and the other to obtain the resource using this token:
@Autowired
WebClient client;

public Mono<String> obtainSecuredResource() {
    String encodedClientData =
      Base64Utils.encodeToString("bael-client-id:bael-secret".getBytes());
    Mono<String> resource = client.post()
      .uri("localhost:8085/oauth/token")
      .header("Authorization", "Basic " + encodedClientData)
      .body(BodyInserters.fromFormData("grant_type", "client_credentials"))
      .retrieve()
      .bodyToMono(JsonNode.class)
      .flatMap(tokenResponse -> {
          String accessTokenValue = tokenResponse.get("access_token")
            .textValue();
          return client.get()
            .uri("localhost:8084/retrieve-resource")
            .headers(h -> h.setBearerAuth(accessTokenValue))
            .retrieve()
            .bodyToMono(String.class);
        });
    return resource.map(res ->
      "Retrieved the resource using a manual approach: " + res);
}
This example is mainly to understand how cumbersome it can be to leverage a request following the OAuth2 specification and to see how the setBearerAuth method is used.
In a real-life scenario, we’d let Spring Security take care of all the hard work for us in a transparent manner, as we did in previous sections.
9. Conclusion
In this tutorial, we’ve seen how we can set up our application as an OAuth2 Client, and more particularly, how we can configure and use the WebClient to retrieve a secured resource in a full-reactive stack.
Last but not least, we’ve analyzed how Spring Security 5 OAuth2 mechanisms operate under the hood to comply with the OAuth2 specification.
As always, the full example is available over on Github.