
Table of Contents
DOM modification is the key to creating “live” pages.
Here we’ll see how to create new elements “on the fly” and modify the existing page content.
1. Example: show a message
Let’s demonstrate using an example. We’ll add a message on the page that looks nicer than alert.
Here’s how it will look:
<style>
.alert {
  padding: 15px;
  border: 1px solid #d6e9c6;
  border-radius: 4px;
  color: #3c763d;
  background-color: #dff0d8;
}
</style>

<div class="alert">
  <strong>Hi there!</strong> You've read an important message.
</div>
That was the HTML example. Now let’s create the same div with JavaScript (assuming that the styles are in the HTML/CSS already).
2. Creating an element
To create DOM nodes, there are two methods:document.createElement(tag)
Creates a new element node with the given tag:
let div = document.createElement('div');
document.createTextNode(text)
Creates a new text node with the given text:
let textNode = document.createTextNode('Here I am');
Most of the time we need to create element nodes, such as the div for the message.
3. Creating the message
Creating the message div takes 3 steps:
// 1. Create <div> element
let div = document.createElement('div');

// 2. Set its class to "alert"
div.className = "alert";

// 3. Fill it with the content
div.innerHTML = "<strong>Hi there!</strong> You've read an important message.";
We’ve created the element. But as of now it’s only in a variable named div, not in the page yet. So we can’t see it.
4. Insertion methods
To make the div show up, we need to insert it somewhere into document. For instance, into <body> element, referenced by document.body.
There’s a special method append for that: document.body.append(div).
Here’s the full code:
<style>
.alert {
  padding: 15px;
  border: 1px solid #d6e9c6;
  border-radius: 4px;
  color: #3c763d;
  background-color: #dff0d8;
}
</style>

<script>
  let div = document.createElement('div');
  div.className = "alert";
  div.innerHTML = "<strong>Hi there!</strong> You've read an important message.";

  document.body.append(div);
</script>
Here we called append on document.body, but we can call append method on any other element, to put another element into it. For instance, we can append something to <div> by calling div.append(anotherElement).
Here are more insertion methods, they specify different places where to insert:
node.append(...nodes or strings)– append nodes or strings at the end ofnode,node.prepend(...nodes or strings)– insert nodes or strings at the beginning ofnode,node.before(...nodes or strings)–- insert nodes or strings beforenode,node.after(...nodes or strings)–- insert nodes or strings afternode,node.replaceWith(...nodes or strings)–- replacesnodewith the given nodes or strings.
Arguments of these methods are an arbitrary list of DOM nodes to insert, or text strings (that become text nodes automatically).
Let’s see them in action.
Here’s an example of using these methods to add items to a list and the text before/after it:
<ol id="ol">
  <li>0</li>
  <li>1</li>
  <li>2</li>
</ol>

<script>
  ol.before('before'); // insert string "before" before <ol>
  ol.after('after'); // insert string "after" after <ol>

  let liFirst = document.createElement('li');
  liFirst.innerHTML = 'prepend';
  ol.prepend(liFirst); // insert liFirst at the beginning of <ol>

  let liLast = document.createElement('li');
  liLast.innerHTML = 'append';
  ol.append(liLast); // insert liLast at the end of <ol>
</script>
Here’s a visual picture of what the methods do:

So the final list will be:
before
<ol id="ol">
  <li>prepend</li>
  <li>0</li>
  <li>1</li>
  <li>2</li>
  <li>append</li>
</ol>
after
As said, these methods can insert multiple nodes and text pieces in a single call.
For instance, here a string and an element are inserted:
<div id="div"></div>
<script>
  div.before('<p>Hello</p>', document.createElement('hr'));
</script>
Please note: the text is inserted “as text”, not “as HTML”, with proper escaping of characters such as <, >.
So the final HTML is:
<p>Hello</p>
<hr>
<div id="div"></div>
In other words, strings are inserted in a safe way, like elem.textContent does it.
So, these methods can only be used to insert DOM nodes or text pieces.
But what if we’d like to insert an HTML string “as html”, with all tags and stuff working, in the same manner as elem.innerHTML does it?
5. insertAdjacentHTML/Text/Element
For that we can use another, pretty versatile method: elem.insertAdjacentHTML(where, html).
The first parameter is a code word, specifying where to insert relative to elem. Must be one of the following:
"beforebegin"– inserthtmlimmediately beforeelem,"afterbegin"– inserthtmlintoelem, at the beginning,"beforeend"– inserthtmlintoelem, at the end,"afterend"– inserthtmlimmediately afterelem.
The second parameter is an HTML string, that is inserted “as HTML”.
For instance:
<div id="div"></div>
<script>
  div.insertAdjacentHTML('beforebegin', '<p>Hello</p>');
  div.insertAdjacentHTML('afterend', '<p>Bye</p>');
</script>
…Would lead to:
<p>Hello</p>
<div id="div"></div>
<p>Bye</p>
That’s how we can append arbitrary HTML to the page.
Here’s the picture of insertion variants:
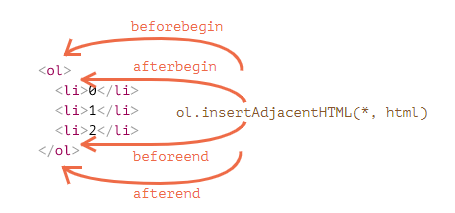
We can easily notice similarities between this and the previous picture. The insertion points are actually the same, but this method inserts HTML.
The method has two brothers:
elem.insertAdjacentText(where, text)– the same syntax, but a string oftextis inserted “as text” instead of HTML,elem.insertAdjacentElement(where, elem)– the same syntax, but inserts an element.
They exist mainly to make the syntax “uniform”. In practice, only insertAdjacentHTML is used most of the time. Because for elements and text, we have methods append/prepend/before/after – they are shorter to write and can insert nodes/text pieces.
So here’s an alternative variant of showing a message:
<style>
.alert {
  padding: 15px;
  border: 1px solid #d6e9c6;
  border-radius: 4px;
  color: #3c763d;
  background-color: #dff0d8;
}
</style>

<script>
  document.body.insertAdjacentHTML("afterbegin", `<div class="alert">
    <strong>Hi there!</strong> You've read an important message.
  </div>`);
</script>
6. Node removal
To remove a node, there’s a method node.remove().
Let’s make our message disappear after a second:
<style>
.alert {
  padding: 15px;
  border: 1px solid #d6e9c6;
  border-radius: 4px;
  color: #3c763d;
  background-color: #dff0d8;
}
</style>

<script>
  let div = document.createElement('div');
  div.className = "alert";
  div.innerHTML = "<strong>Hi there!</strong> You've read an important message.";

  document.body.append(div);
  setTimeout(() => div.remove(), 1000);
</script>
Please note: if we want to move an element to another place – there’s no need to remove it from the old one.
All insertion methods automatically remove the node from the old place.
For instance, let’s swap elements:
<div id="first">First</div>
<div id="second">Second</div>
<script>
  // no need to call remove
  second.after(first); // take #second and after it insert #first
</script>
7. Cloning nodes: cloneNode
How to insert one more similar message?
We could make a function and put the code there. But the alternative way would be to clone the existing div and modify the text inside it (if needed).
Sometimes when we have a big element, that may be faster and simpler.
- The call
elem.cloneNode(true)creates a “deep” clone of the element – with all attributes and subelements. If we callelem.cloneNode(false), then the clone is made without child elements.
An example of copying the message:
<style>
.alert {
  padding: 15px;
  border: 1px solid #d6e9c6;
  border-radius: 4px;
  color: #3c763d;
  background-color: #dff0d8;
}
</style>

<div class="alert" id="div">
  <strong>Hi there!</strong> You've read an important message.
</div>

<script>
  let div2 = div.cloneNode(true); // clone the message
  div2.querySelector('strong').innerHTML = 'Bye there!'; // change the clone

  div.after(div2); // show the clone after the existing div
</script>
8. DocumentFragment
DocumentFragment is a special DOM node that serves as a wrapper to pass around lists of nodes.
We can append other nodes to it, but when we insert it somewhere, then its content is inserted instead.
For example, getListContent below generates a fragment with <li> items, that are later inserted into <ul>:
<ul id="ul"></ul>

<script>
function getListContent() {
  let fragment = new DocumentFragment();

  for(let i=1; i<=3; i++) {
    let li = document.createElement('li');
    li.append(i);
    fragment.append(li);
  }

  return fragment;
}

ul.append(getListContent()); // (*)
</script>
Please note, at the last line (*) we append DocumentFragment, but it “blends in”, so the resulting structure will be:
<ul>
  <li>1</li>
  <li>2</li>
  <li>3</li>
</ul>
DocumentFragment is rarely used explicitly. Why append to a special kind of node, if we can return an array of nodes instead? Rewritten example:
<ul id="ul"></ul>

<script>
function getListContent() {
  let result = [];

  for(let i=1; i<=3; i++) {
    let li = document.createElement('li');
    li.append(i);
    result.push(li);
  }

  return result;
}

ul.append(...getListContent()); // append + "..." operator = friends!
</script>
We mention DocumentFragment mainly because there are some concepts on top of it, like template element, that we’ll cover much later.
9. Old-school insert/remove methods
Old schoolThis information helps to understand old scripts, but not needed for new development.
There are also “old school” DOM manipulation methods, existing for historical reasons.
These methods come from really ancient times. Nowadays, there’s no reason to use them, as modern methods, such as append, prepend, before, after, remove, replaceWith, are more flexible.
The only reason we list these methods here is that you can find them in many old scripts:parentElem.appendChild(node)
Appends node as the last child of parentElem.
The following example adds a new <li> to the end of <ol>:
<ol id="list">
  <li>0</li>
  <li>1</li>
  <li>2</li>
</ol>

<script>
  let newLi = document.createElement('li');
  newLi.innerHTML = 'Hello, world!';

  list.appendChild(newLi);
</script>
parentElem.insertBefore(node, nextSibling)
Inserts node before nextSibling into parentElem.
The following code inserts a new list item before the second <li>:
<ol id="list">
  <li>0</li>
  <li>1</li>
  <li>2</li>
</ol>
<script>
  let newLi = document.createElement('li');
  newLi.innerHTML = 'Hello, world!';

  list.insertBefore(newLi, list.children[1]);
</script>
To insert newLi as the first element, we can do it like this:
list.insertBefore(newLi, list.firstChild);
parentElem.replaceChild(node, oldChild)
Replaces oldChild with node among children of parentElem.
parentElem.removeChild(node)
Removes node from parentElem (assuming node is its child).
The following example removes first <li> from <ol>:
<ol id="list">
  <li>0</li>
  <li>1</li>
  <li>2</li>
</ol>

<script>
  let li = list.firstElementChild;
  list.removeChild(li);
</script>
All these methods return the inserted/removed node. In other words, parentElem.appendChild(node) returns node. But usually the returned value is not used, we just run the method.
10. A word about “document.write”
There’s one more, very ancient method of adding something to a web-page: document.write.
The syntax:
<p>Somewhere in the page...</p>
<script>
  document.write('<b>Hello from JS</b>');
</script>
<p>The end</p>
The call to document.write(html) writes the html into page “right here and now”. The html string can be dynamically generated, so it’s kind of flexible. We can use JavaScript to create a full-fledged webpage and write it.
The method comes from times when there was no DOM, no standards… Really old times. It still lives, because there are scripts using it.
In modern scripts we can rarely see it, because of the following important limitation:
The call to document.write only works while the page is loading.
If we call it afterwards, the existing document content is erased.
For instance:
<p>After one second the contents of this page will be replaced...</p>
<script>
  // document.write after 1 second
  // that's after the page loaded, so it erases the existing content
  setTimeout(() => document.write('<b>...By this.</b>'), 1000);
</script>
So it’s kind of unusable at “after loaded” stage, unlike other DOM methods we covered above.
That’s the downside.
There’s an upside also. Technically, when document.write is called while the browser is reading (“parsing”) incoming HTML, and it writes something, the browser consumes it just as if it were initially there, in the HTML text.
So it works blazingly fast, because there’s no DOM modification involved. It writes directly into the page text, while the DOM is not yet built.
So if we need to add a lot of text into HTML dynamically, and we’re at page loading phase, and the speed matters, it may help. But in practice these requirements rarely come together. And usually we can see this method in scripts just because they are old.
11. Summary
- Methods to create new nodes:
document.createElement(tag)– creates an element with the given tag,document.createTextNode(value)– creates a text node (rarely used),elem.cloneNode(deep)– clones the element, ifdeep==truethen with all descendants.
- Insertion and removal:
node.append(...nodes or strings)– insert intonode, at the end,node.prepend(...nodes or strings)– insert intonode, at the beginning,node.before(...nodes or strings)–- insert right beforenode,node.after(...nodes or strings)–- insert right afternode,node.replaceWith(...nodes or strings)–- replacenode.node.remove()–- remove thenode.
- There are also “old school” methods:
parent.appendChild(node)parent.insertBefore(node, nextSibling)parent.removeChild(node)parent.replaceChild(newElem, node)
node. - Given some HTML in
html,elem.insertAdjacentHTML(where, html)inserts it depending on the value ofwhere:"beforebegin"– inserthtmlright beforeelem,"afterbegin"– inserthtmlintoelem, at the beginning,"beforeend"– inserthtmlintoelem, at the end,"afterend"– inserthtmlright afterelem.
elem.insertAdjacentTextandelem.insertAdjacentElement, that insert text strings and elements, but they are rarely used. - To append HTML to the page before it has finished loading:
document.write(html)