
Table of Contents
tsParticles is a perfect background animation library with diverse ways to move fancy particles that fit your website layout. It is extremely flexible and made to fit any background that matches your website.
You may have come across a website with a background effect that slightly look like these examples listed below.

tsParticles is one of the JavaScript libraries that will help you include this type of animation into your websites. tsParticles is a lightweight animation library. As the name suggests, the library enables you move tiny particles on your web background, with many other fancy features.
Particle.js was an earlier version, although it hasn’t been updated (lately) and has many bugs that have not been fixed. Due to this, the hybrid typescript library tsParticles was introduced, to improve on the particles.js bugs and lack of maintenance. It supports some common JavaScript frontend frameworks/libraries such as Angular, Vue (2.x and 3.x), React, Vanilla, Svelte, and jQerry.
In this guide, we’ll show you how to create a particle animation background effect that you can apply to any website using standard JavaScript.
1. Installation and Usage
1.1. Using CDN
tsParticles supports CDN hosting to load particles. CDN includes script tags and CDN src , as these shown below.
<script src="https://cdnjs.cloudflare.com/ajax/libs/tsparticles/1.18.11/tsparticles.min.js"> < /script>
Head out to tsparticles CDN and check the latest CDN version to take advantage of any updated features.
1.2. Using NPM
If you are a Node.js user and love using require() or import{} in your project, tsParticles is available in the npm registry.
Run npm install tsparticles and use require() or ES6 import in .js files.
const tsParticles = require("tsparticles");
import { tsParticles } from "tsparticles"
1.3. JavaScript Frameworks
If you love working with a JavaScript frameworks such as React, Vue (2.x and 3.x), Angular, Svelte or jQuery, head here and choose the framework of your choice to integrate with tsparticles.
2. File Setup
Create three files, named index.html app.css and app.js .
In your index.html file, add tsparticles div DOM. Add CDN, and import app.css and app.js from your root project directory.
index.html
<!DOCTYPE html>
<html lang="en">

<head>
    <title>tsparticles </title>
    <!-- Import app.css from root directory -->
    <link rel="stylesheet" href="./app.css" />
</head>

<body>
    <!-- tsparticles div dom -->
    <div id="tsparticles"></div>
   <!-- Import cdn -->
    <script src="https://cdnjs.cloudflare.com/ajax/libs/tsparticles/1.18.11/tsparticles.min.js"></script>

    <!-- Import app.js from root directory -->
    <script src="/app.js">
    </script>
</body>

</html>
app.css
Your app.css file will hold the tsparticles stylesheet configurations.
#tsparticles {
    /*   background; */
    width: 100%;
    background-color: #0ab1e9;
    height: 100%;
}
CSS properties will vary depending on your website. It will depend on the background that best fits your web colors and the position you will want to place the tsparticles.
That’s all for app.css and index.html .
3. Adding particles
The aspect properties of the particles are specified on the .js file. This is where you manipulate and play with the particles until you get the desired particle movements. Specify both the tsparticles and the div element we defined earlier in the index.html file.
/* tsParticles.load(@dom-id, @options); */
tsParticles.load("tsparticles", {})
First, specify the number of particles you would like to have move on your background canvas.
/* tsParticles.load(@dom-id, @options); */
tsParticles.load("tsparticles", {
    particles: {
        number: {
            value: 200
        },
    }
});
Define the number of particles you would like to show within the parameter values and pass a number to it. I choose to use 200; it mainly depends on the kind of movement you want to build in the animation. Load the index.html and 200 particles will float onto your canvas.
The number can vary as you practice and create more of a different background. The number can be small depending on the particle size, collisions, linking, and interactivity. We’ll look at that in a bit more detail as we play with tsparticles in later sections.
Note: If you open the index.html page directly on the browser.
For example:

You will notice that there are no particles loaded. This is because we need to make sure we are using the live-server provided with your text editor when opening the index.html files.

For example:
- Visual studio code – install live server extension.
- Atom – install atom live server.
4. Adding Motion
The particles we created are motionless at the moment. Right below the number: property let’s add.
move: {
    enable: true
},
We need to enable motion to true . We then save the file. A live server will reload the page, and you’ll now notice the particles are moving around.
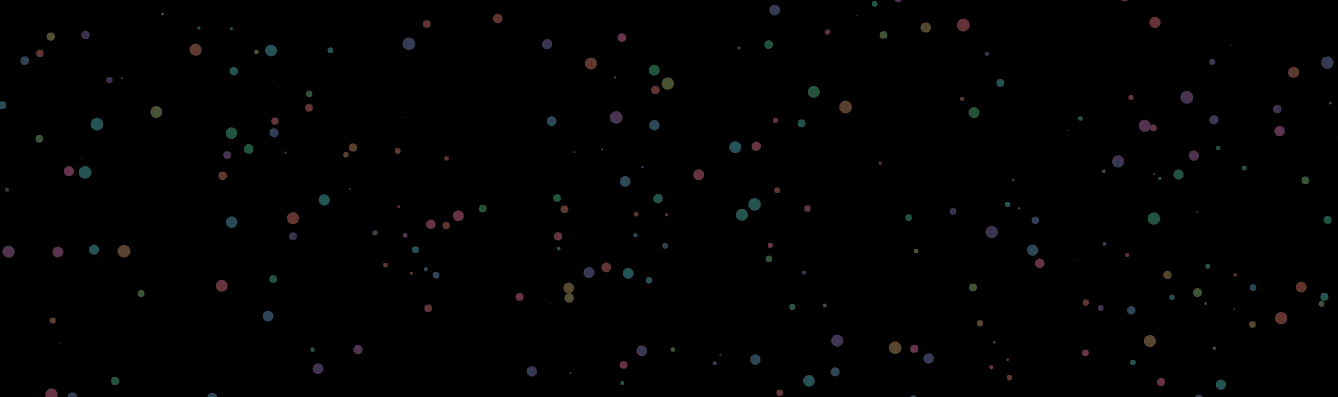
5. Playing with Colors
tsParticles load these particles with the default color set. There are several ways to play with the particle color values.
5.1. Single Color
By adding the code snippet below we will have all the particles in one uniform color.
color: {
    value: "#ff0000"
},
5.2. Multiple Colors
Particles can have different colors as well, the color value can take an array of colors. For example, we can make the first particle black, and the next nearest particle white.
color: {
    value: ["#5bc0eb", "#fde74c", "#9bc53d", "#e55934", "#fa7921"],
},
5.3. Random Colors
Passing a random value, tsparticles can give the particles randomized colors. Wit this feature almost every particle will have a different color in the background.
color: {
    value: "random ",
},
Let’s animate the tsParticles to have a beautiful transforming colored animation. We can specify the speed that a particle will alternate from color a to color b. Adding animation to a single color will randomized the particles colors.
color: {
    value: "#ff0000",
    animation: {
        enable: true,
        speed: 40,
        sync: true
    }
},
6. Shaping the Particles
The particles will load on the default circular shape. Other common shapes include:
"circle"
"edge" / "square"
"triangle"
"polygon"
"star"
"char" / "character"
"image" / "images"
We can specify it with:
shape: {
    type: "circle",
},
Go ahead and try these shapes. Specify the sides for polygon-shaped particles.
Example snippet below:
polygon: {
    sides: 5
}
Just like the colors, we can add an array of shapes to have multiple shaped particles.
type: ["circle", "star", "edge"],
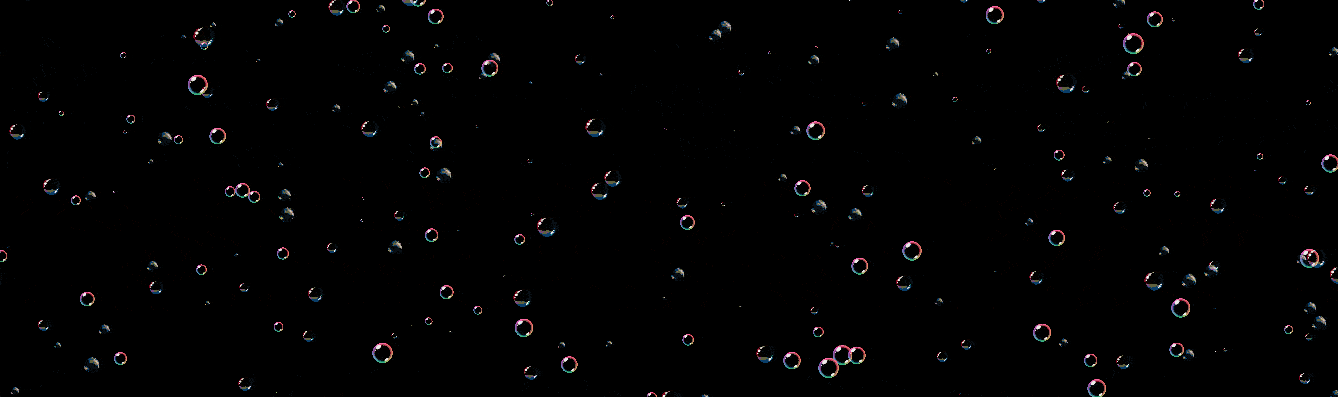
Or try a default image.
tsParticles allows you to choose an image or an array of images as a particle. For example, if I wanted my particles to be bubbles, I could link an image with bubbles. In this case I have passed an array of images below.
shape: {
    type: "image",
    options: {
        image: [{
            src: "https://cdn130.picsart.com/262323691001212.png?r1024x1024",
            width: 202,
            height: 200
        }, {
            src: "http://pngimg.com/uploads/soap_bubbles/soap_bubbles_PNG72.png",
            width: 1153,
            height: 1080
        }, {
            src: "https://images-wixmp-ed30a86b8c4ca887773594c2.wixmp.com/f/54e847be-8444-4485-9d2f-0d51a9ab6b3f/dcruv7h-9c57c565-e380-4d20-9413-d743c35c83a4.png/v1/fill/w_894,h_894,strp/transparent_rainbow_bubble_prop_png_3_by_lxc808_dcruv7h-pre.png?token=eyJ0eXAiOiJKV1QiLCJhbGciOiJIUzI1NiJ9.eyJzdWIiOiJ1cm46YXBwOjdlMGQxODg5ODIyNjQzNzNhNWYwZDQxNWVhMGQyNmUwIiwiaXNzIjoidXJuOmFwcDo3ZTBkMTg4OTgyMjY0MzczYTVmMGQ0MTVlYTBkMjZlMCIsIm9iaiI6W1t7ImhlaWdodCI6Ijw9MTAyNCIsInBhdGgiOiJcL2ZcLzU0ZTg0N2JlLTg0NDQtNDQ4NS05ZDJmLTBkNTFhOWFiNmIzZlwvZGNydXY3aC05YzU3YzU2NS1lMzgwLTRkMjAtOTQxMy1kNzQzYzM1YzgzYTQucG5nIiwid2lkdGgiOiI8PTEwMjQifV1dLCJhdWQiOlsidXJuOnNlcnZpY2U6aW1hZ2Uub3BlcmF0aW9ucyJdfQ.laWMbla12KsLhf1aJHcWGzVyHxfciBK84P_uzOZSKTs",
            width: 894,
            height: 894
        }]
    }
},
Remember, adding an image will only work if you specify the shape property to be of the type: "image" .
7. Particle Size
We can modify the shape size.
size: {
    value: 10,
    random: true,
    animation: {
        enable: true,
        speed: 20,
        minimumValue: 0.1,
        sync: false
    }
},
You could set random to true to create particles of different sizes ranging from mini of 0.1 to 10. Add an animation property to animate the particles as the size changes.
You now have an creative background with fancy colors, animated sizes, and shapes.
At this point, the app.js should look close to this code sample below.
tsParticles.load("tsparticles", {
            particles: {
                number: {
                    value: 400
                },
                color: {
                    value: "#344455",
                    animation: {
                        enable: true,
                        speed: 40,
                        sync: false
                    }
                },
                shape: {
                    type: "circle",
                },
                size: {
                    value: 6,
                    random: true,
                    animation: {
                        enable: true,
                        speed: 20,
                        minimumValue: 0.1,
                        sync: false
                    },
                    move: {
                        enable: true,
                    },
                }
            });
If you serve index.html , you should be seeing a background close to the samples below.
7.1. Using Circular Shapes with Randomized colors
your code here
7.2. Using Bubbled Array Images as the Shape
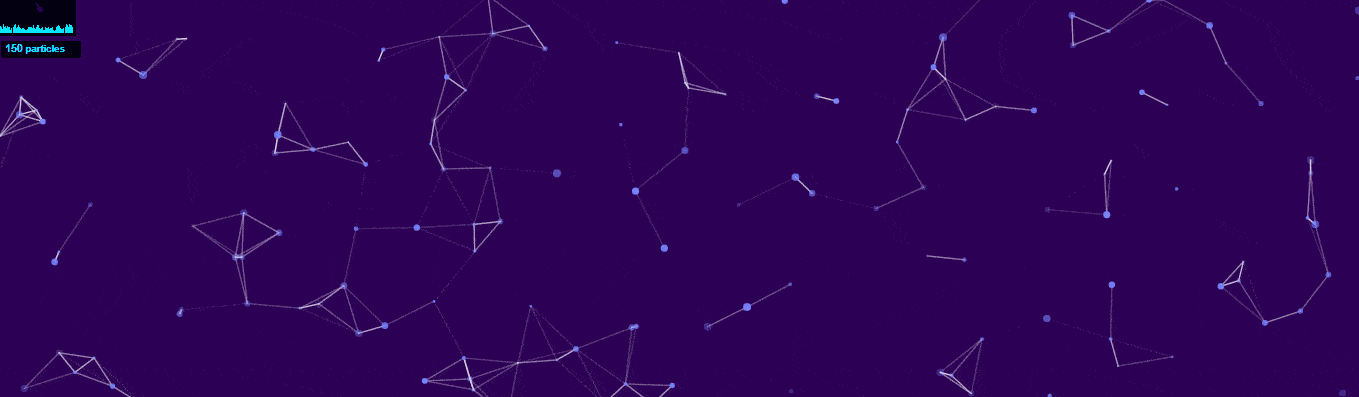
8. Particle Linking
The next big thing we will go over is linking a particle to the nearest neighboring particles to create a connection between the particle movement. When links: is enabled to true, every particle will be connected to the all the adjacent particles.
The linking line takes additional values such as distance. Distance specifies the range at which a particle should link to another particle. Customize the link by passing the color, opacity, and width parameters.
links: {
    enable: true,
    distance: 100,
    color: "#fff",
    opacity: 0.4,
    width: 1
},
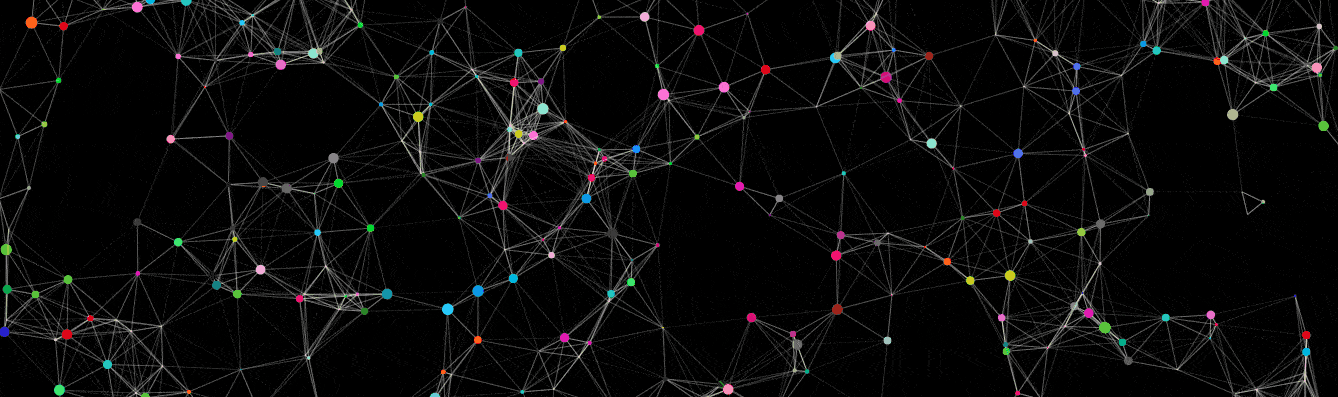
9. Interactivity
One more thing I would like to add, is that the particles’ interactivity with mouse movements, such as onClick and onHover events. This will tell the particle what to do whenever onscreen interaction is detected. Each event takes a parameter mode that defines how the particles will behave on an event detection. These modes specify the behaviors of the events.
The modes include:
- Push – add more particles. Specified with
quantity(the number of particles to add). - Bubble – expand particles on a specified range.
- Remove – delete or remove particles on onClick. Specified with
quantity(the number of particles to remove). - Repulse – pushes particles away to a radius.
- Grab – connect the particles and mouse in a specified radius. This is only applicable with onHover.
- Connect – connect particles between themself in a specified radius. This is only applicable with onHover
interactivity: {
    detectsOn: "canvas",
    events: {
        onHover: {
            enable: true,
            mode: "repulse"
        },
        onClick: {
            enable: true,
            mode: "bubble"
        },
        resize: true
    },
    modes: {
        grab: {
            distance: 400,
            links: {
                opacity: 1
            }
        },
        bubble: {
            distance: 400,
            size: 40,
            duration: 2,
            opacity: 0.8
        },
        repulse: {
            distance: 200
        },
        push: {
            quantity: 4
        },
        remove: {
            quantity: 2
        }
    }
},
Final Output
tsParticles.load("tsparticles", {
    particles: {
        number: {
            value: 400
        },
        color: {
            value: "random",
            animation: {
                enable: true,
                speed: 40,
                sync: false
            }
        },
        shape: {
            type: "circle",
        },
        size: {
            value: 5,
            random: true,
            animation: {
                enable: true,
                speed: 16,
                minimumValue: 0.1,
                sync: false
            }
        },
        links: {
            enable: true,
            distance: 100,
            color: "random",
            opacity: 0.4,
            width: 1
        },
        move: {
            enable: true,
        },
    },
    interactivity: {
        detectsOn: "canvas",
        events: {
            onHover: {
                enable: true,
                mode: "repulse"
            },
            onClick: {
                enable: true,
                mode: "bubble"
            },
            resize: true
        },
        modes: {
            grab: {
                distance: 400,
                links: {
                    opacity: 1
                }
            },
            bubble: {
                distance: 400,
                size: 40,
                duration: 2,
                opacity: 0.8
            },
            repulse: {
                distance: 200
            },
            push: {
                quantity: 4
            },
            remove: {
                quantity: 2
            }
        }
    },
    detectRetina: true,
});
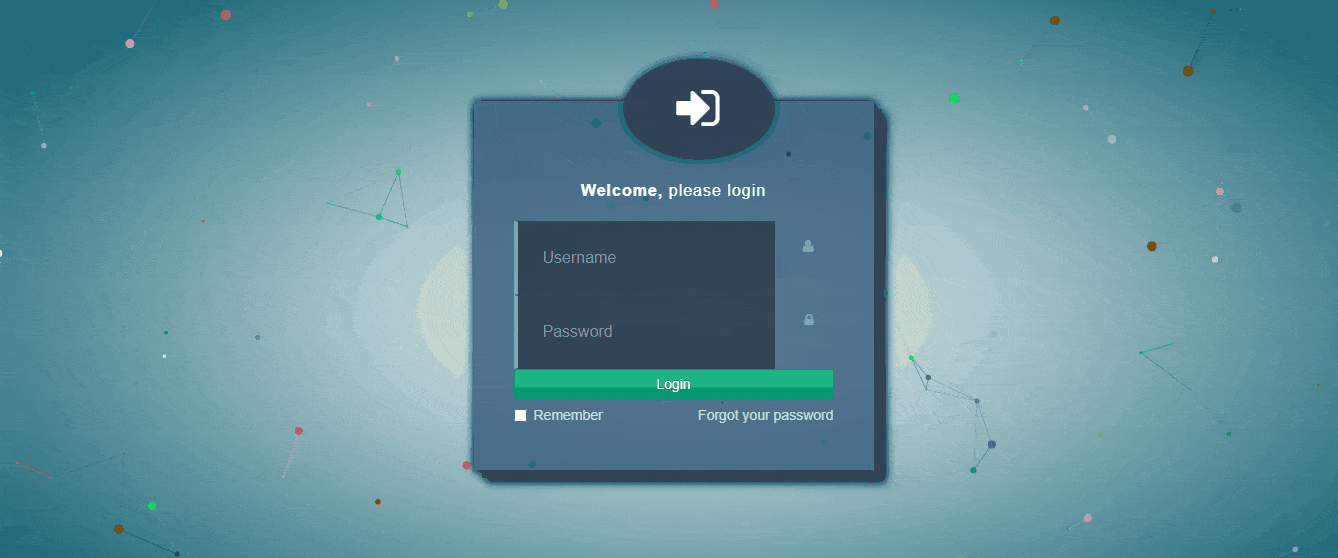
10. Application Example
Next we will go over how to apply the end product (the particle background) into your website. The example below will show a login form floating over the particle’s background.
Files Setup:
App.css
html {
    height: 100%;
    overflow: hidden;
}

body {
    background: #f2f2f2;
    font-family: "Varela", sans-serif;
    font-size: 14px;
    line-height: 1.5;
    color: #333;
    height: calc(100%);
    overflow: auto;
    position: relative;
}

label {
    margin-top: 6px;
    line-height: 17px;
}

a {
    color: #fff;
}

a:focus,
a:hover {
    color: #008080;
}

.checkbox-inline+.checkbox-inline,
.radio-inline+.radio-inline {
    margin-top: 6px;
}

/******* Login Page *******/
body.login {
    background: rgb(205, 206, 140);
    background: -moz-radial-gradient(center,
            ellipse cover,
            rgba(255, 255, 255, 1) 0%,
            rgba(19, 80, 88, 1) 100%);
    background: -webkit-gradient(radial,
            center center,
            0px,
            center center,
            100%,
            color-stop(0%, rgba(255, 255, 255, 1)),
            color-stop(100%, rgb(9, 54, 59)));
    background: -webkit-radial-gradient(center,
            ellipse cover,
            rgba(255, 255, 255, 1) 0%,
            rgba(19, 80, 88, 1) 100%);
    background: -o-radial-gradient(center,
            ellipse cover,
            rgba(255, 255, 255, 1) 0%,
            rgba(19, 80, 88, 1) 100%);
    background: -ms-radial-gradient(center,
            ellipse cover,
            rgba(255, 255, 255, 1) 0%,
            rgba(19, 80, 88, 1) 100%);
    background: radial-gradient(ellipse at center,
            rgba(255, 255, 255, 1) 0%,
            rgba(19, 80, 88, 1) 100%);
    filter: progid: DXImageTransform.Microsoft.gradient(startColorstr='#f1f2b5', endColorstr='#135058', GradientType=1);
}

.relative {
    position: relative;
}

.login-container-wrapper .logo,
.login-container-wrapper .welcome {
    margin: 0 0 20px 0;
    font-size: 16px;
    color: #fff;
    text-align: center;
    letter-spacing: 1px;
}

.login-container-wrapper .logo {
    text-align: center;
    position: absolute;
    top: -42px;
    margin: 0 auto;
    width: 25%;
    left: 37.5%;
    border-radius: 50%;
    background-color: #344455;
    padding: 25px;
    box-shadow: 0px 0px 9px 2px #344454;
}

.login-container-wrapper {
    max-width: 400px;
    margin: 10% auto 8%;
    padding: 40px;
    box-sizing: border-box;
    background: rgba(57, 89, 116, 0.8);
    box-shadow: 1px 1px 10px 1px #000000, 8px 8px 0px 0px #344454,
        12px 12px 10px 0px #000000;
    position: relative;
    padding-top: 80px;
}

.logo .fa {
    font-size: 50px;
}

.login input:focus+.fa {
    color: #fff;
}

.login-form .form-group {
    margin-right: 0;
    margin-left: 0;
}

.login-form i {
    position: absolute;
    top: 18px;
    right: 20px;
    color: #93a5ab;
}

.login-form .input-lg {
    font-size: 16px;
    height: 52px;
    padding: 10px 25px;
    border-radius: 0;
}

.login input[type="email"],
.login input[type="password"],
.login input:focus {
    background-color: rgba(40, 52, 67, 0.75);
    border: 1px solid #4a525f;
    color: #eee;
    border-left: 4px solid #93a5ab;
}

.login input:focus {
    border-left: 4px solid #ccd8da;
}

input:-webkit-autofill,
textarea:-webkit-autofill,
select:-webkit-autofill {
    background-color: rgba(40, 52, 67, 0.75) !important;
    background-image: none;
    color: rgb(0, 0, 0);
    border-color: #faffbd;
}

.login .checkbox label,
.login .checkbox a {
    color: #ddd;
}

#tsparticles {
    /*   background: cornflowerblue; */
    width: 100%;
    height: 100%;
    position: absolute;
    z-index: -1;
}
Index.html
<!DOCTYPE html>
<html lang="en">

<head>
    <title>tsparticles</title>
    <!-- Import app.css from root directory -->
    <link rel="stylesheet" href="./app.css" />
    <!-- Import Varela font-->
    <link rel="stylesheet" href="https://fonts.googleapis.com/css?family=Varela">
    <!-- Import font-awesome -->
    <link rel="stylesheet" href="https://cdnjs.cloudflare.com/ajax/libs/font-awesome/4.7.0/css/font-awesome.min.css">
    <!-- Import icons -->
    <link rel="stylesheet" href="//netdna.bootstrapcdn.com/twitter-bootstrap/2.3.2/css/bootstrap-combined.no-icons.min.css">
</head>

<body>
    <!-- tsparticles div -->
    <div id="tsparticles"></div>

    <body class="login">
        <div class="container">
            <div class="login-container-wrapper clearfix">
                <div class="logo">
                    <i class="fa fa-sign-in"></i>
                </div>
                <div class="welcome"><strong>Welcome,</strong> please login</div>
                <form class="form-horizontal login-form">
                    <div class="form-group relative">
                        <input id="login_username" class="form-control input-lg" type="email" placeholder="Username" required>
                        <i class="fa fa-user"></i>
                    </div>
                    <div class="form-group relative password">
                        <input id="login_password" class="form-control input-lg" type="password" placeholder="Password" required>
                        <i class="fa fa-lock"></i>
                    </div>
                    <div class="form-group">
                        <button type="submit" class="btn btn-success btn-lg btn-block">Login</button>
                    </div>
                    <div class="checkbox pull-left">
                        <label><input type="checkbox"> Remember</label>
                    </div>
                    <div class="checkbox pull-right">
                        <label> <a class="forget" href="" title="forget">Forgot your password</a> </label>
                    </div>
                </form>
            </div>
        </div>
        <!-- Import tsparticles.js and app.js files -->
        <script src="https://cdnjs.cloudflare.com/ajax/libs/tsparticles/1.18.11/tsparticles.min.js"> </script>
        <script src="/app.js">
        </script>
    </body>

</html>
App.js
tsParticles.load("tsparticles", {
    particles: {
        number: {
            value: 100
        },
        color: {
            value: "random",
            animation: {
                enable: true,
                speed: 50,
                sync: false
            }
        },
        shape: {
            type: "circle",
        },
        size: {
            value: 5,
            random: true,
            animation: {
                enable: true,
                speed: 16,
                minimumValue: 0.1,
                sync: false
            }
        },
        links: {
            enable: true,
            distance: 100,
            color: "random",
            opacity: 0.4,
            width: 1
        },
        move: {
            enable: true,
        },
    },
    interactivity: {
        detectsOn: "canvas",
        events: {
            onHover: {
                enable: true,
                mode: "repulse"
            },
            onClick: {
                enable: true,
                mode: "bubble"
            },
            resize: true
        },
        modes: {
            grab: {
                distance: 400,
                links: {
                    opacity: 1
                }
            },
            bubble: {
                distance: 400,
                size: 40,
                duration: 2,
                opacity: 0.8
            },
            repulse: {
                distance: 200
            },
            push: {
                quantity: 4
            },
            remove: {
                quantity: 2
            }
        }
    },
    detectRetina: true,
});
Output
11. Final Notes
tsParticles is a cool library that you should try in your next JavaScript project. It provides fancy backgrounds that will make your user enjoy interacting with your web apps.
Consider looking at the tsParticles codepen examples and their official docs. This will give you more examples to interact with as you try to manipulate and play with other tsparticles values.
Remember to check out how to use tsParticles with your favorite Javascript framework.
tsParticles borrows its concept from Particle.js. If you had previously worked on a Particle.js project, check out how to migrate to tsparticle and enjoy the more updated features.
If you enjoy building WordPress websites, this article will help you add tsParticles to your WordPress blogs.