
Table of Contents
M-Pesa can be described as a phone-based mobile banking service. Since its inauguration in 2007 by Vodafone Group PLC and Safaricom in Kenya, it has expanded to eight more countries in Africa.
An API (Application Programming Interface) is an intermediary between two software applications that enables them to communicate.
B2C (Business to Consumer) M-Pesa API enables software developers or merchants to send payments to their customers. You can read more about the M-Pesa API from here.
1. Goals
In this article, we will integrate the B2C M-Pesa API in a Node.js RESTful API. We will consume the API using Swagger.
2. Prerequisites
To follow along in this article, it is helpful to have the following:
- Node.js installed on your computer.
- Some basic knowledge on JavaScript.
- A text editor installed. Preferrably VScode
3. Overview
- Setting up the development server
- Getting an access token
- B2C API
4. Setting up the development server
This article assumes that you have a Safaricom developer account.
If you don’t, go through these steps to create one.
Also, ensure that you have created at least one application from your developer portal. If you haven’t, follow these guidelines.
To get started, we will clone the starter project from here. With all the basic configurations done on the skeleton, our focus throughout the article will be on implementing the core functionalities.
We first need to install the following dependencies:
- axios: For handling the requests to the M-Pesa API.
- dotenv: For loading the environmental variables.
- express: For providing a faster, and easier way to set up a RESTful API.
- ngrok: For exposing our localhost server.
- swagger-ui-express: For serving the API docs to the user interface.
To install these packages, open the starter project in your text editor. Next, launch the terminal in your text editor and run the following command:
npm install
Having installed the dependencies, we can move on to the next step.
Note that we will be working from the
src/controllers/Mpesa.jsfile.
5. Getting an access token
All requests to the M-Pesa API must have an access token. It forms the basis for authentication.
To implement this functionality, we will edit the getAccessToken() method as follows:
//get access token.
async getAccessToken(req,res,next){
    // get data from headers by destructuring
    let {consumerkey,consumersecret} = req.headers;
    // request url
    let url = "https://sandbox.safaricom.co.ke/oauth/v1/generate?grant_type=client_credentials";

    // get a base64 encoded string from a buffer
    let buf = new Buffer.from(`${consumerkey}:${consumersecret}`).toString("base64");
    // authentication string
    let auth = `Basic ${buf}`;
    let response;

    try {

        // send a GET request to the URL
        response = await axios.default.get(url,{
            headers:{
                "Authorization":auth
            }
        });

    } catch (error) {

        // in case of an error, get the code and error message
        let err_code = error.response.status;
        let err_msg = error.response.statusText;

        // send response to client
        return res.status(err_code).send({
            message:err_msg
        });

    }

    // get the access token from server response
    let accessToken  = response.data.access_token;

    // set the status code.
    res.status(200);

    // send the access token to client
    return res.send({
        accessToken
    });
};
In the code snippet above, we are:
- Destructuring the
consumerkeyandconsumersecretfrom theheaders. - Setting the
URLto send the request. - Generating a
base64encoded string from a buffer. - Composing the authentication string by appending
Basicbefore the encoded string. - Sending the request to M-Pesa API from a
try/catchblock. In case of an error, the error is sent to the client. Otherwise, if there is no error, the access token is sent to the client.
To test it:
- Start the development server by running the following command from the terminal of your text editor:
npm run dev
- In your browser, navigate to
http://localhost:4000/api-docs. - Click the
/access-tokensection underMpesa B2Ctag. - Click the
Try it outbutton. - To get your
consumer keyandconsumer secret, visit your applications page, select your application, from thekeyssection, then copy and paste them respectively into the section’s parameters. - Click the
Executebutton. - In case of an error, revisit the steps. Otherwise your server response should resemble the following:
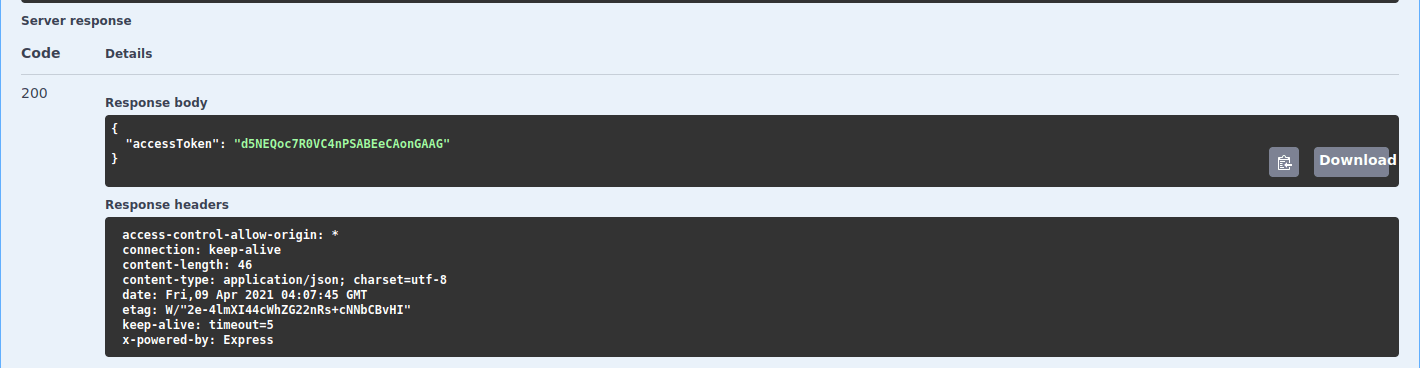
A screenshot of getting access token server response.
6. B2C API
We can use the access token to access the B2C API.
To do that, we need to modify the b2c() method as follows:
//b2c.
async b2c(req,res,next){
// destructure from headers
let {accesstoken,initiatorname,securitycredential,commandid,amount,partya,partyb,remarks}= req.headers;
// url to send request to.
let url = "https://sandbox.safaricom.co.ke/mpesa/b2c/v1/paymentrequest";
// url to expose our local server
let ngrok_url = process.env.NGROK_URL;
// authentication string
let auth = `Bearer ${accesstoken}`;
let response;

try{

    // send the request
    response = await axios.default.post(url,{
    "InitiatorName": initiatorname,
    "SecurityCredential":securitycredential,
    "CommandID": commandid,
    "Amount": amount,
    "PartyA": partya,
    "PartyB": partyb,
    "Remarks": remarks,
    "QueueTimeOutURL": `${ngrok_url}/timeout`,
    "ResultURL": `${ngrok_url}/cb`,
    "Occasion": remarks
    },{
        headers:{
            "Authorization":auth
        }
    })

}catch(error) {

    // in case of an error, get the code and the message.
    let err_code = error.response.status;
    let err_msg = error.response.data.errorMessage;

    // send to the client
    return res.status(err_code).send({
        message:err_msg
    });
}

// set the status code
res.status(200);

// send to the client
return res.send({
    result:response.data
});
};
In the above code snippet, we are:
- Destructuring the data sent from the
headers. - Setting the URL to send the request to.
- Setting the
ngrok URL. To get it, ensure that you have ngrok installed. Then open another tab in the terminal of your text editor and run thenpm run ngrokcommand. Then, copy theHTTPS URLlogged in your terminal and paste it appropriately in the.envfile on the root of your project folder. - Setting the authentication token by appending
Bearerbefore the access token. - Sending the request from a
try/catchblock. In case of an error, we are getting the status code and the error message and sending them to the client. If no error, we are setting the status code to200and sending the response from the request to the client.
To test it:
- We first need to implement the
timeoutURL and theresultURL. To do that we will edit thetimeout()andcb()methods as follows:
//time-out.
async timeOut(req,res,next){
    console.log("--- request timeout ----");
    console.dir(req.body);
    console.log("--- end of request timeout ---");
};

//callback.
async cb(req,res,next){
    console.log("--- callback request ----");
    let response = req.body.Result;

    if(response.ResultParameters) {
        response.ResultParameters = response.ResultParameters.ResultParameter;
    }

    if(response.ReferenceData) {
        response.ReferenceData = response.ReferenceData.ReferenceItem;
    };

    console.log(response)
    console.log("--- end of callback request ---");
};
- Ensure that your development server is running.
- In your browser, navigate to
http://localhost:4000/api-docspage, and then proceed to the/b2csection. - Click the
Try it outbutton. - Fill in the parameters as follows:
- For
AccessToken, Repeat the previous process and copy and paste the access token generated. - For
InitiatorName, copy and paste theInitiator Namefrom your test credentials page. - For
SecurityCredential, copy theSecurity Credentialfrom the test credentials page and paste it in theInitiator Security Passwordinput below and clickGenerate Credentials. Copy and paste the long generated text. - For
CommandID, select any from the dropdown. - For
Amount, enter any amount. - For
PartyA, copy and paste theShortcode 1from test credentials page. - For
PartyB, copy and paste theTest MSISDNfrom test credentials page. - For
Remarks, enter any text. Keep it short.
- For
- Click the
Executebutton. - In case of any error, revisit the steps above. Otherwise the following output should resemble your server response.
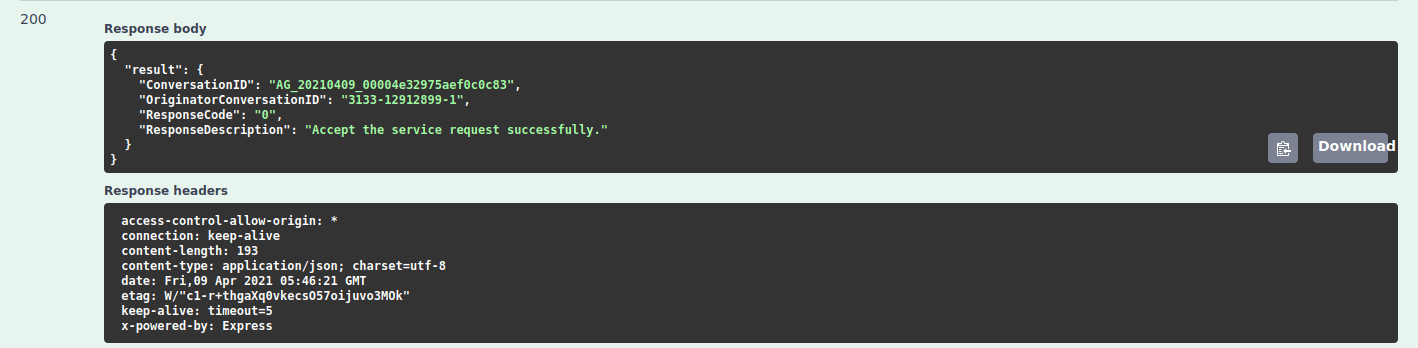
A screenshot of b2c server response.
The information logged on your console should mimic the following:
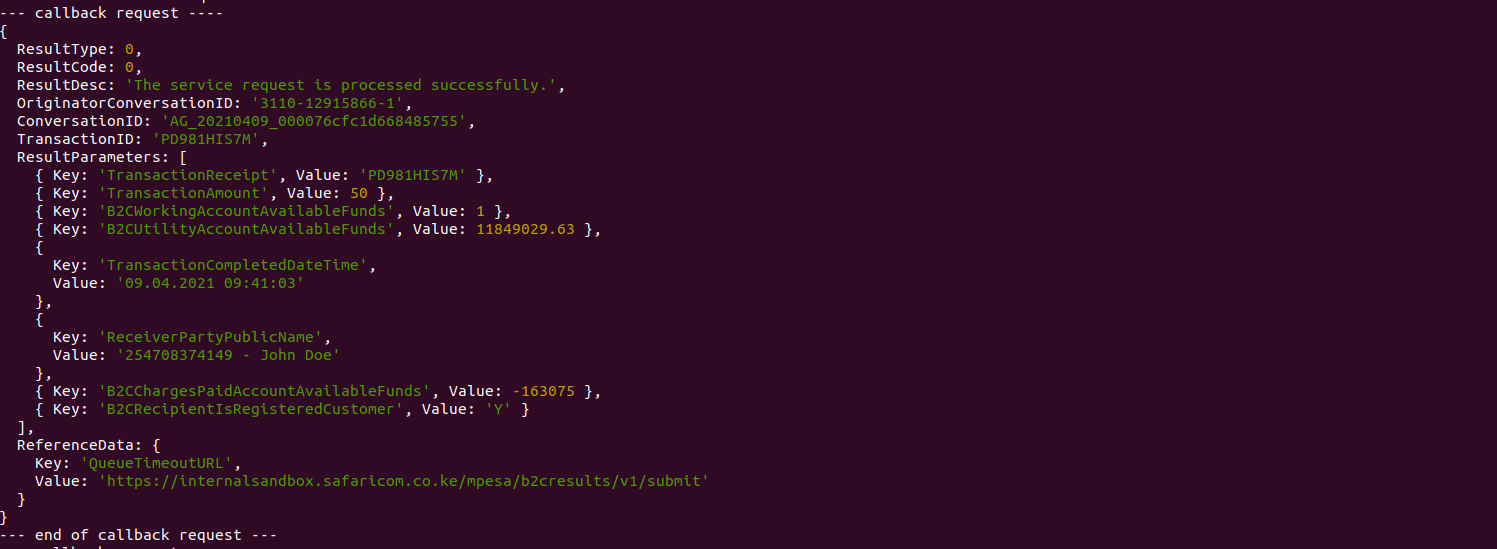
A screenshot of b2c console response
7. Conclusion
In today’s competitive business environment, business processes should be automated to lower costs. The M-Pesa B2C API offers an infrastructure to automate payments from merchants to customers.
To expand your knowledge on the covered topics, check out the following resources:
Happy coding!!