
Table of Contents
Node.js is used to develop applications ranging from a simple portfolio website to complex APIs and applications used by millions. As the size of the application grows, the risk of bugs also grows. An application is not complete until it is tested. A test can be a simple console.log to a function to see if it is working as intended.
Backend code holds all of our application’s business logic and it is important that we get it right. Deploying bug-ridden code can cost an organization millions of dollars. As Node.js is being used in critical applications all over the world, it is important we test our applications. Manual testing is tedious and prone to human error; automatic testing involves writing logic to test your code rather than testing your application’s functionality by going through each function or class manually.
There are several stages to testing an application, the most commonly accepted ones are:
- Unit Testing: Unit tests are written to test the functionality of a specific section of code, like testing a single class or a function, discussed in detail below.
- Integration Testing: In integration testing software units are grouped together and tested, it is used to detect defects in the interfaces and between integrated components. Meaning if you are exporting(module.exports) and importing(required) code in Node.js, integration testing can be done to see if they both work as intended. The problem with this type of testing is that it deals with a lot of code and it may be difficult to pin-point the cause of an error. It is usually performed after unit testing.
- System Testing: A system test is performed on a completely integrated system to verify if it meets the required needs.
- Acceptance Testing: Often, the final level of testing, where a product’s readiness is tested prior to its release to the consumer.
Below we’ll look at Unit Testing as a method of automated testing.
function addNumbers(a,b){
	return a+b;
}
console.log(addNumbers(1,2));
1. Unit Testing
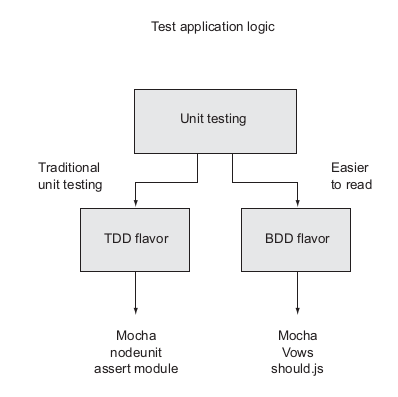
Unit testing is a type of automated testing where you write logic to test discrete parts of your application. Unit testing tests code logic directly at the function or method level and it’s applicable to all types of applications. Writing tests make you think about your application design choices and help you avoid pitfalls early. The unit-testing methodology can be divided into two major forms: test-driven development and behavior-driven development.
Unit tests
2. Unit testing with Node assert module.
The basis for most Node testing is the built-in assert module, which tests a condition and, if that condition is not met, throws an error.
Let’s look at a simple example of assertion testing.
//index.js
function addTwo(a){
  return a+2; 	//a normal function
}

function testAddTwo() {
  var x = 5;
  var x2 = x + 2;
  var x3 = addTwo(x);

  console.log("Expected "+x2+" Got " + x3);

  if (x2 === x3){
    return console.log("Passed");
  }

  console.log("Failed");

}

testAddTwo();
In the example above, we used a test case of x=5 and when we run this script, we can see on the console:
Expected 7 Got 7
Passed
3. Structuring Unit Tests
Let’s examine one way of structuring tests, AAA Pattern. A test has 3 parts or sections, Arrange, Act, Assert.
- Arrange: Initialize variables, setup necessary preconditions and inputs.
- Act: Execute the function/unit being tested.
- Assert: Assert (or check) that the value received from executing the unit is the same value that is expected.
The code above is
//index.js
function addTwo(a){
  return a+2;
}

function testAddTwo() {
	//Step 1. Arrange
  var x = 5;
  var x2 = x + 2;

	//Step 2. Act
  var x3 = addTwo(x);

  console.log("Expected "+x2+" Got " + x3);
	//Step 3. Assert
  if (x2 === x3){
    return console.log("Passed");
  }

  console.log("Failed");

}

testAddTwo();
The if condition in the code example above asserts whether the code is working correctly or not. Node.js comes with an assert module with it. Let’s do the same action using assert.
var assert = require("assert")
function addTwo(a){
  return a+2;
}
function testAddTwo(){
	var x = 5;
	var y1 = x + 2;
	var y2 = addTwo(x);
	console.log("Expected "+y1+" Got " +y2);
	try{
		assert.equal(y1,y2);
		console.log("Passed");
	 } catch (err) {
	 	console.log("Failed");
		console.log(err);
		}
	}

testAddTwo();
We can expect the following result on the console for the correct code.
Expected 7 Got 7
Passed
When we deliberately change var y1 = x + 2; to var y1 = x + 1; we see the following error message.
Expected 6 Got 7
Failed
AssertionError [ERR_ASSERTION]: 6 == 7
{
  generatedMessage: true,
  code: 'ERR_ASSERTION',
  actual: 6,
  expected: 7,
  operator: '=='
}
equal tests if the contents of a variable are indeed equal to a value specified in the second argument. Let’s look at various methods in the assert module and how we can use them.
Examples:
assert.equal(a,b,c). Throws Assertion error with optional message c, if a is not equal to b. If c is not provided then a default message is shown.assert.notEqual(a, b,c). Throws error with optional message c, if a is equal to b. Used when the generation of a certain value by application indicates a problem in logic.assert.strictEqual(a,b,c). This uses strict equality (===) rather than (==). Throws error with optional message c if a and b are not strictly equal.assert.deepEqual(a,b,c). This compares the objects. They recursively compare two objects, comparing two object’s properties and, if the properties are themselves objects, comparing these as well.assert.ok(val, mes). This can be used for testing asynchronous functions. When we use it asassert.ok(value, error_message)if the value is false then it throws theerror_message.
Examples:
 function doAsync (callback) {
	setTimeout(callback, 2000, true); // "callback" function with arguements "true"
 }

function testAsync (callback) {
	 doAsync(function (value) {
	 	assert.ok(value, "Callback should be passed true, got false");
	 	callback();  //trigger callback when done
	}) //if we deliberately change the value in doAsync to false then we can see the error.
 }
4. Mocha
Mocha is a popular JavaScript testing framework that runs on both Node.js and the browser. Mocha is simple, extensible and fast, it’s used for unit and integration testing. Mocha does not have built-in assertion so it is used with libraries like assert, chai, etc. Mocha provides easy asynchronous and synchronous testing with an easy interface.
5. Installation and Set-up
Create a new directory and initialize a node project (if you don’t already have a node project).
mkdir test-project
cd test-project

npm init -y

npm install --save-dev mocha chai
Add the test script to your package.json.
//package.json
...
{
"scripts": {
    "test": "mocha"
  }
}
...
6. Unit Testing with Mocha and Assert
Mocha follows this template for writing tests.
describe([String with Test Group Name], function() {
    it([String with Test Name], function() {
        [Test Code]
    });
});
The describe() function is used to group similar tests, grouping tests makes our test code easier to maintain. The it() contains our test code. We will use the BDD interface of Mocha. Let’s write a simple function that adds “2” to the number (same example as above).
//addTwo.js
// adds two to a number, if an array is passed adds 2 to every number, if non-number then throws error.
module.exports = function() {
	var args = Array.prototype.slice.call(arguments);
	if (!args.every(Number.isFinite)) {
    	throw new TypeError('addTwo() exprects only numbers or array of numbers')
  }
	return args.map(x => x+2);
}
Create a sub-directory called test and create a file inside the directory called testAddTwo.js(doesn’t matter). We add tests for different cases in this example.
var addt = require("../addTwo.js");
var assert = require("assert");
var expect = require("chai").expect;

describe("addTwo()", function() {
        context("Not passing any arguments", function(){
                it("should return 0", function(){
                        assert.equal(addt(), 0);
                })
        })

        context("Passing proper number", function(){
                it("should add 2", function(){
                        assert.equal(addt(1), 3);
                })
        })
        context("With an array of numbers", function(){
                it("should add 2", function(){
                        assert.deepEqual(addt([1,2,3]) ,  [3,4,5]); #comparing objects so "deepEqual"
                })
        })
        context("With non-numbers", function(){
                it("should throw error", function(){
                        expect(function(){
                                addt([1,"as", 1])
                        }).to.throw(TypeError, 'addTwo() exprects only numbers or array of numbers')
                })
        })

})
We used the chai assertion library for the last test, here we can see the areas where the assert module might just not cover it. Chai provides three assertion styles assert, expect and should – you can read about the differences and uses here.
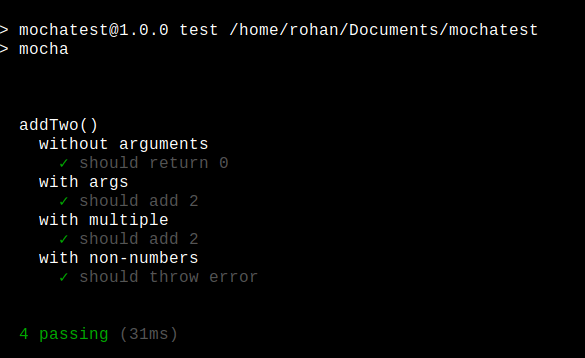
When we run the command npm test we can see the following results.
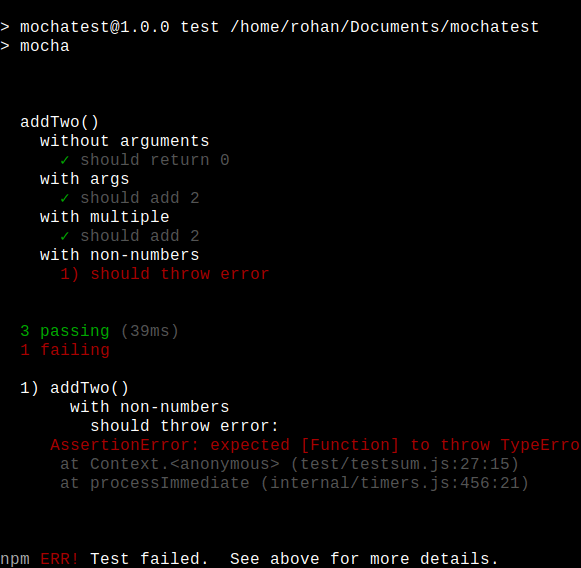
When I made changes to cause an error this was the output.
7. Testing Asynchronous Code with Mocha
Most Node.js applications use a lot of asynchronous code. Mocha also makes it easy to test asynchronous code with a very similar syntax. Here is an example of an asynchronous function using async await and callbacks taken from mochajs.org.
//callbacks
describe('User', function () {
  describe('#save()', function () {
    it('should save without error', function (done) {
      var user = new User('Luna');
      user.save(function (err) {
        if (err) done(err);
        else done();
      });
    });
  });
});

//async
beforeEach(async function () {
  await db.clear();
  await db.save([tobi, loki, jane]);
});

describe('#find()', function () {
  it('responds with matching records', async function () {
    const users = await db.find({type: 'User'});
    users.should.have.length(3);
  });
});
We have done as an argument to it(), The done() callback function is used by Mocha to tell it when an asynchronous function is completed.
8. Conclusion
When writing tests keep in mind that tests are made to make your life easier, design your tests to be simple, short and understandable.