
Table of Contents
A time ago, traditional server side rendering used to be the norm. All of the HTML was dynamically rendered on the server and sent to the client. Back in those days, websites were not user-friendly and native. Today the web consists of single-page applications and universal web-apps. Single-page applications are applications that do not reload the entire page every time we click on a link within the browser.
Instead it bundles and loads the entire JavaScript onto the client. It then renders parts of the webpage on the client-side, resulting in a fluid user-experience. React.js and Vue.js are technologies that can be used to create single page applications.
Universal applications have parts of the application already rendered by the server. This reduces initial loading times and improves Search Engine Optimization. Next.js and Nuxt.js are technologies that can be used to create universal applications.
Let us look at the differences between Node.js and Nuxt which are two important technologies used on the web.
1. Why is Node.js Needed
JavaScript is a powerful object-oriented programming language that runs within a browser. To harness the power of JS on the server-side, Node.js was created.
Node.js is a server-side JavaScript runtime environment. It is based on the Google V8 engine. Today, it is one of the most popular server-side languages for the web.
Node.js is single threaded and event driven. Node.js is not a framework, but it is an environment. There are many frameworks that are built on top of Node.js, namely Express and Koa.
It’s also preferred because front-end developers can easily jump into backend development, because they would already know JavaScript.
2. Why is Nuxt Needed
Since traditional server-side rendering fails to provide a smooth user experience, client-side rendering became the new standard for web applications.
Client-side rendering involves a single HTML file being sent to the client. Now, the entire JavaScript is downloaded and runs on the client to handle interactivity.
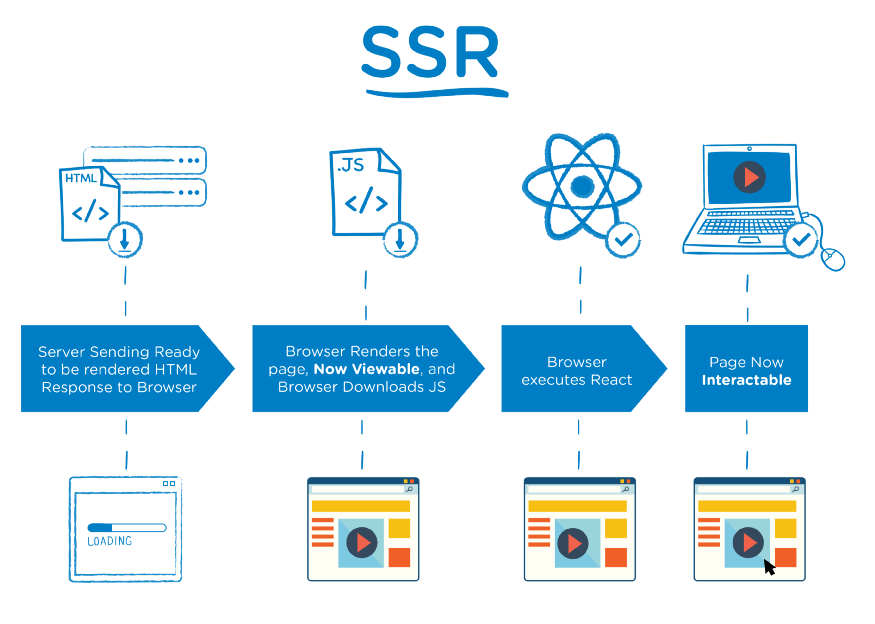
Figure: Server Side Rendering
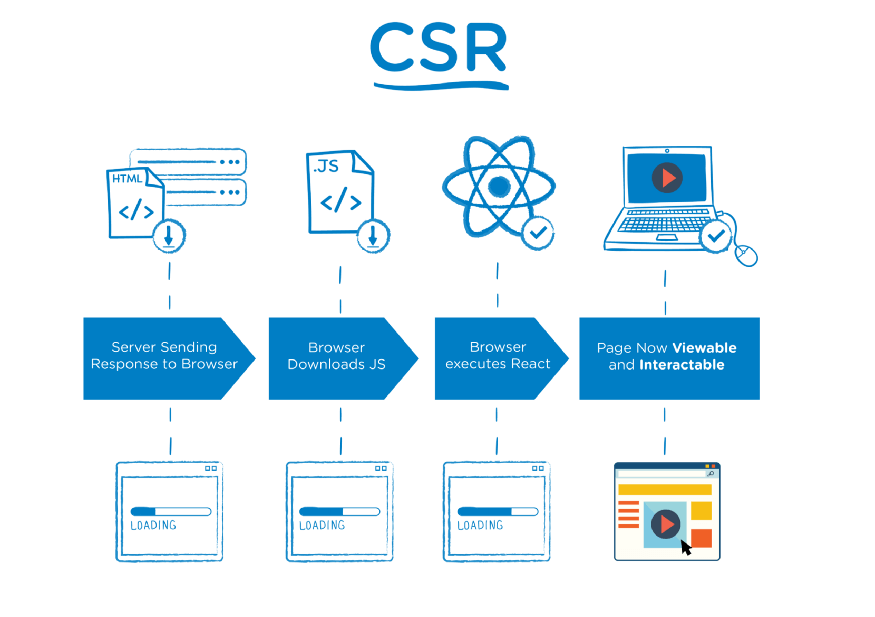
Figure: Client Side Rendering
This had a few drawbacks with Search Engine Optimization being the most crucial one. The SEO parser isn’t able to parse all the DOM elements due to that SEO took a hit.
Here, pages are rendered both on the client and the server-side. This improves SEO and the initial page load times.
Nuxt is a framework that is built on top of Vue.js. Vue.js is a front-end JavaScript framework that is used for building user interfaces. The main advantage Nuxt has over Vue.js would be its support for Universal Rendering and a pre-configured router and store.
It accelerates the development of universal web applications. It is versatile and has support for modules to enable Progressive Web App support, multi-language support and more.
3. Node.js vs Nuxt
| Node.js | Nuxt | |
|---|---|---|
| What it is? | Node.js is a server-side JavaScript runtime environment. | Nuxt is a framework used for building universally rendered web applications. |
| Primary Use | Server-side scripting, creating application programming interfaces. | Making single page applications and universally rendered applications. |
| Built on | Chrome V8 Engine | Vue.js |
| Languages Supported | JavaScript, TypeScript | JavaScript, TypeScript |
| Open-Sourced | Yes | Yes |
| When should I use? | Node.js is ideal for creating web servers and application programming interfaces. | Nuxt can be used to create performant user interfaces with server-side rendering and good SEO. |
4. Create a Node.js App
Let’s create a basic Node.js application.
- To start, create a directory called hello-node.
mkdir hello-node

cd hello-node
Next, initiate a Node.js application by using the Node Package Manager.
npm init
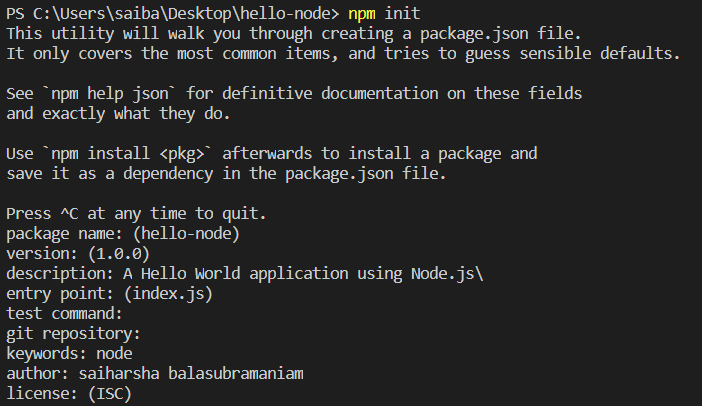
- The above command initializes a project and creates a
package.jsonfile in the current directory. The package.json file is used to manage dependencies of the application. - If you don’t want to configure the
package.json, use the following command,
npm init -y
- Create a new file
index.js. - For our script, let us install dependencies using the node package manager.
npm i emoji-random node-emoji
- Now, let’s start writing our Node.js script that prints a random emoji to the console.
// Importing process.stdin to take user input
let std_input = process.stdin;

// Importing packages
let re = require("emoji-random");
let emoji = require("node-emoji");

console.log("1. print");
console.log("2. exit");

// When data is entered into stdin, this block executes
std_input.on("data", (data) => {
  if (data != "exit") {
    let randEmoji = re.random();
    var finalEmoji = emoji.get(randEmoji);

    // Print to the console
    console.log(
      "Here is the " + randEmoji.split(":")[1] + "emoji: " + finalEmoji
    );
    process.exit();
  } else {
    console.log(data);
    console.log("exiting!");
    process.exit();
  }
});
- To run this application, type the following command.
node index.js
- Now, the application is waiting to accept user input. Enter
1to print an emoji.
Note: Your console must support Unicode in order to render the emojis correctly.
- We have created a Node.js application.
5. Create a Nuxt App
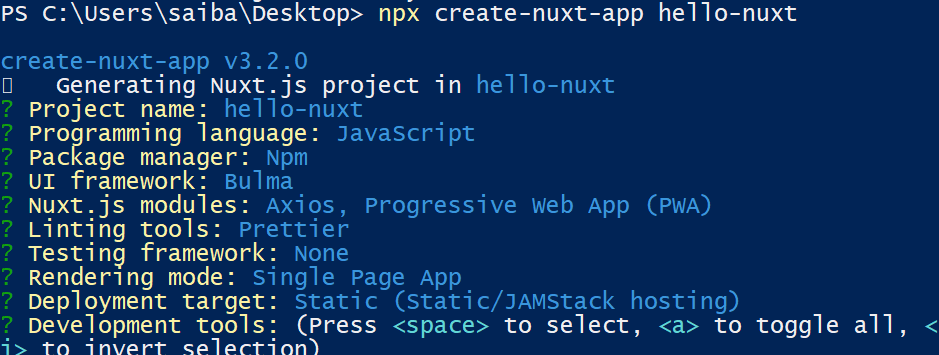
- To create a Nuxt application, we use the
create-nuxt-apputility.
npx create-nuxt-app hello-nuxt
create-nuxt-appinteractively prompts us to choose various application configuration choices such as UI framework and the application mode.- Project name – This option is to choose the name of our project.
- Programming language – We can choose from either JavaScript or TypeScript as the language of our choice. For this demo web app, choose JavaScript.
- Package manager – Here, we can choose from the yarn or the npm package manager for our Nuxt app. Let’s choose npm for now.
- UI framework – We can add a UI framework like Bootstrap or Bulma to our project. UI frameworks make it easier to create a responsive front-end for our application. Let’s choose Bulma.
- Nuxt.js modules – We can add support for API requests through the Axios module, PWA support and more. For now, let’s not select any of them.
- Linting tools – We can configure Nuxt to use formatters and linting tools. Let’s choose Prettier for code formatting.
- Testing framework – Nuxt.js has support for testing utilities like Jest. We should choose None for now.
- Rendering mode – We can set up our Nuxt application as a Universal application or a Single Page Application. Let’s choose Universal mode.
- Deployment target – This configures Nuxt to be deployed to a server or static hosting service. Let’s choose Server.
- Nuxt creates a folder structure for us and also takes care of routing. Every
.vuefile under thepagesfolder is a route. - Let’s run the application.
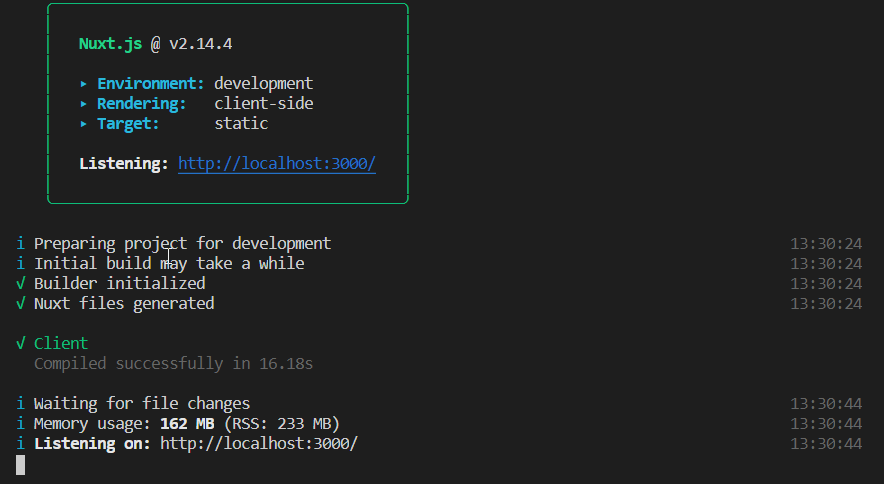
npm run dev
- The application is initialized and runs on
localhost:3000.
- The web application can be viewed on the browser.
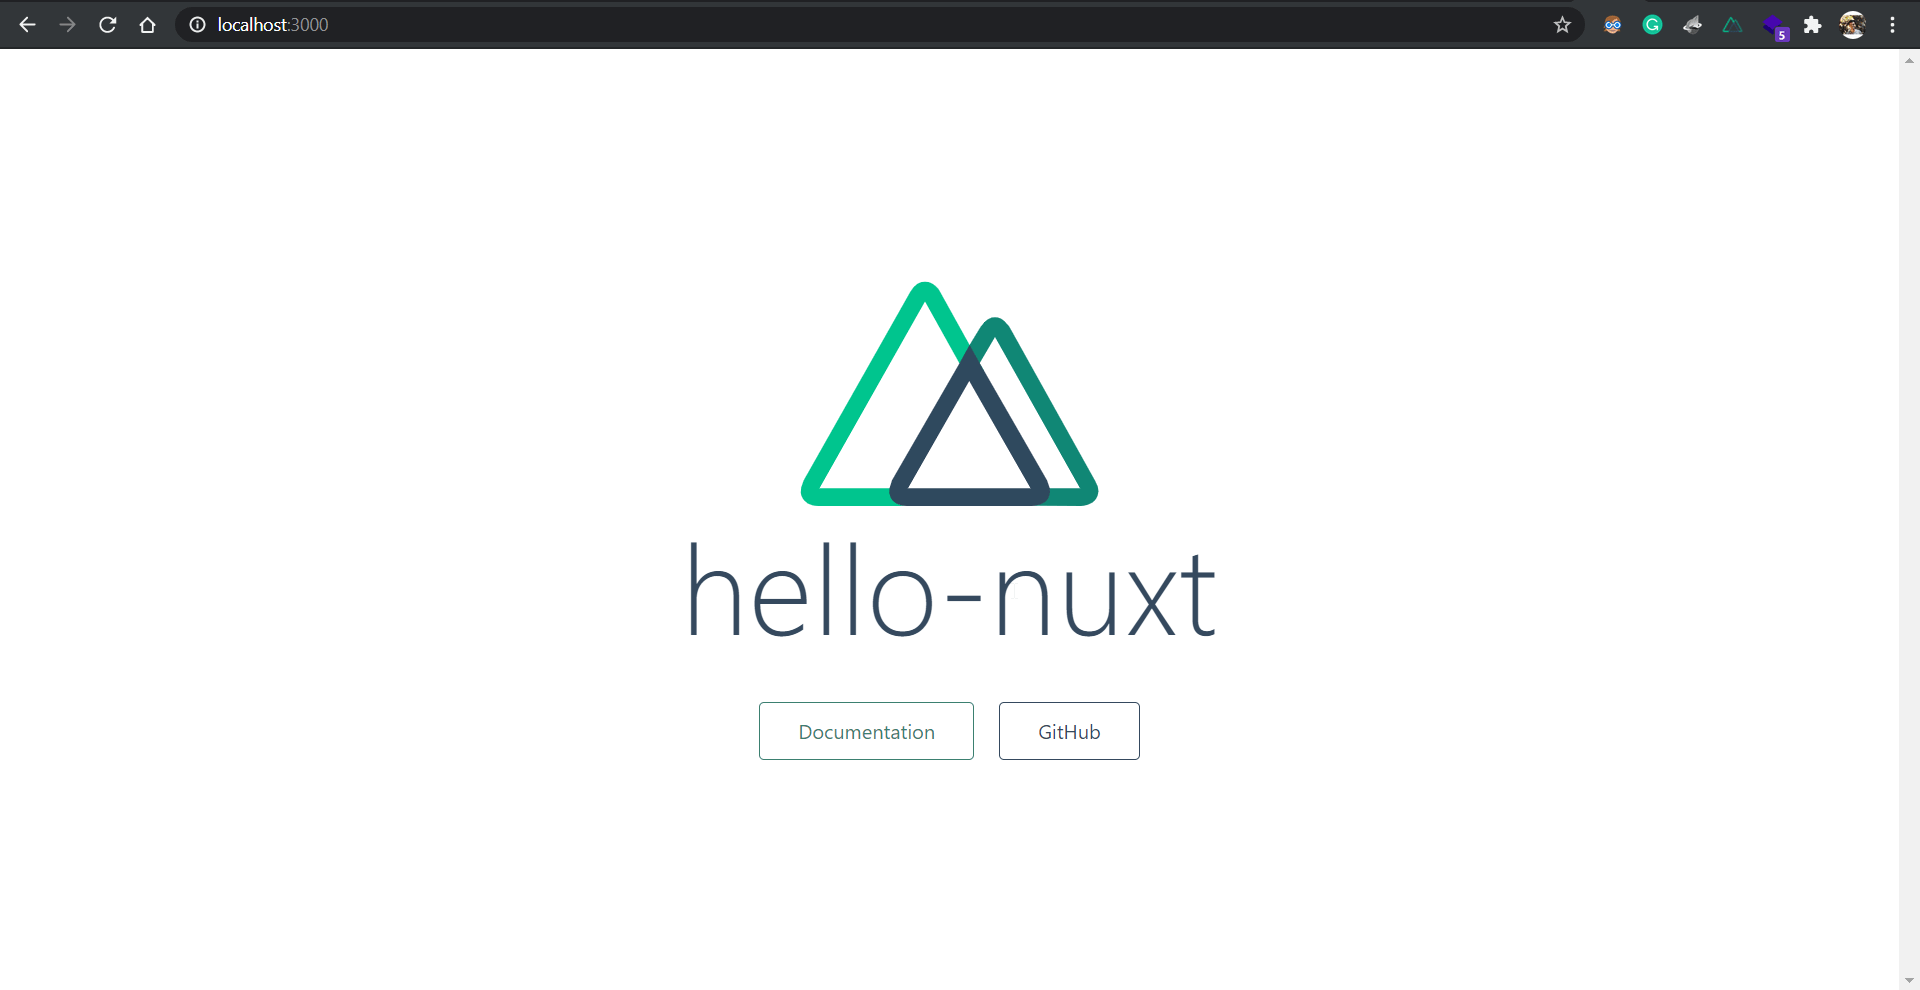
- To modify our web app, we can start editing the
pages/index.vuefile.
<!--index.vue-->
<!--The template tag contains all the page content and markup-->
<template>
  <div class="container">
    <div>
      <Logo />
      <h1 class="title">hello-nuxt</h1>
      <div class="links">
        <a href="https://nuxtjs.org/" target="_blank" rel="noopener noreferrer" class="button--green">
          Documentation
        </a>
        <a href="https://github.com/nuxt/nuxt.js" target="_blank" rel="noopener noreferrer" class="button--grey">
          GitHub
        </a>
      </div>
    </div>
  </div>
</template>

<script>
export default {};
</script>

<!--Stylesheets for this page-->
<style>
.container {
  margin: 0 auto;
  min-height: 100vh;
  display: flex;
  justify-content: center;
  align-items: center;
  text-align: center;
}

.title {
  font-family: "Quicksand", "Source Sans Pro", -apple-system, BlinkMacSystemFont,
    "Segoe UI", Roboto, "Helvetica Neue", Arial, sans-serif;
  display: block;
  font-weight: 300;
  font-size: 100px;
  color: #35495e;
  letter-spacing: 1px;
}

.subtitle {
  font-weight: 300;
  font-size: 42px;
  color: #526488;
  word-spacing: 5px;
  padding-bottom: 15px;
}

.links {
  padding-top: 15px;
}
</style>
- We’ve just created a Nuxt application.
6. Further Reading
We saw an overview of the differences between Node.js and Nuxt and created a basic application in both. For additional learning about these technologies, take a look at the links below.
- Reasons to use Nuxt for your web app
- Nuxt Documentation
- Video Tutorials on Nuxt
- Node.js Documentation
- Learn Node.js