
Table of Contents
Web applications handle data from various sources. Keeping track of these records can be challenging for administrators. AdminBro solves this issue by providing an interface to manage data from a single panel.
AdminBro is an open-source Node.js package that adds an auto-generated admin dashboard where we can manage data in a single panel in our applications. Some of its features include form validation, customization, and access control.
1. Goal
In this tutorial, we will set up a working admin interface that can be used to manage data from a single panel in a Node.js application.
2. Prerequisites
To follow along, you will need:
- A basic knowledge of JavaScript.
- Have a code editor on your system, VS Code preferably.
- Have a web browser on your system, preferably Google Chrome.
- Have Node.js installed on your machine.
- MongoDB NoSQL database installed on your system or a cloud solution such as MongoDB Atlas.
3. Setting up our project
Open your IDE and create a folder and name it Express-AdminBro. Inside this folder, set up a new project using the npm init -y command to generate a package.json file.
We require various npm modules from the npm registry:
- express: Express is a Node.js framework used for building web applications and backend APIs.
- mongoose: Mongoose is a package that connects the application to the database.
- admin-bro: AdminBro generates a UI that can be plugged into a Node.js application to manage content.
- @admin-bro/express:
@admin-bro/expressis a plugin that will help us add AdminBro to the Express application. - @admin-bro/mongoose:
@admin-bro/mongooseis the recommended Mongoose database adapter when using AdminBro. - nodemon: nodemon is a development dependency package that monitors our application changes and restarts the server.
- tslib:
tslibis a module runtime library for TypeScript with various helper functions. - express-session: This is a session middleware which we will use in our Admin panel.
Next, we will install the packages using npm.
Run the command:
npm install express mongoose express-formidable admin-bro
and the command:
npm install @admin-bro/express @admin-bro/mongoose tslib express-session
To use AdminBro with other Node.js frameworks, check the official documentation.
To start our Node.js server using Express, we will create the entry file named server.js.
Add the following code inside the server.js file.
const express = require('express');

var app = express();

app.use('/', (req, res)=> res.send("Hello World"));
app.listen(8000, ()=> console.log('Listening to Port 8000'));
This is the Express server starter code. We import the express package and create an instance for our application using const app = express(). Having created the express instance, we need to listen to the incoming request.
The app.listen() method accepts two arguments, a port number and a callback function that is executed when a connection is established.
Before starting the server, we will edit the package.json file by adding the following script:
"scripts": {
  "dev": "node server.js",
  "test": "echo \"Error: no test specified\" && exit 1"
},
To start our development server, we need to run the command npm run dev on the terminal. The application should start at port 8000. When you navigate to localhost:8000/ route (index page), you will see a Hello World output.
4. Starting the database connection
Now that we have a basic Node.js server, we will create a database connection and models using mongoose. First, let’s establish a database connection in our application.
Inside our Express-AdminBro application directory, add another folder named config and inside it, create a db.config.js file.
From here, we need to establish a connection to the database using the mongoose package:
const mongoose = require('mongoose')

const DB_URI = 'mongodb:localhost:27017/AdminBro';
//Database connection
mongoose.connect(DB_URI,
{useNewUrlParser: true, useUnifiedTopology: true});

const connection = mongoose.connection

module.exports = connection
In the code above, we established a connection to the MongoDB when the DB_URI string was passed as an argument to the mongoose object. To check the connection, we imported the connection object and used it in our server.js file.
5. Creating the MongoDB models
Mongoose is a package that manages relationships between data and provides schema validation. When using mongoose, models are defined using a Schema interface that defines fields in MongoDB documents.
Schemas will then be transformed into models using the mongoose.model() method. The model is what we use to find, create, update, and delete documents of a given type. We will create two models namely, Customer.js and Admin.js. Add a folder named models in our project for our Schemas and Admin.js file.
Here are the fields and Schema for the Admin.js file:
const mongoose = require('mongoose')

const AdminSchema = new mongoose.Schema({
    name: String,
    email: String,
    password: String
});

module.exports = mongoose.model('Admin', AdminSchema)
In the code snippet above, we have created a schema interface by importing the mongoose module. The mongoose.Schema method is instantiated to create the AdminSchema. This object takes the values that our MongoDB document will store.
The values include:
- name: This is a string property that will represent the name of the admin in the database model.
- email: A string property field to store the admin’s email.
- password: password is a field property that will be stored as a string in our database.
Next, let’s add the Customer.js file as the Customer model:
const mongoose = require('mongoose')

const CustomerSchema = new mongoose.Schema({

    CustomerName: {
      type: String,
      required: true,
    },
    CustomerEmail: {
      type: String,
      required: true,
    },

  });

module.exports = mongoose.model('Customer',CustomerSchema);
6. Creating the admin panel
Now, we need to create the Express router for handling AdminBro traffic. I will add the entire AdminBro plugin configuration in our server.js file.
Below is the entire code.
server.js
const express = require('express');

const AdminBro = require('admin-bro');
const mongooseAdminBro = require('@admin-bro/mongoose');
const expressAdminBro = require('@admin-bro/express');


app.get('/', ()=>res.send('Hello World'));

// Database
const connection = require('./config/db.config');

connection.once('open', ()=>console.log('Database connected Successfully'));
connection.on('error',()=>console.log('Error', err));

//Admin Bro and Models
const Customer = require('./models/Customer')
const Admin = require('./models/Admin')

AdminBro.registerAdapter(mongooseAdminBro)
const AdminBroOptions = {
  resources: [Admin, Customer],
}

const adminBro = new AdminBro(AdminBroOptions)
const router = expressAdminBro.buildRouter(adminBro)

app.use(adminBro.options.rootPath, router)

app.listen(8000, ()=>console.log('Listening at Port 8000'));
Let’s briefly dissect the code above:
To start the admin panel, we have to seed the admin panel with data by connecting our resource database models from the ODM (mongoose) that our app is using.
We first import the AdminBro’s database adapter for Mongoose before we register the adapter to be used in our application. Next, we pass the database to the AdminBro ({}) options object. The model paths have to be at the top of the scope before passing the options.
From here, we register the AdminBro adapter for mongoose and build a router for our AdminBro and consume it with app.use(adminBro.options.rootPath, router). Finally, we listen to incoming requests in our Node.js server at port 8000 using the app.listen() method.
Note: To implement this setup on an app that has an existing middleware stack, we need to make sure that AdminBro is the first element in the routing layers. This is because AdminBro cannot handle requests that have been transformed by other middleware.
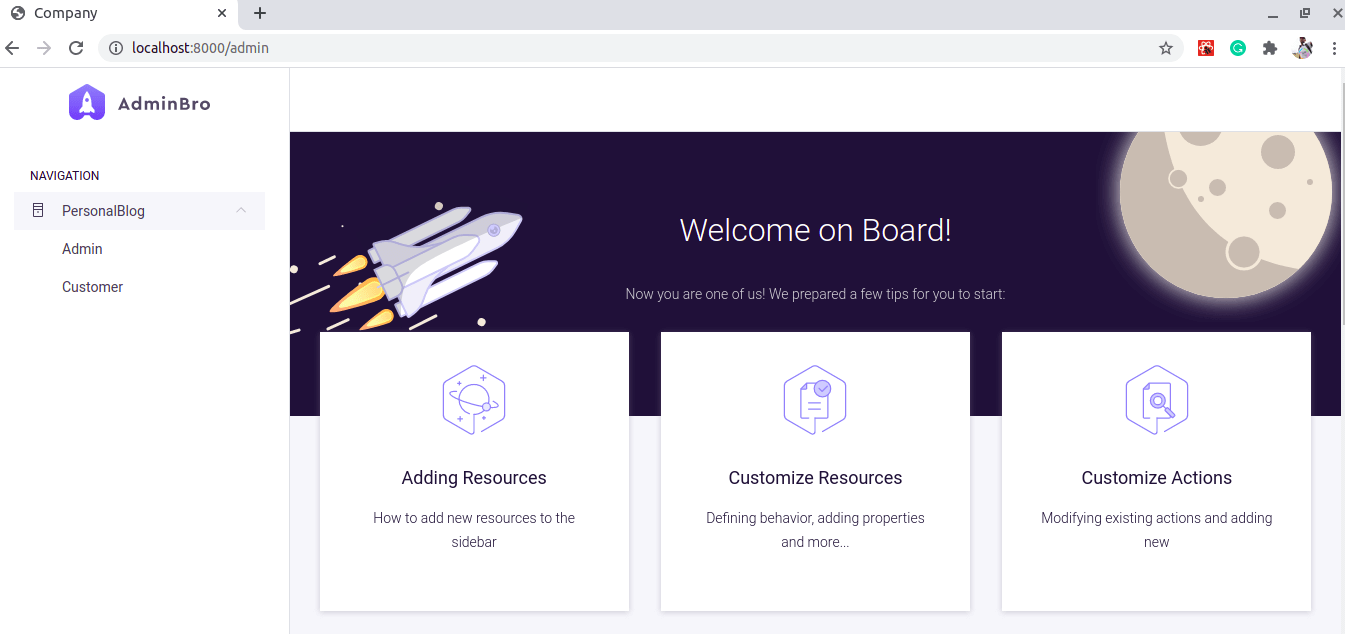
7. Start the application
At this point, we have the admin interface set up in our application. we need to ensure that our database and the express server are up and running. Open your browser and navigate to http:localhost:8000/admin endpoint for the admin dashboard:
 .
.
For the entire source code, check this github repository.
8. Conclusion
Admin Panels are great for increasing developer productivity, especially in handling database queries. However, the Node.js framework does not come bundled with one.
If you are a web developer coming from Python/Django background which has a great Admin Panel integrated, this can be a little disappointing.
By adding AdminBro to our Node.js applications, we enjoy an amazing set of features, extensibility, and various customization options.
Happy coding!