
Table of Contents
Most applications have an authentication system or a way of verifying their users. Some make use of APIs while others use other services like OAuth2, etc. Here, I will show you how to make an authentication API that will be used to verify users in a database (MongoDB) and return a JSON web token.
1. Prerequisites
- Express.js: We will be using this framework to make Node.js servers and produce APIs.
- Mongoose.js: This will help us create schemas and perform CRUD operations in the database.
- MongoDB: Our data will be saved using this database service.
2. Setting up
To set up our work environment, run the following commands in the terminal while in the project directory.
npm init : to initialize node in the package. Follow all the steps to configure details about your app.
npm i express mongoose : to add express and mongoose to your project.
npm i bcrypt jsonwebtoken nodemon: we have three new npm packages here:
- bcrypt : This will be used to hash our passwords, as we cannot save them directly for security purposes.
- jsonwebtoken : It will create and decode our JSON web tokens.
- nodemon : This is a useful tool used to restart our server whenever we make any changes in the javascript files.
Then create an index.js file in the root level of the directory. You should also ensure that the index.js file name is the same as the value of “main” property in the package.json file.
Add the following code in your index.js
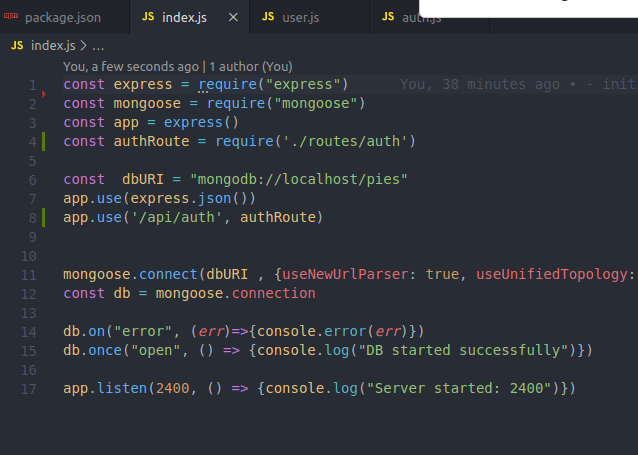
const express = require("express")
const mongoose = require("mongoose")
const app = express()

const  dbURI = "mongodb://localhost/authentication"
app.use(express.json())


mongoose.connect(dbURI , {useNewUrlParser: true, useUnifiedTopology: true})
const db = mongoose.connection

db.on("error", (err)=>{console.error(err)})
db.once("open", () => {console.log("DB started successfully")})

app.listen(2400, () => {console.log("Server started: 2400")})
We first import the express and mongoose modules. Then we initialize the app as an express application using the express() method.
app.use(express.json()) makes sure the server can receive json as a request body.
Using mongoose, we connect the server to mongoDB using the mongodb:// uri. Then we listen to the connection with the database.
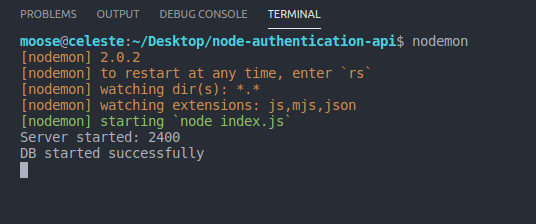
The server then listens to port number 2400 for any incoming requests. Once you run nodemon, you will have a result similar to the one below.
Next, we can create a user schema/model to define how our user objects will be structured in the database. So go ahead and create a folder known as models and within it, a file called user.js and add the code below.
const mongoose = require('mongoose')

const model = mongoose.Schema({
    email: {
        type: String,
        required: true
    },
    password: {
        type: String,
        required: true
    }
});

module.exports = new mongoose.model("User", model)
Here, we import the mongoose module and use it to create our user schema. The schema “model” has two fields, name and passwords, which are of type “String”. The id of the schema is not necessary as mongoose automatically creates one if there is none. In the last line, we export the mongoose schema with the name “User”.
Next, we create the routes in the server (i.e the endpoints). So now in the root directory, add a folder named routes and add a javascript file known as auth.js. In the auth file, we can create routes as below…
const express = require('express')
const router = express.Router()
const User = require('../models/user')

router.get('/login', (req, res) => {

});

router.post('/signup', (req, res) => {

});

module.exports = router
The express router module will help us to create router handlers and even manage to add our own middleware. We have two endpoints/routes. One for login and one for signup. We also have to set up routing in our server’s entry point. To do this, make changes in the index.js to look like the one below.
With that, the complete urls will be:
login– http://localhost:2400/api/auth/loginsignup– http://localhost:2400/api/auth/signup
Now, let’s start with signup (i.e. registering users). This is a post method where we will be receiving the user email and password from the request body. From here, we will hash the user password and save it with the email in the database.
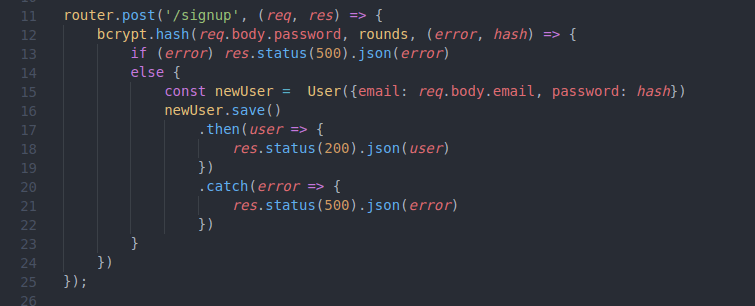
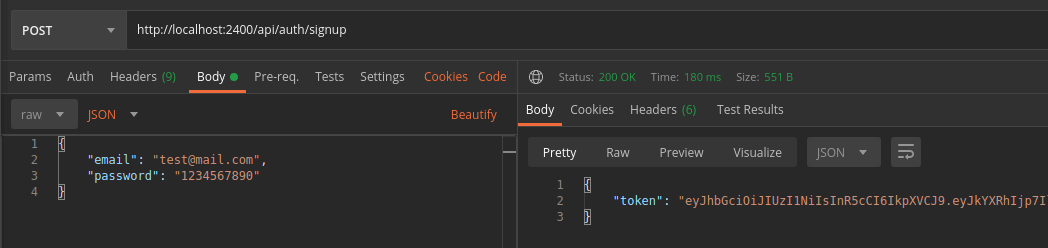
As you can see in the signup route, we import the bcrypt module. Then we use it to hash the password from the request body using ten salt rounds. Then we save the hashed password and email to our database using the mongoose method save(). This method returns a promise, and we send the response accordingly. Below is an example of a signup request made with postman.
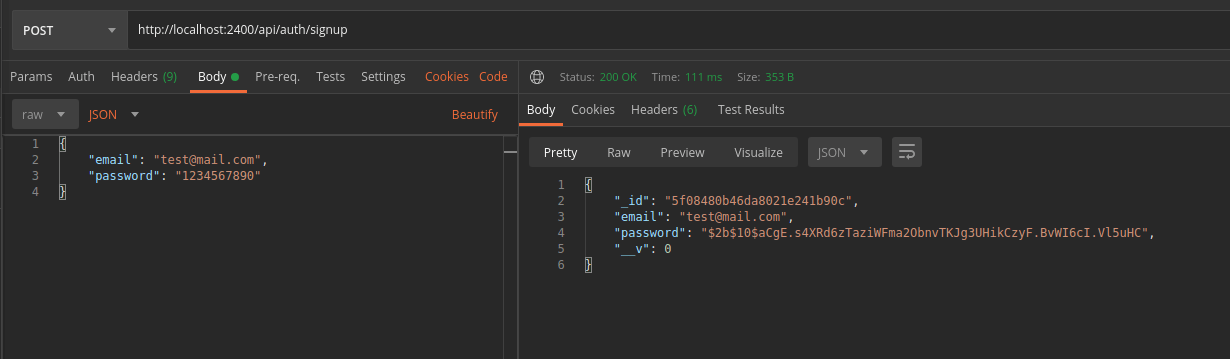
As you can see, mongoose has automatically generated an id for us. Next, we have to create a JSON web token after the signup process. We will use the user object returned as our payload.
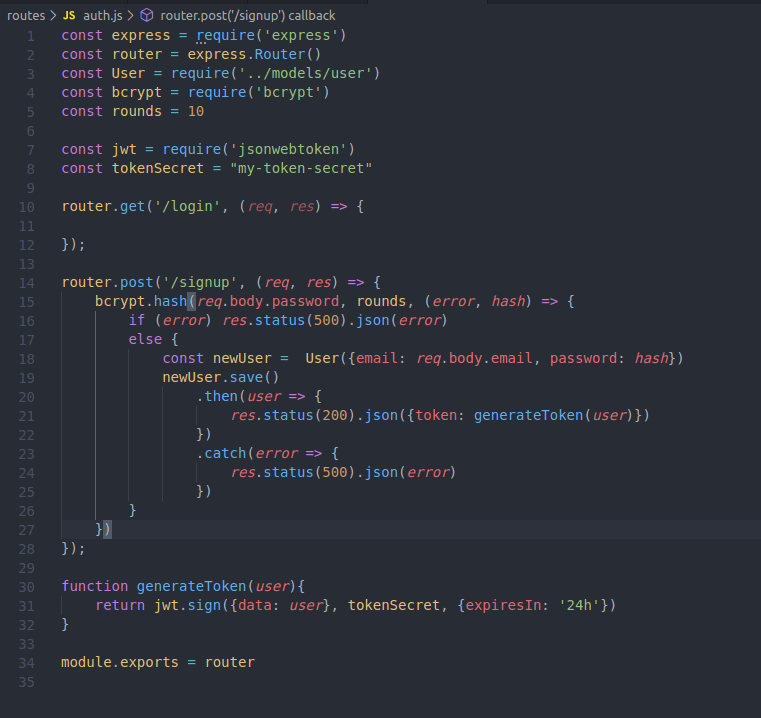
In the above code, we import the jsonwebtoken module and create a variable known as tokenSecret which will be used to decrypt and encrypt our payloads. Then we create a function called generateToken which will be used to create the JSON web token and return it. This token will be the one displayed as the return of the request. It also has an expiry duration of 24hrs, you can add a different one like 2 days, 60 * 60 (1 minute), etc.
Next, we move to the login route. In this route, we look for the user in the database, then we compare if the password in the database matches the one provided in the request body. If they all match, we can generate new JSON web tokens to be used. Add the following code to the login route.

In the login route, we first look for the record that matches the email. If there is no record, the method returns undefined and we handle the error using a 404 code. Then we proceed to compare the two passwords and if they match, then we send a success response containing the token.
We can add middleware to check and verify our JSON web token. First, we create a file middleware.js in the project’s root directory. Then we add the following code.
const jwt = require('jsonwebtoken')
const tokenSecret = "my-token-secret"

exports.verify = (req, res, next) => {
    const token = req.headers.authorization
    if (!token) res.status(403).json({error: "please provide a token"})
    else {
        jwt.verify(token.split(" ")[1], tokenSecret, (err, value) => {
            if (err) res.status(500).json({error: 'failed to authenticate token'})
            req.user = value.data
            next()
        })
    }
}
Here we export a function known as verify which checks for the availability of the token in the request. Then it decodes it and we add a value known as user in the request so that we can use it later in search queries or manipulation. We import this module in our auth.js file for us to access the exported methods. We use this verify method as middleware in our request. It is executed before the rest of the request block and with this, we can add it to other requests to verify the JSON web token.

And that’s it. Congratulations on your first Authentication! You can use it to authenticate tokens and provide a basic authentication system. You can access the full code on GitHub.