
Table of Contents
In this Node.js tutorial, we will learn about HTTP/2 and server push, how it works, and its impact on performance. We will use Node.js to build our HTTP/2 server.
The HTTP protocol has been the foundation of internet communication for a long time. Its architecture is mainly based on the Client/Server model. What web applications have you built where load times suffer when waiting for assets to load and pushing them ahead of time would help?
This is what HTTP/2 aims to solve, improving web efficiency. It was released in 2015 with improved features to address the HTTP/1 (version one) limitations. It uses methods such as compression, multiplexing, and prioritization.
All to overcome the HTTP overheads. Let’s begin!
1. Prerequisites
To follow along with this tutorial – the reader will need the following:
- A basic knowledge of JavaScript programming is essential.
- You need a text editor installed on your system. My favorite is VS Code.
- Install a browser such as Google Chrome on your system.
- Have Node.js installed on your machine.
2. A brief on HTTP/2 and Server Push
HTTP/2 will make our web applications feel faster, be simpler, and make them more robust. It uses new technologies such as multiplexing connections to take away the web’s performance bottleneck.
The primary goals of HTTP/2 include:
- Reducing overheads by compressing the server request headers.
- Performing full request and response multiplexing over a single HTTP or TCP connection.
- Using HTTP/2 Server Push and client caching.
Check more about this here. Server push is what bundles our assets for a single client request into one HTTP/2 response. Instead of waiting for the browser to first load the HTML and determine which assets to download, we can push all the assets to the browser ahead of time.
Under the hood, all the streams are initiated via PUSH_PROMISE containing HTTP headers of the promised resource. This will signal the server to push the described resources to the client ahead of the response time thus avoiding duplicate requests.
3. Setting up our project
First things first, create an http2-server-push folder and open it on your IDE. In the root of the http2-server-push folder, run the command npm init -y to set up a new project by generating an initial package.json file.
Our project will use two dependencies from the npm registry:
express: Express is a Node.js framework for building web applications and backend APIs.spdy: spdy is an express compatible module that creates HTTP/2 enabled servers in Node.js.nodemon: nodemon is a development dependency module that will automatically restart our Node.js server.
To install these packages using npm.
Run the command: npm install express spdy
For the devDependency nodemon package add it using the command: npm install -D nodemon
Most of the browsers will not support server push functionality unless it is done from a secured server. Therefore, we will generate a key and a certificate for our application.
Run the following command to generate an SSL certificate:
openssl req -x509 -sha256 -nodes -days 365 -newkey rsa:2048 -keyout server.key -out server.crt
For all prompts, click enter to leave all the fields empty. The command will create a server.crt and server.key files. In our Node.js server script, we will read from server.key and server.crt files.
Add this npm nodemon server launch script in the package.json for auto-reloading:
  "scripts": {
    "devStart": "nodemon server.js",
  },
Our project structure now looks like:
/http2-server-push
  node_modules/
|--- server.crt
|--- server.key
package.json
package.lock.json
4. Implementing HTTP/2 and Server Push using Express and spdy
Import the dependencies. Create the entry index.js file in the root of our folder (see project structure above).
Add the following Node.js script inside the index.js file:
const spdy = require("spdy")
const express = require("express")
const fs = require("fs")
const {promisify} = require("util")

const readFile = promisify(fs.readFile)

const app = express()

app.use(express.static("public"))

app.get("/push", async (req, res) => {
  try {
    if(res.push){
      [
        "/app.js",
        "/styles.css",
        "/images/image.png"
      ].forEach(async (file) => {
       res.push(file, {}).end(await readFile(`public${file}`))
      })
    }

    res.writeHead(200)
    res.end(await readFile("index.html"))
  }catch(error){
    res.status(500).send(error.toString())
  }
})

spdy.createServer(
  {
    key: fs.readFileSync("./server.key"),
    cert: fs.readFileSync("./server.crt")
  },
  app
).listen(8000, (err) => {
  if(err){
    throw new Error(err)
  }
  console.log("Listening on port 3001")
})
Let us now dissect the codeabove:
- Using the
spdymodule, we create a new HTTP/2 server. - We import the express package and instantiate a new express application.
app.use(express.static("public"))is a middle that serves static files from thepublicfolder.- Our express server needs to serve the requested
index.htmlfile when we navigate and hit the “/” endpoint while pushing all the other files from thepublicfolder such as images, scripts, and stylesheets. spdy.createServeris a method that is called to create our HTTP/2 server and listen for incoming requests atport 3001. It takes an instance of our app and the other as options object with our server key and certificate.
Next, we need to run the node server. Open your browser and the developer tools and go to the Network tab. In our application, we are using a self-signed certificate to set up the TLS and hence the browser will show a warning.
We need to get past this by clicking advanced and proceed with the site. Now let’s go to https://localhost:3001 where our HTTP/2 server is running.
Under the Network tab, we see that all our requests for our scripts, images, and stylesheets will be received as “Push” from the server.
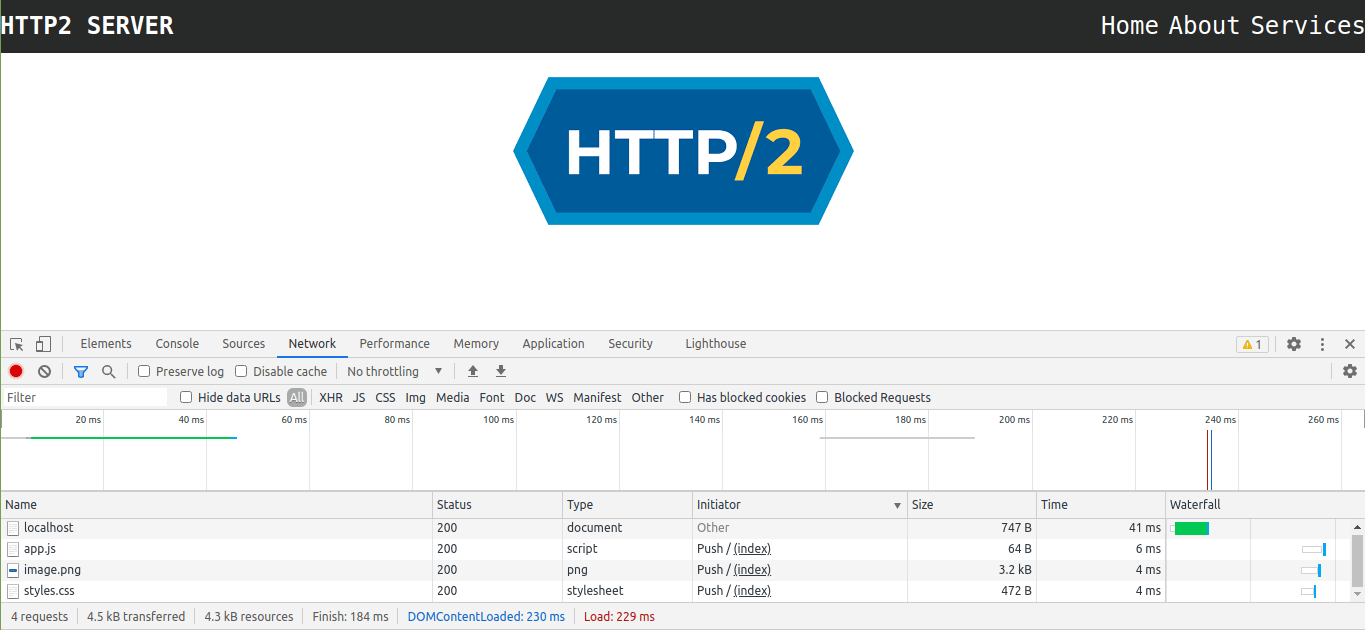
The logical flow of our application is like:
- The client/browser will request the HTML document file.
- This request is received by our backend server which processes the request before sending back the HTML document.
- When sending the
/index.html, the server identifies more resources such as/app.js,/styles.css, and/images/image.pngneeded so that our index file is rendered correctly. So the server will also push those files along with the/index.htmlfile. - The browser will then render the page using the HTML document and its associated resources.
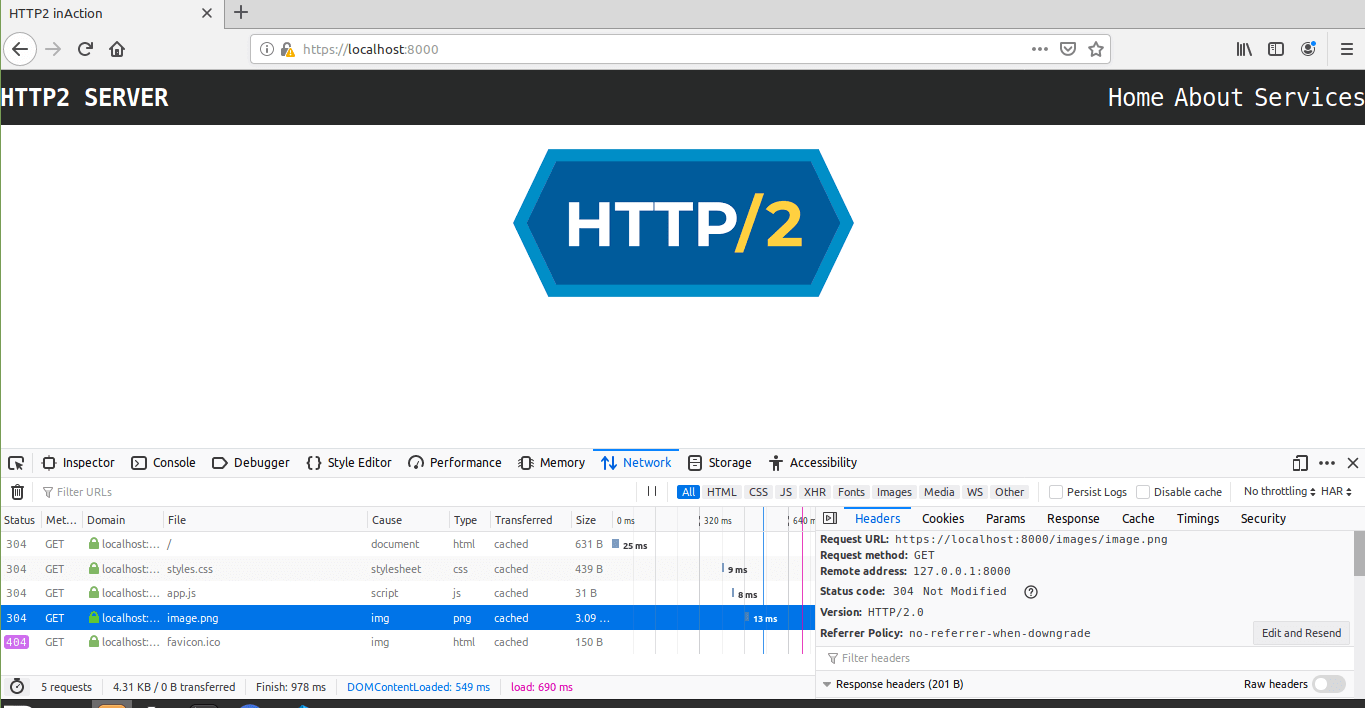
Still, under the browser developer tools, we can confirm that our application is using version 2 of the HTTP protocol.
5. Conclusion
Everyone knows the significance of improving the speed of our web applications. With minimal code, we’ve implemented a simple Node.js server with HTTP/2 and server push. HTTP/2 is becoming the new web standard with its great features that constantly improve web efficiency while simplifying the development hassle.
With features such as server push that enables us to send assets before even waiting for client requests, page load, and latency are greatly improved. Check the source code on my Github repo.
Happy coding!