
Table of Contents
One of the main problems a developer faces during media upload is a quick image and video manipulation and delivery optimization. This can be solved by the use of artificial intelligence (AI) which not only does it do both of these but also automates the process. Cloudinary is a good example of this service.
You can access and upload images to Cloudinary servers remotely on a custom website, locally (using Node.js or Django), or on the Cloudinary webpage.
Cloudinary supports many language formats such as Ruby, PHP (v1 and v2), Python, Node.js, Java, .NET, iOS, and even Android.
Take a look at some of the framework integrations here.
1. Cloudinary SDKs
| Client-Side SDKs | Server-Side SDKs | Mobile SDKs |
|---|---|---|
| React | PHP SDK | Android |
| Angular | Ruby on Rails | Kotlin |
| Vue.js | Django | iOS |
| JavaScript | Go | – |
| jQuery | Java | – |
| – | Node.js | – |
| – | .Net | – |
You can find a comprehensive guide or tutorial on how to upload images to Cloudinary using Django here. I highly recommend it for Python developers.
In this tutorial, we are going to learn how to upload an image to Cloudinary using Node.js.
2. Key takeaways
At the end of the tutorial, you will have learned about:
- Getting started with Cloudinary.js.
- Integrating Cloudinary.js in a Node.js application.
- Uploading an image to Cloudinary.
3. Pre-requisites
The basic requirements for this tutorial are:
- Web development basics.
- A basic IDE installation on the machine. In our case, we will be using Visual Studio Code (free, easy to use, and very efficient).
- Node.js basics.
- A stable internet connection.
4. Create an account
Cloudinary provides developers with a free account option. Some of the advantages of this account are mentioned in the blog found here.
Once created proceed to the next steps.
5. Setting up our project
Create a new directory named Cloudinary-uploader. Within the folder, create two new files, index.js and .env respectively. Open your folder and view it in your IDE.
Open an integrated terminal and within the folder run npm init -y to quickly create the package.json file. Install the needed libraries for our project.
These will include:
- nodemon
- cloudinary
- formidable
- dotenv
- express
The formidable.js library was made to focus on video and image uploading and encoding. It is used for parsing form data, mostly file uploads.
To install all at once, run:
npm i nodemon cloudinary dotenv formidable express
npm i nodemon cloudinary dotenv formidable express
The dotenv.js library will enable us to easily and quickly load environment variables from a locally stored .env file into
process.env.
This will provide safety when working with the API names and keys in any Node.js project since they are stored away from the main process and are only available when required. It provides safety and security using The Twelve-Factor App methodology.
You can learn more about Environment Variables in Node.js, what are .env files, and how to work and configure them here.
Once done you can update any of the packages which were initially installed by running npm update in the integrated terminal.
6. Folder structure
Our folder structure is as shown below:
├──  node_modules (folder)
├──  .env (file)
├──  package.json (file)
└──  index.js (file)
7. Configure package.json
Open our package.json file and under the “scripts” section, add start and dev as shown in the code below:
{
    "name": "Cloudinary-uploader-Node.js",
    "version": "1.0.0",
    "description": "In this repository, you will find code that will enable you to easily upload your images to Cloudinary. It is under MIT License. You can clone and modify it for your use.",
    "main": "index.js",
    "scripts": {
        "start": "node index.js",
        "dev": "nodemon index.js",
        "test": "echo \"Error: no test specified\" && exit 1"
    },
    "repository": {
        "type": "git",
        "url": "git+https://github.com/RisoriTofa/Cloudinary-uploader-Node.js.git"
    },
    "keywords": [],
    "author": "",
    "license": "ISC",
    "bugs": {
        "url": "https://github.com/RisoriTofa/Cloudinary-uploader-Node.js/issues"
    },
    "homepage": "https://github.com/RisoriTofa/Cloudinary-uploader-Node.js#readme",
    "dependencies": {
        "cloudinary": "^1.25.1",
        "dotenv": "^8.2.0",
        "express": "^4.17.1",
        "formidable": "^1.2.2",
        "nodemon": "^2.0.7"
    }
}
The scripts in the package.json file will specify custom scripts that one can run using npm. For more information on scripts, please visit this page.
In case you want to do some unit testing, you can specify the testing framework under the ‘test’ script.
You can run the index.js file using Node.js by running:
node index.js
Or nodemon by running:
nodemon run dev
In case you obtained the code from a repository, it shall add additional repository configurations indicating where the code is from and where to report any arising issues.
8. Setting up our starting point
Inside the index.js file, we shall do the following in a sequential process:
- Requiring modules for this project.
These are shown in the code below:
// Required modules
const http = require('http');
const util = require('util');

// https://github.com/node-formidable/node-formidable
const Formidable = require('formidable');

//https://www.npmjs.com/package/dotenv
const cloudinary = require("cloudinary");
require('dotenv').config()
- Setting up our Cloudinary configuration. In it, we shall set three parameters that are stored in the
.envfile. These include the Cloud name (CLOUD_NAME), our API key (API_KEY), and the API secret (API_SECRET).
This is shown in the code below:
// Cloudinary configuration settings
// This will be fetched from the .env file in the root directory
cloudinary.config({
    cloud_name: process.env.CLOUD_NAME,
    api_key: process.env.API_KEY,
    api_secret: process.env.API_SECRET
});
- We shall create a simple Node.js server to run our project in it. In this server, we shall call on a cloudinary function named
uploadto fetch the image in the path selected and to upload it into our cloudinary account. We shall then display the results both in the terminal and in the browser as plain text when the request inside our URL is/uploadand apostmethod is used. This is the uploaded file’s metadata.
This is shown below:
//Create a server
http.createServer((req, res) => {
    if (req.url === '/upload' && req.method.toLowerCase() === 'post') {

        // parse a file upload
        const form = new Formidable();

        form.parse(req, (err, fields, files) => {

            // Find Cloudinary documentation using the link below
            // https://cloudinary.com/documentation/upload_images
            cloudinary.uploader.upload(files.upload.path, result => {

                // This will return the output after the code is exercuted both in the terminal and web browser
                // When successful, the output will consist of the metadata of the uploaded file one after the other. These include the name, type, size and many more.
                console.log(result)
                if (result.public_id) {

                // The results in the web browser will be returned inform of plain text formart. We shall use the util that we required at the top of this code to do this.
                    res.writeHead(200, { 'content-type': 'text/plain' });
                    res.write('received uploads:\n\n');
                    res.end(util.inspect({ fields: fields, files: files }));
                }
            });
        });
        return;
    }
- Let us now set our program to return a webpage when it is run. The page shall be formatted with some CSS, bootstrap and Google fonts. It shall contain a heading, file, and button elements inside the body tags. We shall also set our port number to “5000” so that we can access the webpage at
localhost:5000.
This is shown here:
    // show a file upload form
    res.writeHead(200, { 'content-type': 'text/html' });
    res.end(`
            <!doctype html>
            <html lang="en">

            <head>
                <title>CLOUDINARY UPLOADER</title>
                <!-- Required meta tags -->
                <meta charset="utf-8">
                <meta name="viewport" content="width=device-width, initial-scale=1, shrink-to-fit=no">

                <!-- Bootstrap CSS -->
                <link rel="stylesheet" href="https://stackpath.bootstrapcdn.com/bootstrap/4.3.1/css/bootstrap.min.css" integrity="sha384-ggOyR0iXCbMQv3Xipma34MD+dH/1fQ784/j6cY/iJTQUOhcWr7x9JvoRxT2MZw1T" crossorigin="anonymous">

                <!-- Custom CSS -->
                <style>
                    @import url('https://fonts.googleapis.com/css2?family=Montserrat:wght@500&display=swap');
                    * {
                        font-family: Montserrat;
                    }
                </style>
                </head>

            <body>

             <!-- Optional JavaScript -->
              <!-- jQuery first, then Popper.js, then Bootstrap JS -->
             <script src="https://code.jquery.com/jquery-3.3.1.slim.min.js" integrity="sha384-q8i/X+965DzO0rT7abK41JStQIAqVgRVzpbzo5smXKp4YfRvH+8abtTE1Pi6jizo" crossorigin="anonymous"></script>
             <script src="https://cdnjs.cloudflare.com/ajax/libs/popper.js/1.14.7/umd/popper.min.js" integrity="sha384-UO2eT0CpHqdSJQ6hJty5KVphtPhzWj9WO1clHTMGa3JDZwrnQq4sF86dIHNDz0W1" crossorigin="anonymous"></script>
             <script src="https://stackpath.bootstrapcdn.com/bootstrap/4.3.1/js/bootstrap.min.js" integrity="sha384-JjSmVgyd0p3pXB1rRibZUAYoIIy6OrQ6VrjIEaFf/nJGzIxFDsf4x0xIM+B07jRM" crossorigin="anonymous"></script>

             <!-- Main Container -->
             <div class="container">

                    <!-- Header -->
                    <br>
                    <h1 class="text-center">CLOUDINARY UPLOADER</h1>
                   <hr>
                    <p class="text-secondary">This is a simple image uploader system!</p>
                   <hr>
                    <!-- Header end.//-->

                   <!-- Form-->
                   <form action="/upload" enctype="multipart/form-data" method="post">

                         <div class="form-group">
                              <label for="upload-image-file"></label>
                              <input type="file" class="form-control-file" name="upload" id="upload" placeholder="upload-image-file" aria-describedby="fileHelpId">
                              <small id="fileHelpId" class="form-text text-muted">Please select the image to be uploaded...</small>
                          </div>

                         <button type="submit" class="btn btn-primary" value="Upload">Upload</button>

                  </form>
                  <!-- Form end.//-->
                </div>
             <!--container end.//-->
            </body>

        </html>
  `);
    // Port number
}).listen(5000);
9. Configure the .env file
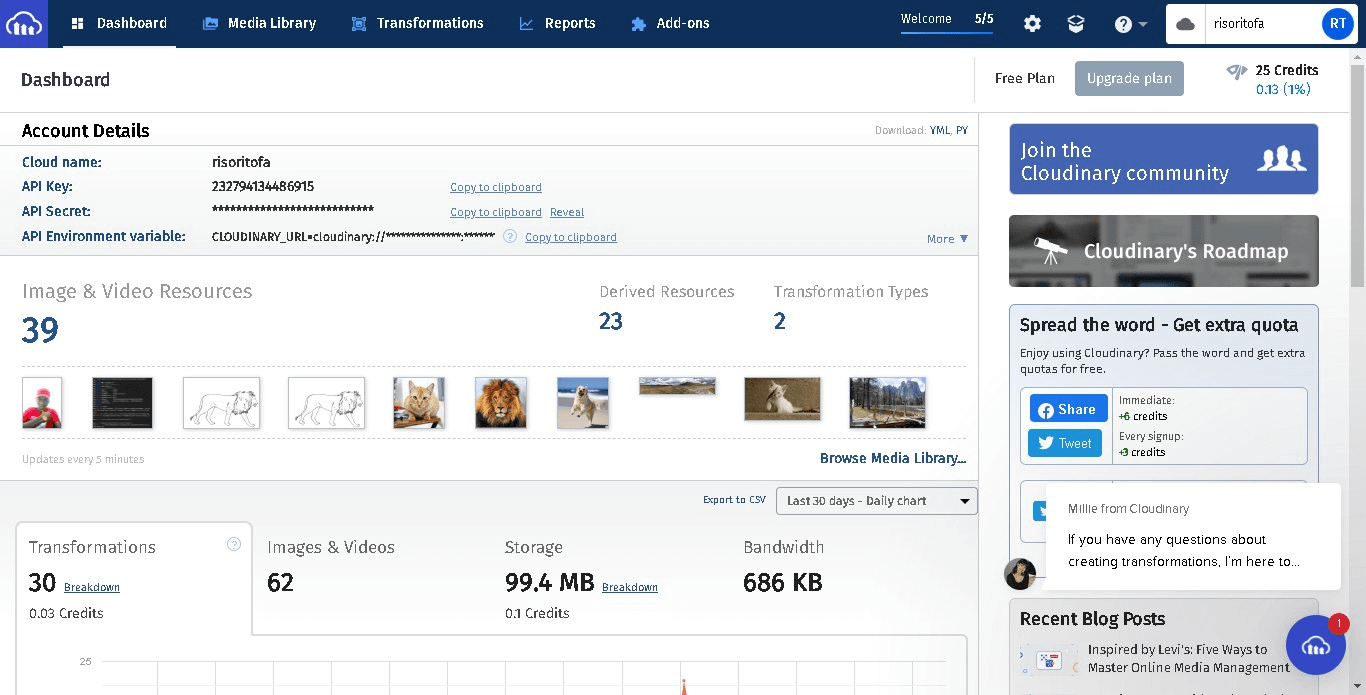
Open the “.env” file. In it, let’s set up our cloudinary name, API key, and API secret. These are all found in the Cloudinary dashboard as shown below:
Note: Remember that these are important credentials that allow one to easily access your Cloudinary account. Make sure that they are not exposed anywhere. Don’t save them in an online repository by any means. I would rather recommend that you add a
.gitignorefile and include the.envfile there. Always enable GitGuardian to check for any exposed keys in your project.
The .env file format will be as shown:
CLOUD_NAME=
API_KEY=
API_SECRET=
Copy and paste the credentials directly from your dashboard into the file. Save the file.
10. Run the code
Now you can proceed to run the code.
This can be done by running the command below on the terminal:
your code here
nodemon run dev
Open a web browser and in the URL, access the webpage through localhost:5000.
It will look like this:
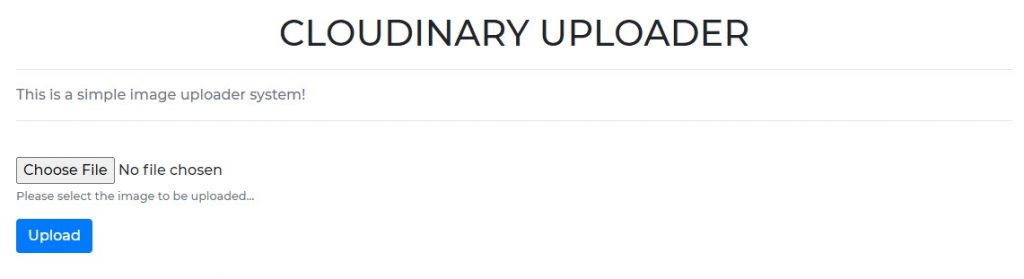
Select the image by pressing the “Choose File” button then upload it by clicking on the “Upload” button.
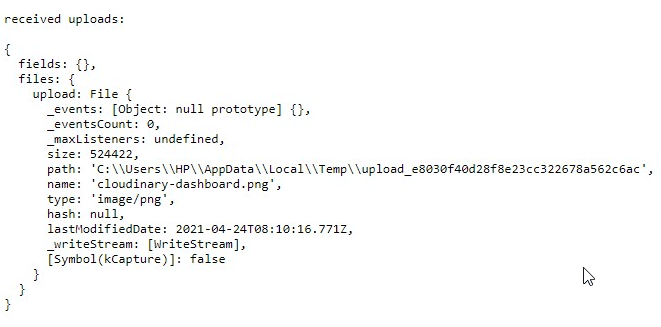
If successful, it shall display as shown below. The metadata will change depending on the file uploaded.
Open your cloudinary site and sign in. Under the dashboard, view the uploaded image. You can manipulate it as you please using the onboard AI.
Cloudinary automatically assigns each file uploaded (whether image or video) a unique public_id by default. This can be changed as documented in the documentation found here.
You can find the code in this repository.
Well done, you have successfully uploaded an image to your Cloudinary account using a simple Node.js program!
11. Conclusion
We have acquired the following knowledge from this tutorial:
- What is Cloudinary.
- Languages and frameworks supported.
- How to upload images to Cloudinary using Node.js.
- Brief introduction to what
.envfiles are and their purposes.
Happy coding!
12. Further projects
You can further your project by doing the following:
- Setting default cloudinary AI editing to each file as it is uploaded.
- Uploading and viewing the uploaded images in other languages and SDKs.
- Set each file to be uploaded using their real name and not a public_id in Node.js as documented here.