
Table of Contents
- 1. Goal
- 2. Prerequisites
- 3. Application packages
- 4. The application structure
- 5. Setting up the project
- 6. Setting up the server
- 7. Test if the server is working
- 8. Setting up the routes
- 9. Setting up the controllers
- 10. Linking the controllers to the routes
- 11. Setting up the views
- 12. Linking the views to the routes
- 13. Testing the application
- 14. Conclusion
REST stands for REpresentational State Transfer. It allows you to create a data object, send the state of that object to the server and return the values of that object. REST is a set of design criteria rather than the physical structure (architecture). It uses “representations” of resources (data) to transfer a resource state from a server to the application state on the client-side.
API stands for Application Programming Interface. It is the communication language between two software programs. An API uses an agreed-upon data format to send requests and responses back and forth between programs. It defines the communication rules and procedures between two programs. This helps in the formation of a point of contact (an endpoint) between these programs.
An API that applies the REST style is referred to as RESTful. A RESTful API works almost as the web does. Typically, you make an API request to the server and get a response back via an HTTP protocol.
The following diagram depicts the concept:
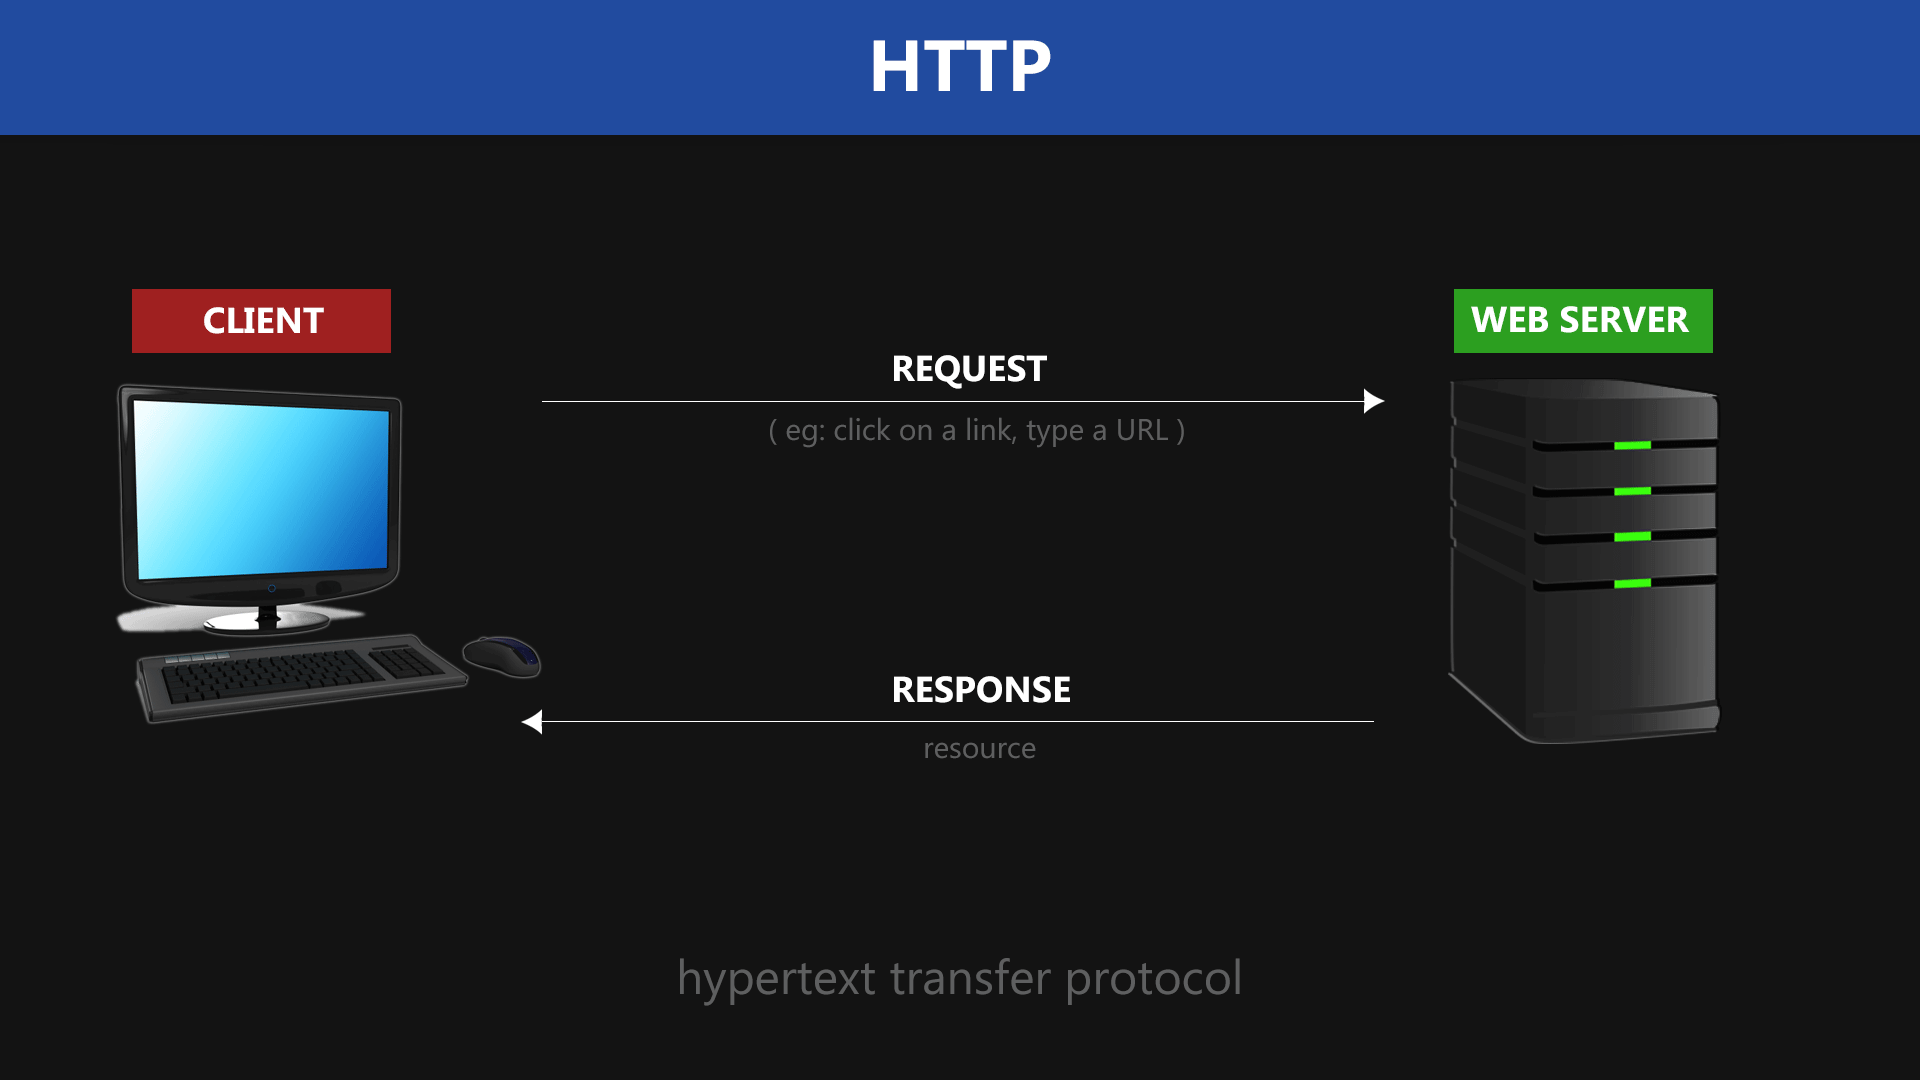
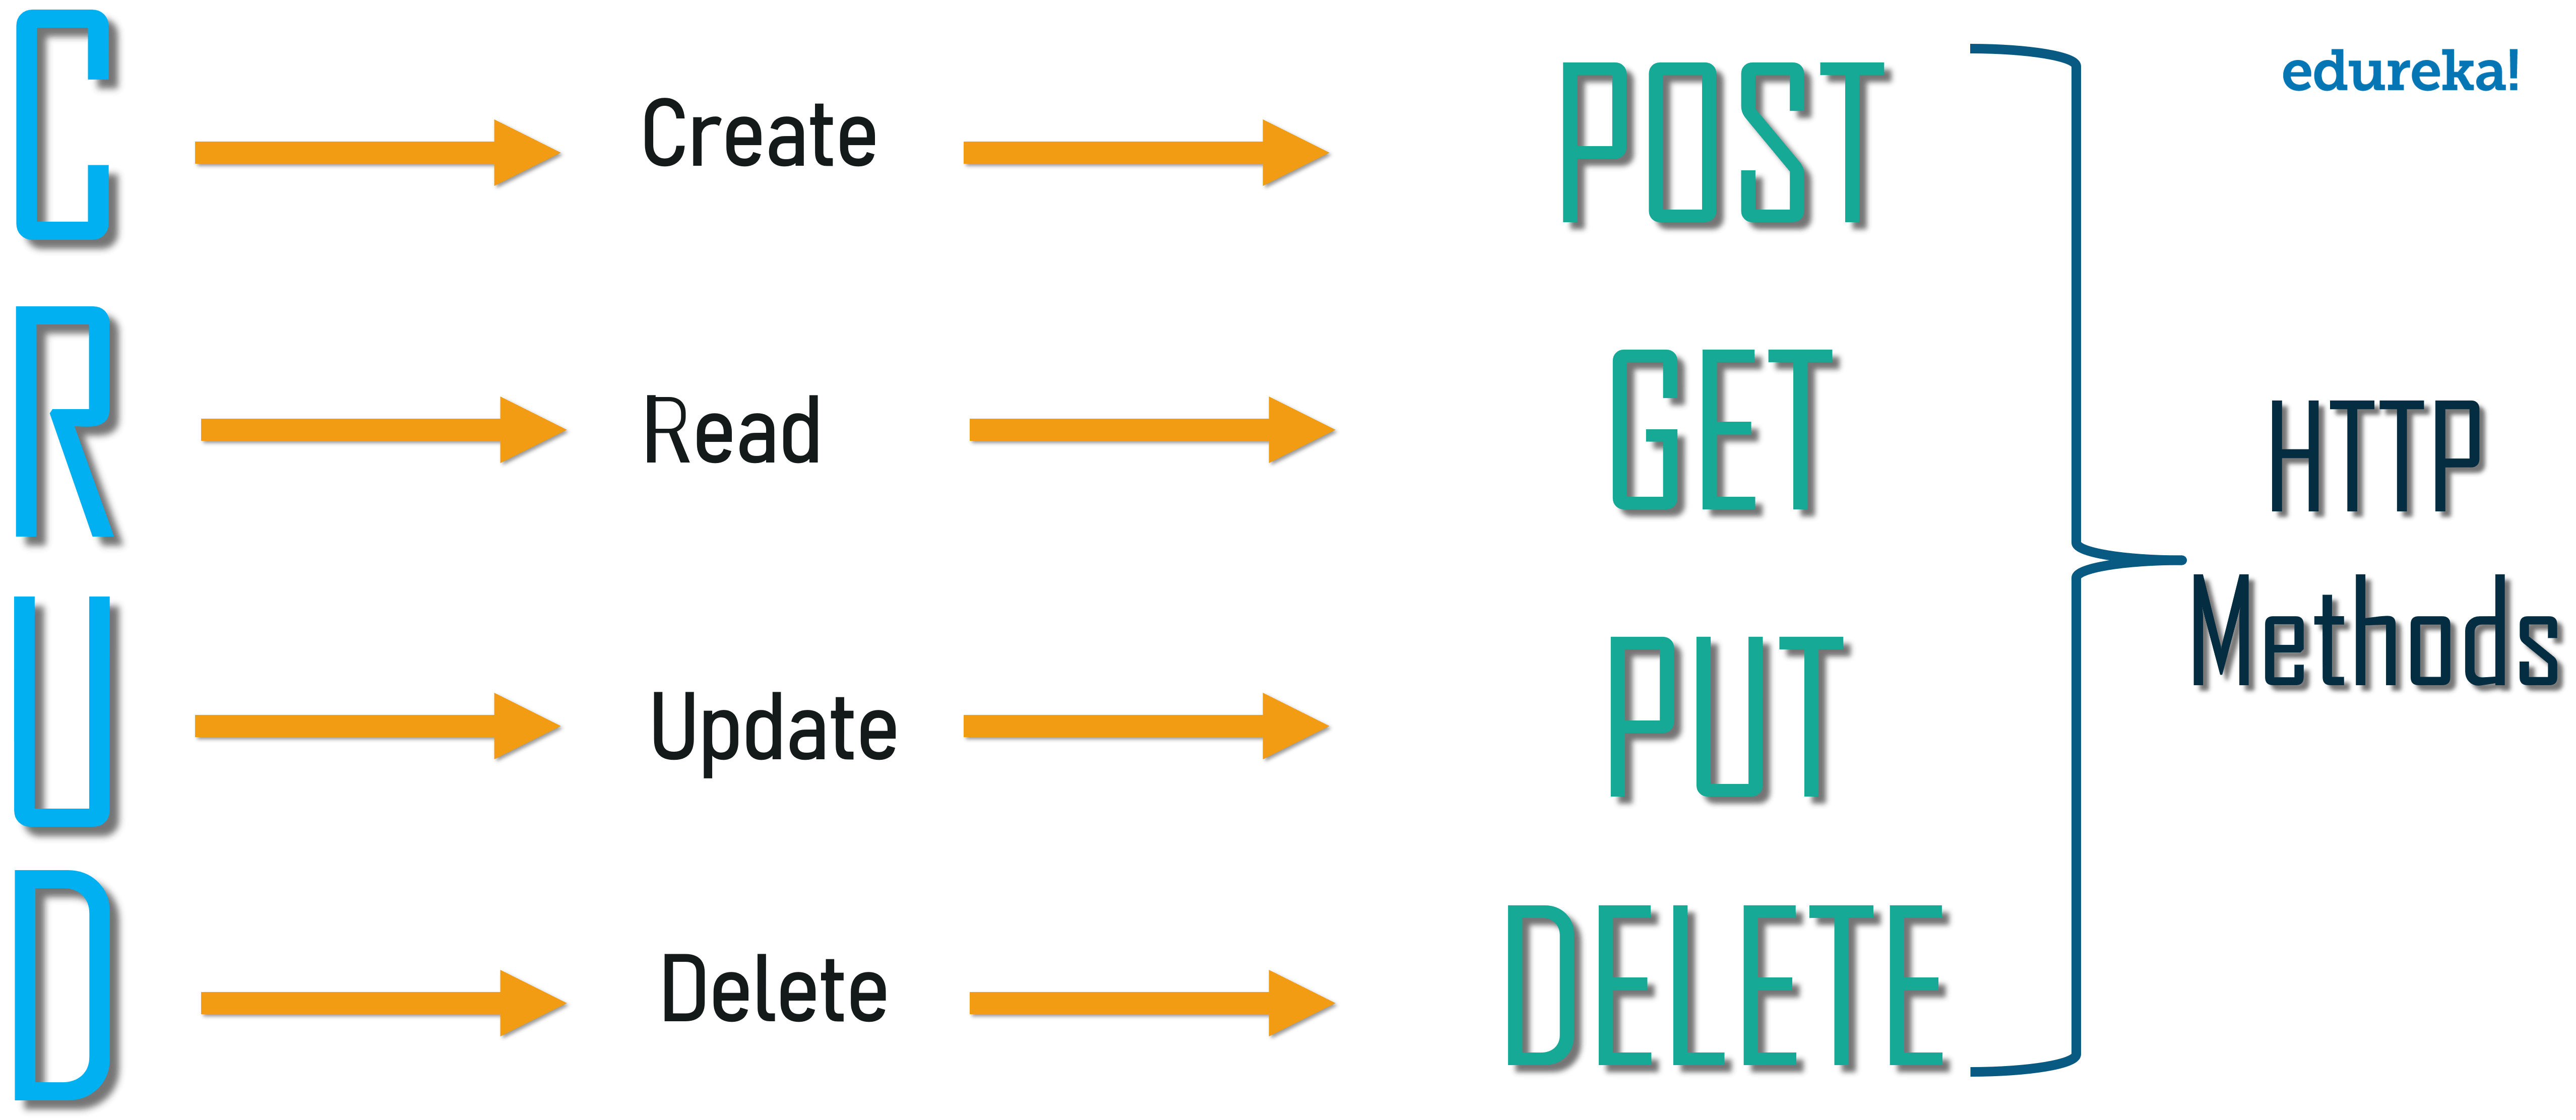
The request made to a server uses HTTP methods such as:
- GET – retrieves data from the server.
- POST – It is used to submit specific data to be processed by the server.
- PUT- allows sending an update request to the server. PUT method allows modifying specified data values.
- DELETE – this enables you to make a request and informs the server that you want to delete some specified data values.
RESTful API can be developed with almost every programming language. In this guide, you’ll learn the REST concept by building a RESTful API using Node.js.
We will use Express to manage the server’s HTTP protocols. Since we will build an interactive API, we need a way to store our data. This guide will use PostgreSQL (a relation database management system) to manage our data.
Some of the reasons why RESTful APIs are popular include:
- They are stateless and cacheable.
- Offer high-performance due to their cacheable architecture.
- They feature a uniform client-server architecture. This separates the client from the server thus, resulting in scalable server components and resources.
- They have a uniform interface. Each HTTP method (URL) is unique. This makes it easier to identify and manipulate self-descriptive resources using representations.
- RESTful API allows software applications written in a variety of programming languages to communicate with one another in different environments.
1. Goal
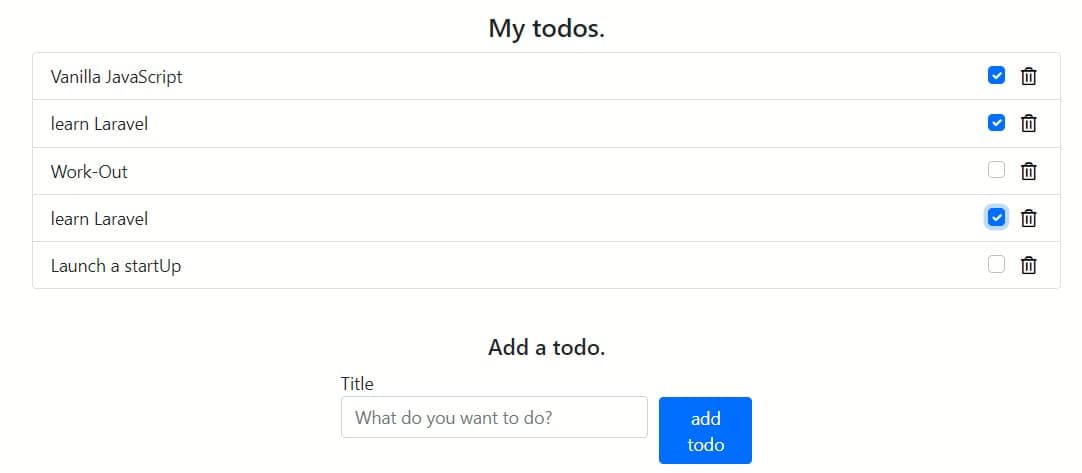
We will create a todo-list RESTful API.
This app complies with CRUD operations such as:
- CREATE – adding a new todo item.
- READ – view the todo list items.
- UPDATE the todo list. To update the todo list, we will use a toggle to distinguish between done and undone todo. This will capture the aspect of UPDATE.
- DELETE a todo item.
These CRUD operations depend on HTTP methods.
2. Prerequisites
This guide assumes you have prior knowledge of the following key areas.
- Basic knowledge of Node.js.
- Be able to write SQL queries. We will use SQL to communicate with our database. Therefore, some prior knowledge on how to write these queries will be of great importance. This beginner guide will help you learn how to write and execute SQL queries within your Node.js applications.
- Basic knowledge of how to use Express. You need to be familiar with Express, a Node.js framework. Be able to create routes and manage a simple server with Express. Here is a guide to help you get started using Express.
- Be familiar with PostgreSQL. PostgreSQL is a relational database that uses SQL queries to interact with data stored in database tables.
3. Application packages
The following packages will help us build the todo app.
- Express – Express will help us make the API endpoints that will communicate with the database server. This allows us to access the resources (data) we want. The data will be accessed based on the HTTP standard methods, i.e., GET, POST, UPDATE and DELETE.
- CORS – CORS stands for
Cross Origin Resource Sharing. It allows us to bypass security applied to a RESTful API. - EJS – EJS stands for Embedded JavaScript. It is a template engine language that lets you generate HTML mark-up with plain JavaScript. Instead of serving static content, we can serve more dynamic content using EJS. EJS template is rendered on the server-side to produce an HTML document that the client can then receive. We will use the EJS template to create a client-side page for our RESTful API.
- PG – PG makes it possible for Node.js to connect and communicate with PostgreSQL databases.
- Nodemon – this a
devpackage (not needed for the app to function). Nodemon ensures that the server is running whenever you make changes. When you save changes, you don’t have to restart the server. Nodemon will handle this for you.
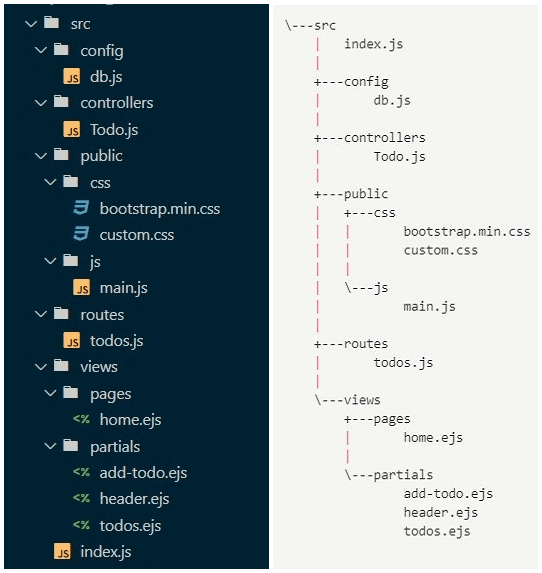
4. The application structure
Here is the project structure of the todo app:
5. Setting up the project
Ensure you have Node.js runtime installed on your computer. You can check the Node.js version by running node –v command.
In your desired folder, run the following command to initialize your Node.js project.
npm init
Answer the relevant questions, and then follow through to the next steps.
Alternatively, you can run `npm init -y’ to auto initialize your project with NPM default values. Check this guide to understand how to use NPM.
5.1. Installing the necessary dependencies
You can install all the Node.js Packages that we discussed above as follows:
npm install cors ejs express pg
and
npm install --save-dev nodemon
5.2. Setting up the PostgreSQL database
Install the following PostgreSQL environments.
- PostgreSQL – an opensource relational databse management system.
- pgAdmin – a standalone destop application for managing PostgreSQL databases.
Once installed and well configured, create a my_todos_db database and a table to work with, as shown below.
- Create a database,
my_todos_db.
CREATE DATABASE test
CREATE TABLE todos (
  id SERIAL PRIMARY KEY,
  title VARCHAR(100) NOT NULL,
  checked  Boolean NOT NULL)
In the src folder, create a config folder and then a db.js file (src/config/db.js). We will configure the database as follows:
const Pool = require("pg").Pool;
const pool = new Pool({
    user:'postgres', // default postgres
    host:'localhost',
    database:'name_of_your_database', // `my_todos_db`
    password:'your_password', //added during PostgreSQL and pgAdmin installation
    port:'5432' //default port
});

module.exports = pool;
6. Setting up the server
In the src folder, create an index.js file (src/index.js), and configure the application server as follows:
const express = require("express");
const cors = require("cors");
const app = express();

app.use(express.json());
app.use(cors());

app.get("/", (req, res) =>{
    res.send("hello world!");
});

const PORT = process.env.PORT || 4000;

app.listen(PORT, () => {
    console.log(`app started on port ${PORT}`)
});
7. Test if the server is working
To start the server, configure the scripts object in package.json as follows.
"dev": "nodemon ./src/index.js"
Then, run npm run dev to start the server.
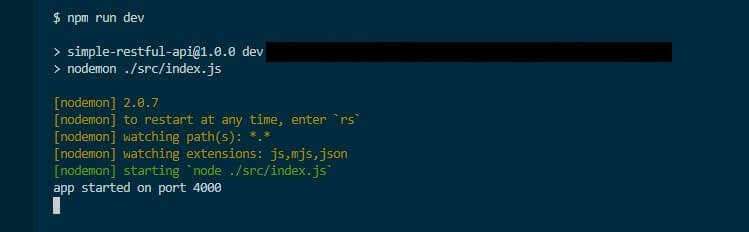
Open http://localhost/4000 in a browser. This should give you a response hello world!.
If there was an error connecting to the server, you will be prompted in the console. Ensure that you fix the error before proceeding to the next step.
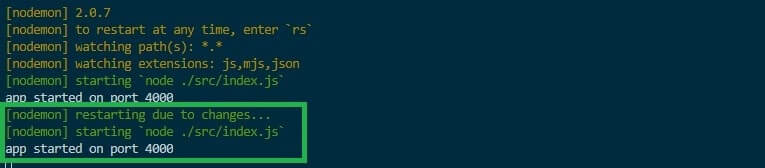
Since the server is up and running, we can do away with app.get("/", (req, res) =>{res.send("hello world!");
The server application will be restarted by Nodemon incase of any changes. There is no need to re-run the server.
8. Setting up the routes
Create a routes folder and add a todos.js file (src/routes/todos.js).
Here we will configure our routes as follows:
const express = require("express");
const router = express.Router();

//Get all todos.
router.get('/', async (req,res) => {
});

//Create a todo.
router.post('/todo', async (req,res) => {
});

//Update a todo.
router.put('/todos/:todoId', async (req,res) => {
});

//Delete a todo.
router.delete('/todos/:todoId', async (req,res) => {
});

module.exports = router;
For the routes to work out, we need to configure them in the index.js file. To do this, we add the following changes to the src/index.js file:
//import the routes
const todoRoutes = require('./routes/todos');

//configure the app.
app.use(todoRoutes);
9. Setting up the controllers
Controllers are responsible for handling the functionality exposed by the routes. To set the controllers, create a folder and name it controllers. Next, create a file Todo.js, (src/controllers/Todo.js). In this file, we will add all our needed SQL queries such as SELECT, INSERT, UPDATE and DELETE functionalities as follows:
const db = require("../config/db");

class Todo {
  //get all todos.
  async getTodos() {
    let results = await db.query(`SELECT * FROM todos`).catch(console.log);
    return results.rows;
  }

  //create a todo.
  async createTodo(todo) {
    await db
      .query("INSERT INTO todos (title, checked) VALUES ($1, $2)", [todo.title,false,])
      .catch(console.log);
    return;
  }

  //update a todo.
  async updateTodo(todoId) {
    //get the previous todo.
    let original_todo = await db
      .query(`SELECT * FROM todos WHERE id=$1`, [parseInt(todoId)])
      .catch(console.log);
    let new_checked_value = !original_todo.rows[0].checked;

    //update the checked todo
    await db
      .query(`UPDATE todos SET checked=$1 WHERE id=$2`, [new_checked_value,parseInt(todoId),])
      .catch(console.log);
    return;
  }

  //delete a todo.
  async deleteTodo(todoId) {
    await db.query(`DELETE FROM todos WHERE id=$1`, [parseInt(todoId)]).catch(console.log);
    return;
  }
}

module.exports = Todo;
10. Linking the controllers to the routes
For the routes to really function, we need to link them with their respective controllers as defined in the Todo.js. In the src/routes/todos.js file, add the following changes:
//import the controller
const Todo = require('../controllers/Todo');

//Get all todos.
router.get('/', async (req,res) => {
    let todos = await new Todo().getTodos();
});

//Create a todo.
router.post('/todo', async (req,res) => {
    let {title} = req.body;
    await new Todo().createTodo({title},res);
});

//Update a todo.
router.put('/todos/:todoId', async (req,res) => {
    let {todoId} = req.params;
    await new Todo().updateTodo(todoId,res);
    let todos = await new Todo().getTodos();
});

//Delete a todo.
router.delete('/todos/:todoId', async (req,res) => {
    let {todoId} = req.params;
    await new Todo().deleteTodo(todoId);
    let todos = await new Todo().getTodos();
});
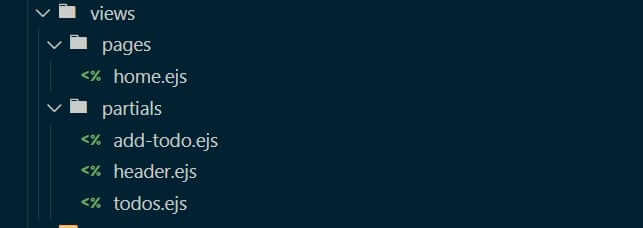
11. Setting up the views
We will set the EJS views that will be rendered to the client-side. EJS views work the same as HTML elements such as buttons and forms. Views will help us trigger the necessary actions such as adding, deleting, or updating a todo item from the client-side.
Set up the CSS and views folders, as shown in the application structure.
We’ll include the following views.
- A home page (
src/views/pages/home.ejs) to include any EJS template that we add to our todo app.
<%- include('../partials/header.ejs') %>
    <section class="home-page">
        <div class="container">
            <div class="row">
                <div class="col-12 col-md-12 col-sm-12">
                    <div class="todo-content">
                        <h4 class="todo-heading">My todos.</h4>
                        <%- include('../partials/todos.ejs') %>
                        <%- include('../partials/add-todo.ejs') %>
                    </div>
                </div>
            </div>
        </div>
    </section>
In the code above, we are doing the following:
- Importing home page header.
- Setting the layout of the home page.
- Importing the
todos.ejsfile. It contains the fetched todos. - Importing the
add-todo.ejsfile. It contains the form to add a todo.
- A header (
header.ejs) – this will include the following:
- A todo header.
- Link the
src/public/css/custom.css,src/public/css/bootstrap.min.cssand,src/public/js/main.js. We will add the update and delete functionalities linking to the views in thismain.jsas shown below:
//updating a todo.
function updateTodo(todoId) {
    //contact server
    return $.ajax({
        method: "put",
        url: `/todos/${todoId}`,
        contentType: "application/json",
        cache: false,
        error: (error) => {
            console.error(error);
        },
    });
}

//deleting a todo.
function deleteTodo(todoId) {
    //contact server
    return $.ajax({
        method: "delete",
        url: `/todos/${todoId}`,
        contentType: "application/json",
        cache: false,
        success: () => {
            location.reload();
        },
        error: (error) => {
            console.error(error);
        },
    });
}
In the above code, we are:
- Using AJAX to communicate with the server based on
PUTandDELETEmethod. This is because HTML forms do not support these methods by default.
This how the src/views/partials/header.ejs should look like, after adding a header, the CSS files, and main.js.
<!DOCTYPE html>
<html lang="en">

<head>
    <meta charset="UTF-8">
    <meta http-equiv="X-UA-Compatible" content="IE=edge">
    <meta name="viewport" content="width=device-width, initial-scale=1.0">
    <title>Todolist app</title>
    <link href="/static/css/bootstrap.min.css" rel="stylesheet" />
    <link href="/static/css/custom.css" rel="stylesheet" />
    <script src="https://code.jquery.com/jquery-3.1.1.min.js"></script>
    <script src="https://kit.fontawesome.com/a076d05399.js" crossorigin="anonymous"></script>
    <script src="/static/js/main.js"></script>
</head>
- Add new todo (
src/views/partials/add-todo.ejs) – a form that sends aPOSTrequest to the server alongside the data entered by a user.
<div class="add-todo">
    <h5 class="add-todo-heading">Add a todo.</h5>
    <form class="add-todo-form" method="POST" action="/todo">
        <div class="form-group form-title">
            <label for="title"> Title </label>
            <input id="title" type="text" class="form-control" name="title" placeholder="What do you want to do?" />
        </div>
        <div class="form-group form-submit">
            <button type="submit" class="btn btn-primary">add todo</button>
        </div>
    </form>
</div>
- Todo list (
src/views/partials/todos.ejs). A GET form method fetches all the todo. Every todo item will have a delete button and a toggle to check a completed todo.
<ul class="list-group">
    <% for(let i=0; i < todos.length; i++) { %>
        <li class="list-group-item d-flex justify-content-between align-items-center">
            <%= todos[i].title %>
            <div class="list-group-item-actions">
                <div class="form-check">
                    <input type="checkbox" class="form-check-input" onclick="updateTodo(<%=todos[i].id %>)" <%=todos[i].checked ? "checked" : "" %>/>
                </div>
                <button class="delete-todo-form-btn" onclick="deleteTodo(<%= todos[i].id %>)">
                    <i class="far fa-trash-alt"></i>
                </button>
            </div>
        </li>
        <% } %>
</ul>
Some CSS to style the views (custom.css).
.home-page {
    width:100%;
    height: 100;
    margin-top: 10px;
    padding:20px;
}

.todo-content {
    width:100%;

}

.todo-heading {
    width: 100%;
    text-align: center;
    margin: 10px 0px;
}

.list-group-item-actions{
    display: flex;
    justify-content: space-between;
}

.update-todo-form {
    margin-right: 5px;
}

.add-todo{
    width:80%;
    margin: 20px auto;
    padding: 10px 0px;
}

.add-todo-heading {
    width: 100%;
    text-align: center;
    margin: 10px 0px;
}

.add-todo-form{
    width:50%;
    margin:0px auto;
    display: flex;
    justify-content: space-between;
}

.form-title {
    width:80%;
    margin-right: 10px;
}

.form-submit {
    margin-top: 24px;
}

.delete-todo-form-btn{
    border: none;
    background: transparent;
    cursor: pointer;
}
Check this project on GitHub and grab the bootstrap used to style the bootstrap elements such as buttons. Bootstrap is specified on the
bootstrap.min.cssfile.
To integrate the app with these views, we need to add these lines of code to our server (src/index.js).
app.use(express.urlencoded({extended:true}));
app.set("view engine","ejs");
app.set("views","src/views/pages");
app.use('/static',express.static(`${__dirname}/public`));
This will:
- Serve the EJS engine templates.
- Serve static files such as
.cssfiles.
12. Linking the views to the routes
We need to link our views with the backend.
Add the following configuration to the src/routes/todos.js file.
//Get all todos.
router.get('/', async (req,res) => {
    let todos = await new Todo().getTodos();
    return res.render('home',{todos});
});

//Create a todo.
router.post('/todo', async (req,res) => {
    let {title} = req.body;
    await new Todo().createTodo({title},res);
    return res.redirect('/')
});

//Update a todo.
router.put('/todos/:todoId', async (req,res) => {
    let {todoId} = req.params;
    await new Todo().updateTodo(todoId,res);
    let todos = await new Todo().getTodos();
    return res.render('home',{todos});
});

//Delete a todo.
router.delete('/todos/:todoId', async (req,res) => {
    let {todoId} = req.params;
    await new Todo().deleteTodo(todoId);
    let todos = await new Todo().getTodos();
    return res.render('home',{todos});
});
13. Testing the application
Ensure that the development server is running. If it’s not, use the following command to restart it:
npm run dev
Navigate to http://localhost/4000 in your browser to access the application.
Alternatively, clone this project from this GitHub repository.
After cloning the repository, open the project in your terminal and run npm install to install the project dependencies.
Make sure your database is well set as we described in this guide.
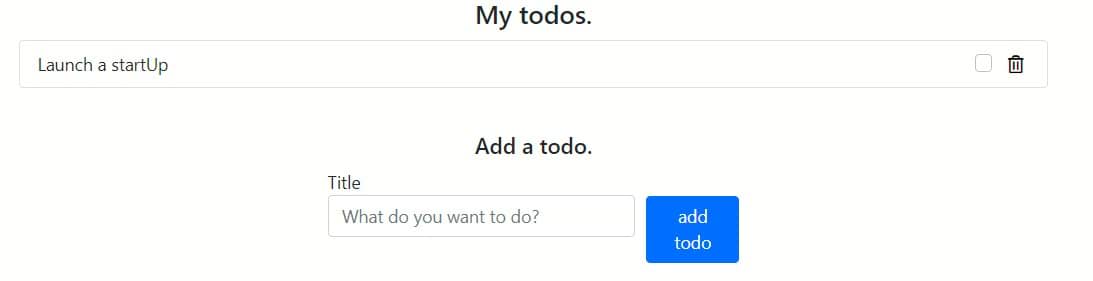
Run the app using npm run dev and open http://localhost/4000 in a browser to interact with the todo app. Then, check the database to confirm if adding or updating a todo reflect as such.

For any code reference, check this project from GitHub.
14. Conclusion
RESTful APIs allow the client and server sides to be independent. This is a significant advantage, especially when working as a team or when you want to build scalable applications. To learn more about RESTful APIs, read the following post.
Happy coding!!