
Real-time data has become a crucial part of most applications these days. Many web applications use sockets to connect clients to other clients and to servers. Still, the main challenge with this is the storage of data. Firebase has a real-time database feature that allows easy creation of real-time applications such as chat apps.
To get started, let’s begin by creating a Node.js application using npm init and add the following packages:
firebase: this will be used to access and perform actions to our firebase real-time databasewebsocket: will be used to connect our clients to the server and allow them to send messages to the server and in turn the server will echo the same message after it has been recorded in the database. And if any other message from anywhere else arrives in the real time database, it will echo it to all clients listening to the server.
To set up your firebase account follow these instructions from the official firebase docs and get your credentials. Follow along until Step 3. It would be preferable to hide your credentials in an .env file too.
Add the following code to set up the firebase config and database. We are using the firebase/database package to access the real time database and we will be working with the messages database reference.
const firebase = require("firebase/app");

const firebaseConfig = {
    apiKey: process.env.apiKey,
    authDomain: process.env.authDomain,
    databaseURL: process.env.databaseURL,
    projectId: process.env.projectId,
    storageBucket: process.env.storageBucket,
    messagingSenderId: process.env.messagingSenderId,
    appId: process.env.appId,
    measurementId: process.env.measurementId
};
firebase.initializeApp(firebaseConfig);
require('firebase/database')
const database = firebase.database().ref('messages/')
Next, we will need to set up our server to create a socket. We will use the Node.js http interface to create a server. Then we will use websocket to connect the register to the socket in the server (create a socket server). The server listens to port 2400 and we create a socketServer using the server we have created.
const http = require('http')
const server = http.createServer()
server.listen(2400)

const socketServer = require('websocket').server
const socket = new socketServer({httpServer: server})
Next up we send the messages and save them to firebase. We first accept connections from every client. Then whenever a message is sent, we add it to the database. Since the database offers real time capabilities, we listen to whenever a new message arrives, we display it to all listening clients.
socket.on('request', (req) => {
const connection = req.accept(null, req.origin)
connection.on('message', (message) => {
database.set({message: message})
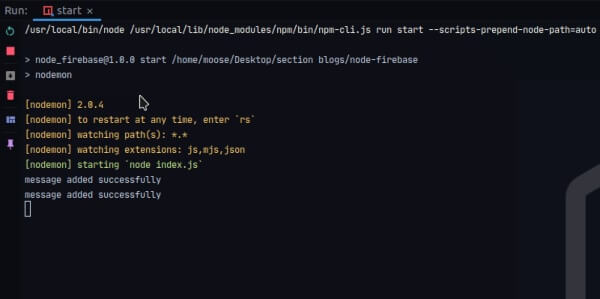
.then(_ => {console.log('message added successfully')})
.catch(err => {console.log(err)})
})
connection.on('close', () => {database.off()})
database.on('value', snapshot => {
connection.send(JSON.stringify(snapshot.val()))
})
})
We use the database.set method to write the firebase database and when it is successful, we log that the message has been added. Then, we use the database.on('value') method to listen to any changes in the database. Since the data comes in a snapshot, we call the .val() method to get the contents of the snapshot i.e. the new data in the database.
Once the websocket connection closes, we also close the database to avoid wasting resources.
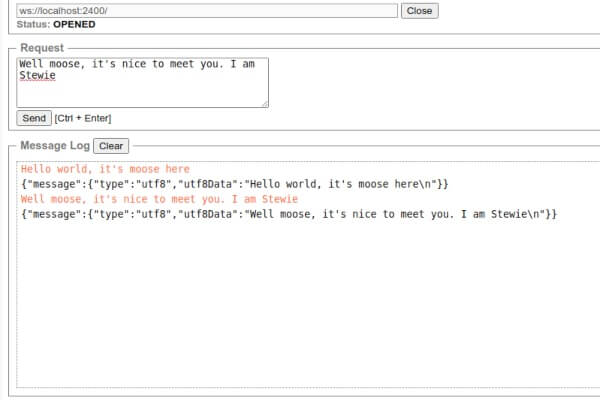
As you can see below, two messages are sent to the server, once saved, we get two logs and two messages sent to the clients.
In case you prefer socket.io for client-client connections, you can check out the maixuanviet.com tutorial and incorporate firebase to save the messages.