
Table of Contents
- 1. Introduction
- 2. Technologies involved
- 3. Prerequisites
- 4. What is a WebSocket?
- 5. Project architecture
- 6. Getting started
- 7. WebSockets in Adonis.js
- 8. Handling user registration
- 9. How to handle connected clients
- 10. Server emissions
- 11. How we handle player moves
- 12. Client emissions and listeners
- 13. Board moves on the client
- 14. Security considerations
- 15. Best practices when dealing with WebSockets
- 16. Conclusion
Browser-based multiplayer games require split-second communication between players. Tic-Tac-Toe is no exception. Player1 needs to see Player2s move in less than a second. In this tutorial we will be using the WebSocket API to achieve this communication speed.
1. Introduction
For this article we will use Adonis.js, which is a Node.js MVC framework, on the backend. Adonis.js implements web sockets both on the client and server side.
2. Technologies involved
- Node.js
- Adonis.js
- Redis
3. Prerequisites
3.1. Node.js
First, check that your Node.js version is >= 10.
$ node -v
# v10.19.0
Install the latest LTS version of Node.js from the official website if yours is less than v10.
3.2. Redis

We will use Redis to handle the game state. Horizontal scaling is a common requirement in modern software development. We should be able to spin up and tear down servers at will. This means we shouldn’t store the state in our apps since the instances will not be able to share the state.
Redis will allow us to maintain the game state for millions of gamers. Redis offers faster read-write operations than a traditional DB, so it is ideal for the game.
Follow the instructions here to install Redis on your machine.
4. What is a WebSocket?
According to Wikipedia:
A WebSocket is a computer communication protocol, providing a full-duplex communication channel over a single TCP connection.
A WebSocket is a communication channel that allows for bi-directional communication. Emissions and broadcasts replace the request-response mechanism in HTTP.
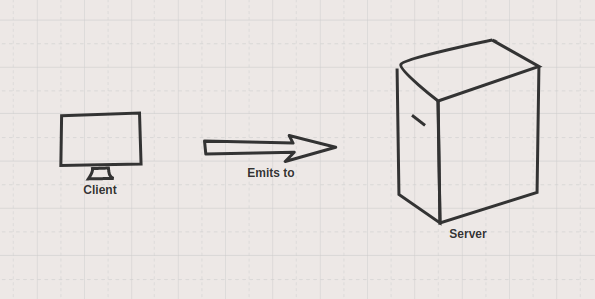
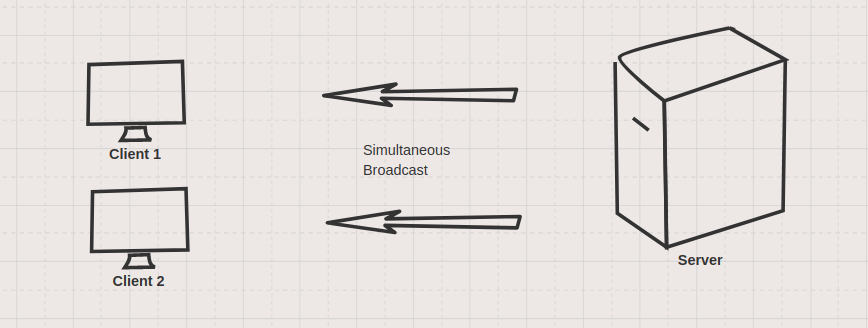
A server can broadcast to several connected clients at the same time.
Clients emit information to the server without waiting for a response. That way communication occurs through listeners that are set up by the client.
5. Project architecture
The project follows this architecture:
- A user sets a username.
- The user generates a game code.
- The user shares the game code with a friend.
- The friend sets a username and uses the game code to initialize the game.
- Both users are redirected to the game where they play in rounds.
6. Getting started
We won’t go into the details of the markup and frontend Javascript. We will instead look into the implementation of Websockets in Adonis.js.
Step 1: Clone the repo.
$ git clone https://github.com/vietmx/tic-tac-toe-tut.git
Step 2: Install the dependencies.
$ npm i
Step 3: Start the Redis server.
$ redis-server
Step 4: In another terminal, start the dev server.
$ npm run dev

# or
$ npm run dev
Now that everything is set up, we will look at the logic in core parts of the game and learn more about WebSockets.
7. WebSockets in Adonis.js
Adonis.js uses channels to organize WebSocket business logic. For this game, we created one channel, tic-tac-toe, in start/socket.js. Clients can subscribe to different channels to listen to events on those channels.
const Ws = use("Ws");

Ws.channel("tic-tac-toe", "TicTacToeController");
Clients can also communicate with other clients on a channel by emitting to an event.
// in the browser
ws.getSubscription("tic-tac-toe").emit("checkForExistingGame");
If we wanted to add chat to our game, we will create another channel, named chat. We will also create a different controller for the chat channel.
Ws.channel("chat", "ChatController");
The controllers are represented as classes.
class TicTacToeController {
  constructor({ socket, request }) {
    this.socket = socket;
    this.request = request;
  }
  async onClose() {}
}
Every connected client links to an instance of this class. That way a client can communicate with other clients in the server environment. The connected client’s socket is this.socket. We can also access the request object here using this.request. This means we can access cookies in the WebSocket Controller. This will prove useful as we go further.
// get all cookies
this.request.cookies();
8. Handling user registration
To identify a user, we set their username in an encrypted, httpOnly cookie during registration.
// register method in UserController.js
session.flash({ success: "Account created successfully" });
response.cookie("username", username);
Since we didn’t use session or JWT auth, the cookies serve as a Psuedo-auth. We return an authenticated view if the username cookie is present after reload. An example of this is displaying Hi {{username}} in home.edge.
@if(username)
<div class="col-md-6 mb-5">
  <h2>Hi {{ username }}</h2>
  ...
</div>
@else ... @endif
The index method HomeController.js passes the variables in the home.edge view.
// index method in HomeController.js
const game_code = await Redis.hget(request.cookie("username"), "game_code");
const username = request.cookie("username");
return view.render("home", { game_code, username });
9. How to handle connected clients
When the home or game page loads, the browser tries to establish a connection with the server. An API call triggers the setSocketId method in UserController.js. This is where the gamer’s socket-id is linked to their created Redis map.
const username = request.cookie("username");
await Redis.hset(username, "socket_id", socket_id);
This happens every time the browser reloads, so the connection is always established.
10. Server emissions
Events sent by your client to the server can trigger emissions to:
- Yourself using
this.socket.emit. - Several connected clients using
t=his.socket.emitTo. - All other connected clients except yourself using
this.socket.broadcast. - All connected clients including yourself using
this.socket.broadcastToAll.
This game utilizes 1 and 2. For example, when player1 makes a mark (“X”) on the board, they send the board’s index. The server then emitsTo player2 with player1’s mark (“X”) and the board index.
this.socket.emitTo(
  "otherPlayerMove",
  { cell, other_player_mark: current_player_mark },
  [`tic-tac-toe#${next_player_socket_id}`]
);
This is an instance of where we can’t rely on the client’s input. We don’t expect player1 not to change their mark from “X” to say “M”. The client can do a lot to break our game so we must limit their power.
11. How we handle player moves
When a player makes a move, we execute that turn’s logic if the move is valid.
11.1. Turn logic
When a player makes a move, the game may resolve into either:
- A win state
- A draw state
11.2. Win state
The turn logic involves setting a player’s mark on an array. The array’s elements’ indexes correspond to the game board.
const board = JSON.parse(gameObject.board);
const { mark: current_player_mark } = JSON.parse(
  gameObject[`${username}_stats`]
);
board[Number(cell)] = current_player_mark;
Then checking if the board has a valid win state.
// inside the `executeTurnLogic` method
const { status, player, sequence } = this.checkForWinner(board);
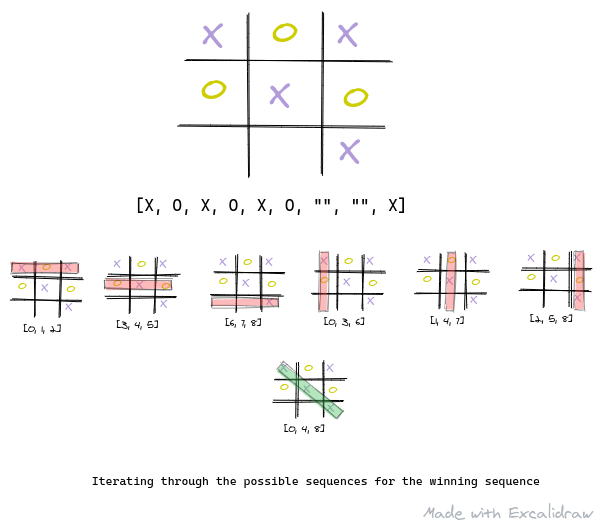
In the checkForWinner method, we iterate through a set of winning sequences.
const winningSequences = [
  [0, 1, 2],
  [3, 4, 5],
  [6, 7, 8],
  [0, 3, 6],
  [1, 4, 7],
  [2, 5, 8],
  [0, 4, 8],
  [2, 4, 6],
];
We represent the board cells which map to the sequence as boardSequence. The first winning sequence will look like:
[0, 1, 2]
["O", "X", "X"]
We check if all elements in the current sequence mapping have the same values: “O” or “X”. If it is “X”, player1 wins, else player2 wins.
for (let sequence of winningSequences) {
  const boardSequence = [
    board[sequence[0]],
    board[sequence[1]],
    board[sequence[2]],
  ];
  const player1IsWinner = boardSequence.every((value) => value === "X");
  if (player1IsWinner) {
    return { status: "win", player: "player1", sequence };
  }

  const player2IsWinner = boardSequence.every((value) => value === "O");
  if (player2IsWinner) {
    return { status: "win", player: "player2", sequence };
  }
}
Here’s a visualization of an iteration on move 7.
11.3. Draw state
At the start of the game, the board is an 8 sized array of empty strings.
const board = ["", "", "", "", "", "", "", ""];
If no empty string exists in the array, the game results in a draw. Both players will be able to request a rematch.
# Example of draw state
["X", "O", "X", "X", "X", "O", "O", "X", "O"]

X | O | X
X | X | O
O | X | O
12. Client emissions and listeners
Since WebSockets support bidirectional communication, we can have simultaneous client-server communication. A client cannot emit events to other clients, it can only emit to the server which then emits to other clients.
13. Board moves on the client
When we emit a boardMove event to the server. The server has to figure out how to process this event and send a “response” to both players.
function makeMove(cell) {
  ws.getSubscription("tic-tac-toe").emit("boardMove", {
    cell,
  });
  updateTurnNotification(`It's ${other_player}'s turn`);
}
We can receive messages from the server by setting listeners like this.
game.on("otherPlayerMove", (response) => {
  updateBoard(response);
  canMove = true;
  updateTurnNotification(`It's your turn`);
});
We set up all the listeners in the subscribeToChannel function in game.js. These listeners are like JavaScript event listeners. They keep handling the events they are listening to after their registration.
14. Security considerations
Most of the game logic lives on the server. Every datastore on a web-browser is mutable by Javascript. Javascript can’t read or change encrypted cookies. This gives them the highest security.
15. Best practices when dealing with WebSockets
- Only use Websockets if HTTP, polling, and Server-Sent Events (SSE) aren’t suitable for the problem. For example, a real-time dashboard with little or no events sent from the client should use SSE.
- Maintain state in a cache such as Redis or Memcached. You won’t want to be making DB calls for time-sensitive operations.
16. Conclusion
In this article, we learned about the WebSocket protocol. We saw the details of building Tic-Tac-Toe using the WebSockets in AdonisJS. Finally, we learned the best practices to follow when building websocket applications.