
Table of Contents
- 1. Understand the Node.js Package Manager (NPM)
- 2. Understand the A to Z Most Useful Node.js Modules and Frameworks
- 3. The Node.js HTTP Server Module
- 4. Embracing Asynchronous Node.js Functions
- 5. Handling Node.js Errors
- 6. Debugging Node.js Programs
- 7. Always Keep Your Code Simple and Light
- 8. Security practices for your server
- 9. Deploying Your Node.js Application
- 10. Monitoring Your Node.js Application
- 11. Conclusion
As a developer getting started with Node.js application development, there a few basic skills that you need to be familiar with as you start to build your first Node.js application. This article will cover some of the common tips you need to know in order to have a strong background to get started with Node.js application development.
1. Understand the Node.js Package Manager (NPM)
NPM is an easy to use package manager for the Node.js platform. It helps to install packages and manage versions and dependencies. NPM helps to install the package you want with just a single command. To use NPM, you need Node.js to be installed on your computer. For OS X and Windows, the Node.js installer has an easy to use interface and NPM is included. Developers using Linux need to run the following command in their package manager to set up Node.js which automatically install NPM in your project.
curl -sL https://deb.nodesource.com/setup_14.x
sudo -E bash -
sudo apt-get install -y nodejs
Run npm -v to check the Node.js version you have just installed. If you realize you have an older version run npm install npm -g (for Windows) or npm install -g npm\@latest (for Linux and Mac) to update to the latest version of NPM. NPM helps to install Node.js modules. For example, you just need to write npm install followed by your specified module i.e. npm install express. Once the package is installed you will be able to use require () on your Node.js project and they will run just as if they were built-in. Another important aspect of Npm is dependency management. You can run npm install in your root folder and any listed dependency in your package.json (if you have one) will be installed. This will help mostly when installing Node.js projects from git repositories. For example, vow (a Node.js testing framework) can be installed from git and its single dependency eye can automatically be installed.
2. Understand the A to Z Most Useful Node.js Modules and Frameworks
The power of Node.js is backed by hundreds of packages that make it easier to write your program. These packages are open sourced and they are the ecosystem of Node.js applications. Every Node.js developer will interact with these packages to get a more efficient development workflow. Here’s a list of some of the most useful libraries that will help ease the development of Node.js applications.
Express– is a web application framework for Node.js that handles robust APIs and Web servers.Gulp– helps to automate development workflow. It helps to automate simple tasks in the development of web applications.Moment– is an insubstantial JavaScript date library for parsing, validating, manipulating, and formatting dates.Async– is a utility module that provides powerful straightforward functions for working with asynchronous JavaScript.Lodash– makes JavaScript easier by taking out the irritation of working with arrays, numbers, objects, strings, etc.JSHint– detects errors and potential problems in your Node.js (JavaScript) code. You can easily adjust it in the environment you expect your code to execute.Browserify– analysesrequire ()calls in your Node.js application to create a bundle that you can serve the browser in a single<script>tag.Nodemailer– Allows (easy as pie) email sending.Restify– It is a Node.js web service framework, which is optimized for building semantic RESTful web services (API) that are ready for production use at scale.Koa– Next generation framework Node.js with the aim of a robust foundation for web applications and APIs.MySQL– It is a Node.js client for MySQL protocol.Morgan– It is an HTTP request logger middleware for Node.js application.Nodemon– Helps to develop Node.js based applications by automatically restarting the application when file changes in the directory are detected.
You can have a look at more available libraries on GitHub.
3. The Node.js HTTP Server Module
Node.js. has a built-in module called HTTP (Hypertext Transfer Protocol). It helps in making requests as a client and running the server to accept requests and return responses. In this case, when you visit a webpage from a browser, you make a request to another computer (webserver) via the internet, which then provides you the webpage response. The webserver receives HTTP requests from the client, which listens to a server port and provides an HTTP response for example an HTML Page. To use HTTP client or server in Node.js you must use require ('http');. Let’s look at a simple http_test.js HTTP Server module that will listen on port number 3000.
//load http module
var http = require('http');
http.createServer(function (request, response) {
    //http header
    //tell the browser everything is okey with status code 200 and data text
    response.writeHead(200, { "Content-Type": "text/plain" });
    // write the text to your body page
    // send the body and header to the server
    response.end("Hello my server");
    //tell the server which port you are running
}).listen(3000);
//print the message on console
console.log('Server running at port 3000');
Save your http_test.js and run it on your terminal. i.e. node http_test.js And there you go, you have just created the simplest server of your whole career. The server you have created can then be accessed on http://localhost:3000 or http://127.0.0.1:3000 from your browser. Check out more on working with HTTP and Node.js. to find out.
4. Embracing Asynchronous Node.js Functions
Asynchronous is heavily used in Node.js to ensure non-blocking operations flow. It enables a system to handle thousands of concurrent requests and process gigabytes of data with a small amount of RAM. Asynchronous I/O permits other processing to continue even before the first transmission has finished. Asynchronous helps to avoid the so-called “Call-back Hell”
Example of async/await in Node.js:
async function myFunction(inputValue) {

    try {
        const a = await asyncFunc1('value');
        const b = await asyncFunc2(a);
        const c = syncFunc3(b);
        return await asyncFunc4(c);
    } catch (ex) {
        // handle exception
    }
}
In this scenario, we can see that functions 1, 2 and 4 are asynchronous.
5. Handling Node.js Errors
A few common Node.js errors are:
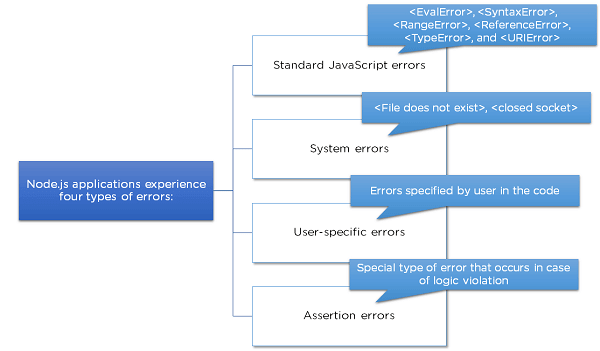
In Node.js, errors are handled through exceptions. For example, if we have an error that would occur when we divide a number by zero, our Node.js application will crash, so then we need to handle the error to continue with the normal execution of our application i.e.
try {
    var m = 1;
    var n = 1 / 0;
} catch (err) {
    //Handle the error here.
    //the application does do something to execute the error without having to make our application crash
}
6. Debugging Node.js Programs
As a developer, you need to constantly check for bugs in your apps and scripts. Debugging helps in tracing coding errors back to its source making it easier to find bugs efficiently. The commonly used approach for debugging Node.js applications is console.log.
// writing a hello world to console
console.log("hello world");
Console.log is provided by internet browsers such as Chrome DevTools, it has debug protocols ported into a Node.js module and can be used to debug Node apps. It requires you to install node-inspector (npm install -g node-inspector) then run node-inspect myscript.js. This will open up Chrome Developer Tools and you can start debugging your app. Alternatively, you can use Node.js’ built-in debugger by running node inspect app.js. Another method is using watchers in expressions and variables while debugging your Node app. To start watching an expression, include watch ('my expression');. On each breakpoint, every expression will be evaluated in its current context and displayed before the breakpoint of the code listing. The command watcher will print active watchers. To remove a watcher you can use: unwatch ('my expression'); Check out this article to find more efficient ways to deal with bugs in your app.
7. Always Keep Your Code Simple and Light
It is important to keep the Node.js codebase compact and shallow to reduce the latency and speed up the response time of the application. Some devices are slower and their latencies are higher thus you need to keep the code as small executions, well-arranged, and light. These same ideas should be applied to your server code as well. While writing your Node.js code ensure proper and appropriate naming of things for better referencing. This will serve as documentation for your application and make it easier to go back to your code when changes are required. Better code quality helps in easier code maintainability
8. Security practices for your server
As you get started with Node.js, try to secure your application by using proper coding, tooling, and operations. The main practices that will help to develop secure Node.js application include:
- Setting up secure HTTP headers.
- Doing a static review of your codebase.
- Handling errors carefully (error codes and stack traces).
- Regularly using strict mode i.e. restricted variant, undeletable properties validation, and authentication.
- Implementing proper session management such as HTTP only.
- Setting cookie scope and cookie flags.
- Avoiding command injection.
- Constantly checking for vulnerabilities in your Node.js app using
npm@6.
With npm@6, every NPM registry user receives automatic warning if you try to use any code with known security issues. NPM will automatically return a warning if your code contains vulnerabilities. Run npm audit to scan and analyze any insecure module in your dependency tree so that you can find a safer alternative dependency or update to a new safer version. npm@6 will recommend dependency replacement or fix the issues automatically with npm audit fix. Runnpm i -g npm@latestto get the latest npm@6 update. Subsequently, test your application before deployment to make sure that your app passes all security demands.
9. Deploying Your Node.js Application
After finishing application development processes, testing its features, and security preferences – your Node.js application is now ready for production. The most common Node.js deployment method are either PaaS provider such as Heroku and others like DigitalOcean or using Docker.
Let’s briefly look at how to deploy to Heroku. To get started, download Heroku CLI for your app. You need to have a Node.js version higher than 8. Check this using node -v. Next, confirm that Heroku is installed by running heroku -v then heroku login to start your Heroku server account. Ensure you have git installed by running (git install) and usable on the top-level directory of your application.
Use the git status command to check if git exists on your directory. If not, make a git directory (git init) then git add and Commit the files you have added to git by git commit -m “initial commit” command. Now you can create the Heroku application using the command heroku create.
This will create a git remote that is connected to your git repository. Finally, you can now deploy your application to the Heroku server. Use git push heroku master. Then you can use heroku open to open your application on your browser. For more detailed instructions, read Deploying Your First Node.js Web App.
10. Monitoring Your Node.js Application
Monitoring helps to gain insight into your production application to ensure a fast, stable and reliable system. Insights are critical in helping to detect performance problems within your system. As a developer, you need to know if your system is down even before your customers start to complain about how your system is faulty. Thus you need real-time alerting so you can be notified immediately.
Proper monitoring also helps get insight into features of your application’s behavior. You need to know how much time does your app takes to run each function in the production environment. In addition, if you are using microservices, you need to monitor network connections and lower delays in the communication between two services. Node.js application monitoring has two main segments:
10.1. Server Monitoring
This revolves around your host machine. You need to constantly be checking:
- Disk Space.
- CPU Memory.
- CPU Time.
- CPU Profiling.
- Network.
10.2. Application Monitoring
This revolves around monitoring the health of your application instances such as
- Databases.
- Handling Requests.
- Response Time.
- Server Requests.
Node.js monitoring frameworks include: Hapi, Restify, Derby, Express, Koa , etc.
11. Conclusion
As a Node.js developer, there are many concepts you need to be familiar with for you to have a good Node.js application. Check out what you need to know, learn, and be able to apply that in your system and all will be good. I wish you the best as you learn to work with Node.js.