
Table of Contents
JSON Web Token (JWT) is an RFC standard that ensures data being transmitted between a client and a server as a JSON object is secured. The information is also digitally signed. Meaning it can be verified and signed.
JWTs are signed using a secret key or a public or a private key pair using RSA/ECDSA algorithms. In this guide we will use a secret key.
1. Prerequisites
To follow along with this tutorial, you will need:
- Some knowledge of Node.js, Angular 11 and JWT.
- A text editor. I will be using Visual Studio Code.
- Node.js with related libraries installed.
- A web browser. In this guide, I will be using Google Chrome.
- Postman installed in your machine.
2. Reason why JSON Web Tokens are used
The main reason why a JWT is used is because it ensures the integrity of the information exchanged between parties. In this case a client and a server. The data can then be verified and authorized. The session expires based on time upon unsuccessful token verification.
3. How the app works
The app will use Angular as the frontend and Node.js as the server .ie. the backend. On the frontend, I will create an interceptor. All HTTP Request sent from the frontend is broken down and duplicated by the Interceptor. Then a token is added to it before being sent.
All requests received are broken down, cloned, a token is extracted, and verified on the backend. Upon successful verification, the request is sent to its handler and a response sent. On failed verification, other requests are rejected, and 401 Unauthorized status is sent back to Angular.
Here, all the requests are checked for a 401 status. If such requests exist, the stored token will be removed. The user is then signed out of all the sessions and sent back to the login page.
4. Creating the Angular app
Create a base folder and navigate to the folder.
Then, using a terminal run the following command:
$ ng new angFrontend
The command will create an Angular app in your base folder with a new subfolder named the same as the app’s name. In this case, angFrontend. It comes with preinstalled libraries required by a typical Angular app.
5. Creating an interceptor
Next, we will be creating the interceptor. First, browse to the folder where the angular app was created and run the following command to achieve that:
$ ng generate service AuthInterceptor
Then, navigate to src/app and edit the file app.module.ts to look like the code below. I imported the HTTP Module for HTTP calls. I also made the interceptor that was just created to be a provider, so that it will have global access to all HTTP calls.
// the modules required by the app are imported here
import { BrowserModule } from '@angular/platform-browser'; // this ensures the application will run on the browser
import { NgModule } from '@angular/core';

import { AppRoutingModule } from './app-routing.module'; // ensures the application have routing capabilities

import { AppComponent } from './app.component'; // made present for bootstrapping application on the launch

import { HTTP_INTERCEPTORS, HttpClientModule } from '@angular/common/http'; // enables the application to communicate with the backend services
import { AuthInterceptorService } from './auth-interceptor.service'; // this will allow the app to automatically attach authorization information to requests
import { HomeComponent } from './home/home.component'; // implements the home route

@NgModule({
  declarations: [
    AppComponent,
    HomeComponent
  ],
  imports: [
    BrowserModule,
    AppRoutingModule,

    HttpClientModule
  ],
  providers: [
    { provide: HTTP_INTERCEPTORS, useClass: AuthInterceptorService, multi: true }
  ],
  bootstrap: [AppComponent]
})
export class AppModule { }
Next, edit src/app/auth-interceptor.service.ts to look like the code shown below:
import { Injectable } from '@angular/core'; // imports the class that provides local storage for token
import { HttpEvent, HttpInterceptor, HttpHandler, HttpRequest, HttpErrorResponse } from '@angular/common/http';
import { catchError, filter, take, switchMap } from "rxjs/operators";
import { Observable, throwError } from 'rxjs';

@Injectable({
  providedIn: 'root'
})

export class AuthInterceptorService implements HttpInterceptor {

  intercept(req: HttpRequest<any>, next: HttpHandler) {
    console.log("Interception In Progress"); // Interception Stage
    const token: string = localStorage.getItem('token'); // This retrieves a token from local storage
    req = req.clone({ headers: req.headers.set('Authorization', 'Bearer ' + token) });// This clones HttpRequest and Authorization header with Bearer token added
    req = req.clone({ headers: req.headers.set('Content-Type', 'application/json') });
    req = req.clone({ headers: req.headers.set('Accept', 'application/json') });

    return next.handle(req)
        .pipe(
           catchError((error: HttpErrorResponse) => {
                // Catching Error Stage
                if (error && error.status === 401) {
                    console.log("ERROR 401 UNAUTHORIZED") // in case of an error response the error message is displayed
                }
                const err = error.error.message || error.statusText;
                return throwError(error); // any further errors are returned to frontend
           })
        );
  }
}
6. Interception stage code explanation
In authentication, the token obtained from the server is stored locally. It will then be retrieved from local storage and the header httpRequest req, a cloned and Authorisation, Bearer: token header is added into it. Then the token is sent in the httpRequest header.
7. Error stage code explanation
In case of an error response or 401, 402, etc. error status, the pipe will help catch the error. The user will not authenticate due to a bad request or Unauthorized Request. The error in the call is returned to the frontend in case of further error requests.
8. Creating the backend
I will start by creating a directory in the base folder for the server and initialize it as a Node.js project by running the following commands.
$ mkdir node_server
$ cd node_server
$ npm init –y
The libraries: Express.js, body parser and Express JWT need to be installed.
Install them by running the command below:
$ npm i -S express cors body-parser express-jwt jsonwebtoken
Then, create a new file app.js and add the following code.
const express       = require('express')
const bodyParser    = require('body-parser');
const cors          = require('cors');
const jwt           = require('jsonwebtoken');
var expressJWT      = require('express-jwt');

const app           = express();
const port          = 3000;

app.use(cors());
app.options('*', cors());
app.use(bodyParser.json({limit: '10mb', extended: true}));
app.use(bodyParser.urlencoded({limit: '10mb', extended: true}));

app.get('/', (req, res) => {
    res.json("Hello World");
});

/* more code to be added later */

/* the listen function */
app.listen(port, function() {
    console.log("Listening to " + port);
});
Next, I will create a route where a token is generated. This is where the user authenticates. On a successful authentication, a token is sent. Add the code below before the listen function in app.js.
// SECRET FOR JWT
let secret = 'some_secret'; // a secret key is set here

/* Create token to be used */
app.get('/token/sign', (req, res) => {
    var userData = {
        "name": "My Name",
        "id": "1234"
    }
    let token = jwt.sign(userData, secret, { expiresIn: '15s'})
    res.status(200).json({"token": token});
});
Once the route has been created, it stores the user data, and encodes the data. When decoded, it will give back the user data. In this case only the username and id since storing a password is never a good practice.
Then, run the application and check the generated token by running:
$ node app.js
I will use Postman to test the /token/sign route as shown below.
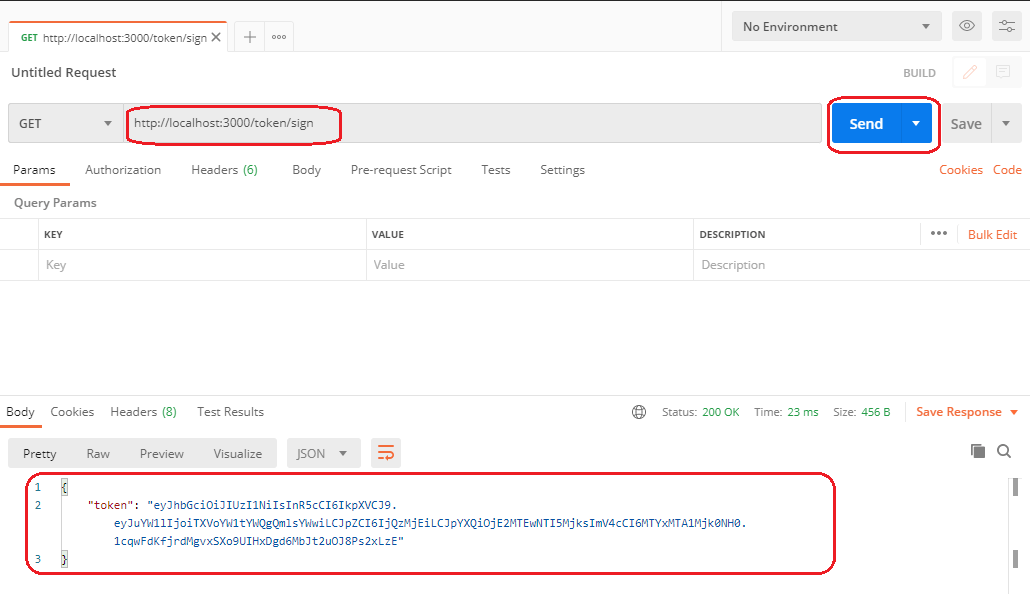
As of now, I have generated the first web token. Next, I will create a /path1 and secure it using my JSON Web Token.
For this task, I will be using the express-jwt function.
Add the code below to app.js.
app.use(expressJWT({ secret: secret, algorithms: ['HS256']})
    .unless( // This allows access to /token/sign without token authentication
        { path: [
            '/token/sign'
        ]}
    ));
Next, I will be testing /path1 using Postman, with no token sent in the header.
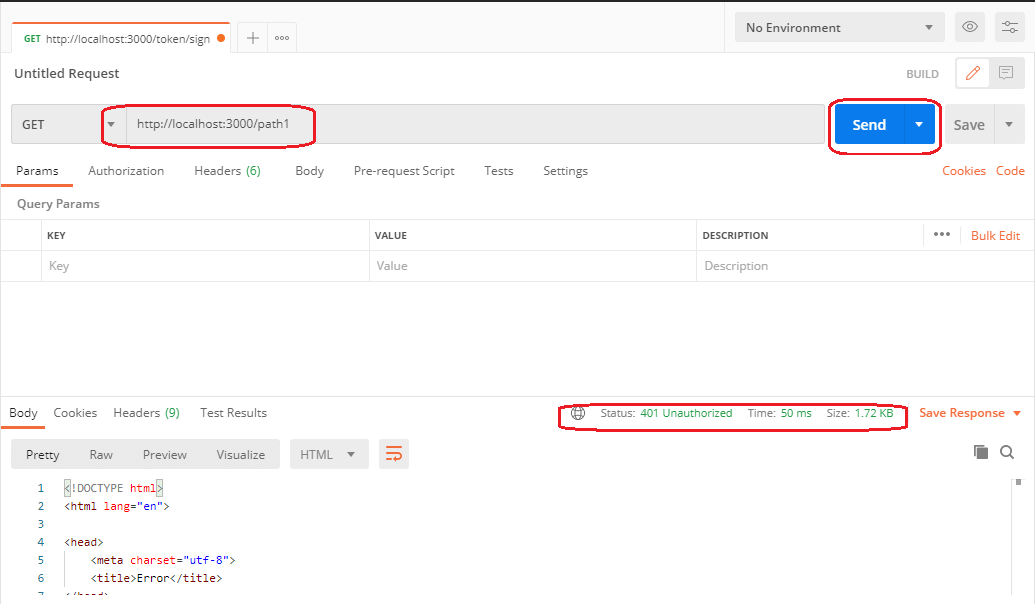
The app did not allow me to access the path. Accessing the path returns a 401 Unauthorized as expected. The code below will allow access to /path1 if the token obtained from /token/sign is sent along.
Add this code to app.js.
// upon successful token authentication, access to path1 is granted
app.get('/path1', (req, res) => {
    res.status(200)
        .json({
            "success": true,
            "msg": "Secret Access Granted"
        });
});
On adding the Bearer Token and accessing /path1, the success message is displayed as shown below:

Back to Angular, I will create a new component home by running the following command:
$ ng generate component home
Then I will modify home.component.ts located at src/app to look as the code below:
import { Component, OnInit } from '@angular/core';
import { HttpClient } from '@angular/common/http';

@Component({
  selector: 'app-home',
  templateUrl: './home.component.html',
  styleUrls: ['./home.component.css']
})
export class HomeComponent implements OnInit {

  readonly API_URL = 'http://localhost:3000';

  constructor(
    private http: HttpClient
  ) { }

  ngOnInit() {
  }

signIn() {
    this.http.get(this.API_URL + '/token/sign')
      .subscribe(
        (res) => {
          console.log(res);
          if (res['token']) {
            localStorage.setItem('token', res['token']); //token here is stored in a local storage
          }
        },
        (err) => {
          console.log(err);
        }
      );
  }

  getPath() {
    this.http.get(this.API_URL + '/path1') //path1 is then requested
      .subscribe(
        (res) => {
          console.log(res);
        },
        (err) => {
          console.log(err);
        }
      );
  }
}
The signIn() function in the code above, creates a token and stores it in local storage. The getPath() function requests the path path1 of our Node.js app.
Then, I will write a simple HTML page to test the two functions above.
Also, modify src/app/app-routing.module.ts to look like the code below. This will map the home component to the home route (/).
import { NgModule } from '@angular/core';
import { Routes, RouterModule } from '@angular/router';
import { HomeComponent } from './home/home.component';
const routes: Routes = [
 { path: '', component: HomeComponent }
];
@NgModule({
  imports: [RouterModule.forRoot(routes)],
  exports: [RouterModule]
})
export class AppRoutingModule { }
Open src/app/home/home.component.html and add the code below:
<h3>JSON Web Test</h3>

<button (click)="signIn()">Sign In</button>
<button (click)="getPath()">Get Path 1</button>
Also, replace the content of the template file src/app/home/app.component.html with the code below. This will load our Html page instead of the default template.
<router-outlet></router-outlet>
To run the Angular app, browse to the project folder and run the command below on a terminal.
$ ng serve
The command will compile the whole Angular project and open the page on the browser.
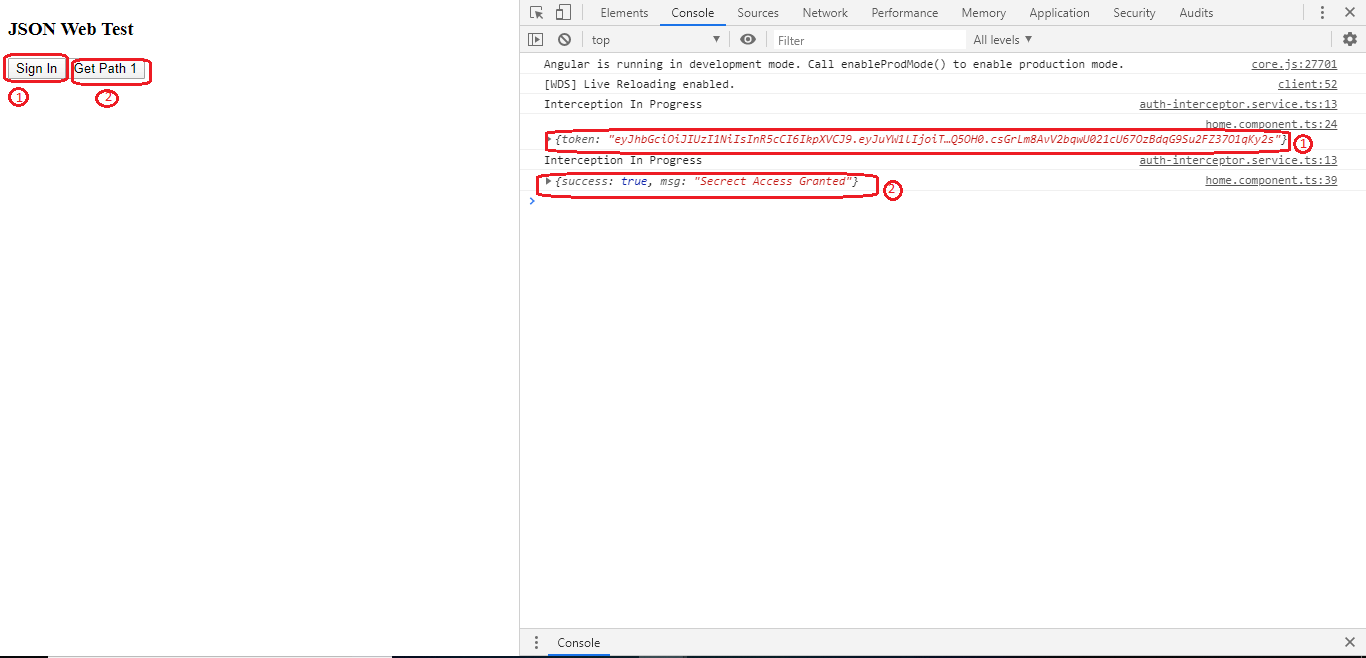
Press F12 to open the developer console. Then, click on the Sign In button to get a token. Then click on the Get Path1 Button to access the path as shown below:
To clear the token stored in local storage, I will refresh the browser.
Then I will try to access the path as shown below:
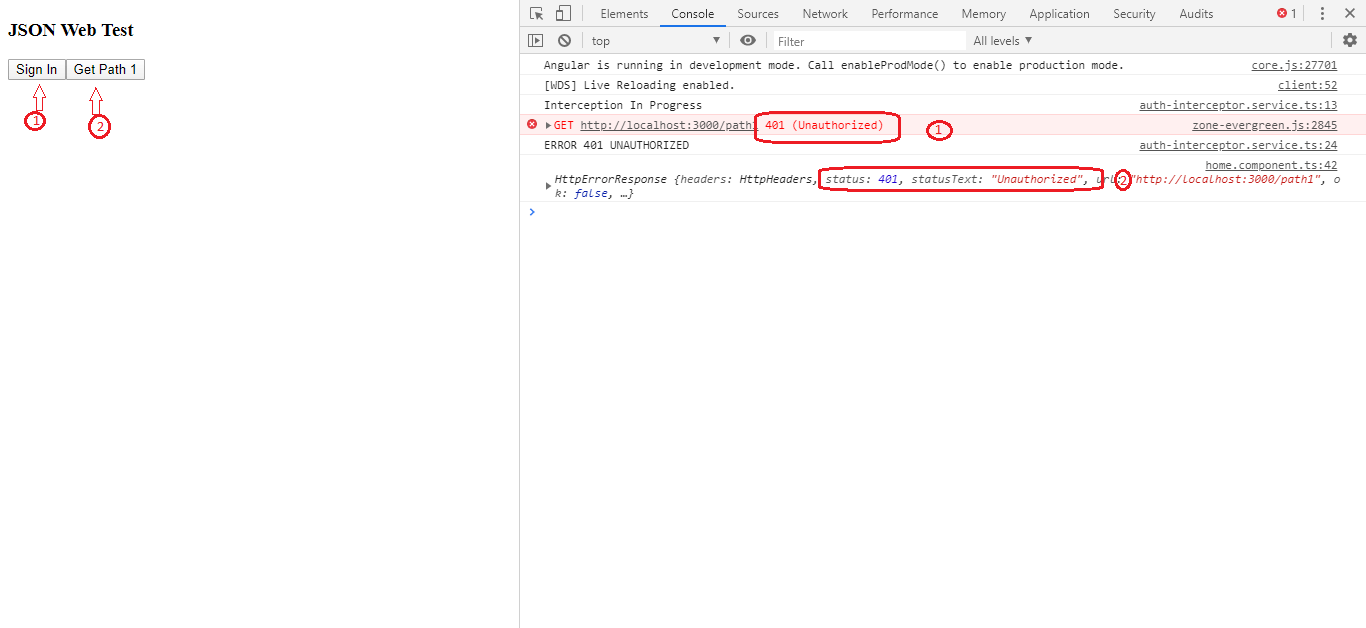
We get a 401 Unauthorized error. This shows that our application is now secure.
9. Conclusion
When using JSON Web Tokens, the app also becomes secure since the services and any communication between the server and the app are also secure. This tutorial guided you on how to implement the JSON Web Token in Angular 11 and Node.js. This will help anyone to secure their applications for production.
The code used in this tutorial can be found in this GitHub repo.
That is it.
Happy coding!