
Table of Contents
This article will explain how to create a simple chat application with Node.js and React, where the exchanged messages will have end-to-end encryption using secret keys.
In recent times, real-time chat applications have grown tremendously. Most organizations have adopted them for communication. For security reasons, the messages exchanged over the network must be encrypted.
If a malicious program tries to tap the messages illegally that are exchanged across a network, the intercepted message would be in an encrypted format, thus the content of the message will not be compromised.
1. Prerequisites
To follow this article along you will need the following:
- Working knowledge of Node.js, Express, React.js, aes256 encryption, and Socket.io.
- A text editor, preferably VS Code Editor.
- A working web browser for testing, preferably Google Chrome.
- Node.js Installed.
2. How the app works
We’ll create a secret key and store it in the frontend for demonstration purposes. The key is saved in a .ENV variable where the frontend has been deployed in a server.
Whenever a user sends or receives a message, the message will be encrypted or decrypted using an aes256 npm package with the same secret key.
3. Creating the backend
For the backend, we’ll use Node.js and the Express framework. Socket.io is needed to provide real-time, two-way communication between the backend server and the frontend.
The folder structure for our backend will look as follows:

4. Coding the backend
Step 1
Create a server directory with the name chatbackend and browse to the directory.
mkdir chatbackend
cd chatbackend
Initialize the server project by running the commands below in the terminal that will generate the package.json file.
npm init –y
Step 2
Next, let’s install the dependencies required by running the following commands:
npm i socket.io express cors colors
npm i -D nodemon
Let’s create a file called dummyuser.js, where we create an empty array of users and add a user who joins a room. In case the user disconnects, the array is emptied.
const c_users = [];

// joins the user to the specific chatroom
function join_User(id, username, room) {
  const p_user = { id, username, room };

  c_users.push(p_user);
  console.log(c_users, "users");

  return p_user;
}

console.log("user out", c_users);

// Gets a particular user id to return the current user
function get_Current_User(id) {
  return c_users.find((p_user) => p_user.id === id);
}

// called when the user leaves the chat and its user object deleted from array
function user_Disconnect(id) {
  const index = c_users.findIndex((p_user) => p_user.id === id);

  if (index !== -1) {
    return c_users.splice(index, 1)[0];
  }
}

module.exports = {
  join_User,
  get_Current_User,
  user_Disconnect,
};
In the code snippet above, the below functions that deals with the user has been created:
The join_User() function adds the user to the array of users already declared in the code above. It consists of three keys id, a username, and a room name, where the room name tells the user the room or group belongs.
The get_Current_User() function will take the id of the particular user and return its user object.
In the user_Disconnect() function, if a user disconnects or leaves the chat, the function accepts a user id and deletes the user object from the array users.
Step 3
In this step, let’s create a file called server.js that initializes backend connection and ensures the communication between the users in the room.
const express = require("express");
const app = express();
const socket = require("socket.io");
const color = require("colors");
const cors = require("cors");
const { get_Current_User, user_Disconnect, join_User } = require("./dummyuser");

app.use(express());

const port = 8000;

app.use(cors());

var server = app.listen(
  port,
  console.log(
    `Server is running on the port no: ${(port)} `
      .green
  )
);

const io = socket(server);

//initializing the socket io connection
io.on("connection", (socket) => {
  //for a new user joining the room
  socket.on("joinRoom", ({ username, roomname }) => {
    //* create user
    const p_user = join_User(socket.id, username, roomname);
    console.log(socket.id, "=id");
    socket.join(p_user.room);

    //display a welcome message to the user who have joined a room
    socket.emit("message", {
      userId: p_user.id,
      username: p_user.username,
      text: `Welcome ${p_user.username}`,
    });

    //displays a joined room message to all other room users except that particular user
    socket.broadcast.to(p_user.room).emit("message", {
      userId: p_user.id,
      username: p_user.username,
      text: `${p_user.username} has joined the chat`,
    });
  });

  //user sending message
  socket.on("chat", (text) => {
    //gets the room user and the message sent
    const p_user = get_Current_User(socket.id);

    io.to(p_user.room).emit("message", {
      userId: p_user.id,
      username: p_user.username,
      text: text,
    });
  });

  //when the user exits the room
  socket.on("disconnect", () => {
    //the user is deleted from array of users and a left room message displayed
    const p_user = user_Disconnect(socket.id);

    if (p_user) {
      io.to(p_user.room).emit("message", {
        userId: p_user.id,
        username: p_user.username,
        text: `${p_user.username} has left the room`,
      });
    }
  });
});
In the server.js code above, we started by importing the modules and functions from the file dummyuser.js. The code listens on port 8000 and initializes the socket.
After initializing the socket, let’s set two listeners listed below:
- joinRoom: The function we pass to
socket.on(“joinRoom”)runs when a new room user joins the room. A message to welcome the room user will be shown to the user. Also, a message “username has joined” will be broadcasted to all other users except the user who joined the room. - chat: The function we pass to
socket.on(“chat”)handles sending and receiving message. If a user leaves the chat, a disconnect message is broadcasted to all other room users.
The event listeners of the functions above, joinRoom and chat will be triggered from the frontend in the files home.js and chat.js as explained later in this guide.
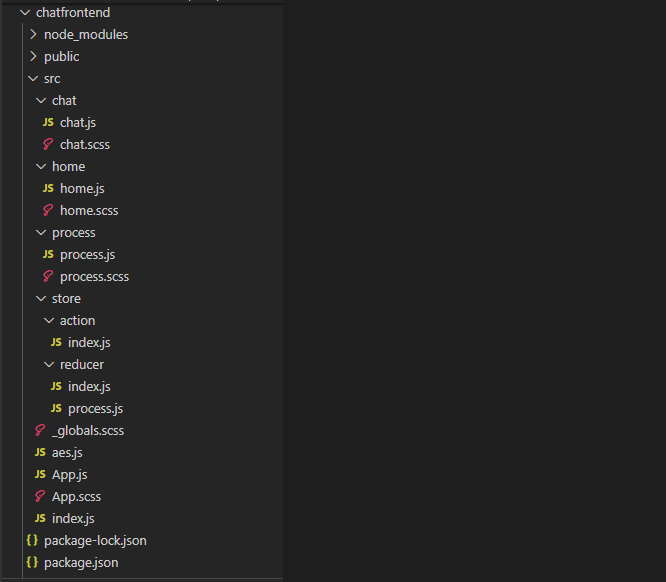
5. Creating the frontend
We will use React, Redux library, the socket.io-client, and aes256 for encrypting and decrypting the messages for the frontend.
The folder structure for our client-side will appear as below:
6. Coding the frontend
Step 1
First, let’s run the commands below in the terminal to create a client folder for our React App, namely chatfrontend, browse to the created directory and install the necessary dependencies required for the react app to run.
npx create-react-app chatfrontend
cd chatfrontend
npm i node-sass react-redux react-router-dom redux socket.io-client aes256
Step 2
Next, let’s modify the file /src/index.js to help implement reducers in our react app as explained later in this guide.
The code will be as below:
import App from "./App";
import rootReducers from "./store/reducer/index";
import ReactDOM from "react-dom";
import { createStore } from "redux";
import { Provider } from "react-redux";
import React from "react";

//here we create an object to store the current state of the application
const store = createStore(rootReducers);
ReactDOM.render(
  <Provider store={store}>
    <App />
  </Provider>,
  document.getElementById("root")
);
In the code above, we have added redux and imported reducers from the file /store/reducer/index.js
Next, let’s create a file /store/action/index.js that will define the action object and return the the same to avoid writing the object every time we need it.
The code is as shown below:
//here we export the function process with the defined parameters and define action object PROCESS, which will return the same parameters as the payload.
export const process = (encrypt, text, cypher) => {
  return {
    type: "PROCESS",
    payload: {
      encrypt,
      text,
      cypher,
    },
  };
};
Then let’s create a file /store/reducer/process.js that will be our reducer. It takes the current state and the action object we have just created to return a new state.
The code is as shown below:
//initialiaze the function with two arguments
export const ProcessReducer = (state = {}, action) => {
  switch (action.type) {
    //returns updated state
    case "PROCESS":
      return { ...action.payload };
    //else the current state is retained
    default:
      return state;
  }
};
Then, let’s create a file /store/reducer/index.js where we import the reducer we have just created and call the action object created previously.
The code is as shown below:
// import the reducers
import { ProcessReducer } from "./process";
import { combineReducers } from "redux";
// define the object and call the action
const rootReducers = combineReducers({
  ProcessReducer: ProcessReducer,
});
// else return default root reducer
export default rootReducers;
In the code snippets above, we add redux into our React App and then create an action by the name process.
The action will help send and receive incoming and outgoing messages respectively to the file aes.js, which will encrypt and decrypt messages.
Step 3
Next, let’s create the file App.js that is rensponsible for fetching the routes for the user name and room name.
The file appears as below:
import Chat from "./chat/chat";
import Process from "./process/process";
import Home from "./home/home";
import { BrowserRouter as Router, Switch, Route } from "react-router-dom";
import "./App.scss";
import React from "react";
import io from "socket.io-client";

const socket = io.connect('/');

function Appmain(props) {
  return (
    <React.Fragment>
      <div className="right">
        <Chat
          username={props.match.params.username}
          roomname={props.match.params.roomname}
          socket={socket}
        />
      </div>
      <div className="left">
        <Process />
      </div>
    </React.Fragment>
  );
}

function App() {
  return (
    <Router>
      <div className="App">
        <Switch>
          <Route path="/" exact>
            <Home socket={socket} />
          </Route>
          <Route path="/chat/:roomname/:username" component={Appmain} />
        </Switch>
      </div>
    </Router>
  );
}

export default App;
In the code above, we added routes and imported the components (React, io, Chat, Process, Home). We rendered home components and got username and roomname from the routes on the base URL.
On this path, /chat/roomname/username the AppMain component is rendered, and it returns two divs. The first div is for the chatbox and the other returns process for displaying encrypted and decrypted, incoming and outgoing messages, respectively.
Let’s add some styling for App.js.
We’ll create the files App.scss and _globals.scss as below:
App.scss
@import "./globals";
.App {
  width: 100%;
  height: 100vh;
  background-color: $backgroundColor;
  display: flex;
  justify-content: center;
  align-items: center;
  .right {
    flex: 2;
  }
  .left {
    flex: 1;
  }
}
_globals.scss
@import url("https://fonts.googleapis.com/css2?family=Muli:ital,wght@0,200;0,300;0,400;0,500;0,600;0,700;0,800;0,900;1,200;1,300;1,400;1,500;1,600;1,700;1,800;1,900&display=swap");
* {
  margin: 0 auto;
  padding: 0;
  box-sizing: border-box;
  color: white;
  font-family: "Muli", sans-serif;
}

$backgroundColor: #282b34;
$redColor: #ff1e56;
$yellowColor: #ffac41;
$greyColor: #2d343e;
Step 4
Next, let’s code the file /home/home.js, that acts as our homepage page, where the user keys in the user name and room name is joining.
The code for the file should be as below:
import React, { useState } from "react";
import "./home.scss";
import { Link } from "react-router-dom";

function Homepage({ socket }) {
  const [username, setusername] = useState("");
  const [roomname, setroomname] = useState("");
  //activates joinRoom function defined on the backend
  const sendData = () => {
    if (username !== "" && roomname !== "") {
      socket.emit("joinRoom", { username, roomname });
      //if empty error message pops up and returns to the same page
    } else {
      alert("username and roomname are must !");
      window.location.reload();
    }
  };

  return (
    <div className="homepage">
      <h1>Welcome to ChatApp</h1>
      <input
        placeholder="Input your user name"
        value={username}
        onChange={(e) => setusername(e.target.value)}
      ></input>
      <input
        placeholder="Input the room name"
        value={roomname}
        onChange={(e) => setroomname(e.target.value)}
      ></input>
      <Link to={`/chat/${roomname}/${username}`}>
        <button onClick={sendData}>Join</button>
      </Link>
    </div>
  );
}

export default Homepage;
From the code above, we take the user name and room name and call the function socket.emit("joinRoom") and pass the username and roomname.
The function will activate the joinRoom function defined in the backend. The joinRoom function will add the user to the room, and a welcome message will be displayed as explained earlier in the backend.
Now, let’s add some styling to home.js.
We create a file home.scss as below:
.homepage {
  width: 500px;
  height: 500px;
  padding: 2rem;
  background-color: #2d343e;
  display: flex;
  justify-content: space-evenly;
  flex-direction: column;
  border-radius: 5px;
  input {
    height: 50px;
    width: 80%;
    background-color: #404450;
    border: none;
    padding-left: 1rem;
    border-radius: 5px;
    &:focus {
      outline: none;
    }
  }
  button {
    font-size: 1rem;
    padding: 0.5rem 1rem 0.5rem 1rem;
    width: 100px;
    border: none;
    background-color: #ffac41;
    border-radius: 5px;

    color: black;
    &:hover {
      cursor: pointer;
    }
  }
}
Step 5
Next, let’s code the file /chat/chat.js as it loads once the user has joined the room. It is the main page where a user can chat with each other using the chatbox.
The code for the file is shown below:
import "./chat.scss";
import { to_Decrypt, to_Encrypt } from "../aes.js";
import { process } from "../store/action/index";
import React, { useState, useEffect, useRef } from "react";
import { useDispatch } from "react-redux";
//gets the data from the action object and reducers defined earlier
function Chat({ username, roomname, socket }) {
  const [text, setText] = useState("");
  const [messages, setMessages] = useState([]);

  const dispatch = useDispatch();

  const dispatchProcess = (encrypt, msg, cipher) => {
    dispatch(process(encrypt, msg, cipher));
  };

  useEffect(() => {
    socket.on("message", (data) => {
      //decypt the message
      const ans = to_Decrypt(data.text, data.username);
      dispatchProcess(false, ans, data.text);
      console.log(ans);
      let temp = messages;
      temp.push({
        userId: data.userId,
        username: data.username,
        text: ans,
      });
      setMessages([...temp]);
    });
  }, [socket]);

  const sendData = () => {
    if (text !== "") {
      //encrypt the message here
      const ans = to_Encrypt(text);
      socket.emit("chat", ans);
      setText("");
    }
  };
  const messagesEndRef = useRef(null);

  const scrollToBottom = () => {
    messagesEndRef.current.scrollIntoView({ behavior: "smooth" });
  };

  useEffect(scrollToBottom, [messages]);

  console.log(messages, "mess");

  return (
    <div className="chat">
      <div className="user-name">
        <h2>
          {username} <span style={{ fontSize: "0.7rem" }}>in {roomname}</span>
        </h2>
      </div>
      <div className="chat-message">
        {messages.map((i) => {
          if (i.username === username) {
            return (
              <div className="message">
                <p>{i.text}</p>
                <span>{i.username}</span>
              </div>
            );
          } else {
            return (
              <div className="message mess-right">
                <p>{i.text} </p>
                <span>{i.username}</span>
              </div>
            );
          }
        })}
        <div ref={messagesEndRef} />
      </div>
      <div className="send">
        <input
          placeholder="enter your message"
          value={text}
          onChange={(e) => setText(e.target.value)}
          onKeyPress={(e) => {
            if (e.key === "Enter") {
              sendData();
            }
          }}
        ></input>
        <button onClick={sendData}>Send</button>
      </div>
    </div>
  );
}
export default Chat;
In the code above, we took the user’s input and passed it to the action process, and then the data was passed to the aes function for encryption.
Then the encrypted data was sent to socket.on("chat"). Also, if the message is received, it will be passed to the aes function for decryption.
Let’s add some styling to chat.js.
Let’s code the file chat.scss as below:
@import "../globals";
@mixin scrollbars(
  $size,
  $foreground-color,
  $background-color: mix($foreground-color, white, 50%)
) {
  //stylesheet for the display in Google Chrome
  &::-webkit-scrollbar {
    height: $size;
    width: $size;
  }

  &::-webkit-scrollbar-thumb {
    border-radius: 10px;
    background: $foreground-color;
  }

  &::-webkit-scrollbar-track {
    border-radius: 10px;
    background: $background-color;
  }

  // stylesheet for the display in Internet Explorer
  & {
    scrollbar-track-color: $background-color;
    scrollbar-face-color: $foreground-color;
  }
}
.chat {
  display: flex;
  width: 400px;
  padding: 1rem;
  justify-content: space-between;
  height: 600px;
  flex-direction: column;
  background-color: $greyColor;
  .user-name {
    width: 100%;
    text-align: start;
    h2 {
      border-bottom: 1px solid rgba(255, 255, 255, 0.1);
      font-weight: 300;
      padding-bottom: 1rem;
    }
  }
  .chat-message {
    @include scrollbars(5px, $backgroundColor, $yellowColor);
    height: 70%;
    display: flex;
    overflow-y: auto;
    align-content: flex-start;
    width: 100%;
    flex-direction: column;

    .message {
      padding-left: 0.5rem;
      max-width: 220px;
      margin-left: 0px;
      p {
        color: #b4b6be;
        font-size: 1rem;
        font-weight: 300;
        background-color: #250202;
        border-radius: 0px 10px 10px 10px;
        padding: 1rem;
      }

      span {
        color: #b4b6be;
        font-size: 0.6rem;
        padding-left: 0.5rem;
        font-weight: 200;
      }
    }
    .mess-right {
      display: flex;
      margin-left: auto;
      flex-direction: column;
      padding-right: 0.5rem;
      margin-right: 0px;
      max-width: 220px;
      p {
        background-color: $redColor;
        text-align: end;
        color: white;
        border-radius: 10px 0px 10px 10px;
      }
      span {
        padding-left: 0rem;
        width: 100%;
        padding-right: 0.5rem;
        text-align: end;
      }
    }
  }

  .send {
    height: 50px;
    display: flex;
    width: 100%;
    input {
      background-color: #404450;
      width: 80%;
      padding-left: 1rem;
      text-decoration: none;
      border-radius: 5px 0px 0px 5px;
      border: none;
      &:focus {
        outline: none;
      }
    }
    button {
      background-color: $yellowColor;
      width: 20%;
      border-radius: 0px 5px 5px 0px;
      border: none;
      &:hover {
        cursor: pointer;
      }
    }
  }
}
Step 6
Next, let’s create the file aes.js which is responsible for the encryption of outgoing messages and decryption of incoming messages by the use of the same secret key, as below:
var aes256 = require("aes256");
//the secret key used for encrypting and decrypting messages
var secret_key = "uI2ooxtwHeI6q69PS98fx9SWVGbpQohO";
//returns the encrypted text
export const to_Encrypt = (text) => {
  var encrypted = aes256.encrypt(secret_key, text);
  return encrypted;
};
//welcome message is not decrypted
export const to_Decrypt = (cipher, username) => {
  if (cipher.startsWith("Welcome")) {
    return cipher;
  }

  if (cipher.startsWith(username)) {
    return cipher;
  }
  //decryped message is returned
  var decrypted = aes256.decrypt(secret_key, cipher);
  return decrypted;
};
In the code above, we imported aes256 from the aes module and wrote the functions where the incoming encrypted message is decrypted and outgoing message is encrypted.
Note the welcome user message is not to be encrypted.
Step 7
Next we will be creating the file /process/process.js that is displayed on the right side of the chat room. It displays the secret key used, encrypted and decrypted message.
The code is as below:
import "./process.scss";
import { useSelector } from "react-redux";
function Process() {
  // returns new state from the reducers
  const state = useSelector((state) => state.ProcessReducer);

  return (
    <div className="process">
      <h5>
        Secret Key : <span>"uI2ooxtwHeI6q69PS98fx9SWVGbpQohO"</span>
      </h5>
      <div className="incoming">
        <h4>Incoming Data</h4>
        <p>{state.cypher}</p>
      </div>
      <div className="crypt">
        <h4>Decypted Data</h4>
        <p>{state.text}</p>
      </div>
    </div>
  );
}
export default Process;
The code above is an optional component where we display an incoming encrypted message and decrypt it using our secret key. The file process.js displays the incoming encrypted and decrypted messages on the sidebar.
Let’s add some styling to the file process.js.
Let’s create the file /process/process.scss as below:
.process {
  align-items: center;
  min-height: 500px;
  padding: 2rem;
  width: 450px;
  flex-direction: column;
  display: flex;
  margin-right: 12rem;
  justify-content: space-evenly;

  h5 {
    span {
      color: yellow;
    }
    font-weight: 400;
    margin-bottom: 5rem;
    color: rgb(4, 238, 4);
  }
  h4 {
    font-weight: 400;
    color: rgb(4, 238, 4);
  }
  p {
    font-size: 1rem;
    padding: 1.2rem;
    margin-top: 0.5rem;
    border-radius: 5px;
    background-color: rgba(0, 0, 0, 0.4);
    text-overflow: auto;
  }
  .incoming {
    width: 100%;
    margin-bottom: 15rem;
    overflow: auto;
    text-overflow: auto;
  }
  .crypt {
    width: 100%;
    overflow: auto;
    height: 100%;
  }
}
7. Running the app
Now that we have successfully created a Real-time chat E2E App, the final step will be to run the server and the React app to test it.
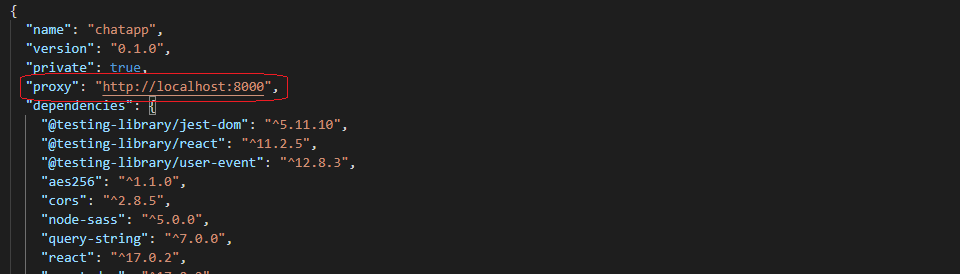
We need to note that our server runs on port 8000, and our frontend runs on port 3000. We need to proxy the connection for our Node.js server to communicate with our frontend.
To achieve this, we need to edit the React App’s package.json file located at /chatfrontend/package.json and add the line of code below:
"proxy": "http://localhost:8000"
The package.json file will appear as below:
To run our server, navigate to the backend directory and type the commands below in the terminal:
cd chatbackend
node server.js
To run the frontend, type the commands below in the terminal:
cd chatfrontend
npm start
The command will compile the project and run the React app. Once this is complete, open the web browser and go to http://localhost:3000, type a user name and a room name.
Launch another tab and access http://localhost:3000 and, type a different user name but type same room name and test the app.
8. Conclusion
In general, the app demonstrated above is quite simple and does not have many features a modern chat app would have. However, the idea, the code behind the app, and end-to-end encryption can be used to implement a real chat app.
A lot more can be added from this chat app, but the concept and method can remain the same.
The project files and source code used in this guide can be found at GitHub Repository.
Happy coding!