
Table of Contents
1. Overview
React is a component-based JavaScript library built by Facebook. With React, we can build complex web applications with ease. In this article, we’re going to make Spring Security work together with a React Login page.
We’ll take advantage of the existing Spring Security configurations of previous examples. So we’ll build on top of a previous article about creating a Form Login with Spring Security.
2. Set up React
First, let’s use the command-line tool create-react-app to create an application by executing the command “create-react-app react”.
We’ll have a configuration like the following in react/package.json:
{
    "name": "react",
    "version": "0.1.0",
    "private": true,
    "dependencies": {
        "react": "^16.4.1",
        "react-dom": "^16.4.1",
        "react-scripts": "1.1.4"
    },
    "scripts": {
        "start": "react-scripts start",
        "build": "react-scripts build",
        "test": "react-scripts test --env=jsdom",
        "eject": "react-scripts eject"
    }
}
Then, we’ll use the frontend-maven-plugin to help build our React project with Maven:
<plugin>
    <groupId>com.github.eirslett</groupId>
    <artifactId>frontend-maven-plugin</artifactId>
    <version>1.6</version>
    <configuration>
        <nodeVersion>v8.11.3</nodeVersion>
        <npmVersion>6.1.0</npmVersion>
        <workingDirectory>src/main/webapp/WEB-INF/view/react</workingDirectory>
    </configuration>
    <executions>
        <execution>
            <id>install node and npm</id>
            <goals>
                <goal>install-node-and-npm</goal>
            </goals>
        </execution>
        <execution>
            <id>npm install</id>
            <goals>
                <goal>npm</goal>
            </goals>
        </execution>
        <execution>
            <id>npm run build</id>
            <goals>
                <goal>npm</goal>
            </goals>
            <configuration>
                <arguments>run build</arguments>
            </configuration>
        </execution>
    </executions>
</plugin>
The latest version of the plugin can be found here.
When we run mvn compile, this plugin will download node and npm, install all node module dependencies and build the react project for us.
There are several configuration properties we need to explain here. We specified the versions of node and npm, so that the plugin will know which version to download.
Our React login page will serve as a static page in Spring, so we use “src/main/webapp/WEB-INF/view/react” as npm‘s working directory.
3. Spring Security Configuration
Before we dive into the React components, we update the Spring configuration to serve the static resources of our React app:
@EnableWebMvc
@Configuration
public class MvcConfig extends WebMvcConfigurerAdapter {

    @Override
    public void addResourceHandlers(
      ResourceHandlerRegistry registry) {

        registry.addResourceHandler("/static/**")
          .addResourceLocations("/WEB-INF/view/react/build/static/");
        registry.addResourceHandler("/*.js")
          .addResourceLocations("/WEB-INF/view/react/build/");
        registry.addResourceHandler("/*.json")
          .addResourceLocations("/WEB-INF/view/react/build/");
        registry.addResourceHandler("/*.ico")
          .addResourceLocations("/WEB-INF/view/react/build/");
        registry.addResourceHandler("/index.html")
          .addResourceLocations("/WEB-INF/view/react/build/index.html");
    }
}
Note that we add the login page “index.html” as a static resource instead of a dynamically served JSP.
Next, we update the Spring Security configuration to allow access to these static resources.
Instead of using “login.jsp” as we did in the previous form login article, here we use “index.html” as our Login page:
@Configuration
@EnableWebSecurity
@Profile("!https")
public class SecSecurityConfig
  extends WebSecurityConfigurerAdapter {

    //...

    @Override
    protected void configure(final HttpSecurity http)
      throws Exception {
        http.csrf().disable().authorizeRequests()
          //...
          .antMatchers(
            HttpMethod.GET,
            "/index*", "/static/**", "/*.js", "/*.json", "/*.ico")
            .permitAll()
          .anyRequest().authenticated()
          .and()
          .formLogin().loginPage("/index.html")
          .loginProcessingUrl("/perform_login")
          .defaultSuccessUrl("/homepage.html",true)
          .failureUrl("/index.html?error=true")
          //...
    }
}
As we can see from the snippet above when we post form data to “/perform_login“, Spring will redirect us to “/homepage.html” if the credentials match successfully and to “/index.html?error=true” otherwise.
4. React Components
Now let’s get our hands dirty on React. We’ll build and manage a form login using components.
Note that we’ll use ES6 (ECMAScript 2015) syntax to build our application.
4.1. Input
Let’s start with an Input component that backs the <input /> elements of the login form in react/src/Input.js:
import React, { Component } from 'react'
import PropTypes from 'prop-types'

class Input extends Component {
    constructor(props){
        super(props)
        this.state = {
            value: props.value? props.value : '',
            className: props.className? props.className : '',
            error: false
        }
    }

    //...

    render () {
        const {handleError, ...opts} = this.props
        this.handleError = handleError
        return (
          <input {...opts} value={this.state.value}
            onChange={this.inputChange} className={this.state.className} />
        )
    }
}

Input.propTypes = {
  name: PropTypes.string,
  placeholder: PropTypes.string,
  type: PropTypes.string,
  className: PropTypes.string,
  value: PropTypes.string,
  handleError: PropTypes.func
}

export default Input
As seen above, we wrap the <input /> element into a React controlled component to be able to manage its state and perform field validation.
React provides a way to validate the types using PropTypes. Specifically, we use Input.propTypes = {…} to validate the type of properties passed in by the user.
Note that PropType validation works for development only. PropType validation is to check that all the assumptions that we’re making about our components are being met.
It’s better to have it rather than getting surprised by random hiccups in production.
4.2. Form
Next, we’ll build a generic Form component in the file Form.js that combines multiple instances of our Input component on which we can base our login form.
In the Form component, we take attributes of HTML <input/> elements and create Input components from them.
Then the Input components and validation error messages are inserted into the Form:
import React, { Component } from 'react'
import PropTypes from 'prop-types'
import Input from './Input'

class Form extends Component {

    //...

    render() {
        const inputs = this.props.inputs.map(
          ({name, placeholder, type, value, className}, index) => (
            <Input key={index} name={name} placeholder={placeholder} type={type} value={value}
              className={type==='submit'? className : ''} handleError={this.handleError} />
          )
        )
        const errors = this.renderError()
        return (
            <form {...this.props} onSubmit={this.handleSubmit} ref={fm => {this.form=fm}} >
              {inputs}
              {errors}
            </form>
        )
    }
}

Form.propTypes = {
  name: PropTypes.string,
  action: PropTypes.string,
  method: PropTypes.string,
  inputs: PropTypes.array,
  error: PropTypes.string
}

export default Form
Now let’s take a look at how we manage field validation errors and login error:
class Form extends Component {

    constructor(props) {
        super(props)
        if(props.error) {
            this.state = {
              failure: 'wrong username or password!',
              errcount: 0
            }
        } else {
            this.state = { errcount: 0 }
        }
    }

    handleError = (field, errmsg) => {
        if(!field) return

        if(errmsg) {
            this.setState((prevState) => ({
                failure: '',
                errcount: prevState.errcount + 1,
                errmsgs: {...prevState.errmsgs, [field]: errmsg}
            }))
        } else {
            this.setState((prevState) => ({
                failure: '',
                errcount: prevState.errcount===1? 0 : prevState.errcount-1,
                errmsgs: {...prevState.errmsgs, [field]: ''}
            }))
        }
    }

    renderError = () => {
        if(this.state.errcount || this.state.failure) {
            const errmsg = this.state.failure
              || Object.values(this.state.errmsgs).find(v=>v)
            return <div className="error">{errmsg}</div>
        }
    }

    //...

}
In this snippet, we define the handleError function to manage the error state of the form. Recall that we also used it for Input field validation. Actually, handleError() is passed to the Input Components as a callback in the render() function.
We use renderError() to construct the error message element. Note that Form’s constructor consumes an error property. This property indicates if the login action fails.
Then comes the form submission handler:
class Form extends Component {

    //...

    handleSubmit = (event) => {
        event.preventDefault()
        if(!this.state.errcount) {
            const data = new FormData(this.form)
            fetch(this.form.action, {
              method: this.form.method,
              body: new URLSearchParams(data)
            })
            .then(v => {
                if(v.redirected) window.location = v.url
            })
            .catch(e => console.warn(e))
        }
    }
}
We wrap all form fields into FormData and send it to the server using the fetch API.
Let’s not forget our login form comes with a successUrl and failureUrl, meaning that no matter if the request is successful or not, the response would require a redirection.
That’s why we need to handle redirection in the response callback.
4.3. Form Rendering
Now that we’ve set up all the components we need, we can continue to put them in the DOM. The basic HTML structure is as follows (find it under react/public/index.html):
<!DOCTYPE html>
<html lang="en">
  <head>
    <!-- ... -->
  </head>
  <body>

    <div id="root">
      <div id="container"></div>
    </div>

  </body>
</html>
Finally, we’ll render the Form into the <div/> with id “container” in react/src/index.js:
import React from 'react'
import ReactDOM from 'react-dom'
import './index.css'
import Form from './Form'

const inputs = [{
  name: "username",
  placeholder: "username",
  type: "text"
},{
  name: "password",
  placeholder: "password",
  type: "password"
},{
  type: "submit",
  value: "Submit",
  className: "btn"
}]

const props = {
  name: 'loginForm',
  method: 'POST',
  action: '/perform_login',
  inputs: inputs
}

const params = new URLSearchParams(window.location.search)

ReactDOM.render(
  <Form {...props} error={params.get('error')} />,
  document.getElementById('container'))
So our form now contains two input fields: username and password, and a submit button.
Here we pass an additional error attribute to the Form component because we want to handle login error after redirection to the failure URL: /index.html?error=true.
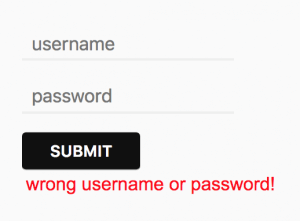
Now we’ve finished building a Spring Security login application using React. The last thing we need to do is to run mvn compile.
During the process, the Maven plugin will help build our React application and gather the build result in src/main/webapp/WEB-INF/view/react/build.
5. Conclusion
In this article, we’ve covered how to build a React login app and let it interact with a Spring Security backend. A more complex application would involve state transition and routing using React Router or Redux, but that’d be beyond the scope of this article.
As always, the full implementation can be found over on GitHub. To run it locally, execute mvn jetty:run in the project root folder, then we can access the React login page at http://localhost:8080.