
Table of Contents
Weather forecasting is very necessary for our daily lives. It helps us to prepare and make plans depending on the expectations. Many weather stations are placed around the world fetching real-time weather elements’ data.
This data includes six elements, such as precipitation, wind, atmospheric pressure, cloudiness, and temperature. With these, you can analyze trends and know the prediction of tomorrow’s data or forecast the weather.
Most of these large chunks of data are processed at base stations using powerful and sophisticated systems. They then share this data, (either analyzed over a long time or real-time data) through APIs. Companies that do this includes OpenWeatherMap and Dark Sky.
In this tutorial, you will learn how to build a beautiful weather app using OpenWeatherMap API.
1. Key takeaways
By the end of the tutorial, you will have learned:
- What the OpenWeatherMap API is.
- How to work with OpenWeatherMap API.
- How to build a beautiful weather website using HTML, CSS, and JavaScript.
- How to integrate the API into the system.
- How to run the web Application.
2. Prerequisites
Some basics needed to follow along with this tutorial include:
- Some basic knowledge in the web development process.
- Basics knowledge in Node.js. If you don’t have Node.js installed on your machine, you can download it from here.
- An IDE/text editor installed on the computer. I strongly recommend to those who don’t have one, to download and install Visual Studio Code.
- A good and stable internet connection.
If you have all the above, let’s get into the steps for a working project.
3. Get the API key
Visit https://openweathermap.org/ and create a new account or sign in if you already have an account.
OpenWeatherMap: Offers both free and paid services. It all depends on the type and size of data being requested. Furthermore, it also depends on the number of requests per time being made.
Click on your account name link found on the top right side of the navigation bar. On the drop-down menu, select ‘My API keys’. You can generate one with a new name or use the default one provided.
Make sure that it is not seen by anyone for security reasons. Also, don’t save it directly in your application.
In case of any invalid ‘Invalid API key’ error, you can create a new key and save it for use. One that has never been used before.
4. Set up the project
Create a new directory, which will be your root directory and name it Weather, and in it, you will initialize the Node.js project by using the command below:
npm init -y
This command accepts all the default options in the terminal dialogue. It creates a new configuration file called package.json in the root directory.
Next, create a folder named views and in it, a file named index.ejs. This file will allow us to view the results using the ejs view engine.
Create another folder in the root directory named public and in it another folder called css. Create files in the root directory named .env and server.js respectively. The project structure will be as shown below.
4.1. Folder structure
.Weather
├── node_modules (Folder)
├── public (Folder)
│   ├── css (Folder)
│       └── style.css (File)
├── views (Folder)
│   └── index.ejs (File)
├── .env (File)
├── package.json (File)
└── server.js (File)
You will now modify your files as follows:
4.2. Install dependencies
The following are the dependencies you will need for the project:
- express: This will help us create the server and serve your API.
- dotenv: This will help us to access hidden keys in the
.envfile. - body-parser: This is a Node.js body parsing middleware. It will allow us to parse incoming request bodies in a middleware before your handlers. These are available under the
req.bodyproperty. - request: This will help make http calls.
- ejs: This will help in the conversion of your templates into a HTML static page that can be viewed in your browser.
You will install them by running the following command in your terminal:
npm i express dotenv body-parser request ejs
4.3. Check application configurations
Let’ tweak your application configurations found inside the package.json file.
Open the file and in it add a start script as follows:
...
        "scripts": {
            "start": "node server.js",
            "test": "echo \"Error: no test specified\" && exit 1"
        },
...
Your complete package.json should look like this:
{
  "name": "Weather",
  "version": "1.0.0",
  "description": "",
  "main": "server.js",
  "scripts": {
    "start": "node server.js",
    "test": "echo \"Error: no test specified\" && exit 1"
  },
  "keywords": [],
  "author": "",
  "license": "ISC",
  "dependencies": {
    "body-parser": "^1.17.2",
    "dotenv": "^10.0.0",
    "express": "^4.15.3",
    "request": "^2.81.0"
  }
}
4.4. Application entry point
Head over to the server.js file which is your application’s main entry point.
You will need to do the following in your code:
- Importing application dependencies
These are the dependencies which you had installed in your application. To use them, you can import them using the require keyword, as shown below:
// Require application dependencies
// These are express, body-parser, and request

const express = require("express");
const bodyParser = require("body-parser");
const request = require("request");
const app = express();

// Configure dotenv package

require("dotenv").config();
Set up your API KEY, express app, and body-parser configurations, and your JavaScript template view engine.
// Set up your OpenWeatherMap API_KEY

const apiKey = `${process.env.API_KEY}`;

// Setup your express app and body-parser configurations
// Setup your javascript template view engine
// we will serve your static pages from the public directory, it will act as your root directory
app.use(express.static("public"));
app.use(bodyParser.urlencoded({ extended: true }));
app.set("view engine", "ejs");
Next, you will setup your default display on launch. This is essentially the page the user will see when they run a get request to the / route.
// Setup your default display on launch
app.get("/", function (req, res) {
  // It will not fetch and display any data in the index page
  res.render("index", { weather: null, error: null });
});
- Next, setup the post request display. This is the page that shows when you make a post request to the API with the data you want. Your fetch will happen on page load at the
/endpoint.
Here, you shall use the city passed in the post request and API_KEY in your .env file to get the data from the API.
// On a post request, the app shall data from OpenWeatherMap using the given arguments
app.post('/', function(req, res) {

    // Get city name passed in the form
    let city = req.body.city;

    // Use that city name to fetch data
    // Use the API_KEY in the '.env' file
    let url = `http://api.openweathermap.org/data/2.5/weather?q=${city}&units=metric&appid=${apiKey}`;
- Next, we will request the data from the OpenWeatherMap API using the credentials passed in the URL. The data found in the body section will be stored in local variables then rendered on the webpage.
In case of errors, it will display an error message as shown bellow:
    // Request for data using the URL
    request(url, function(err, response, body) {

        // On return, check the json data fetched
        if (err) {
            res.render('index', { weather: null, error: 'Error, please try again' });
        } else {
            let weather = JSON.parse(body);
Next, you will check if your weather data returned is undefined. This will indicate errors. If not, you will proceed to store the content.
            // you shall output it in the console just to make sure that the data being displayed is what you want
            console.log(weather);

            if (weather.main == undefined) {
                res.render('index', { weather: null, error: 'Error, please try again' });
            } else {
                // we shall use the data got to set up your output
                let place = `${weather.name}, ${weather.sys.country}`,
                  /* you shall calculate the current timezone using the data fetched*/
                  weatherTimezone = `${new Date(
                    weather.dt * 1000 - weather.timezone * 1000
                  )}`;
                let weatherTemp = `${weather.main.temp}`,
                  weatherPressure = `${weather.main.pressure}`,
                  /* you will fetch the weather icon and its size using the icon data*/
                  weatherIcon = `http://openweathermap.org/img/wn/${weather.weather[0].icon}@2x.png`,
                  weatherDescription = `${weather.weather[0].description}`,
                  humidity = `${weather.main.humidity}`,
                  clouds = `${weather.clouds.all}`,
                  visibility = `${weather.visibility}`,
                  main = `${weather.weather[0].main}`,
                  weatherFahrenheit;
                weatherFahrenheit = (weatherTemp * 9) / 5 + 32;

                // you shall also round off the value of the degrees fahrenheit calculated into two decimal places
                function roundToTwo(num) {
                  return +(Math.round(num + "e+2") + "e-2");
                }
                weatherFahrenheit = roundToTwo(weatherFahrenheit);
Next, the stored values will now be rendered onto the webpage to generate a static webpage which will be displayed to the user.
                // you shall now render the data to your page (index.ejs) before displaying it out
                res.render("index", {
                  weather: weather,
                  place: place,
                  temp: weatherTemp,
                  pressure: weatherPressure,
                  icon: weatherIcon,
                  description: weatherDescription,
                  timezone: weatherTimezone,
                  humidity: humidity,
                  fahrenheit: weatherFahrenheit,
                  clouds: clouds,
                  visibility: visibility,
                  main: main,
                  error: null,
                });
              }
            }
        }
    });
});
Note: You can fetch and display as much data as need. This is in the JSON received.
- Set up your server port configurations and start the server.
Here you will set up your server listening port. You will also start the server and add a message to display when running. You will utilize port 5000 for your project which can be accessed on http://localhost:5000.
// you will set up your port configurations. You will also start the server and add a message to display when running.
app.listen(5000, function () {
  console.log("Weather app listening on port 5000!");
});
You can just copy the code and paste it into your file.
4.5. Setup your views
Let’s now set up your dynamic web pages in the application. Remember, you are using EJS as your template engine. Inside the index.ejs file found in the views folder, you will create a webpage template that shall be converted into a static webpage during display, once the values are fetched.
Note: When this renders the static pages, they will be served from the
publicfolder, it will act as the root directory. This is because of this line of code,app.use(express.static('public'));in theserver.jsfile. Therefore, it will obtain its assets from the ‘public’ folder. This will include the ‘css’ or even image files.
This is what you will be doing in the index.ejs file:
- Create a new bootstrap boilerplate in your
index.ejs. Link thecssfile that will be found inside the ‘css’ folder. In it, you will also change the site’s title toWeatherand add a favicon to it from a URL as shown in the code below:
<!DOCTYPE html>
<html lang="en">
  <head>
    <title>Weather</title>
    <!-- Required meta tags -->
    <meta charset="utf-8" />
    <meta
      name="viewport"
      content="width=device-width, initial-scale=1, shrink-to-fit=no"
    />

    <!-- Bootstrap CSS -->
    <!-- Use some bootstrap CSS and google fonts to quicken the process -->
    <!-- you shall also add a favicon -->
    <link
      rel="shortcut icon"
      href="https://img.icons8.com/office/16/000000/sunset--v2.png"
      type="image/x-icon"
    />
    <link rel="stylesheet" type="text/css" href="/css/style.css" />
    <link
      href="https://fonts.googleapis.com/css?family=Open+Sans:300"
      rel="stylesheet"
      type="text/css"
    />
    <link
      rel="stylesheet"
      href="https://stackpath.bootstrapcdn.com/bootstrap/4.3.1/css/bootstrap.min.css"
      integrity="sha384-ggOyR0iXCbMQv3Xipma34MD+dH/1fQ784/j6cY/iJTQUOhcWr7x9JvoRxT2MZw1T"
      crossorigin="anonymous"
    />
  </head>

  <body>
    <!-- Optional JavaScript -->
    <!-- jQuery first, then Popper.js, then Bootstrap JS -->
    <script
      src="https://code.jquery.com/jquery-3.3.1.slim.min.js"
      integrity="sha384-q8i/X+965DzO0rT7abK41JStQIAqVgRVzpbzo5smXKp4YfRvH+8abtTE1Pi6jizo"
      crossorigin="anonymous"
    ></script>
    <script
      src="https://cdnjs.cloudflare.com/ajax/libs/popper.js/1.14.7/umd/popper.min.js"
      integrity="sha384-UO2eT0CpHqdSJQ6hJty5KVphtPhzWj9WO1clHTMGa3JDZwrnQq4sF86dIHNDz0W1"
      crossorigin="anonymous"
    ></script>
    <script
      src="https://stackpath.bootstrapcdn.com/bootstrap/4.3.1/js/bootstrap.min.js"
      integrity="sha384-JjSmVgyd0p3pXB1rRibZUAYoIIy6OrQ6VrjIEaFf/nJGzIxFDsf4x0xIM+B07jRM"
      crossorigin="anonymous"
    ></script>
  </body>
</html>
Inside the body tags, just above the bootstrap scripts, you will add your content. You shall also use the data properties to access the data rendered to it from the API. If there is no data, it will display the error.
<!-- Main container -->
<div class="container">

  <!-- This shall hold the input fields and the output data -->
  <fieldset>
    <!-- This form shall be used to fetch your city name -->
    <form action="/" method="post">
      <input name="city" type="text" class="ghost-input" placeholder="Enter a City" required>
      <input type="submit" class="ghost-button" value="Get Weather">
    </form>

    <!-- Upon fetching of data you will display it -->
    <%if( weather !== null){ %>
    <div class="grid">
      <p>
        <%= place %>
      </p>
      <p class="text-muted small">
        <%= timezone %>
      </p>
    </div>

    <!-- You can find other data fetched by the app on the console in JSON form and display it as you please -->
    <div class="card-deck">
      <div class="card card-accent-dark mb-3" style="max-width: 18rem;">
        <div class="card-header">Summary</div>
        <div class="card-body text-dark">Bootstrap CSS
          <img src="<%= icon %>" alt="Weather-Icon">
          <h5 class="card-title">Temperature</h5>
          <p class="card-text">
            In Degrees:
            <%= temp %>°C/
            <%= fahrenheit %>°F
          </p>
          <h5 class="card-title">Main</h5>
          <p class="card-text">
            <%= main %>
          </p>
        </div>
      </div>
      <div class="card-deck">
        <div class="card card-acTomorrowcent-dark mb-3" style="max-width: 18rem;">
          <div class="card-header">Description</div>
          <div class="card-body text-dark">
            <h5 class="card-title">Overall Description: </h5>
            <p class="card-text">
              <%= description %>
            </p>
            <h5 class="card-title">Cloud coverage: </h5>
            <p class="card-text">
              <%= clouds %>%
            </p>
            <h5 class="card-title">Visibility: </h5>
            <p class="card-text">
              <%= visibility %> meters
            </p>
          </div>
        </div>
        <div class="card-deck">
          <div class="card card-accent-dark mb-3" style="max-width: 18rem;">
            <div class="card-header">Other info</div>
            <div class="card-body text-dark">
              <h5 class="card-title">Humidity: </h5>
              <p class="card-text">
                <%= humidity %> g.m-3
              </p>
            </div>
            <div class="card-body text-dark">
              <h5 class="card-title">Pressure: </h5>
              <p class="card-text">
                <%= pressure %> N·m−2
              </p>
            </div>
          </div>
        </div>

        <% } %>

        <% if(error !== null){ %>
        <p>
          <%= error %>
        </p>
        <% } %>
  </fieldset>
</div>
Note: Scripts are always placed after the main contents on your page. This will allow the page content to fully load before JavaScript files are executed, hence preventing errors. This is good coding practice.
4.6. Styling your page
You shall style the static webpage generated and stored in the public folder during code execution using your ‘style.css’ file.
This will be your CSS format:
body {
  width: auto;
  margin: 0 auto;
  font-family: "Open Sans", sans-serif;
}

/* This will format the whole fieldset content*/

.container {
  width: 80%;
  margin: 0 auto;
}

/* This will format the whole fieldset content*/

fieldset {
  display: block;
  -webkit-margin-start: 0px;
  -webkit-margin-end: 0px;
  -webkit-padding-before: 0em;
  -webkit-padding-start: 0em;
  -webkit-padding-end: 0em;
  -webkit-padding-after: 0em;
  border: 0px;
  border-image-source: initial;
  border-image-slice: initial;
  border-image-width: initial;
  border-image-outset: initial;
  border-image-repeat: initial;
  min-width: -webkit-min-content;
  padding: 30px;
}

/* Format the input section */

/* Format the input, paragraph, hover effect, focus and button */
.ghost-input,
p {
  display: block;
  font-weight: 300;
  width: 100%;
  font-size: 25px;
  border: 0px;
  outline: none;
  width: 100%;
  -webkit-box-sizing: border-box;
  -moz-box-sizing: border-box;
  box-sizing: border-box;
  color: #4b545f;
  background: #fff;
  font-family: Open Sans, Verdana;
  padding: 10px 15px;
  margin: 30px 0px;
  -webkit-transition: all 0.1s ease-in-out;
  -moz-transition: all 0.1s ease-in-out;
  -ms-transition: all 0.1s ease-in-out;
  -o-transition: all 0.1s ease-in-out;
  transition: all 0.1s ease-in-out;
}

.ghost-input:focus {
  border-bottom: 1px solid #ddd;
}

.ghost-button {
  background-color: transparent;
  border: 2px solid #ddd;
  padding: 10px 30px;
  width: 100%;
  min-width: 350px;
  -webkit-transition: all 0.1s ease-in-out;
  -moz-transition: all 0.1s ease-in-out;
  -ms-transition: all 0.1s ease-in-out;
  -o-transition: all 0.1s ease-in-out;
  transition: all 0.1s ease-in-out;
}

.ghost-button:hover {
  border: 2px solid #515151;
}

p {
  color: #e64a19;
}
4.7. Application environment variables
You will now enter your application environments constants. Inside your .env file, you will place your OpenWeatherMap API KEY.
Just add the following to the file and then copy-paste the acquired key after it:
API_KEY=
Save the file.
You can find the code in the repository found here. Feel free to download and modify it to your needs.
5. Run and access the application
To run the application, you will utilize the ‘start’ script added earlier on in the ‘package.json’ file.
This can be done by running the following code in the inbuilt terminal:
npm run start
You can also start the application using:
node server.js
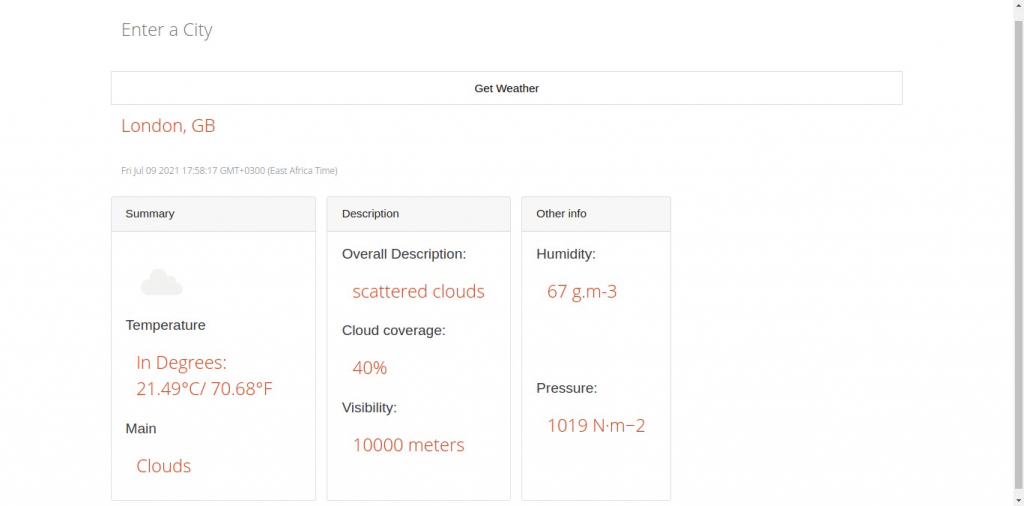
Access the app in the browser at localhost:5000. Enter the city name of your choice and click on the ‘Get Weather’ button.
It will fetch the weather data and the return results in the web browser and the console.
The results will look like this:
You can close the app on the terminal using Ctrl + C.
6. Additional project APIs
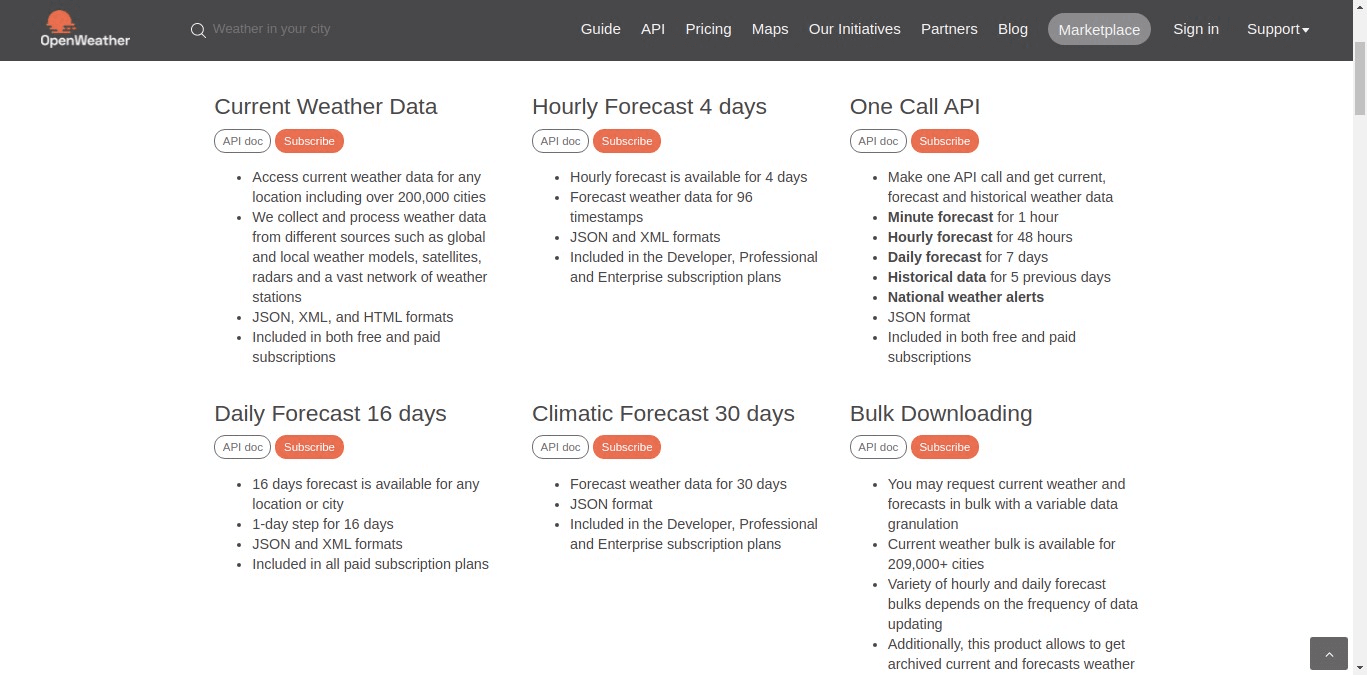
- OpenWeatherMap has more API calls for other types of forecasting which are free. This can be found in this link: https://openweathermap.org/api.
Some are shown below:
You can try fetching the data and displaying it in the console or the browser.
- Try to fetch and use the geolocation to fetch weather data of a user based on their location.
- Try and add a weather map found in this link: https://openweathermap.org/api in your website.
7. Conclusion
You can access more data from the OpenWeatherMap site. This can be useful to customize your app data as required. This also includes live weather maps which can be embedded in web pages. In weather forecasting, the more data, the better.
Happy coding!