
Table of Contents
Websites usually store a small amount of data on the browsers. There are three main kinds of browser-based storage: session storage, local storage, and cookie storage. This guide will discuss what a cookie is, how it works and how to use HTTP cookies in a Node.js application.
1. Prerequisites
- Basic knowledge of Node.js
- Node.js installed on your computer.
- Basic understanding of how to create an HTTP server using Express.
A cookie is usually a tiny text file stored in your web browser. A cookie was initially used to store information about the websites that you visit. But with the advances in technology, a cookie can track your web activities and retrieve your content preferences. I am sure, at some point, you have seen a pop-up screen similar to the one shown below.

This will help the website you have visited to know more about you and customize your future experience.
For example;
- Cookies save your language preferences. This way, when you visit that website in the future, the language you used will be remembered.
- You have most likely visited an e-commerce website. When you include items into your shopping cart, a cookie will remember your choices. Your shopping list item will still be there whenever you revisit the site. Basically, a cookie is used to remember data from the user.
Therefore, cookies are small strings that contain key-value pairs of information sent from the webserver to the browser to get information about the user. The browser will then save them locally. This way, subsequent requests can be made to the server to immediately update user content on the website depending on the previous requests that a user made to the server. A cookie is HTTP generated; thus, called an HTTP cookie.
The first HTTP cookie was created in 1994 by Lou Montulli, an employee of Netscape Communications, the company that created the Netscape browser. Lou was creating an online store for a company that claimed that their servers were getting full from storing each user’s shopping cart data.
Lou, therefore, had to figure out how to store the contents of the shopping cart locally. He came up with an idea to save the shopping cart info on the user’s computer to save server space. He borrowed the concept of HTTP cookies from a computing token called the magic cookie which was used to identify a user when logging into a system.
Lou recreated this concept and implemented it in a web browser. In 1994, the Netscape browser implemented cookies, followed by Internet Explorer in 1995 and that marked the birth of HTTP cookies.
When a user visits a cookie-enabled website for the first time, the browser will prompt the user that the web page uses cookies and request the user to accept cookies to be saved on their computer. Typically, when a makes a user request, the server responds by sending back a cookie (among many other things).
This cookie is going to be stored in the user’s browser. When a user visits the website or sends another request, that request will be sent back together with the cookies. The cookie will have certain information about the user that the server can use to make decisions on any other subsequent requests.
A perfect example is accessing Facebook from a browser. When you want to access your Facebook account, you have to log in with the correct credentials to be granted the proper access. But in this case, it would be tiresome to continuously log in to Facebook every time.
When you first make a login request and the server verifies your credentials, the server will send your Facebook account content. It will also send cookies to your browser. The cookies are then stored on your computer and submitted to the server with every request you make to that website. A cookie will be saved with an identifier that is unique to that user.
When you revisit Facebook, the request you make, the saved cookie, and the server will keep track of your login session and remember who you are and thus keep you logged in.
The different types of cookies include:
- Session cookies – store user’s information for a short period. When the current session ends, that session cookie is deleted from the user’s computer.
- Persistent cookies – a persistent cookie lacks expiration date. It is saved as long as the webserver administrator sets it.
- Secure cookies – are used by encrypted websites to offer protection from any possible threats from a hacker.
- Third-party cookies – are used by websites that show ads on their pages or track website traffic. They grant access to external parties to decide the types of ads to show depending on the user’s previous preferences.
The major difference between sessions and cookies is that sessions live on the server-side (the webserver), and cookies live on the client-side (the user browser). Sessions have sensitive information such as usernames and passwords. This is why they are stored on the server. Sessions can be used to identify and validate which user is making a request.
As we have explained, cookies are stored in the browser, and no sensitive information can be stored in them. They are typically used to save a user’s preferences.
Let’s dive in and see how we can implement cookies using Node.js. We will create and save a cookie in the browser, update and delete a cookie.
Go ahead and create a project directory on your computer. Initialize Node.js using npm init -y to generate a package.json file to manage Node.js project dependencies.
We will use the following NPM packages:
- Express – this is an opinionated server-side framework for Node.js that helps you create and manage HTTP server REST endpoints.
- cookie-parser – cookie-parser looks at the headers in between the client and the server transactions, reads these headers, parses out the cookies being sent, and saves them in a browser. In other words, cookie-parser will help us create and manage cookies depending on the request a user makes to the server.
Run the following command to install these NPM packages:
npm install express cookie-parser
We will create a simple example to demonstrate how cookies work.
6.1. Step 1 – Import the installed packages
To set up a server and save cookies, import the cookie parser and express modules to your project. This will make the necessary functions and objects accessible.
const express = require('express')
const cookieParser = require('cookie-parser')
6.2. Step – 2 Get your application to use the packages
You need to use the above modules as middleware inside your application, as shown below.
//setup express app
const app = express()

// let’s you use the cookieParser in your application
app.use(cookieParser());
This will make your application use the cookie parser and Express modules.
6.3. Step – 3 Set a simple route to start the server
We use the following code to set up a route for the homepage:
//set a simple for homepage route
app.get('/', (req, res) => {
    res.send('welcome to a simple HTTP cookie server');
});
6.4. Step 4 – Set a port number
This is the port number that the server should listen to when it is running. This will help us access our server locally. In this example, the server will listen to port 8000, as shown below.
//server listening to port 8000
app.listen(8000, () => console.log('The server is running port 8000...'));
Now we have a simple server set. Run node app.js to test if it is working.

And if you access the localhost on port 8000 (http://localhost:8000/), you should get an HTTP response sent by the server. Now we’re ready to start implementing cookies.
Let’s add routes and endpoints that will help us create, update and delete a cookie.
We will set a route that will save a cookie in the browser. In this case, the cookies will be coming from the server to the client browser. To do this, use the res object and pass cookie as the method, i.e. res.cookie() as shown below.
//a get route for adding a cookie
app.get('/setcookie', (req, res) => {
    res.cookie(`Cookie token name`,`encrypted cookie string Value`);
    res.send('Cookie have been saved successfully');
});
When the above route is executed from a browser, the client sends a get request to the server. But in this case, the server will respond with a cookie and save it in the browser.
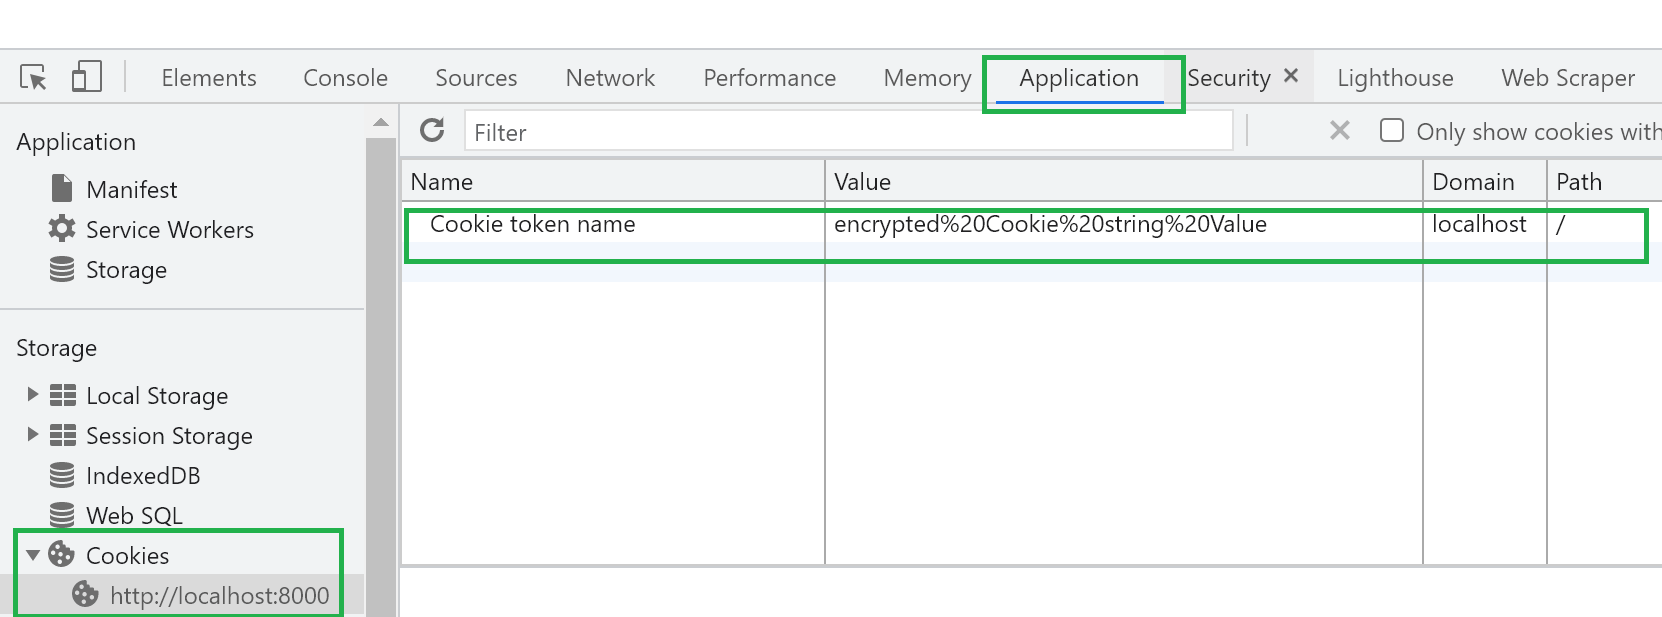
Go ahead and run node app.js to serve the above endpoint. Open http://localhost:8000/getcookie your browser and access the route.
To confirm that the cookie was saved, go to your browser’s inspector tool 🡆 select the application tab 🡆 cookies 🡆 select your domain URL.
If the server sends this cookie to the browser, this means we can iterate the incoming requests through req.cookies and check the existence of a saved cookie. You can log this cookie to the console or send the cookie request as a response to the browser. Let’s do that.
// get the cookie incoming request
app.get('/getcookie', (req, res) => {
    //show the saved cookies
    console.log(req.cookies)
    res.send(req.cookies);
});
Again run the server using node app.js to expose the above route (http://localhost:8000/getcookie) and you can see the response on the browser.

As well as on your console logs.

One precaution that you should always take when setting cookies is security. In the above example, the cookie can be deemed insecure.
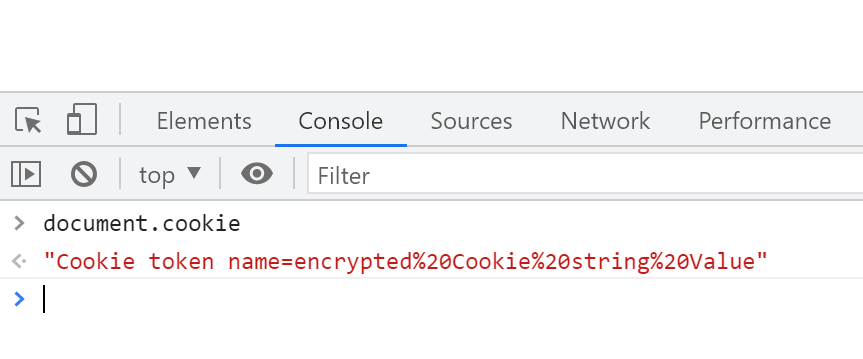
For example, you can access this cookie on a browser console using JavaScript (document.cookie). This means that this cookie is exposed and can be exploited through cross-site scripting.
You can see the cookie when you open the browser inspector tool and execute the following in the console.
document.cookie
The saved cookie values can be seen through the browser console.
As a precaution, you should always try to make your cookies inaccessible on the client-side using JavaScript.
We can add several attributes to make this cookie more secure.
HTTPonlyensures that a cookie is not accessible using the JavaScript code. This is the most crucial form of protection against cross-scripting attacks.- A
secureattribute ensures that the browser will reject cookies unless the connection happens over HTTPS. sameSiteattribute improves cookie security and avoids privacy leaks.
By default, sameSite was initially set to none (sameSite = None). This allowed third parties to track users across sites. Currently, it is set to Lax (sameSite = Lax) meaning a cookie is only set when the domain in the URL of the browser matches the domain of the cookie, thus eliminating third party’s domains. sameSite can also be set to Strict (sameSite = Strict). This will restrict cross-site sharing even between different domains that the same publisher owns.
- You can also add the maximum time you want a cookie to be available on the user browser. When the set time elapses, the cookie will be automatically deleted from the browser.
Read this guide to learn more attributes and how you can use them in JavaScript and Node.js.
//a get route for adding a cookie
app.get('/setcookie', (req, res) => {
    res.cookie(`Cookie token name`,`encrypted cookie string Value`,{
        maxAge: 5000,
        // expires works the same as the maxAge
        expires: new Date('01 12 2021'),
        secure: true,
        httpOnly: true,
        sameSite: 'lax'
    });
    res.send('Cookie have been saved successfully');
});
In this case, we are accessing the server on localhost, which uses a non-HTTPS secure origin. For the sake of testing the server, you can set secure: false. However, always use true value when you want cookies to be created on an HTTPS secure origin.
If you run the server again (node app.js) and navigate to http://localhost:8000/setcookie on the browser, you can see that the values of the cookie have been updated with security values.
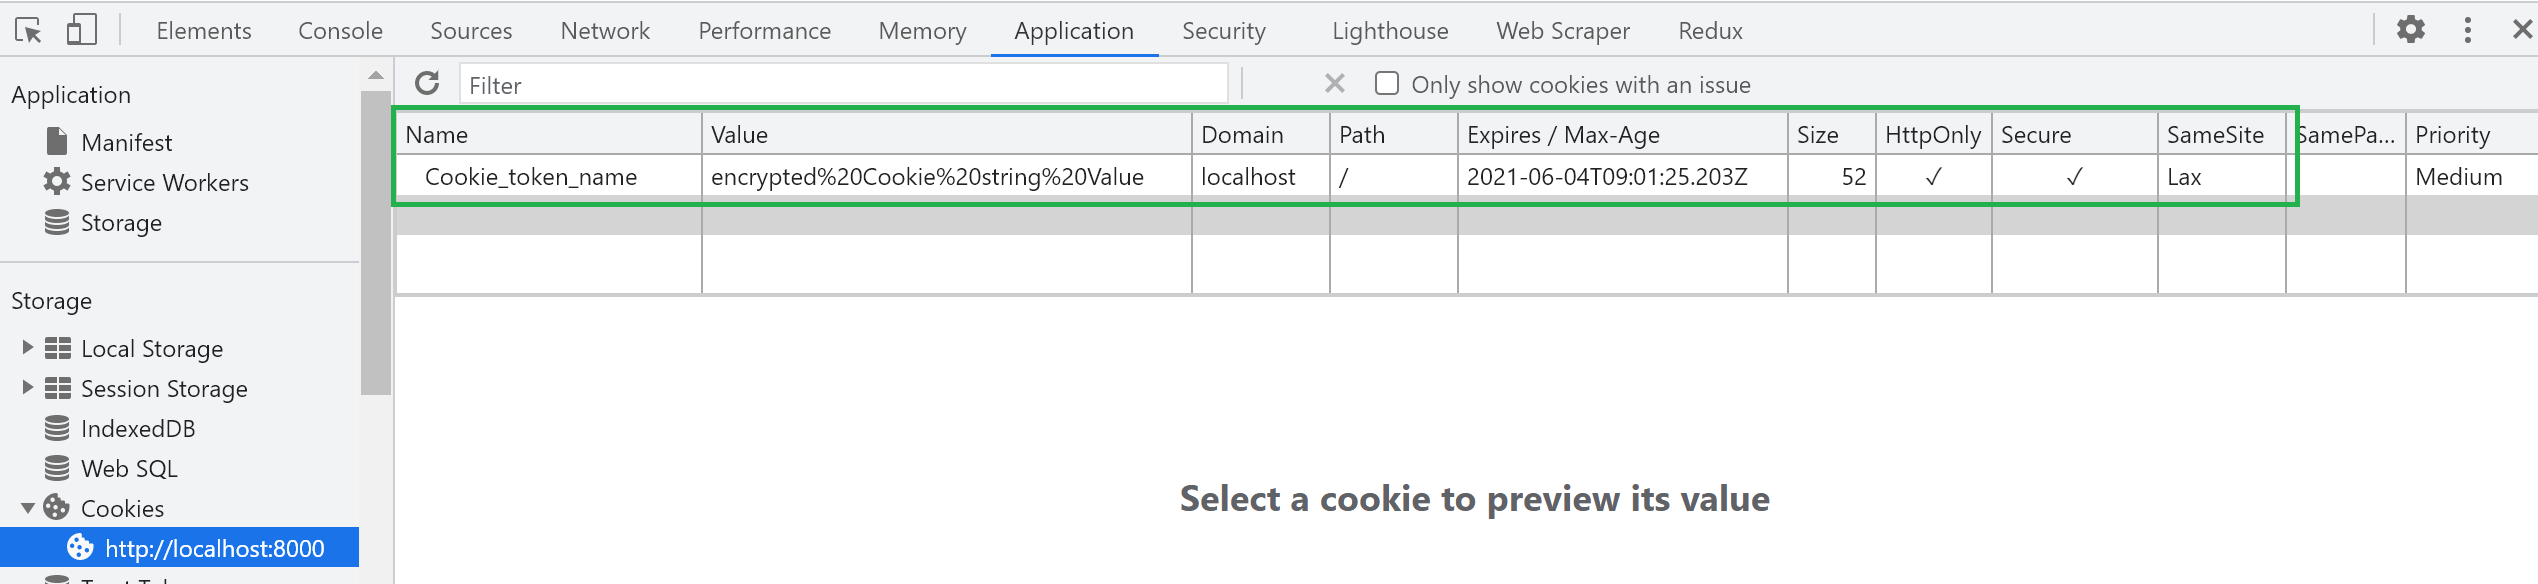
Furthermore, you cannot access the cookie using JavaScript, i.e., document.cookie.

Typically, cookies can be deleted from the browser depending on the request that a user makes. For example, if cookies are used for login purposes, when a user decides to log out, the request should be accompanied by a delete command.
Here is how we can delete the cookie we have set above in this example. Use res.clearCookie() to clear all cookies.
// delete the saved cookie
app.get('/deletecookie', (req, res) => {
    //show the saved cookies
    res.clearCookie()
    res.send('Cookie has been deleted successfully');
});
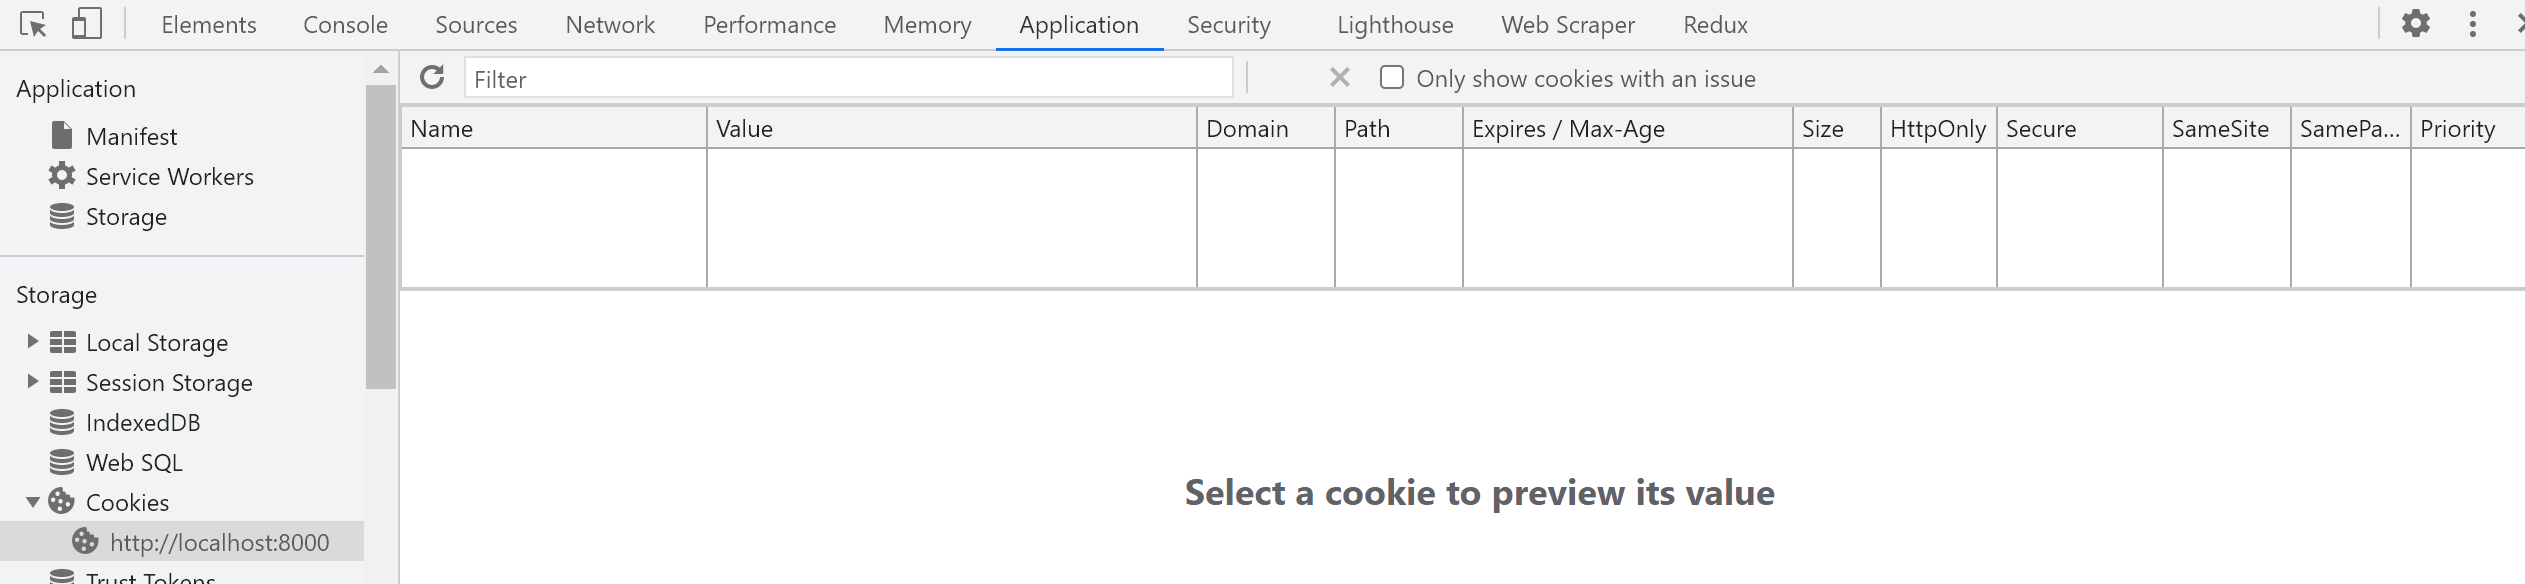
Open http://localhost:8000/deletecookie, and you will see that the saved cookie has been deleted.
Let’s have a simple authentication example that uses cookies to grant access when a user first logs in to a website. This example will show you how to use cookies to process a simple authentication.
8.1. Step 1 – The project structure
Create a new project folder and initialize the Node.js project with npm init -y. Set up your project, as shown below in this structure.
└───node-js-auth-cookies
    ├───public
    │ styles.css
    │
    └───src
        │ index.js
        │
        └───views
                home.ejs
                login.ejs
                welcome.ejs
8.2. Step:2 Setting the project dependencies
This project will use the following NPM packages.
- Cookie-parser – For parsing cookies from the response object to the request object.
- Express – Web framework for Node.js
- Ejs – For rendering the views.
- Helmet – For secure HTTP requests.
- Nodemon – For restarting the server during development.
Install the above packages using the command below.
npm i --save cookie-parser express ejs helmet nodemon
Since we are using nodemon to watch the server files, go ahead and change the scripts tag inside your package.json file, as shown below.
"scripts": {
    "dev": "nodemon src/index.js",
    "start": "node src/index.js"
}
This will help us start the server with npm run dev, and nodemon will watch our file. It will restart the server whenever you make, and save changes.
8.3. Step 3 – Setting up the server
In this step, we will set up our express server. The comments included inside the different lines on the code will help you figure things out if you get stuck.
// src/index.js

// import all the modules/packages
const express = require("express");
const path = require("path");
const helmet = require("helmet");
const cookieparser = require("cookie-parser");

// allow the app to use express
const app = express();

// allow the app to use cookieparser
app.use(helmet());

// allow the app to use cookieparser
app.use(cookieparser());

// allow the express server to process POST request rendered by the ejs files
app.use(express.json());
app.use(express.urlencoded({ extended: false }));

// allow the express server to read and render the static css file
app.use(express.static(path.join(__dirname, "..", "public")));
app.set("view engine", "ejs");

// render the ejs views
app.set("views", path.join(__dirname, "views"));

// a port number to expose the server
const PORT = process.env.PORT || 4000;

app.get("/", (req, res) => {
  // check if user is logged in, by checking cookie
  let username = req.cookies.username;

  // render the home page
  return res.render("home", {
    username,
  });
});

app.get("/login", (req, res) => {
  // check if there is a msg query
  let bad_auth = req.query.msg ? true : false;

  // if there exists, send the error.
  if (bad_auth) {
    return res.render("login", {
      error: "Invalid username or password",
    });
  } else {
    // else just render the login
    return res.render("login");
  }
});

app.get("/welcome", (req, res) => {
  // get the username
  let username = req.cookies.username;

  // render welcome page
  return res.render("welcome", {
    username,
  });
});

app.post("/process_login", (req, res) => {
  // get the data
  let { username, password } = req.body;

  // fake test data
  let userdetails = {
    username: "Bob",
    password: "123456",
  };

  // basic check
  if (
    username === userdetails["username"] &&
    password === userdetails["password"]
  ) {
    // saving the data to the cookies
    res.cookie("username", username);
    // redirect
    return res.redirect("/welcome");
  } else {
    // redirect with a fail msg
    return res.redirect("/login?msg=fail");
  }
});

app.get("/logout", (req, res) => {
  // clear the cookie
  res.clearCookie("username");
  // redirect to login
  return res.redirect("/login");
});

app.listen(PORT, () => console.log(`server started on port: ${PORT}`));
8.4. Step 4 – Setting the EJS views
The server will render the following EJS views.
- A home page – the first page the user will access when a request is made to the endpoint
http://localhost:4000/.
<!-- src/views/home.ejs -->

<!DOCTYPE html>
<html lang="en">
    <head>
        <title>Home</title>
        <link rel="stylesheet" href="/styles.css">
    </head>
    <body>
        <div class="welcome">
            <h4>
                Hello there, welcome.
            </h4>
            <%if(locals.username){%>
            <p>You are logged in as <%=username%></p>
            <a href="/logout">Logout</a>
            <%} else { %>
            <a href="/login">Login</a>
            <% } %>
        </div>
    </body>
</html>
- A login page- once a user selects
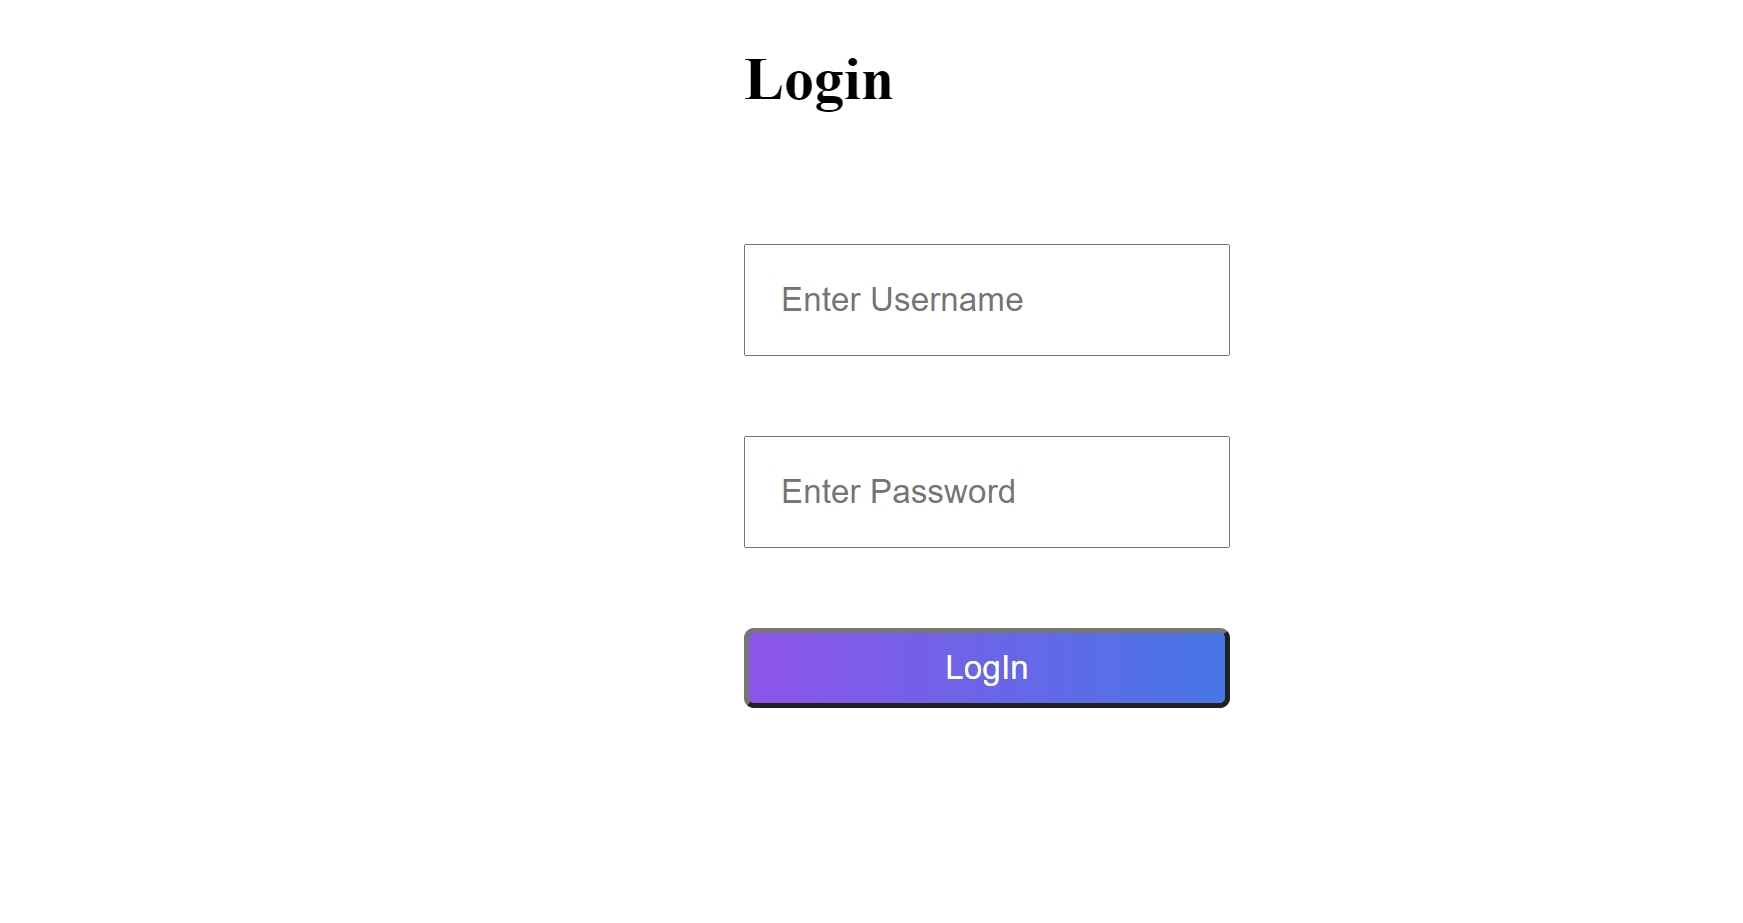
Loginon the home page, they will be redirected to a login page at endpointhttp://localhost:4000/login.
<!-- src/views/login.ejs -->

<!DOCTYPE html>
<html lang="en">
    <head>
        <title>Login</title>
        <link rel="stylesheet" href="/styles.css">
    </head>
    <body>
        <div class="form">
            <form action="/process_login" method="post">
                <h2>Login</h2>
                <% if(locals.error) {%>
                <p class="text-danger"><%=error%></p>
                <%}%>
                <div class="input-field">
                    <input type="text" name="username" id="username" placeholder="Enter Username">
                </div>
                <div class="input-field">
                    <input type="password" name="password" id="password" placeholder="Enter Password">
                </div>
                <input type="submit" value="LogIn">
            </form>
        </div>
    </body>
</html>
- A welcome page- If a user logs in successfully, he/she will be redirected to
welcomewebpage on the endpointhttp://localhost:4000/welcome. From here, a user can log out and be redirected back to theHome page.
<!-- src/views/welcome.ejs -->

<!DOCTYPE html>
<html lang="en">
    <head>
        <title>Welcome</title>
        <link rel="stylesheet" href="/styles.css">
    </head>
    <body>
        <div class="welcome">
            <h4>
                Hi <%=username%>, you are welcome here
            </h4>
            <a href="/logout">Logout</a>
        </div>
    </body>
</html>
Next, add some CSS to style the above views.
/* src/public/styles.css */

body {
  display: flex;
  justify-content: center;
}

form {
  display: flex;
  flex-direction: column;
}

.text-danger {
  color: red;
}

.input-field {
  position: relative;
  margin-top: 2rem;
}

.input-field input {
  padding: 0.8rem;
}

form .input-field:first-child {
  margin-bottom: 1.5rem;
}

form input[type="submit"] {
  background: linear-gradient(to left, #4776e6, #8e54e9);
  color: white;
  border-radius: 4px;
  margin-top: 2rem;
  padding: 0.4rem;
}
8.5. Step 5 – Running the application
To start the server, run npm run dev.

8.6. Step 6 – Testing the application
Let’s now test the application and see if everything is working.
- Open
http://localhost:4000/in a browser, and you will be served thishome page.

- Clicking the
loginlink on thehome pagewill redirect you to thislogin page.
- We then need to enter the
usernameandpassword. Since this is a simple demonstration, we have not used a database to save the login credentials. We have defined them in theindex.jsfile:
  // fake test data
  let userdetails = {
    username: "Bob",
    password: "123456",
  };
Use Bob as the username and 123456 as the password. If the credentials are correct, you will be served with this welcome page.

We are using cookies here, so when Bob logs in successfully, a cookie with Bob’s username will be saved on his browser. Go to your browser inspector tool 🡆 application 🡆cookies 🡆 select your domain http://localhost:4000/.
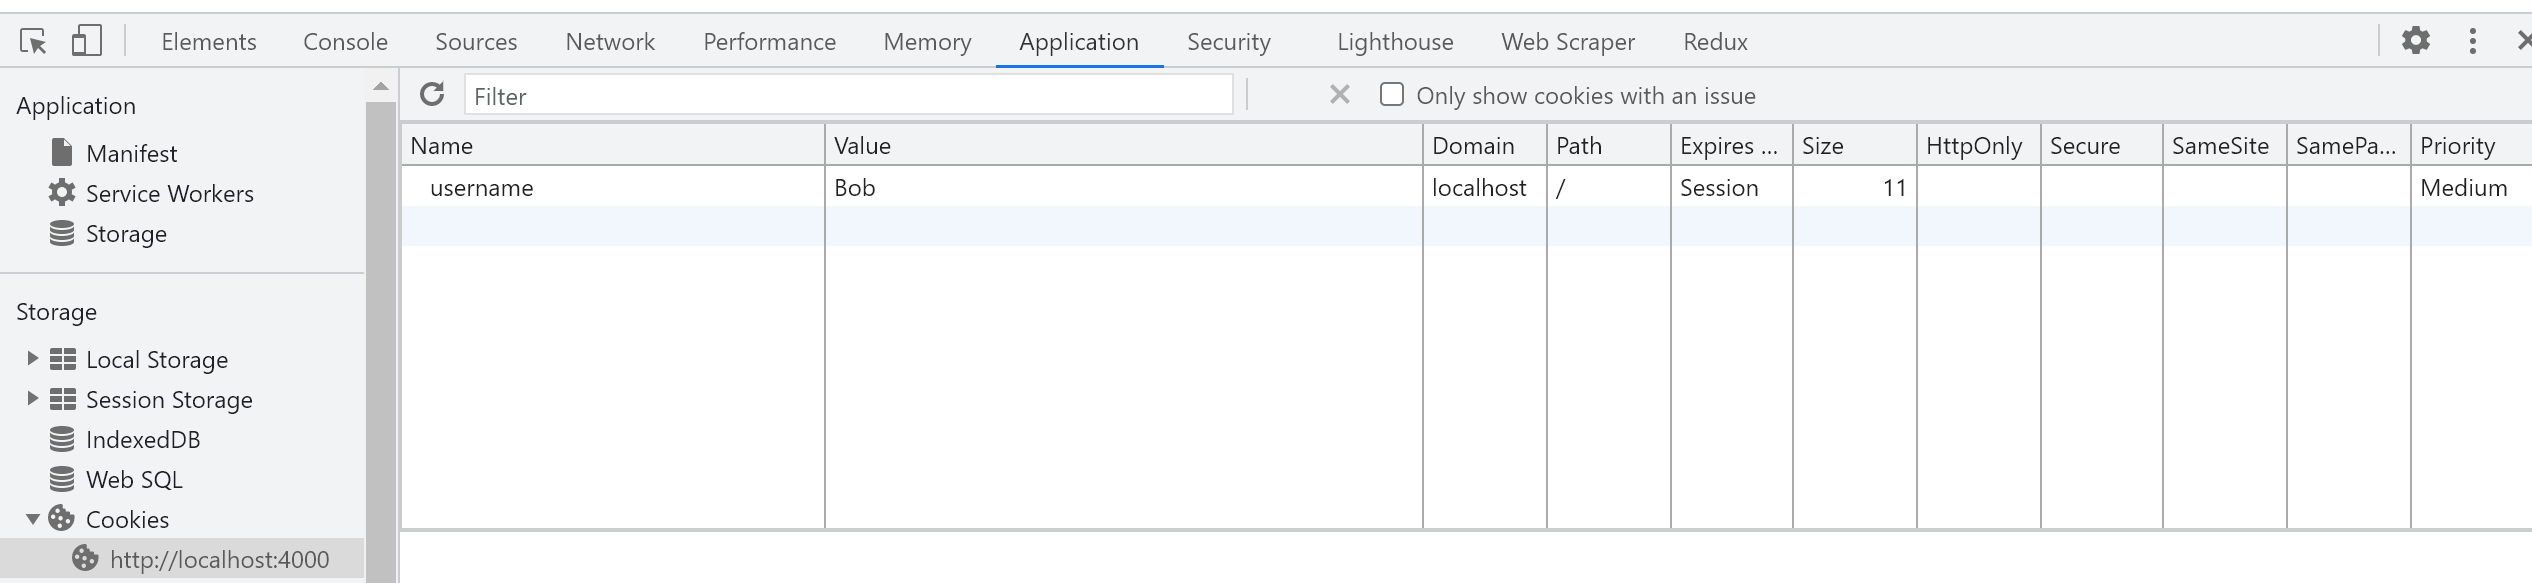
Now that this cookie is saved, Bob will not have to provide login credentials again when he revisits the site. Go ahead and try if this works when you access the home route (http://localhost:4000/).
When Bob chooses to log out the server will send a response to clear the saved login cookie in the browser.
Try to log out and see what happens.
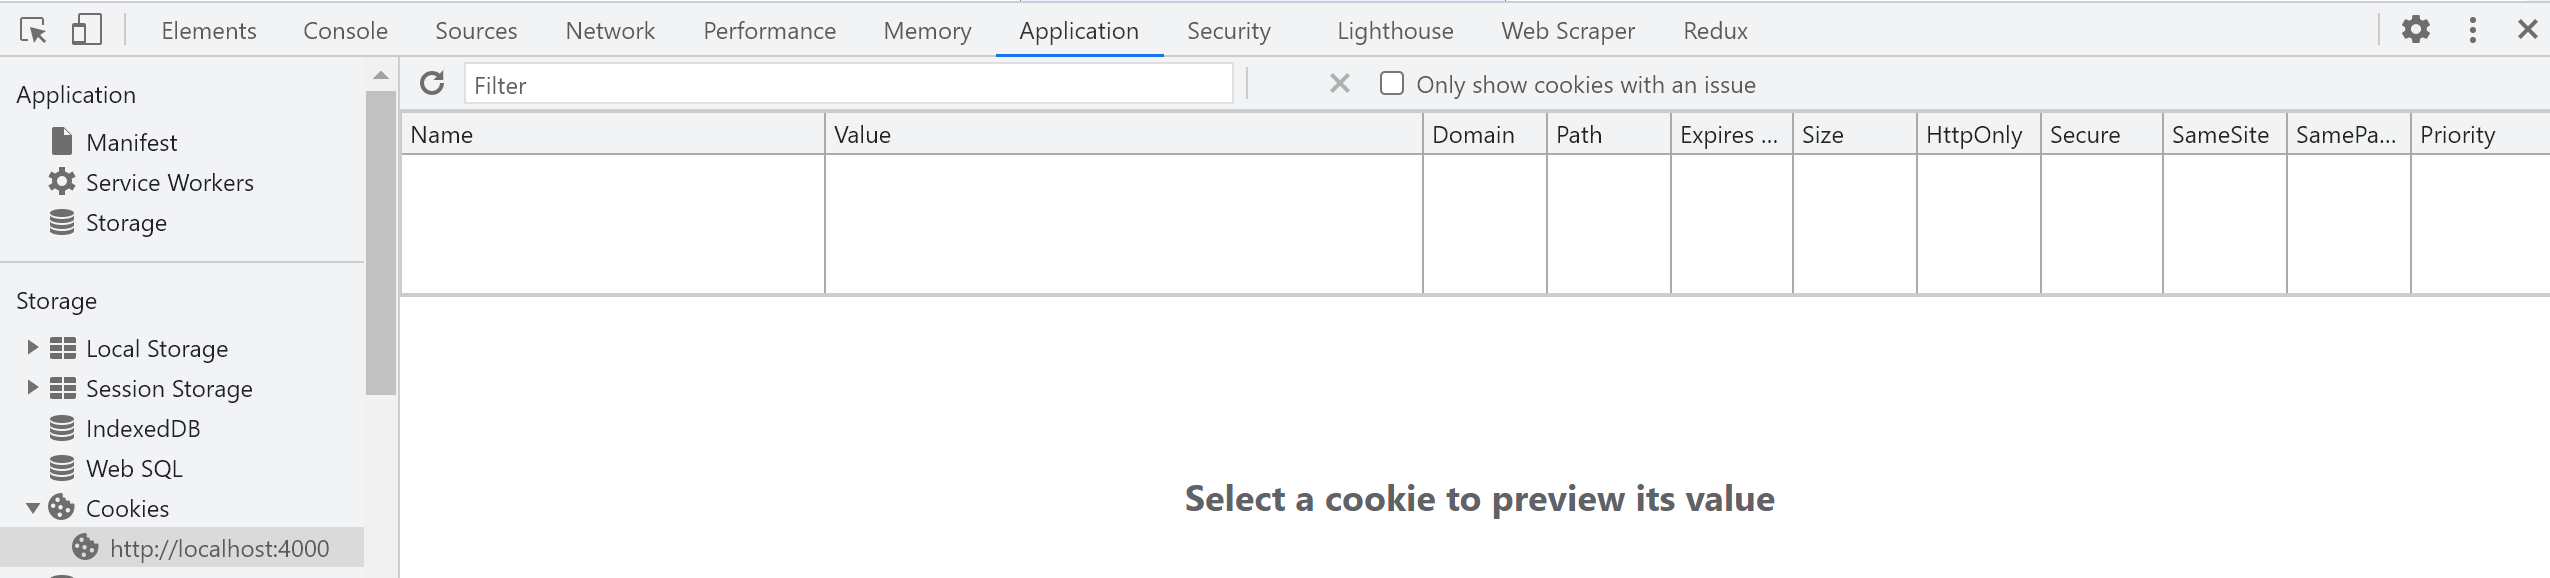
The saved cookie will be cleared, and thus Bob will need to log in again when he wants to access the pages of this domain.
As a developer, you might wonder how cookies are helpful and why developers need to use them. Here are a few use cases that explain the importance of collecting and saving user preferences, as well as other useful information in a cookie.
It tracks the sessions a user has interacted with within a website. Any kind of information that the server needs to remember about you is included in session management. For example, in shopping websites, every cookie is unique to a specific user. As discussed, an e-commerce website can use cookies to store your shopping cart’s contents.
In online games, cookies may be used to store your scores.
9.2. Personalization
This saves user preferences such as themes, languages, and different website settings. In other words, cookies can be used to personalize and make sure the user gets the experience they are looking for.
9.3. Tracking user activities
Cookies can track any user behavior on a website. This includes the pages you access, the links you click, and how long you interact with a web page. This tracking is mostly done by third parties to analyze a website. Since a cookie is specific to one user, it can be used to determine how many unique users visit a website.
10. Conclusion
Note that cookies are not intended for transmitting sensitive data. As a developer, you must ensure that the response you send to a client does not contain sensitive information such as passwords. A cookie is saved on a browser and can, therefore, be manipulated if it falls in the wrong hands.
There are cookie regulations that make sure cookies are not used in the wrong way. These guidelines also restrict the type of data that a cookie can get from a user to avoid compromising user privacy.
According to GDPR, internet identifiers such as cookies are considered personal data, and organizations can only exploit them with the client’s permission. This the reason why cookie opt-in prompts are so common when you visit a website.
I hope this guide helps you to understand what cookies are and how to use them in a Node.js web application in the correct way.
Happy coding!