
Table of Contents
Adonis.js is written from the ground up with strong principles and goals in mind to be a robust integrated system having developer ergonomics, stability, and speed.
To show the capabilities of the Adonis.js JavaScript framework, and how it can be combined with the Vue web framework, this tutorial will lead you through building a Ticketing System App.
This app will create events, generate tickets for the event, allow users to view the event and the tickets, how to make purchases, and redeem the event tickets.
Once you finish the tutorial, you will have a functioning Ticketing application like the demonstrated below:
1. Prerequisites
Before continuing with this article, you should have previous experience with the following:
- Basic understanding of TypeScript and Node.js
- Basic understanding of Adonis.js
- Basic understanding of Vue.js
2. Goals
We will learn how to build a Ticketing app with Adonis.js 5 and Vue.js, so that the users can find events around you, register for a free event, buy tickets, sell tickets online, and promote their event worldwide.
We will also cover best practices in structuring and building your frontend with Vue.js when using Adonis.js as your backend.
- We will learn how to build a real-world app with Adonis.js and Vue.js.
- We will learn how to handle authentication and authorization with Adonis.js and Vue.js.
- We will learn how to integrate Adonis.js and Vue.js.
- We will learn how to build and structure a Ticketing system in Adonis.js and Vue.js.
- We will learn best practices in building performance-oriented Web apps with Adonis.js.
3. Step 1 — Setting up Adonis.js 5
Setting up Adonis.js 5 is very easy, as it requires a simple npm command below.
If you want to learn more about installing and setting up Adonis.js 5, check out Building a RESTful API with Adonis.js
npm init adonis-ts-app adonisjs-ticketing-system-api
After creating the Adonis.js application, move inside the project directory and install the following packages to set up the API.
cd adonisjs-ticketing-system-api
Now, we need to set up our database to connect with the new Adonis.js application.
3.1. Creating the database
Our ticketing system application needs a database for storing, retrieving, updating, and deleting data.
To install the database, we need to first create the database by using any of these database clients and install the Lucid Object Relational Mapper (ORM).
npm i @adonisjs/lucid@alpha
After installing the ORM, set it up by running the following command:
node ace invoke @adonisjs/lucid
After running the above command, follow the instructions and update your .env environment file:
DB_CONNECTION = mysql
MYSQL_USER = [DB_USER]
MYSQL_HOST = localhost
MYSQL_DB_NAME = [DB_NAME]
MYSQL_PORT = 3306
MYSQL_PASSWORD = [DB_PASSWORD]
If you encounter this error Client does not support the authentication protocol requested by the server; while testing your API, follow these steps to solve it:
npm install mysql2
Authentication in Adonis.js is done by installing a package and setting it up, you can read through how to set up authentication here.
Install the Auth package with this command:
npm i @adonisjs/auth@alpha
3.2. Creating migrations and models
Our project will be using a total of 3 migrations and models excluding the User model and migration. With Adonis.js migrations, you can create/modify database by just writing JavaScript.
While models represents the database layer of your application, you can describe your database tables as JavaScript classes and use JavaScript methods for reading, writing, and deleting rows.
So, let’s create our migrations:
node ace make:migration tickets
node ace make:migration events
node ace make:migration user_events
After running the commands, open the database/migrations/xxxx_tickets.ts migration and add the following codes:
/**
* The Tickets class creates a new Database table with the specified columns
*/
import BaseSchema from '@ioc:Adonis/Lucid/Schema'
export default class Tickets extends BaseSchema {
  protected tableName = 'tickets'

  // The UP method create the table with specified table name and columns specified.
  public async up() {
    this.schema.createTable(this.tableName, (table) => {

      // This create an ID column with primary key attribute
      table.increments('id').primary()

      //This create an CODE column with a String
      table.string('code')
      table.double('amount')

      //This create an USER_ID column with relationship constraints
      table.integer('user_id').unsigned().references('id').inTable('users').onDelete('CASCADE')
      table.integer('event_id').unsigned().references('id').inTable('tickets').onDelete('CASCADE')
      table.boolean('is_used').defaultTo(false)
      table.dateTime('used_date').nullable()
      table.timestamps(true)
    })
  }

  // The DOWN method is used to drop the database table.
  public async down() {
    this.schema.dropTable(this.tableName)
  }
}
Repeat the same for the other migrations from our repository. After completing the migrations, you can run the migration with this command:
node ace migration:run
We will also create the models and map the columns using:
node ace make:model Event
You can clone my repository to see how we map the columns, but here is an example of how to map the events model.
/**
 * The Event class is a model that maps the columns of the events table to JS object
 */
import { DateTime } from "luxon";
import {
  BaseModel,
  BelongsTo,
  belongsTo,
  column,
  HasMany,
  hasMany,
} from "@ioc:Adonis/Lucid/Orm";
import Ticket from "./Ticket";
import User from "./User";
export default class Event extends BaseModel {
  // Specifies an ID column with Primary key
  @column({ isPrimary: true })
  public id: number;

  // Specifies a TITLE column
  @column()
  public title: string;

  // Specifies a Description column
  @column()
  public description: string;

  // Specifies a DATE column
  @column()
  public date: string;

  // Specifies a Ticket_Price column
  @column()
  public ticket_price: number;

  // Specifies a USERID column
  @column()
  public userId: number;

  // Specifies a CreatedAT column with auto create attribute
  @column.dateTime({ autoCreate: true })
  public createdAt: DateTime;

  // Specifies a UpdatedAt column with auto create and update attributes
  @column.dateTime({ autoCreate: true, autoUpdate: true })
  public updatedAt: DateTime;

  // Specifies a Has Many relationship between Ticket model
  @hasMany(() => Ticket)
  public tickets: HasMany<typeof Ticket>;

  // Indicates that this event belongs to a User
  @belongsTo(() => User)
  public user: BelongsTo<typeof User>;
}
We have mapped the columns in our migration to the Event models, and also defined the different relationships with hasMany and belongsTo methods.
3.3. Creating controllers
In this step, we will be creating our controllers and also the business logic associated with our ticketing system.
According to a tutorial on Laravel, “Controllers act as a middle man between Models and Views, it processes all the inputs sent by the user from the view.”
We will start by creating the AuthController and setting up the login and registration processes as shown below:
node ace make:controller Auth
Open the file in app/Controllers/Http/AuthController.ts and paste the code below:
import { HttpContextContract } from '@ioc:Adonis/Core/HttpContext'
import User from 'App/Models/User'
export default class AuthController {

  // Our Login method accepts Email and Password before attempting to Login the User

  public async login({ request, auth }: HttpContextContract) {
    const email = request.input('email')
    const password = request.input('password')
    const token = await auth.use('api').attempt(email, password, {
      expiresIn: '10 days',
    })
    return token.toJSON()
  }

  // The register method Creates a New User object and save it to the database.
  public async register({ request, auth }: HttpContextContract) {
    const email = request.input('email')
    const password = request.input('password')
    const name = request.input('name')
    const user = new User()
    user.email = email
    user.password = password
    user.name = name
    await user.save()
    const token = await auth.use('api').login(user, {
      expiresIn: '10 days',
    })
    return token.toJSON()
  }
}
The controller above defines the authentication process for the backend API.
Next, we will create the EventsController and paste in the following code while other controllers can be found in the repository.
The EventController is where all the business logic related to managing events are created.
Let’s break it down in detail.
import { HttpContextContract } from '@ioc:Adonis/Core/HttpContext'
import Event from 'App/Models/Event'
import User from 'App/Models/User'
import Ticket from 'App/Models/Ticket'
import UserEvent from 'App/Models/UserEvent'
import { DateTime } from 'luxon'
const Keygen = require('keygen')

export default class EventsController {

  // The INDEX method returns all the Events available to be displayed on the homepage
  public async index({}: HttpContextContract) {
    const events = await Event.query().preload('user').preload('tickets')
    return events
  }


  // The SHOW method retrieves a single Event by ID
  public async show({ params }: HttpContextContract) {
    try {
      const event = await Event.find(params.id)
      if (event) {
        await event.preload('user')
        await event.preload('tickets')
        return event
      }
    } catch (error) {
      console.log(error)
    }
  }


  // The UPDATE method updates the detail of an Event
  public async update({ request, params }: HttpContextContract) {
    const event = await Event.find(params.id)
    if (event) {
      event.title = request.input('title')
      event.description = request.input('description')
      event.date = request.input('date')
      event.ticket_price = request.input('ticket_price')
      if (await event.save()) {
        await event.preload('user')
        await event.preload('tickets')
        return event
      }
      return // 422
    }
    return // 401
  }


  // The STORE method is used to creat a new Event
  public async store({ auth, request }: HttpContextContract) {
    const user = await auth.authenticate()
    const event = new Event()
    event.title = request.input('title')
    event.description = request.input('description')
    event.date = DateTime.fromISO(request.input('date')).toSQL()
    event.ticket_price = request.input('ticket_price')
    await user.related('events').save(event)
    return event
  }

  // The DESTROY method deletes a particular event
  public async destroy({ response, auth, params }: HttpContextContract) {
    const user = await auth.authenticate()
    await Event.query().where('user_id', user.id).where('id', params.id).delete()
    return response.redirect('/dashboard')
  }

  // The findEvent method retrieves a single Event by ID without HttpContext
  private async findEvent(id: number): Promise<Event | null> {
    try {
      const event = await Event.find(id)
      if (event) {
        await event.preload('user')
        await event.preload('tickets')
        return event
      }
    } catch (error) {
      console.log(error)
    }
    return null
  }
}
The controller includes all the possible CRUD functionalities such as retrieving, storing, updating, and deleting the event.
Next, we will add the Join method to allow the user to join up the event using the code sent when purchasing the Event ticket.
public async join({
    params,
    auth,
    response,
    request
}: HttpContextContract) {

    // Check if user already join event
    const user = await auth.authenticate()
    const ticket = await Ticket.query()
        .where('user_id', user.id)
        .where('code', request.input('code'))
        .where('event_id', params.id)
        .first()
    if (!ticket) {
        // Throw Ticket not found exception
        return response.json({
            message: 'Ticket code not valid'
        })
    }
    if (
        ticket &&
        ticket.is_used &&
        ticket.used_date <= DateTime.fromSQL(ticket.used_date).toSQL()
    ) {
        // throw Used_ticket_Error
        return response.json({
            message: 'Ticket already used'
        })
    }

    // Create a new User Event to indicate that the Event Ticket has be used
    const joinEvent = new UserEvent()
    joinEvent.user_id = user.id
    joinEvent.event_id = params.id
    ticket.is_used = true
    ticket.used_date = DateTime.now().toSQL()
    if ((await joinEvent.save()) && (await ticket.save())) {
        // Send Success Response
        return response
            .status(200)
            .json({
                message: "You've joined event with id: " + params.id + ' successfully'
            })
    }
    return response.status(500).json({
        message: 'Internal Server Error, Please try again'
    })
}
Next, we will include the buy method which is used to purchase an Event ticket for the upcoming event.
public async buy({
    request,
    params,
    response,
    auth
}: HttpContextContract) {
    // Find Event
    const event = await this.findEvent(params.id)

    if (event === null) {
        return response.status(404).json({
            message: 'Event is not valid'
        })
    }
    const user = await auth.authenticate()

    // Check if price matches
    if (event.ticket_price != request.input('amount')) {
        const message =
            'Ticket with id: ' +
            event.id +
            ' with amount: ' +
            event.ticket_price +
            ' does not equal to User amount: ' +
            request.input('amount')
        return response.status(422).json({
            message
        })
    }

    const ticket = new Ticket()
    ticket.userId = user.id
    ticket.eventId = event.id
    ticket.amount = request.input('amount')
    ticket.code = Keygen.hex(5)

    if (ticket.save()) {
        // Send User Email, Send Code
        await User.find(user.id)
        return response
            .status(200)
            .json({
                message: 'Payment for event with id: ' + event.id + ' was successful'
            })
    }

    return response.status(500).json({
        message: 'Internal Server Error, Please try again'
    })
}
3.4. Creating endpoint routes
In this step, we will create all the routes for this project by adding the following code to our start/routes.ts file.
Route.group(() => {
    Route.group(() => {
        Route.post("register", "AuthController.register");
        Route.post("login", "AuthController.login");
    }).prefix("auth");
    Route.group(() => {
        Route.resource("events", "EventsController").apiOnly();
        Route.resource("tickets", "TicketsController").apiOnly();
        Route.post("events/buy/:id", "EventsController.buy");
        Route.post("events/join/:id", "EventsController.join");
    }).middleware("auth:api");
}).prefix("api/v1");
We created three different route groups with a different prefix assigned to each while the last group has the auth middleware applied to make sure the request is authenticated before it can access those endpoints.
You can test out your API immediately by using either Postman client or Hoppscotch on your browser before developing the frontend.
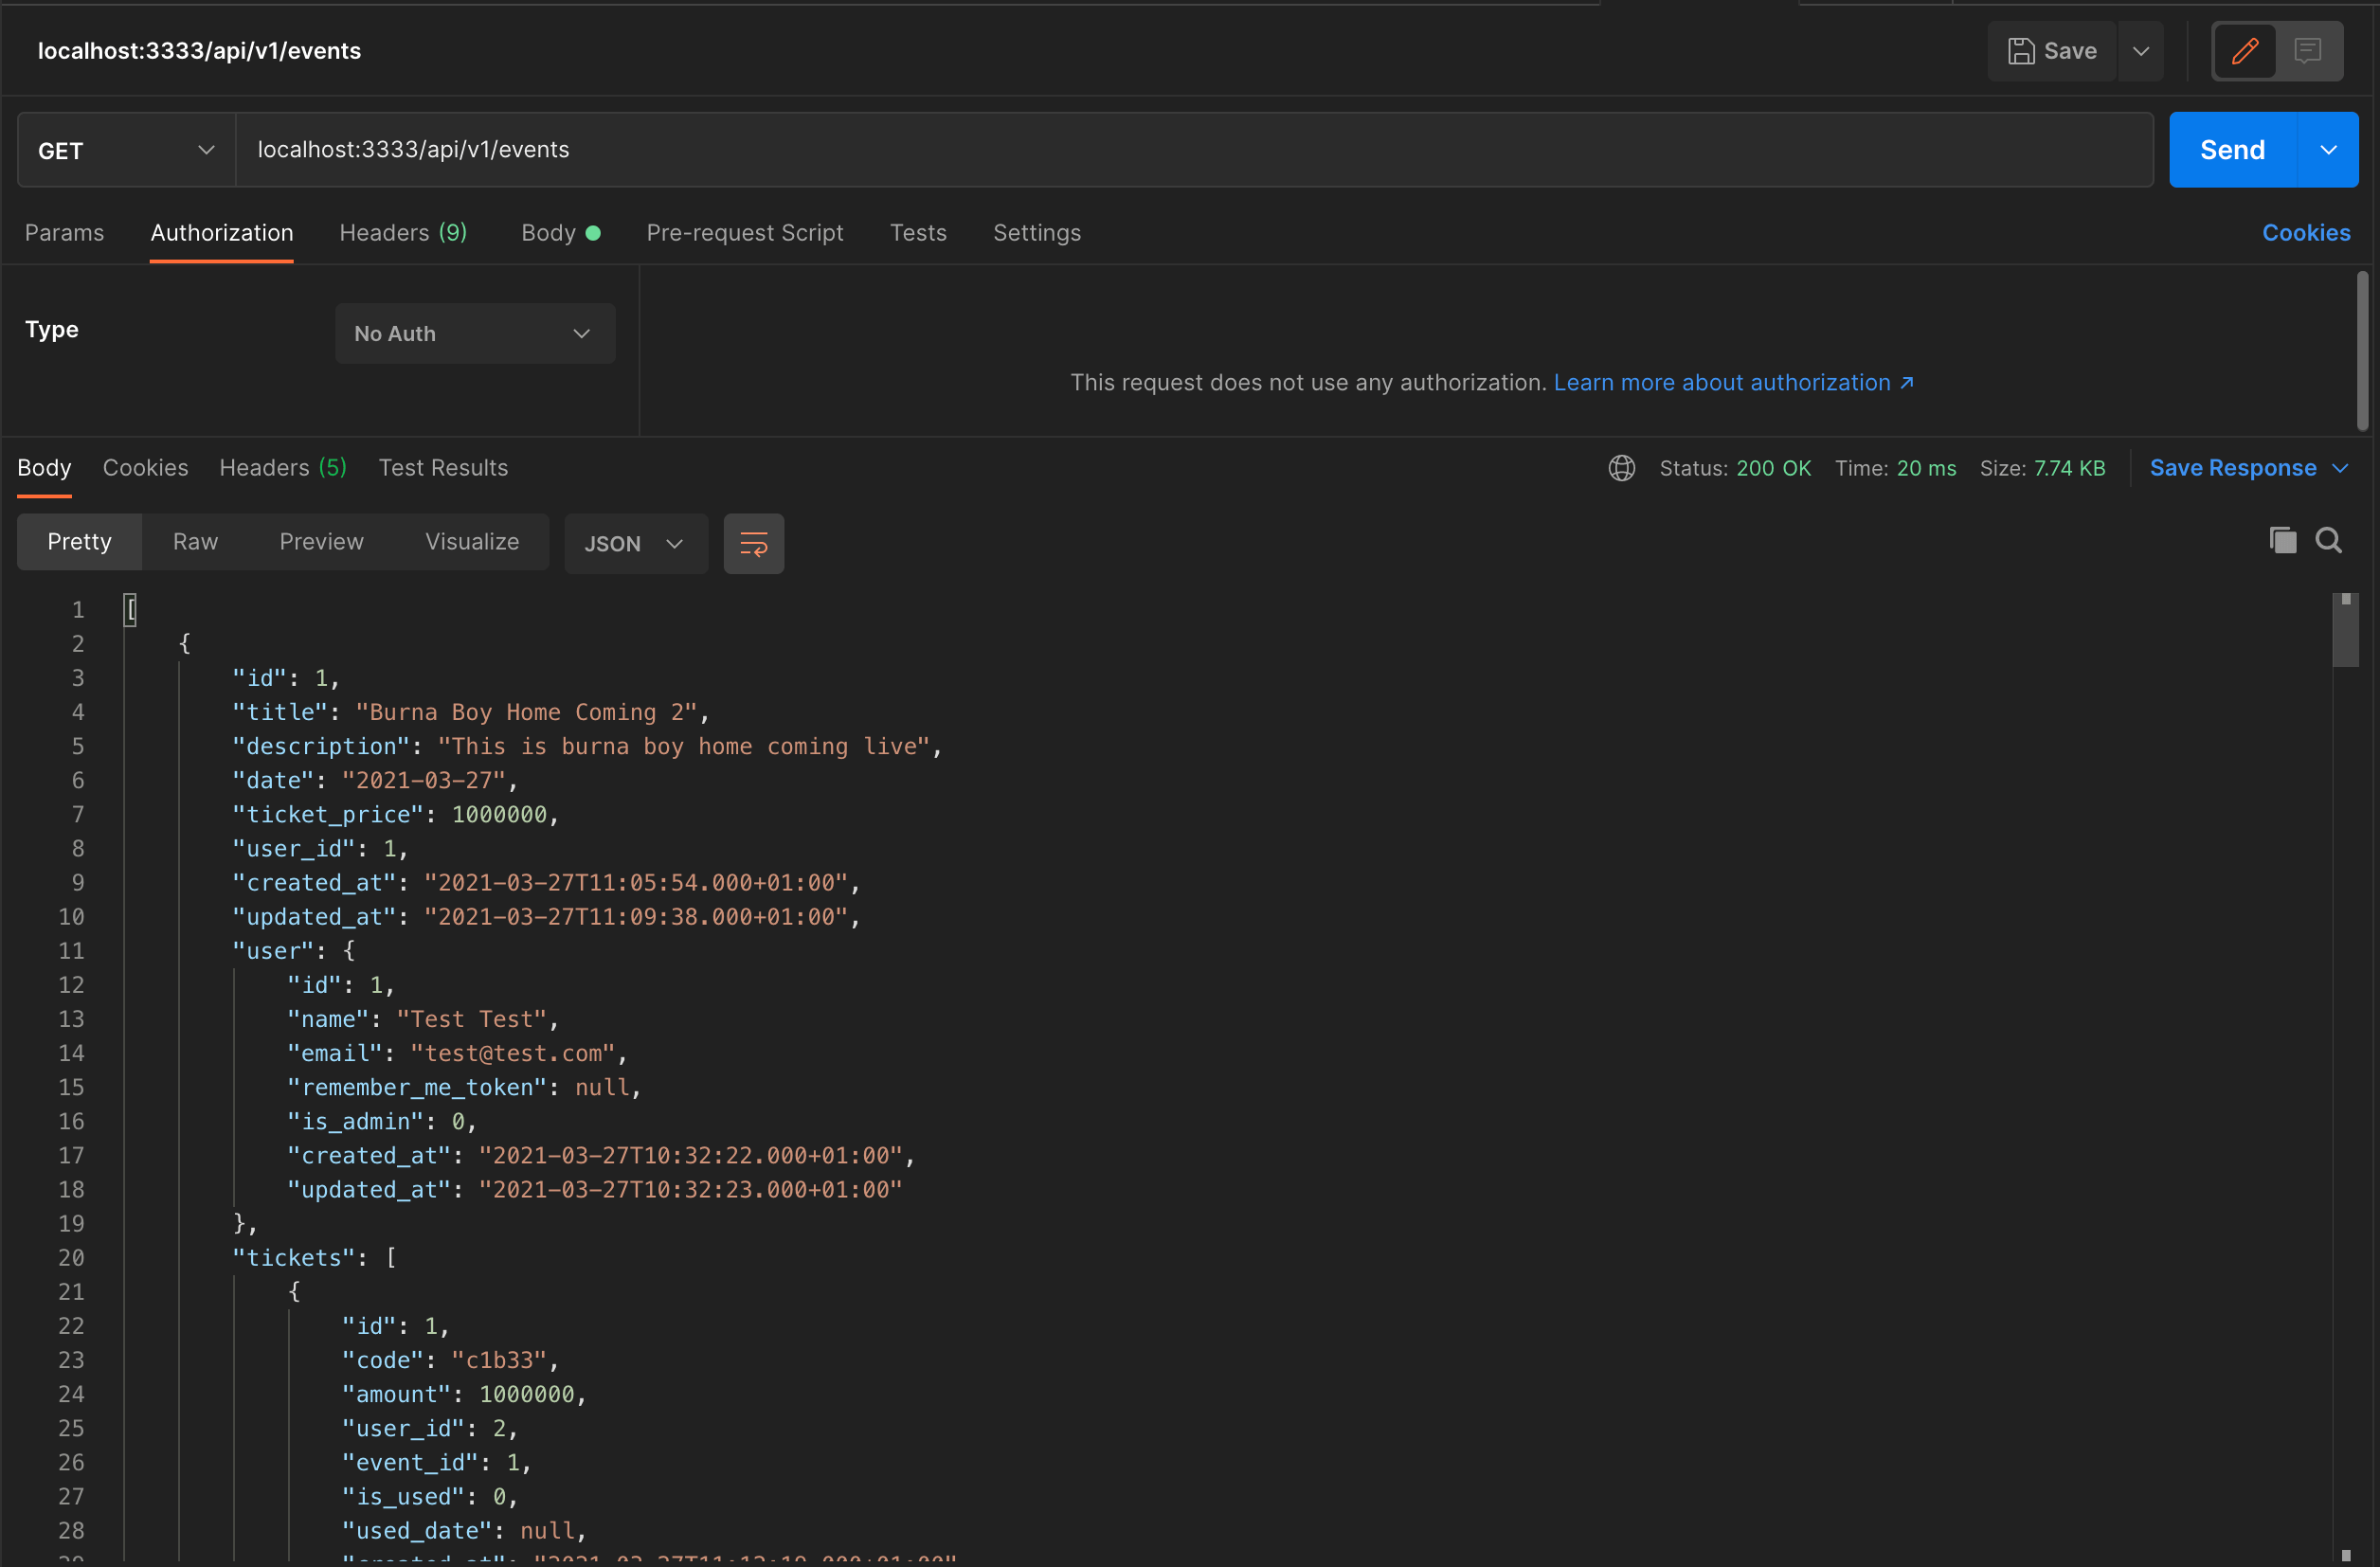
Testing the API using Postman
4. Step 2 — Building the frontend
In setting up the frontend, we will use the recommended Vite web development build tool to create our Vue 3 project.
Run the following command to install using Vite:
npm init @vitejs/app ticketing-system-vue
cd ticketing-system-vue
npm install
npm run dev
You can read through the installation process in the official documentation.
4.1. Creating routes
Next, we will create all the routes that will be used in this project at once by defining a new route.js file inside the src folder and adding the following codes.
// src/routes.js
import {
    createRouter,
    createWebHistory
} from "vue-router";

import store from "./store";
import Home from "./views/Home.vue";
import Login from "./views/Login.vue";
import Register from "./views/Register.vue";
import Ticket from "./views/Ticket.vue";
import User from "./views/dashboard/User.vue";
import Admin from "./layouts/Admin.vue";
import Add from "./views/dashboard/Add.vue";
import AdminHome from "./views/dashboard/Admin.vue";

const routes = [{
        path: "/",
        name: "home",
        component: Home,
    },
    {
        path: "/login",
        name: "login",
        component: Login,
    },
    {
        path: "/register",
        name: "register",
        component: Register,
    },

    // Protected Routes here
];
const router = createRouter({
    history: createWebHistory(),
    routes
});

export default router;
In the code above, we created different routes for login, register, index and protected routes such as admin and user below:
{
    path: "/user/:id",
    name: "user",
    component: User,
    meta: {
        requiresAuth: true
    },
    beforeEnter(to, from, next) {
        if (
            store.getters["isUser"] &&
            parseInt(store.state.user.id) === parseInt(to.params.id)
        ) {
            next();
        } else {
            next({
                name: "login",
            });
        }
    },
}, {
    path: "/admin",
    name: "admin",
    component: Admin,
    meta: {
        requiresAuth: true
    },
    children: [{
            path: "add",
            component: Add,
        },
        {
            path: "/",
            component: AdminHome,
        },
    ],
    beforeEnter(to, from, next) {
        if (store.getters["isAdmin"]) {
            next();
        } else {
            next({
                name: "login",
            });
        }
    },
},
The beforeEach route hook checks each route for any authentication metadata and if found, checks if the user navigating that route has logged in or not then redirects.
router.beforeEach((to, from, next) => {
    to.matched.some((record) => {
        console.log(record);
        return record.meta.requiresAuth;
    });
    if (to.matched.some((record) => record.meta.requiresAuth)) {
        if (!store.state.loggedIn) {
            next({
                path: "/login",
                query: {
                    redirect: to.fullPath
                },
            });
        } else {
            next();
        }
    } else {
        next();
    }
});
To get the routes to work, we added the new route package and registered this file inside the main.js file so we can use it as Vue 3 plugin.
npm install vue-router@4
Inside the main.js, we added it as below:
import { createApp } from "vue";
import router from "./routes";
//........

createApp(App).use(router).use(store).mount("#app");
4.2. Set up user authentication
We will start by creating the login and register views in the src/views folder, run the following commands to create these files.
touch login.vue
touch register.vue
Next, we will add the following code to create in the login.vue to create the login form and also the login process with error handling.
We will add the following code to the login file:
import { ref, reactive } from "vue";
import { useForm, useField } from "vee-validate";
import { object, string } from "yup";
import { useStore } from "vuex";
import { useRouter } from "vue-router";
export default {
  setup() {
    //creating the Vuex Store object
    const store = useStore();

    // creating th Router Object
    const router = useRouter();

    // creating our validation schema using vee-validate
    const schema = object({
      email: string().required().email(),
      password: string().required().min(8),
    });

    // Using the Validation Schema using vee-validate
    useForm({
      validationSchema: schema,
    });

    // Validating each Field with possible error messages
    const { value: email, errorMessage: emailError } = useField("email");
    const { value: password, errorMessage: passwordError } = useField(
      "password"
    );

    // creating an empty User object
    const user = ref({});

    // Create a Login method
    const login = async () => {
      try {
        await store.dispatch("login", {
          email: email.value,
          password: password.value,
        });
        if (store.state.loggedIn && store.getters["isAdmin"])
          return router.push("/admin/");
        else {
          return router.push({
            name: "user",
            params: { id: store.state.user.id },
          });
        }
      } catch (err) {
        console.log(err);
      }
    };

    // Return all data to the DOM
    return {
      login,
      user,
      emailError,
      passwordError,
      email,
      password,
    };
  },
};
In the code above, the HTML mockup generates a login form with a submit button. We handle possible errors using the vee-validate library and then, we dispatch the login action in our Vuex store when the submit button is clicked.
The registration process is almost the same as the Login process, you can take a quick glance at the code here.
4.3. Creating the store
Next, we will create our Vuex store, create a new store.js file inside the src folder and add the following codes.
touch store.js
You can review the complete store codebase here, but below is a quick glance at our Vuex store.
import { createStore } from "vuex";
import Repository from "./repositories/RepositoryFactory";
const EventRepository = Repository.get("events");
const AuthRepository = Repository.get("auth");

const store = createStore({
  state: {
    events: [],
    user: [],
    userevents: [],
    loggedIn: false,
  },

  actions: {
    async getEvents({ commit }) {
      commit("STORE_EVENTS", await EventRepository.get());
    },

    async login({ commit }, payload) {
      commit("STORE_LOGGED_IN_USER", await AuthRepository.login(payload));
    },

    async logout({ commit }) {
      try {
        await AuthRepository.logout();
        commit("STORE_LOGGED_OUT_USER", true);
        return true;
      } catch (error) {
        console.log(error);
      }
      return false;
    },
    async register({ commit }, payload) {
      return await AuthRepository.register(payload);
    },
  },

  mutations: {
    STORE_LOGGED_IN_USER: (state, response) => {
      const { data } = response;
      if (data) {
        localStorage.setItem("token", data.token);
        localStorage.setItem("user", data.user);
        state.user = data.user;
        state.token = data.token;
        state.loggedIn = true;
      }
    },

    STORE_EVENTS: (state, response) => {
      const { data } = response;
      state.events = data;
    },

    STORE_LOGGED_OUT_USER: (state, response) => {
      if (response) {
        localStorage.removeItem("token");
        localStorage.removeItem("user");
        state.user = {};
        state.token = null;
        state.insights = null;
        state.loggedIn = false;
      }
    },
  },

  getters: {
    getEvent: (state) => (id) => {
      return state.events.find((event) => event.id == id);
    },
  },
});

export default store;
The store is where we will manipulate all our data, we retrieved them from the API, stored them to state, delete or update them from the store too.
In the store, we used the repository pattern to separate concerns, loose coupling in communicating with the API, you can have a sneak peek of the repository pattern here and how to implement it here.
4.4. Creating the homepage
Next, we will create the homepage where the events are being displayed from the state, create a file in src/views folder called Home.vue and add the following code.
<!--Home.vue-->

<template>
  <div class="text-center banner">
    <div class="container p-5">
      <div class="p-5">
        <h1>Welcome to Ticketing System</h1>
        <p>
          Find events around you, register for free event, buy tickets, sell
          tickets online and promote your event worldwide.
        </p>
      </div>
    </div>
    <div class="container pb-5">
      <Events />
    </div>
  </div>
</template>

<script></script>
And the JavsScript code below:
import Events from "../components/Events.vue";
export default {
  components: {
    Events,
  },
};
The scripts displays all the events by calling out the Events component.
The Events component is created below:
<template>
  <div class="row pb-5">
    <Event v-for="(event, i) in events" :key="i" :event="event" />
  </div>
</template>
<script></script>
And, the JavaScript below:
import Event from "./Event.vue";
import { computed } from "vue";
import { mapState, useStore } from "vuex";
export default {
  name: "Events",
  components: { Event },
  setup() {
    const store = useStore();
    return {
      events: computed(() => store.state.events),
    };
  },
};
4.5. Displaying a single event
To view a single event, we need to create a route in the routes.js file and link it with each event. The route is defined below:
import Ticket from "./views/Ticket.vue";

{
  path: "/events/:id",
  name: "event",
  component: Ticket,
},
The route is pointing to a Ticket view and we have already created that inside the src/views folders.
<!--src/views/Ticket.vue-->

<template>
  <div class="text-center banner p-3 pb-5">
    <div class="container pb-5">
      <div class="row pb-5">
        <div class="col-md-8 col-12 pb-5">
          <div class="card card-custom p-5">
            <h5 class="authBtn">{{ event.title }}</h5>
            <hr />
            <div class="container">
              <small class="authBtnInner pb-3">{{ event.description }}</small>
            </div>
          </div>
        </div>
        <div class="col-md-4 col-12">
          <div class="card card-custom p-5">
            <h5 class="authBtn">Event Ticket</h5>
            <hr />
            <span>Event Date:</span>
            <small class="authBtnInner pb-3"> {{ event.date }} </small>
            <hr />
            <span>Event Price:</span>
            <small class="authBtnInner pb-3">${{ event.ticket_price }}</small>
            <router-link to="/" class="btn btn-primary customBtn"
              >Buy Ticket</router-link
            >
          </div>
        </div>
      </div>
    </div>
  </div>
</template>
And the JavaScript code is as follows:
import { computed } from "vue";
import { useStore } from "vuex";
import { useRoute } from "vue-router";
export default {
  name: "Ticket",
  setup() {
    const store = useStore();
    const route = useRoute();
    const event = computed(() => store.getters.getEvent(route.params.id));
    return { event };
  },
};
The Ticket component displays the events information including the Ticket price and a Buy button, which after purchasing an email will be sent to the purchaser including the ticket’s code.
5. Testing the project
This is a high-level abstraction of the entire codebase, you can clone the different repositories for this project and take a closer look at each of them in details.
Adonis.js Backend Repository here.
Vue.js 3 Frontend Repository here.
6. Conclusion
In this tutorial, we developed a ticketing system application using Adonis.js for the backend and Vue.js 3 for the frontend.
We learned how to create a Ticketing system API with Adonis.js 5 including authentication and authorization, we went over how to structure the project, and how to consume the API using Vue 3 and the composition API.
Happy coding!