
Table of Contents
Node.js is a very popular JavaScript framework. It shines most when used to build back-end services and APIs. Node.js developers often utilize open-source frameworks and libraries like Express.js to develop applications. These libraries are readily available in the NPM registry.
Whenever you use such packages, there is a lot of abstraction; hence you don’t utilize the core functionalities of Node.js. The low-level logic Node.js of your application is hidden from you as these packages process and execute raw Node.js behind the scenes.
One key thing to note is that these packages make Node.js a popular technology. On the other side, you can opt to use core Node.js to develop your applications. This way, you make use of the Vanilla Node.js functionalities. This blog will teach you how to use vanilla Node.js with no frameworks to build simple APIs.
1. Goal
In this guide, we’ll build a simple REST API using functionalities core to Node.js itself. We’re just using the bare-bones of vanilla Node.js with the HTTP module for creating and managing a server.
This means we won’t use NPM. Therefore no NPM associated dependencies, no package.json, no package-lock.json, and no node_module folder.
The goal is to show you how Node.js works in its purest form and how you may use it without external libraries or frameworks.
Note: When working on any actual project, it is best to use Node.js libraries and packages. This way, you’ll take full advantage of the readily available code to make your development workflow easier and faster.
1. Prerequisites
- Ensure you have Node.js and Postman installed on your computer.
- Be familiar with how to use Postman.
- Basic knowledge of Node.js.
- Basic understanding of REST APIs and CRUD operations.
- Basic understanding of JavaScript. This guide uses ES6 features and syntax, such as the arrow function (=>).
2. Setting up a simple HTTP server
Before creating the REST API, let’s create a simple HTTP API to serve a Hi there statement.
Create a project folder and an app.js file.
- The first thing to do is to pull the HTTP module from Node.js using
require()method. This module is native to Node.js. You don’t need any extra packages or libraries to access it, just Node.js runtime installed on your computer.
const http = require("http");
This way, we make the necessary methods and functions available to set up a server.
- Once available, define the port you want the server to run on, as shown below.
const PORT = process.env.PORT || 5000;
- To create the server, you need to call the
createServermethod from the HTTP module. i.e,http.createServer. Pass a response and a request that serves up your information.
Then use:
req.urlto set the request access route/URL.req.method.res.writeHeadto set any response headers.res.write()to send the actual content for the response.res.end()to end the response.
const server = http.createServer(async (req, res) => {
    //set the request route
    if (req.url === "/api" && req.method === "GET") {
        //response headers
        res.writeHead(200, { "Content-Type": "application/json" });
        //set the response
        res.write("Hi there, This is a Vanilla Node.js API");
        //end the response
        res.end();
    }

    // If no route present
    else {
        res.writeHead(404, { "Content-Type": "application/json" });
        res.end(JSON.stringify({ message: "Route not found" }));
    }
});
- Call the
listen()method and pass in thePORTvariable. Then add aconsole.log()message that will indicate the server is up and running.
server.listen(PORT, () => {
    console.log(`server started on port: ${PORT}`);
});
- The server is well set. Run
node app.jsto test it. This will log theconsole.log()message on your command screen.

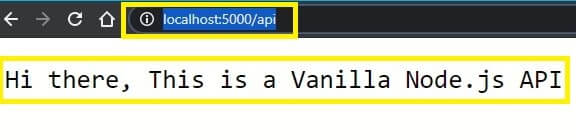
- If you open
http://localhost:5000/apion a browser, you’ll be served the response as defined in theres.write()
3. Setting up the REST API
Let’s now see how to set up a REST API using raw Node.js. We’ll use a todos boilerplate to demonstrate this.
Below is the project structure.
\---vanilla-nodejs-rest-api
|   app.js
|   controller.js
|   data.js
|   utils.js

No sub-folders exist
3.1. Adding test data
data.js: Holds some temporary test data. The information is kept in a todos array. Every todo has a unique id, a todo title, a short description, and a Boolean value that marks a completed todo.
//data.js
/** Todos List*/
const todos = [
    {
        id: 1,
        title: "Coding in Javascript",
        description: "Working with functions in JavaScript",
        completed: false,
    },
    {
        id: 2,
        title: "Cooking Supper",
        description: "Preparing rice and chicken",
        completed: false,
    },
    {
        id: 3,
        title: "Taking a walk",
        description: "Easy time at the park",
        completed: false,
    },
    {
        id: 4,
        title: "Watching Netflix",
        description: "Enjoying the new premiered series",
        completed: false,
    },
];
module.exports = todos;
3.2. Setting up the controllers
controllers.js: this manages the actual functionality and the logic behind each route used in this application. It is made up of the Controller class, which will have the following major HTTP methods:
getTodos(): to get and list down all todos as listed in the temporarydata.jsfile.getTodo(): to get and list a single todo by its unique id.createTodo(): to create a new temporary todo.updateTodo(): to update the values of an existing todo.deleteTodo(): to remove a todo from the list.
// controller.js
// Logic behind the functionalities
const data = require("./data");

class Controller {
    // getting all todos
    async getTodos() {
        // return all todos
        return new Promise((resolve, _) => resolve(data));
    }

    // getting a single todo
    async getTodo(id) {
        return new Promise((resolve, reject) => {
            // get the todo
            let todo = data.find((todo) => todo.id === parseInt(id));
            if (todo) {
                // return the todo
                resolve(todo);
            } else {
                // return an error
                reject(`Todo with id ${id} not found `);
            }
        });
    }

    // creating a todo
    async createTodo(todo) {
        return new Promise((resolve, _) => {
            // create a todo, with random id and data sent
            let newTodo = {
                id: Math.floor(4 + Math.random() * 10),
                ...todo,
            };

            // return the new created todo
            resolve(newTodo);
        });
    }

    // updating a todo
    async updateTodo(id) {
        return new Promise((resolve, reject) => {
            // get the todo.
            let todo = data.find((todo) => todo.id === parseInt(id));
            // if no todo, return an error
            if (!todo) {
                reject(`No todo with id ${id} found`);
            }
            //else, update it by setting completed to true
            todo["completed"] = true;
            // return the updated todo
            resolve(todo);
        });
    }

    // deleting a todo
    async deleteTodo(id) {
        return new Promise((resolve, reject) => {
            // get the todo
            let todo = data.find((todo) => todo.id === parseInt(id));
            // if no todo, return an error
            if (!todo) {
                reject(`No todo with id ${id} found`);
            }
            // else, return a success message
            resolve(`Todo deleted successfully`);
        });
    }
}
module.exports = Controller;
3.3. Utility settings
utils.js: Controls a standard Web API use case. It includes the getReqData() function, which retrieves data from the client on the server.
//utils.js
function getReqData(req) {
    return new Promise((resolve, reject) => {
        try {
            let body = "";
            // listen to data sent by client
            req.on("data", (chunk) => {
                // append the string version to the body
                body += chunk.toString();
            });
            // listen till the end
            req.on("end", () => {
                // send back the data
                resolve(body);
            });
        } catch (error) {
            reject(error);
        }
    });
}
module.exports = { getReqData };
3.4. Setting the server and routes
app.js: This contains;
- Initialization and configuration of the server.
- The appropriate routes listening to the varying HTTP methods of a server.
- A PORT number to listen and set the server live on a browser.
//app.js
const http = require("http");
const Todo = require("./controller");
const { getReqData } = require("./utils");

const PORT = process.env.PORT || 5000;

const server = http.createServer(async (req, res) => {
    // /api/todos : GET
    if (req.url === "/api/todos" && req.method === "GET") {
        // get the todos.
        const todos = await new Todo().getTodos();
        // set the status code, and content-type
        res.writeHead(200, { "Content-Type": "application/json" });
        // send the data
        res.end(JSON.stringify(todos));
    }

    // /api/todos/:id : GET
    else if (req.url.match(/\/api\/todos\/([0-9]+)/) && req.method === "GET") {
        try {
            // get id from url
            const id = req.url.split("/")[3];
            // get todo
            const todo = await new Todo().getTodo(id);
            // set the status code and content-type
            res.writeHead(200, { "Content-Type": "application/json" });
            // send the data
            res.end(JSON.stringify(todo));
        } catch (error) {
            // set the status code and content-type
            res.writeHead(404, { "Content-Type": "application/json" });
            // send the error
            res.end(JSON.stringify({ message: error }));
        }
    }

    // /api/todos/:id : DELETE
    else if (req.url.match(/\/api\/todos\/([0-9]+)/) && req.method === "DELETE") {
        try {
            // get the id from url
            const id = req.url.split("/")[3];
            // delete todo
            let message = await new Todo().deleteTodo(id);
            // set the status code and content-type
            res.writeHead(200, { "Content-Type": "application/json" });
            // send the message
            res.end(JSON.stringify({ message }));
        } catch (error) {
            // set the status code and content-type
            res.writeHead(404, { "Content-Type": "application/json" });
            // send the error
            res.end(JSON.stringify({ message: error }));
        }
    }

    // /api/todos/:id : UPDATE
    else if (req.url.match(/\/api\/todos\/([0-9]+)/) && req.method === "PATCH") {
        try {
            // get the id from the url
            const id = req.url.split("/")[3];
            // update todo
            let updated_todo = await new Todo().updateTodo(id);
            // set the status code and content-type
            res.writeHead(200, { "Content-Type": "application/json" });
            // send the message
            res.end(JSON.stringify(updated_todo));
        } catch (error) {
            // set the status code and content type
            res.writeHead(404, { "Content-Type": "application/json" });
            // send the error
            res.end(JSON.stringify({ message: error }));
        }
    }

    // /api/todos/ : POST
    else if (req.url === "/api/todos" && req.method === "POST") {
        // get the data sent along
        let todo_data = await getReqData(req);
        // create the todo
        let todo = await new Todo().createTodo(JSON.parse(todo_data));
        // set the status code and content-type
        res.writeHead(200, { "Content-Type": "application/json" });
        //send the todo
        res.end(JSON.stringify(todo));
    }

    // No route present
    else {
        res.writeHead(404, { "Content-Type": "application/json" });
        res.end(JSON.stringify({ message: "Route not found" }));
    }
});

server.listen(PORT, () => {
    console.log(`server started on port: ${PORT}`);
});
4. Testing the app
The Vanilla Node.js REST API is now set and ready to test to see if everything is working. Now you need to start the server by running the following command:
node app.js
This will set and run the server on port 5000.
5. Explore the API using Postman
Let’s test the different methods set in the API using Postman. If you are new to Postman API testing, please go over this tutorial to get started.
5.1. Fetch all todos
/API/todos GET: This will fetch all the todos listed in the data.js.
To test this GET request:
- Go over to Postman and SEND a
GETrequest. The request URL ashttp://localhost:5000/api/todosas shown below:

- This will log a response in the Postman response section, with all the todos as listed in
data.js

5.2. Fetch a todo by id
/API/todos/:id GET: This will fetch only one todo specified with the value of the todo’s id.
To test this GET request:
- Go over to Postman and SEND a
GETrequest. Enter the request URL ashttp://localhost:5000/api/todos/:id, where:idis the id of the single todo you want to fetch, as shown below.

- The request will log a single todo to the Postman response section.

5.3. DELETE a todo
/API/todos/:id DELETE: This will perform a DELETE request of a single todo. You will just receive a response message because the data is temporary and not stored in a database.
To put it to the test:
- Go over to Postman and SEND a
DELETErequest. Enter the request URL ashttp://localhost:5000/api/todos/:id, where:idis the id of the single todo you want to delete, as shown below.

- This will log a
Todo deleted successfullymessage in your Postman response console.

5.3. UPDATE a todo
/API/todos/:id PATCH: This will update a todo to indicate that the task is completed, i.e., true or false. You will see the effect on the postman response console.
To see how well it works:
- Go over to Postman and SEND a
PATCHrequest. Enter the request URL ashttp://localhost:5000/api/todos/:id, where:idis the id of the single todo you want to update, as shown below.

- The Postman response console should look like this:

5.4. ADD a new todo
/API/todos POST: This will create a new todo item. The new todo will be returned as a response, but it will not be recorded in the data.js.
To put it to the test, do the following:
- Go over to Postman and open a new tab, select a
POSTrequest and enter the request URL ashttp://localhost:5000/api/todos.

Go over to the Body tab section, select raw, and select’ JSON’ from the dropdown options to the right.
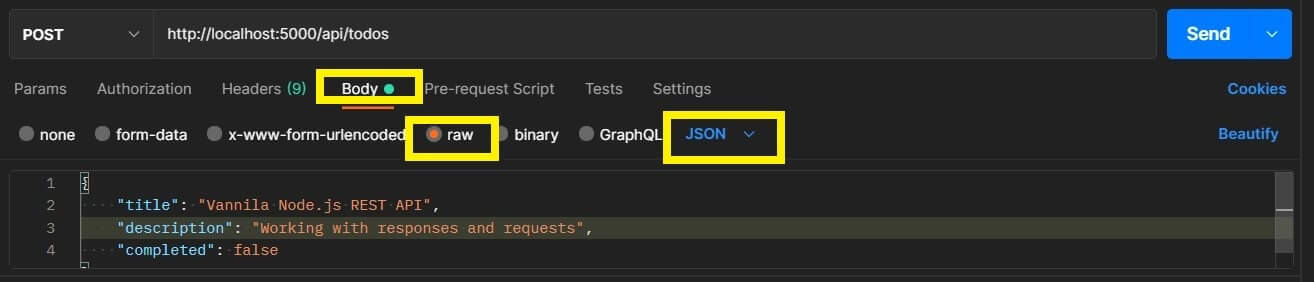
- Add the new todo’s contents (title, the description, and completed).
Here is a simple illustration:
{
   "title": "Vannila Node.js REST API",
    "description": "Working with responses and requests",
    "completed": false
}
- After filling the above details, hit the SEND button to start the POST request, and the newly added todo will be logged in the Postman console.
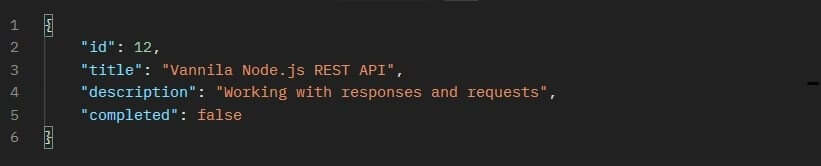
Note: Because the id is generated randomly, it may vary every time you make a new POST request.
There you have it: a straightforward REST API written entirely in Vannila Node.js. I hope you have found this tutorial instructive, informative, and helpful.
Happy coding!!!