
Table of Contents
Short Message Service (SMS) is one of the best marketing strategies that organizations use to communicate with their clients. Using SMS in your mobile or a web application allows you to reach out to a broader audience since people tend to check their message inbox more often than emails.
Vonage’s SMS API allows developers to integrate messaging services into an application with ease.
The API’s benefits include:
- Support for local phone numbers.
- Low latency.
- High delivery rates.
- Modern web technologies support.
1. Goal
This article will enable you to integrate SMS functionality into a Node.js application using Vonage’s SMS API.
2. Setting up Vonage account
- Navigate to Vonage’s website to create an account for free. The platform allows you to have a free trial for $2.00, after which you will have to pay more.
- Create an account by inputting your email address and a strong password.
- In the phone number field, provide a valid number that we will use to test the application.
- Since we will use Node.js, select it as the target programming language.
- Click on SMS, then wait for the platform to set up your account.
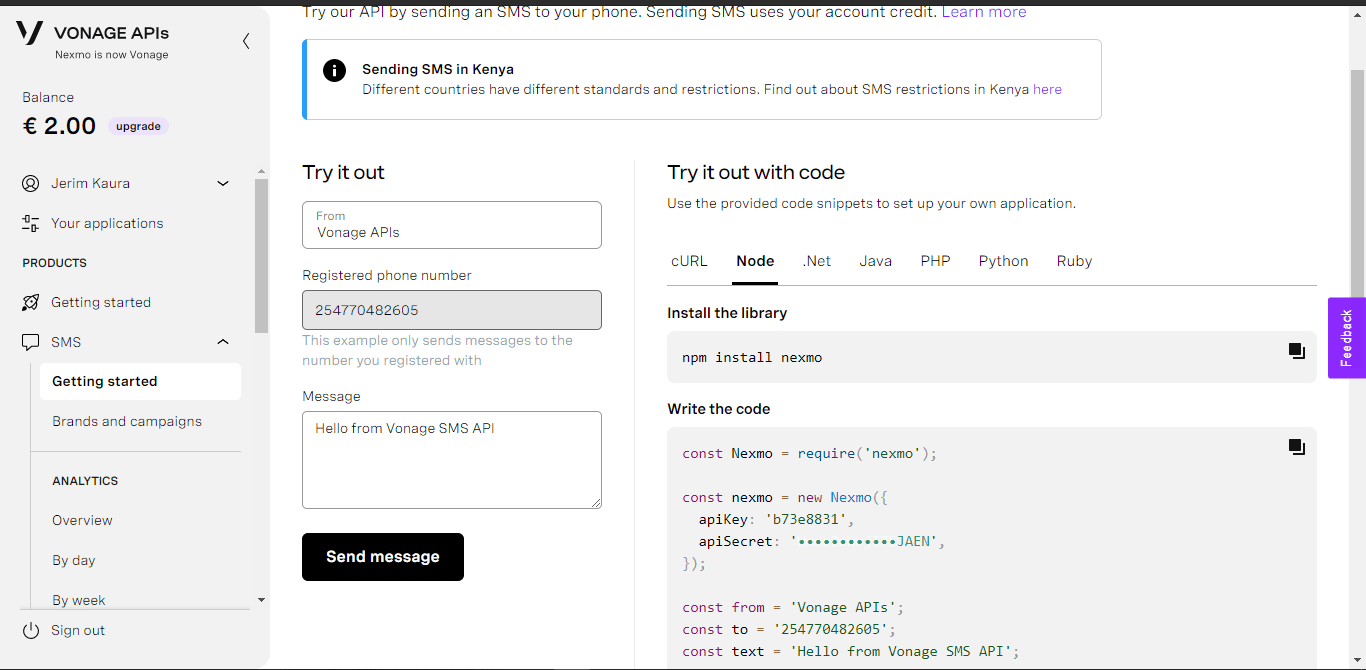
You have successfully created a Vonage account; your dashboard should look like this.
3. Creating the Node.js application
3.1. Init application
Set up the Node.js application by running the following command:
npm init
This command will create an empty package.json file for our application. The package.json will hold the project’s metadata that includes dependencies, scripts, and versions.
3.2. Install dependencies
Next, we will install the required dependencies.
We will use
expressas our backend framework for Node.js,EJSas our template engine,body-parserto parse HTTP request body,nexmo APIfor sending the message, andsocket.ioto request a delivery report for the messages sent.
To install these dependencies, run the following command in your terminal.
npm install –save express, nexmo, eggs, body-parser, socket.io, fetch
3.3. Nodemon
We will need nodemon to monitor changes in the application and restart the server when a change is detected. I prefer installing nodemon globally. To install nodemon, run the following command.
npm install -g nodemon
We are all set. Now, let’s start coding!
4. Implementation
First, we need to create our application’s entry point file. I will name this app.js.
You can set the app’s entry point using the
initcommand or manually set up within thepackage.jsonfile.
In the app.js, we will import our dependencies, as shown below:
const express = require('express');
const bodyParser = require('body-parser');
const ejs = require('ejs');
const Nexmo = require('nexmo');
const socketio = require('socket.io');
const fetch = require("node-fetch");
Next, we initialize the application with express and set up our templating engine, EJS. EJS allows us to use .html extensions for our views.
We will add the following code to the app.js file:
const app = express()
//Setting up the body parser middleware and ejs template engine
app.set('view-engine', 'html');
app.engine('html', ejs.renderFile);

//public folder setup
app.use(express.static(__dirname + '/public'));

//body parser middleware
app.use(bodyParser.json());
app.use(bodyParser.urlencoded({extended:true});
Specify the index route as index.html since the application will only have a single page.
//index route
app.get('/', (request, response) =>{
    response.render('index.html');
});
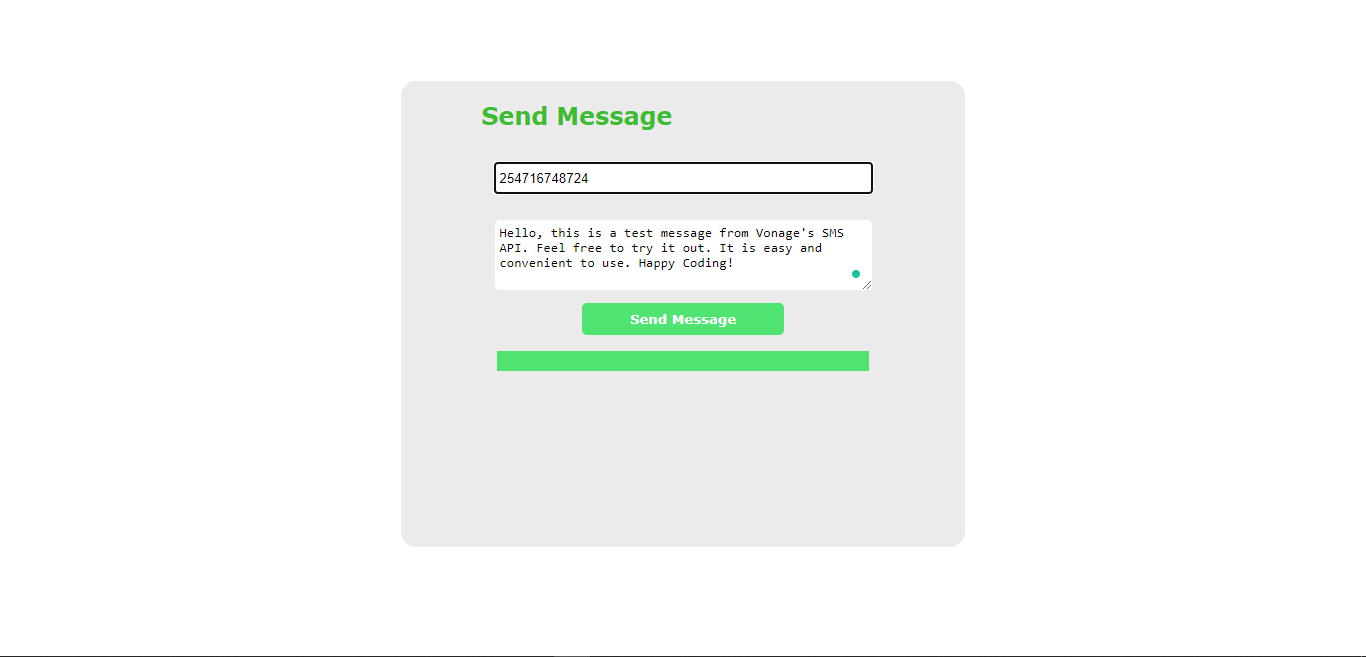
5. Creating our view
We will create a folder called views where we will store our template files. In the folder, create an index.html file. It will contain the input fields for the phone number and message to be sent.
Here is the code for the index.html:
<!DOCTYPE html>
<html lang="en">
<head>
    <meta charset="UTF-8">
    <meta http-equiv="X-UA-Compatible" content="IE=edge">
    <meta name="viewport" content="width=device-width, initial-scale=1.0">
    <title>Send SMS APP</title>
    <link rel="stylesheet" href="css/main.css">
</head>
<body>
    <div class="container">
        <h2>Send Message</h2>
        <!-- phone number input field -->
        <input type="tel" name="number" class="input" id ="number" placeholder="Enter phone number">

        <!-- message input field -->
        <textarea  rows="4" cols="50"  name="msg" id ="message" placeholder="Enter message here..."></textarea>

        <!-- submit button -->
        <div class="button-container">
            <button type="button" id ="button" value="Send">Send Message</button>
        </div>

        <!-- Socket.io response in a paragraph -->
        <p class="response"></p>
    </div>

    <!-- link to js scripts and socket -->
    <script src="/socket.io/socket.io.js"></script>
    <script src="js/main.js"></script>
</body>
</html>
6. Client-side JavaScript driver code
We will create a public folder in the root of our application. In this public folder, we will create a main.js file to contain the JavaScript code for fetching the variables used to trigger the send-SMS functionality.
// phone number
const phoneNumber= document.getElementById('number'),

//message to send
textMessage = document.getElementById('message'),

//send button
button = document.getElementById('button'),

//response field
response = document.querySelector(".respose");
7. Adding the send functionality
Since we have added a send button in the HTML form, we need to attach an EventListener to the button to trigger the send() function.
The block of code below shows an implementation of this function.
button.addEventListener('click', send, false);
function send() {
    // getting value form the variabled  fetched
    const number = phoneNumber.value.replace(/\D/g, '');// eliminate non-numeric characters
    const text = textMessage.value;

    // Making a post request with the data to the our server
    fetch('/', {
        method: 'post',
        headers: {
          'Content-type': 'application/json'
        },
        // convert the request body into a string
        body: JSON.stringify({ number, text })
    }).then(function (res){
        //log the response
        console.log(res);
    }).catch(function(err){ //cathc any error found
        //console log the error
        console.log(err);
    });
}
8. Implementing Nexmo
First, we will initialize Nexmo by supplying our apiKey and secret.
//init out nexmo
const nexmo = new Nexmo({
    apiKey: 'YOUR API-KEY',
    apiSecret: 'API-SECRET',
}, {debug:true});
We need to make a post request to the server. In the app.js file, add the following code to catch the post request and use Nexmo to send the message to the specified number.
//catch post from our main.js
app.post('/', (request, response) =>{
    const phoneNumber = request.body.number;
    const textMessage = request.body.text;

    const from = 'Vonage APIs';
    const to = phoneNumber;
    const text =  textMessage;
    nexmo.message.sendSms(from, to, text, {type:'unicode'}, (error,responseData) =>{
        if(error){
            console.log(error)
        }else{
            console.dir(responseData);
            //get phone number into an object to be sent to the client
            const data = {
                number: responseData.messages[0]['to']
            }
            //send response to client using socket
            io.emit('smsStatus', data);
        }
    });
});
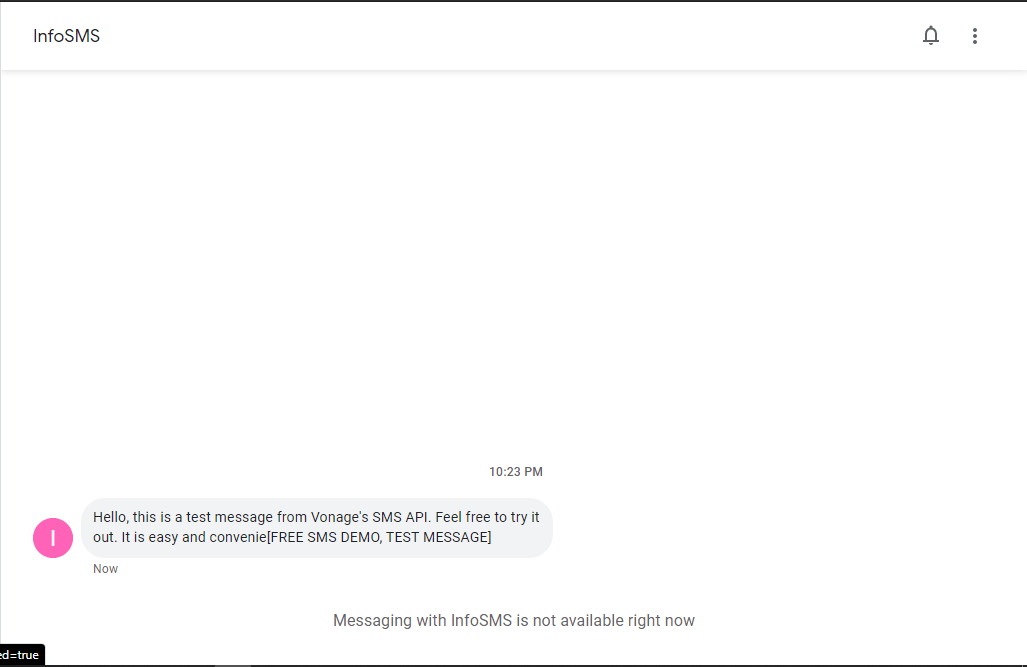
Next, we will send the response data to the client to show if the SMS was sent successfully or not. To do this, we will use the io.emit() function. You could read more on this function here.
io.emit('smsStatus', data)
To receive the data and embed it in our index page, we use the following code in the main.js file:
const socket = io();
socket.on('smsStatus', function(data){
    if(data.error){
        //in case of an error response
        response.innerHTML = '<strong>Failed!</strong><h5> Messae Failed ' + data.error + '</h5>';
    }else{
          // if the sms is sent successfully
        response.innerHTML = '<strong>Success!</strong><h5>Text message sent to ' + data.number + '</h5>';
    }
});
To start our server, we will define a port from where our application will run on the localhost.
//Port number
const port = 3000;

//start server
const server = app.listen(port, () =>{
    console.log(`Server started on port ${port}`);
});
9. Conclusion
We learned how to use Vonage’s SMS API by creating an account, setting up the SMS API, and using the API to send messages to a provided number. The number used for testing must be registered under your account.
Note that this only applies to non-premium users. We also learned how to use sockets.io to communicate between the server and client application.
You can find the complete application code here.
Happy coding!