
Table of Contents
Two-factor authentication is a security measure implemented in an application to increase security by providing two separate pieces of evidences for authorization to the system. Two-factor authentication (2FA) works beyond username/email and password authentication.
In this tutorial, we will learn to authenticate by using the Speakeasy library. We’ll also learn to do a backend implementation of two-factor authentication using a token generated by the Google Authenticator app.
1. Introduction
One of the ways through which 2FA is implemented is using the speakeasy library.
The Speakeasy library provides two-factor authentication using a One-Time Password (OTP). The library provides an additional layer of security to an application’s standard authentication process.
Using the OTP, Speakeasy provides extra data required for account access.
You can find more about the library here.
2. Setting up the Node.js application
Let’s begin by initializing our application using the init command.
npm init -y
The command will create a package.json file, that holds the metadata about the project.
{
  "name": "node-two-factor-auth",
  "version": "1.0.0",
  "description": "",
  "main": "index.js",
  "scripts": {
    "test": "echo \"Error: no test specified\" && exit 1",
    "start": "nodemon start"
  },
  "keywords": [],
  "author": "mia-roberts",
  "license": "ISC",
  "dependencies": {
    "express": "^4.17.1",
    "node-json-db": "^1.3.0",
    "speakeasy": "^2.0.0",
    "uuid": "^8.3.2"
  }
}
3. Installing the dependencies
After the setup, our application needs some project-specific dependencies.
The dependencies include:
expressas the backend server.uuidto generate universal unique user-id.node-json-dbas our database to store the data as JSON.speakeasylibrary for authenticationnodemonto use as our development dependency.
With nodemon, we won’t have to restart our application every time we make a change.
npm install –-save express, nodemon, speakeasy, uuid, node-json-db
4. Setting up the application
First, we will set up our server.
Our server will run on the application’s entry point index.js file.
So, we add the block of code below under the index file:
const express = require('express')
const app = express();
const PORT = process.env.PORT || 5000

app.use(express.json())
After setting up the server, we bring in our dependencies into the index.js file.
The uuid will create a unique user id, while the node-json-db will serve as the database to store the user-id and the secret associated with that user-id.
//adding the speakeasy library
const speakeasy = require('speakeasy')

//adding the uuid dependacy
const uuid = require('uuid')

//adding node-json-db
const { JsonDB } = require('node-json-db')
const { Config } = require('node-json-db/dist/lib/JsonDBConfig')
5. The node JSON database
Our application will use the node-json-db module to store user records in JSON format.
Check out this link to find more about node-json-db.
As mentioned in the documentation of node-json-db, to initialize the node-json-db, we will add the script below:
// instance of the node-json-db
const db = new JsonDB(new Config("DataBase", true, false, '/'));
new Config()– creates anode-json-dbdatabase config.DataBase– specifies the name of the JSON storage file.true– tells the database to save on each push.false– instructs the database to save the database in a human-readable format./– the separator to use when accessing our database values.
6. Sending requests using Postman
Since our application does not have a frontend, we will use Postman when sending the requests to the applications’ backend.
Postman provides an interface for handling requests that would have otherwise been handled by the HTML.
Check out this guide on how to use Postman.
You can download Postman using this link.
In postman, we will use three routes, /register, /verify and /validate route.
Now we will create the URLs as below:
- Register:
http://localhost:5000/api/register - Verify:
http://localhost:5000/api/verify - Validate:
http://localhost:5000/api/validate
7. Registering users
In this application, we assume that a user is authenticated using his/her user-id. Therefore, we ignore other user identification details.
We will register users and store their user-id alongside the secret-key generated by speakeasy in the Database.json file.
The registration process begins by passing a POST request to the /register route in the index.js file.
We then use uuid to generate a unique user-id and generate a temporary secret-key for the user ID.
Next, we store the user-id and the secret-key in the node-json-db.
The code for the process is as below:
app.post('/api/register', (request, response) =>{
    const userid = uuid.v4()
    try {
        const path = `user/${userid }`
        const temp_secret = speakeasy.generateSecret()
        db.push(path,{ userid , temp_secret })
        // we only need the base32
        response.json({userid , secret: temp_secret.base32})
    }catch (error) {
        console.log(error)
        response.status(500).json({message: 'Error generating the secret'})
    }
})
The user object in the database will be as shown below:
{
    "user":{
        "00e296df-cff6-44ee-94f7-763de86962c3":{
            "id":"00e296df-cff6-44ee-94f7-763de86962c3",
            "temp_secret":{
                "ascii":"eez>9svVgNa$DE9TXZQw#z0dkXI!GSQT",
                "hex":"65657a3e39737656674e612444453954585a5177237a30646b58492147535154",
                "base32":"MVSXUPRZON3FMZ2OMESEIRJZKRMFUULXEN5DAZDLLBESCR2TKFKA",
                "otpauth_url":"otpauth://totp/SecretKey?secret=MVSXUPRZON3FMZ2OMESEIRJZKRMFUULXEN5DAZDLLBESCR2TKFKA"
            }
        }
    }
}
8. Verifying the user
Next, we need to verify our registered users using their user-id and temp-secret. We also need to set the secret permanently into the database.
8.1. Retrieving id and temp secret from the database
Since we will need the user-id and temp secret, we extract them from the database using the code below:
// Retrieve user from the database
const path = `/user/${userId}`;
const user = db.getData(path);

//destructure the base-32 of the temp=secret
const { base32: secret } = user.temp_secret;
8.2. Generating verification token
Next, we use the temp-secret from above to generate a verification token using the authenticator app.
Navigate to Chrome, under Extensions, download the authenticator.
We will use the authenticator to generate verification tokens for our users.
You can follow this link to learn more about generating authentication tokens with an authenticator application.
The authenticator will generate a code that we will supply to the JSON body of the verify-route using Postman.
8.3. Sending post request for verification response via Postman
In Postman, we will create a new route /verify for verification, where we enter the user-id and the token.
Next, on the body section of the Postman, use the JSON data to send the user-id retrieved and the associated token generated by the authenticator application as shown below:
{
  "userId": "ed48c14e-cb85-4575-830c-c534d142f8e4",
  "token":"127381"
}
The application’s /verify route will extract the token and user-id from the body using the block of code below:
const {token, userId} = req.body;
Next, we will call the /verify function of the speakeasy to verify the user by checking the token against the temp-secret.
The function returns true, if the token is successfully verified. On returning true, we update the temp-secret to a permanent-secret in the database.
We implement this as shown below:
const verified = speakeasy.totp.verify({
  secret,
  encoding: 'base32',
  token
});

if (verified) {
  // Update the temporary secret to a permanent secret
  db.push(path, { id: userId, secret: user.temp_secret });
  res.json({ verified: true })
} else {
  res.json({ verified: false})
}
9. Validate the token
We need to continuously validate tokens from the authenticator.
We will create a new route called /validate. The route will have the same code, except for a time window after which the token is validated.
Additionally, we won’t change the temp-secret in this phase.
The code is below:
  //Validate the token
  app.post('/api/validate', (req,res) => {
    const {token, userId} = req.body;
    try {
      // Retrieve user from database
      const path = `/user/${userId}`;
      const user = db.getData(path);

      const { base32: secret } = user.secret;
      const tokenValidate = speakeasy.totp.verify({
        secret,
        encoding: 'base32',
        token,
        window:1 // time window
      });

      if (tokenValidate) {

        res.json({ validated: true })
      } else {
        res.json({ validated: false})
      }
    }catch(error) {
      console.error(error)
      res.status(500).json({ message: "Error retrieving user!"})
    };
  })
To check if a user is validated, we will navigate to the /validate in Postman, and supply the user-id and token.
10. Running the server
To test out the application, we add the block of code below in the index.js file.
To run the server, use npm start.
const PORT = process.env.PORT || 5000
app.listen(PORT, () =>{
    console.log(`Server running on port ${PORT}`);
})
The images below show the results for each request sent via Postman: 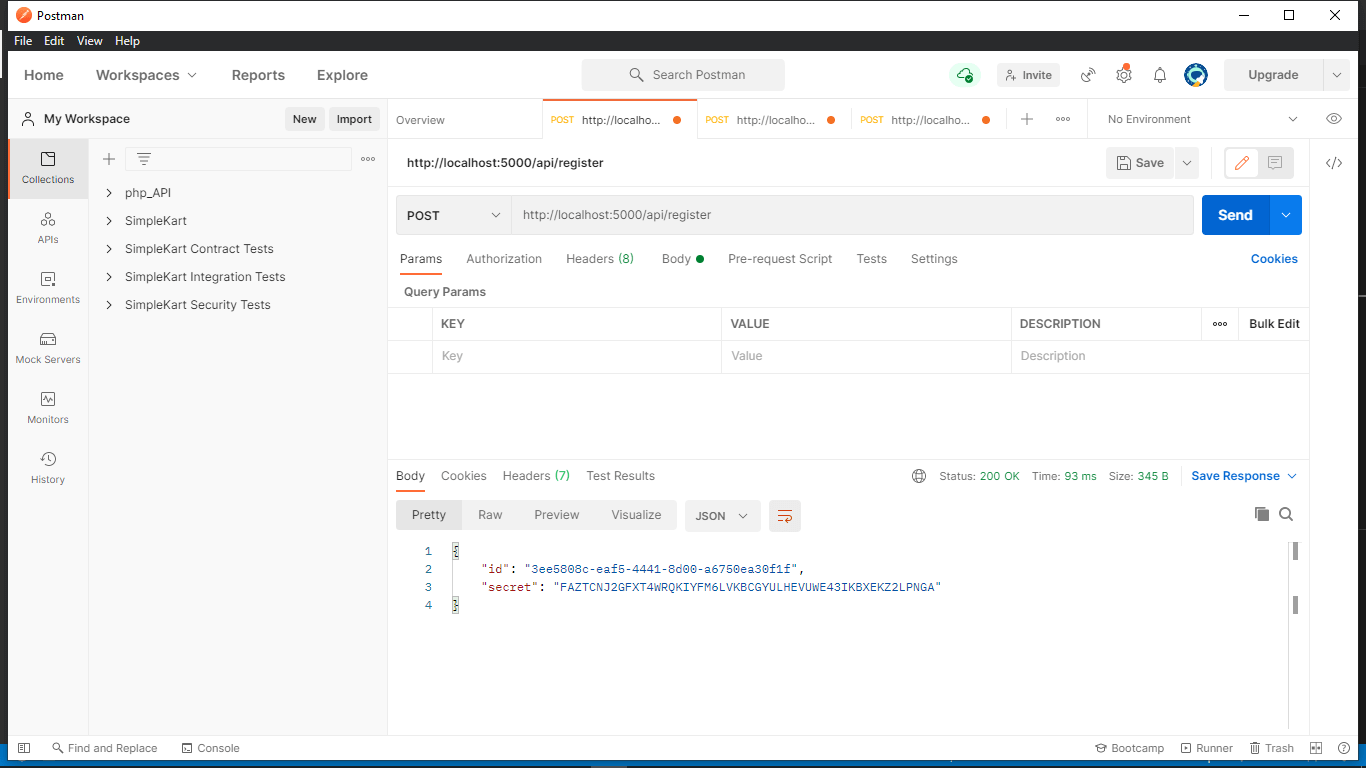
Route for registration
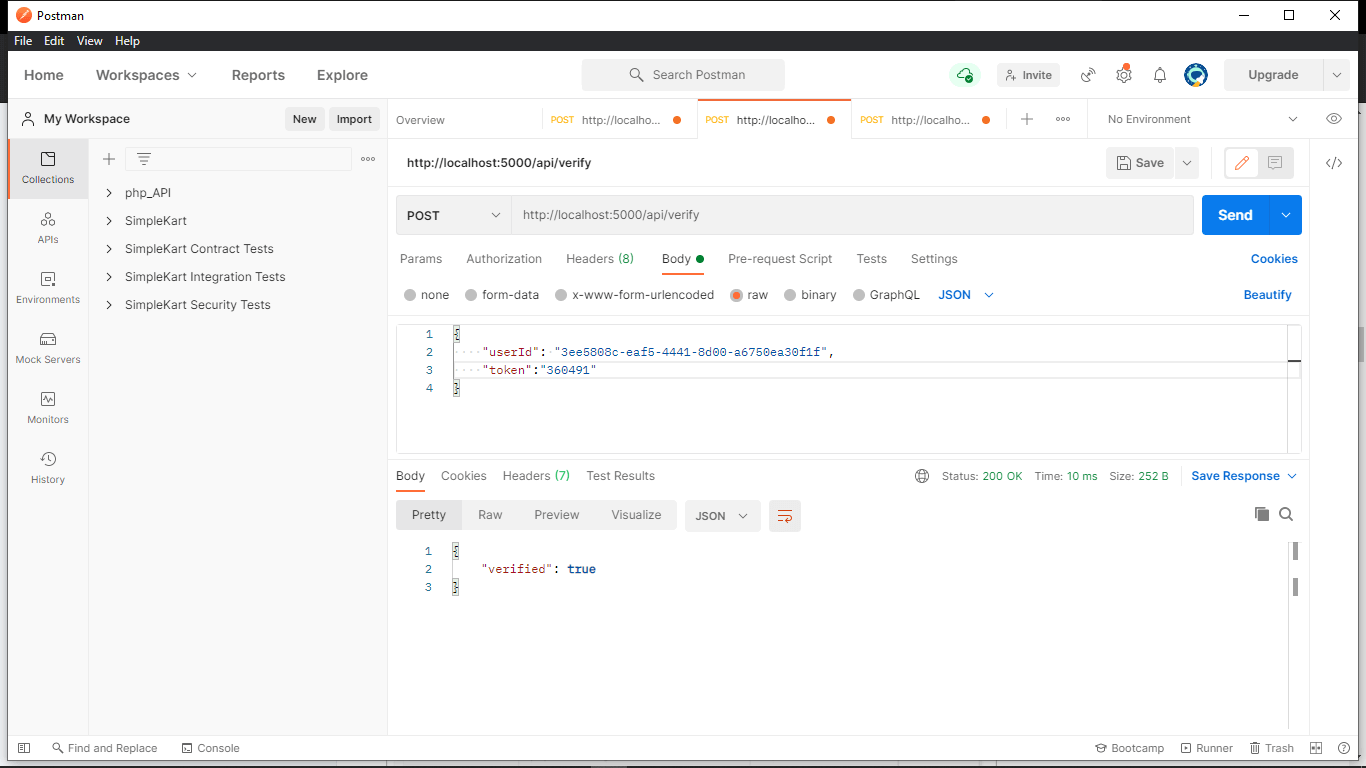
Route for verification
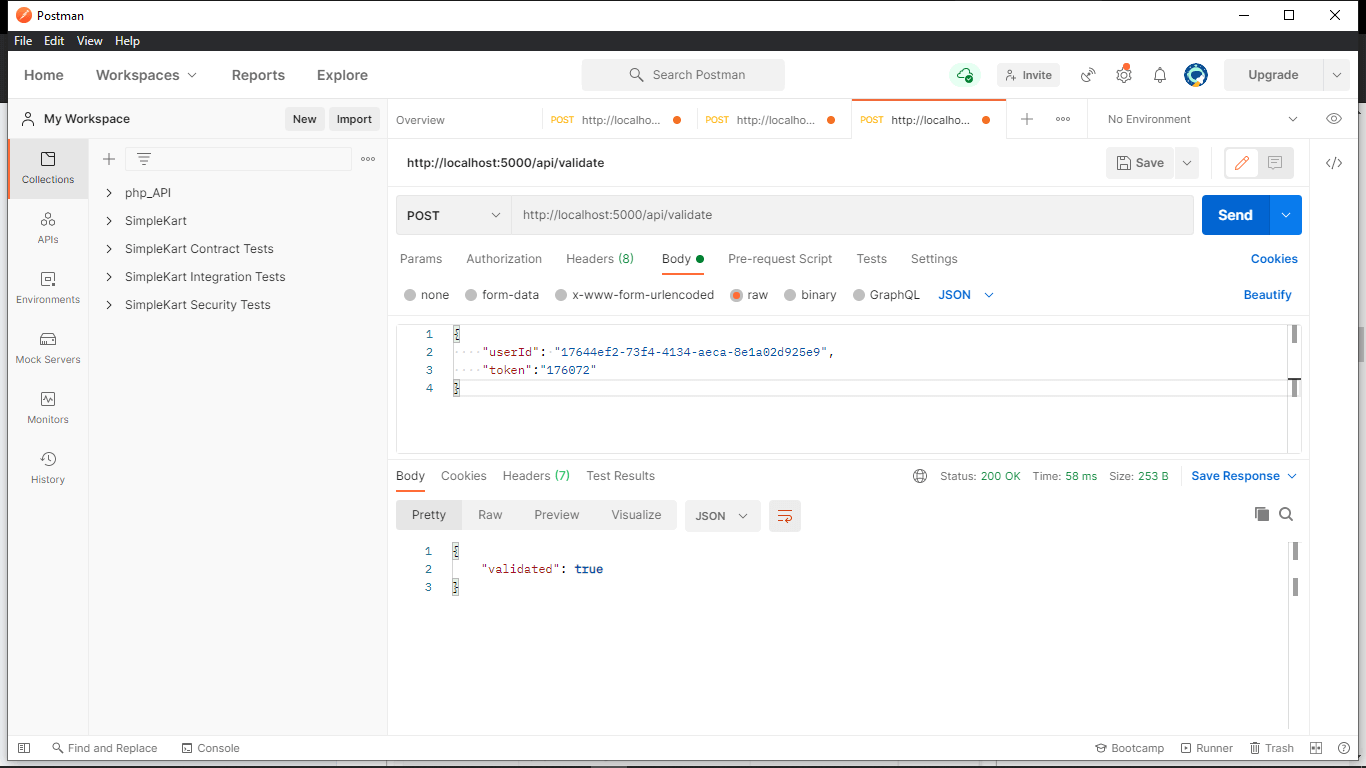
Route for validation
11. Conclusion
We set up a Node.js application and coded a backend for two-factor authentication using Speakeasy. We also learned how to use the authenticator extension in chrome for generation tokens.
Finally, we used Postman to simulate sending requests from the front end of an application.
Check the links in the section below for more information about the topic.
You can find the code for implementation here:
const express = require('express')
const bodyParser = require('body-parser');
const speakeasy = require('speakeasy');
const ejs = require('ejs');
const uuid = require('uuid')
const { JsonDB } = require('node-json-db')
const { Config } = require('node-json-db/dist/lib/JsonDBConfig')
const { response } = require('express')

const app = express()
app.use(express.json())
const db = new JsonDB(new Config('DataBase', true, false, '/'));

//setup template engine
app.set('view-engine', 'html');
app.engine('html', ejs.renderFile);


//body parser middleware
app.use(bodyParser.json());
app.use(bodyParser.urlencoded({extended:true}));

//secifying the index route
app.get('/api', (request, response) =>{
	response.render('index.html');
})

//Register users and generate secret key
app.post('/api/register', (request, response) =>{
    const id = uuid.v4()
    try {
        const path = `/user/${id}`
        const temp_secret = speakeasy.generateSecret()
        db.push(path,{id , temp_secret })
        response.json({id , secret: temp_secret.base32})
    }catch (error) {
        console.log(error)
        response.status(500).json({message: 'Error generating the secret'})
    }
})

//verify the token and change the secret to permanent
app.post('/api/verify', (req,res) => {
    const {token, userId} = req.body;
    try {
		// Retrieve user from database
		const path = `/user/${userId}`;
		const user = db.getData(path);

		const { base32: secret } = user.temp_secret;
		const verified = speakeasy.totp.verify({
			secret,
			encoding: 'base32',
			token
		});

		if (verified) {
			// Update the temporary secret to a permanent
			db.push(path, { id: userId, secret: user.temp_secret });
			res.json({ verified: true })
		} else {
			res.json({ verified: false})
		}
    }catch(error) {
		console.error(error)
		res.status(500).json({ message: "Error retrieving user!"})
    };
  })

  //Validate the token
  app.post('/api/validate', (req,res) => {
	  const {token, userId} = req.body;
	  try {
		  // Retrieve user from database
		  const path = `/user/${userId}`;
		  const user = db.getData(path);

		  const { base32: secret } = user.secret;
		  const toeknValidate = speakeasy.totp.verify({
			  secret,
			  encoding: 'base32',
			  token,
			  window:1
		  });

		  if (toeknValidate) {

			  res.json({ validated: true })
		  } else {
			  res.json({ validated: false})
		  }
	  }catch(error) {
		  console.error(error)
		  res.status(500).json({ message: "Error retrieving user!"})
	  };
	})
const PORT = process.env.PORT || 5000
app.listen(PORT, () =>{
    console.log(`Server running on port ${PORT}`);
})
However, you’ll have to download the source code and install Postman for testing.
Happy coding!