
Table of Contents
This tutorial will guide you on how to convert a static website that uses HTML, CSS and JavaScript (JS) to a dynamic one using MongoDB, Express, Static HTML, CSS, JS, and Node.js. Similar to the popular MEAN/MERN stack (MongoDB, Express, Angular or React, and Node.js), but instead of using Angular or React, we will use a templating engine called EJS (Embedded JavaScript.) Other popular templating engines include Handlebars, Pug, and Nunjucks.
Learning a templating language can be easier than a JS framework because you can just write HTML, and it lets you insert the same piece of code in multiple locations (called partials) or pass server-side variables to be displayed on the front-end (such as a username).
1. Installing Node.js
First, make sure you’ve installed Node.js on your local machine or VPS hosting provider. If you haven’t installed it, go to the Node.js website to do so. With Node.js, you can write server-side code using a special form of JavaScript so you can use an already familiar language.
The Node.js installer comes bundled with the package manager NPM. NPM is a repository for Node Modules, reusable pieces of code that can extend the functionality of your server. It’s similar to a plugin repository, and Node Modules can be thought of as code snippets or libraries (depending on how large they are).
Windows Users: Need to add Node and NPM to their PATH so they can call them easily on the command line. For more in-depth instructions, see my guide on How to Install MongoDB.
2. Testing the Install
To test that the installation has worked correctly, open a terminal window, and type node -v and npm -v If the resulting message starts with a v and is followed by some numbers (indicating a version), then the installation has been successful. Now you’re ready to create your first server.
3. Creating Your First Server
Once you have created a static website, the first step in creating a Node.js app is to create an Express web server.
First, move all your website’s static files (HTML, CSS, JS, images, etc.) into a folder called public and create a file called server.js in the root directory of your website folder. In the server.js file type:
// Load Node modules
var express = require('express');
// Initialise Express
var app = express();
// Render static files
app.use(express.static('public'));
// Port website will run on
app.listen(8080);
Then in the terminal, type: npm init. Press enter to accept the default parameters for all the following options, but make sure the entry point is server.js.
Finally, type: npm start and then go to (IP Address of your VPS host, or localhost:8080/index.html (or the name of one of your webpages) in the browser. The Express server you just created should now be serving your website’s static files.
4. Next Steps
Moving forward, we will discuss how to convert your static files to dynamic ones using the EJS templating engine and how to copy repeated code using partials and inject server-side variables to the front-end.~~
5. Templating Basics
5.1. Installing EJS
The first step to use EJS is to install it. A simple npm install ejs --save will do the trick. The –save parameter saves the module to the package.json file so anyone that clones the git repo (or otherwise downloads the site’s files) can install all the required Node modules for the project (called dependencies) using the npm install command instead of having to type npm install (module name) for however many modules you need.
5.2. Converting Static Pages to EJS Files
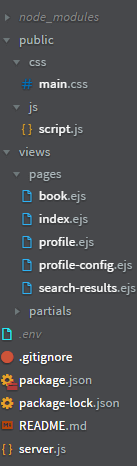
Next, you need to convert your static HTML files into dynamic EJS ones and set up your folder structure in the way EJS expects. In the root directory of your website, create a folder called views and inside that folder create two sub-folders called pages and partials. Move all your HTML files into the pages sub-folder and rename the .html file extensions to .ejs. Your folder structure should look similar to the picture below.
5.3. Reusing Code – Creating Your First EJS Partial
When creating static sites, there’s often code that you repeat on every page such as the head (where the meta tags are located), header, and footer sections. It’s inconvenient to change them on every page (especially on larger sites) if alterations are needed, but if you use EJS partials then you won’t have to. Editing one template (partial) file will update the code on every page that the file is included in.
We’ll take a typical part of a website to be templated, the header as an example. Create a new file called header.ejs in the partials folder. Copy and paste all the code between the <header></header> tags on one of your EJS pages into it.
Finally, on all pages with a header delete the code between the <header></header> tags (the same code you copied to the header.ejs partial file) and replace it with <%- include('../partials/header') %>. Now, you’ve created your first EJS partial. Repeat the process for any other repetitive pieces of code such as the head and footer sections.
Small Tip: If you find it hard to differentiate between your pages and partials since they have the same .ejs file extension then it can be helpful to put an underscore _ in front of the names of partials so _ header.ejs. This is a naming convention that some developers use that can be helpful.
6. Rendering EJS Pages
Now we get to the exciting part, making the server render the EJS pages and partials so you can see them on the front-end.
server.js Example
// Load Node modules
var express = require('express');
const ejs = require('ejs');
// Initialise Express
var app = express();
// Render static files
app.use(express.static('public'));
// Set the view engine to ejs
app.set('view engine', 'ejs');
// Port website will run on
app.listen(8080);

// *** GET Routes - display pages ***
// Root Route
app.get('/', function (req, res) {
    res.render('pages/index');
});
First, we need to add the EJS Node module to our server. So, in the server.js file (see example above), add const ejs = require('ejs');
Second, we need to tell our Express server to use EJS so add app.set('view engine', 'ejs');.
Now, we need to configure routes. Routes tell the server what to do when a user goes to a certain URL in your website such as http://testapp.com/login. There are two types of routes, GET and POST. GET routes display pages and POST routes upload data from the front-end to the server (usually via a form) typically before a page is rendered and the uploaded data is somehow used.
Since we only want to display our EJS pages, we will just use GET routes. Add them after the app.listen(8080) line in server.js. For the index page, the route will be:
// *** GET Routes - display pages ***
// Root Route
app.get('/', function (req, res) {
    res.render('pages/index');
});
The ‘/’ specifies the URL of the website the code will activate on, the req stands for request and res for response. So, the response returned when going to http://testapp.com is rendering (displaying to the browser) the pages/index.ejs page. Add similar routes for your other EJS pages.
7. Passing Server-Side Data to the Frontend
The main attraction of templating apart from reusing code is that you can pass server-side variables to the front-end. Either a single variable like the current user’s username, or an array, like the details of every registered user. However, the real strength of passing server-side variables becomes apparent when using APIs or databases.
For a basic example, the below code will display “Louise” in the h2 tag of the index page:
server.js
// Route Route
app.get('/', function (req, res) {
    var name = "Louise";
    // Render index page
    res.render('pages/index', {
        // EJS variable and server-side variable
        name: name
    });
});
The first name is the name of the EJS variable (the name for displaying it on the front-end), and the second is the variable that contains the data you want to send. (They don’t have to be identical.)
index.ejs
<h2>My name is <%= name %></h2>
For a simple array, you can use this example instead, which will create a p tag for every name in the listnames variable:
server.js
// Route Route
app.get('/', function (req, res) {
    var listnames = ["Louise", "Sadie", "Erik", "Raph", "Gina"];
    // Render index page
    res.render('pages/index', {
        // EJS variable and server-side variable
        listnames: listnames
    });
});
index.ejs
<% listnames.forEach(function(name) { %>
        <p><%= name %></p>
        <% }); %>
8. Passing Server-Side Data
Congratulations! You’ve successfully converted your static website to a Node.js web app. You’ve also created your first Express web server and learned the basics of EJS templating.
Eager to deploy your first Node.js web app so you can show it off? Follow my Node.js deployment tutorial for DigitalOcean.
If you want to build on the skills you’ve learned in this tutorial, I suggest using EJS templating to work with APIs and databases.
If you need a helping hand on either of those areas, check out my Getting to Grips with Databases and Getting to Grips with APIs guides which will get you started.