
Table of Contents
- 1. The goal
- 2. Prerequisites
- 3. Installing Typescript
- 4. Step 1: Initialize Node.js
- 5. Step 2: Install project dependencies
- 6. Step 3: Initialize Typescript
- 7. Step 4: Setting up the tsconfig.json
- 8. Step 5: Modify package.json
- 9. Step 6: Setting up the application structure
- 10. Step 6: Starting the development server
- 11. Step 7: Testing the API with Postman
- 12. Conclusion
Typescript is a superset of JavaScript with additional features such as static types checking. Typescript is gaining a lot of popularity among JavaScript developers. It is a fast-developing programming language for building extensive applications.
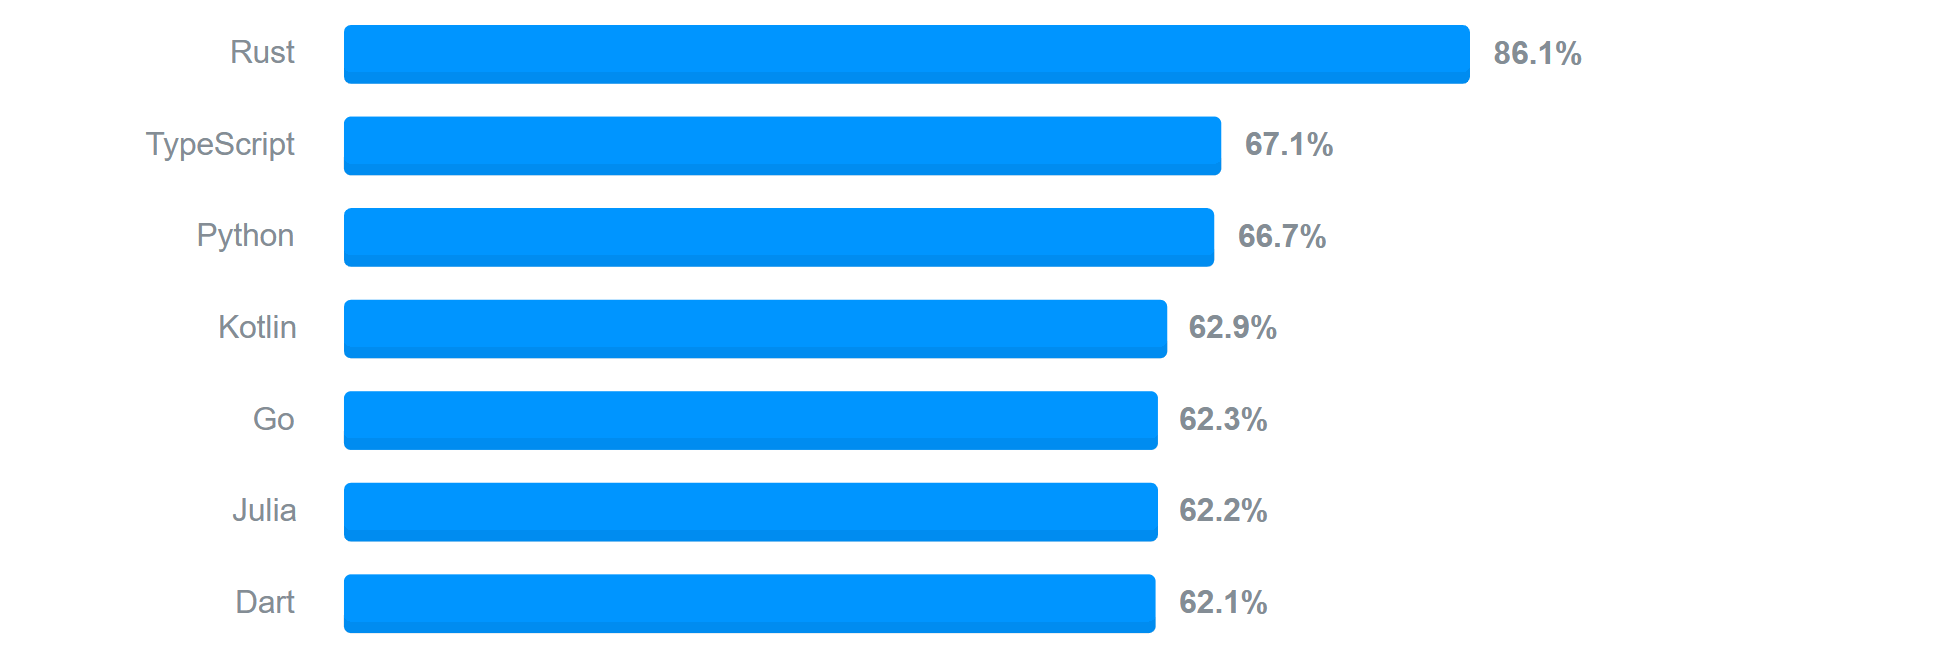
According to the Stack Overflow 2020 survey, Typescript is the second most beloved language with 61.7% votes.
Just above popular languages such as Django and Kotlin, JavaScript, SQL, etc. Popular apps such as Slack are running on the Typescript.
Just like JavaScript, it supports numerous frameworks such as Node.js.
1. The goal
The main advantage of using both Typescript and Node.js together, is that developers can take advantage of the full benefits that these two have.
Typescript is well known for supporting static typing to detect code errors during typing. It helps you catch errors at an early stage of development, creating a faster application development pipeline, unlike Node.js (JavaScript), where you only detect errors during the application runtime. Typescript is a good choice when building extensive applications.
On the other side, Node.js is well known for its diverse open-source libraries, multi-threading ability, asynchronous, and event-driven code execution, being fast and light, etc.
This article will explain how to use Typescript with Node.js. We’ll create a simple REST API using Typescript and Node.js libraries to demonstrate this.
The API implements some common web-based API methods such as GET, POST, DELETE, PUT, AND PATCH. We will use a post-application. The application will consume a Free mock-up API hosted on this JSON placeholder server.
2. Prerequisites
- Ensure that you have Node.js and Postman installed on your machine.
- Ensure you have essential experience of how to write and execute Typescript.
- Be familiar with Node.js and how to use libraries such as Express.js.
- Be familiar with how to test APIs using Postman (a tool for interacting with web-based APIs).
3. Installing Typescript
Unlike JavaScript, Typescript doesn’t run directly on the browser. To execute any Typescript written code, you need a Typescript compiler.
This will compile Typescript into JavaScript. This way, it will be easier to execute and run the Typescripts on a browser. Since we are using Node.js, we will install Typescript from NPM using the command below.
npm install -g typescript
Adding the –g flag to install the packages globally ensures that Typescript is available to any Node.js project.
4. Step 1: Initialize Node.js
To start a Node.js project, create a project folder and run npm init. Follow the prompts. This will create a package.json file that will save any installed dependencies for your project.
Alternatively, run npm init -y to auto-generate the package.json file.
5. Step 2: Install project dependencies
In this application, we are going to use the following Node.js libraries.
- TypeScript: A TypeScript compiler with static set type definitions.
- Ts-node: Allows us to run and configure Typescript execution environments.
- Express: Node.js web application framework for setting and managing web-based server.
- @types/express: Type definitions for Express.
- Morgan: A Node.js HTTP request logger middleware for Node.js.
- @types/morgan: Type definitions for Morgan.
- Axios: A Node.js promise-based HTTP client library for Node.js, for sending HTTP requests to query and consume resources from APIs.
- @types/Axios: Type definitions for Axios.
- Nodemon: A server utility library for monitoring changes of the code on a text editor. It automatically restarts the server whenever code changes are detected.
To install all these libraries, run the following command.
npm install typescript ts-node express @types/express morgan @types/morgan axios @types/axios nodemon
6. Step 3: Initialize Typescript
To execute Typescript with Node.js, you need the tsconfig.json file. This file sets all the environments required to run Typescript. You can create the file manually or run tsc --init to generate a sample tsconfig.json file at the root of your project.
7. Step 4: Setting up the tsconfig.json
This is a Typescript compiler configuration file with options specifying arguments that simplify the Typescript compilation and execution pipeline.
Make sure your file look like this.
{
    "compilerOptions": {
        "forceConsistentCasingInFileNames": true,
        "module": "commonjs",
        "esModuleInterop": true,
        "outDir": "./build",
        "rootDir": "./source",
        "target": "es6",
        "skipLibCheck": true,
        "strict": true
    }
}
Check out this documentation to learn more about the tsconfig.json.
8. Step 5: Modify package.json
Head over to your project package.json file and modify the main and scripts with the following values.
"main": "source/server.ts",
"scripts": {
    "dev": "nodemon source/server.ts",
    "build": "rm -rf build/ && prettier --write source/ && tsc"
}
This will set up the command to build and compile the .ts file to the .js file. In this case, we can then start the development server using the command npm run dev.
9. Step 6: Setting up the application structure
Your project files and subfolders should be set up as shown below.
|   package-lock.json
|   package.json
|   tsconfig.json
\---source
    |   server.ts
    \---controllers
    |       posts.ts
    \---routes
            posts.ts
Create the source folder inside your project directory. The source folder will include all the .ts files the application needs to run, as explained earlier.
9.1. Setting up the controllers
Create the controllers folder. In it have the posts.ts file. This module will handle all the API logic, i.e. getting posts, getting a single post, updating a post, deleting a post, and creating a post.
controllers/posts.ts
/** source/controllers/posts.ts */
import { Request, Response, NextFunction } from 'express';
import axios, { AxiosResponse } from 'axios';

interface Post {
    userId: Number;
    id: Number;
    title: String;
    body: String;
}

// getting all posts
const getPosts = async (req: Request, res: Response, next: NextFunction) => {
    // get some posts
    let result: AxiosResponse = await axios.get(`https://jsonplaceholder.typicode.com/posts`);
    let posts: [Post] = result.data;
    return res.status(200).json({
        message: posts
    });
};

// getting a single post
const getPost = async (req: Request, res: Response, next: NextFunction) => {
    // get the post id from the req
    let id: string = req.params.id;
    // get the post
    let result: AxiosResponse = await axios.get(`https://jsonplaceholder.typicode.com/posts/${id}`);
    let post: Post = result.data;
    return res.status(200).json({
        message: post
    });
};

// updating a post
const updatePost = async (req: Request, res: Response, next: NextFunction) => {
    // get the post id from the req.params
    let id: string = req.params.id;
    // get the data from req.body
    let title: string = req.body.title ?? null;
    let body: string = req.body.body ?? null;
    // update the post
    let response: AxiosResponse = await axios.put(`https://jsonplaceholder.typicode.com/posts/${id}`, {
        ...(title && { title }),
        ...(body && { body })
    });
    // return response
    return res.status(200).json({
        message: response.data
    });
};

// deleting a post
const deletePost = async (req: Request, res: Response, next: NextFunction) => {
    // get the post id from req.params
    let id: string = req.params.id;
    // delete the post
    let response: AxiosResponse = await axios.delete(`https://jsonplaceholder.typicode.com/posts/${id}`);
    // return response
    return res.status(200).json({
        message: 'post deleted successfully'
    });
};

// adding a post
const addPost = async (req: Request, res: Response, next: NextFunction) => {
    // get the data from req.body
    let title: string = req.body.title;
    let body: string = req.body.body;
    // add the post
    let response: AxiosResponse = await axios.post(`https://jsonplaceholder.typicode.com/posts`, {
        title,
        body
    });
    // return response
    return res.status(200).json({
        message: response.data
    });
};

export default { getPosts, getPost, updatePost, deletePost, addPost };
We include all the necessary API methods such as:
getPosts– A request to fetch all posts in the list.getPost– A request to fetch a single post by id.updatePost– A request to update a post with new values.deletePost– A request to delete an existing post.addPost– A request to add a new post to the existing list.
9.2. Adding the routes
Create the routes folder, in it have the posts.ts file. The file connects routes to their controllers.
routes/posts.ts
/** source/routes/posts.ts */
import express from 'express';
import controller from '../controllers/posts';
const router = express.Router();

router.get('/posts', controller.getPosts);
router.get('/posts/:id', controller.getPost);
router.put('/posts/:id', controller.updatePost);
router.delete('/posts/:id', controller.deletePost);
router.post('/posts', controller.addPost);

export = router;
Define all the necessary routes to handle the respective API endpoints, such as GET, POST, PATCH, AND DELETE (as defined in the API controller module).
9.3. Setting up the server
The server.ts file is responsible for setting up the server. This involves express middlewares, the routes, and also starting the server.
server.ts
/** source/server.ts */
import http from 'http';
import express, { Express } from 'express';
import morgan from 'morgan';
import routes from './routes/posts';

const router: Express = express();

/** Logging */
router.use(morgan('dev'));
/** Parse the request */
router.use(express.urlencoded({ extended: false }));
/** Takes care of JSON data */
router.use(express.json());

/** RULES OF OUR API */
router.use((req, res, next) => {
    // set the CORS policy
    res.header('Access-Control-Allow-Origin', '*');
    // set the CORS headers
    res.header('Access-Control-Allow-Headers', 'origin, X-Requested-With,Content-Type,Accept, Authorization');
    // set the CORS method headers
    if (req.method === 'OPTIONS') {
        res.header('Access-Control-Allow-Methods', 'GET PATCH DELETE POST');
        return res.status(200).json({});
    }
    next();
});

/** Routes */
router.use('/', routes);

/** Error handling */
router.use((req, res, next) => {
    const error = new Error('not found');
    return res.status(404).json({
        message: error.message
    });
});

/** Server */
const httpServer = http.createServer(router);
const PORT: any = process.env.PORT ?? 6060;
httpServer.listen(PORT, () => console.log(`The server is running on port ${PORT}`));
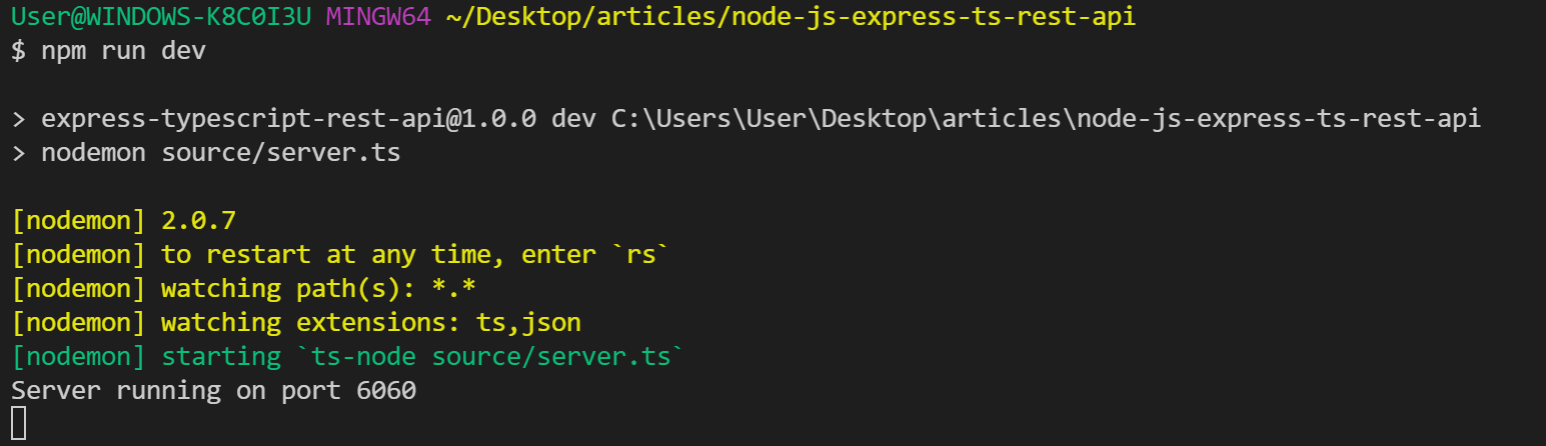
10. Step 6: Starting the development server
Start the development server by running:
npm run dev
This will start the server as shown below:
11. Step 7: Testing the API with Postman
Postman is an interactive web-based APIs testing platform. We will test all the API endpoints as we defined earlier in the routing module.
11.1. Fetch all posts
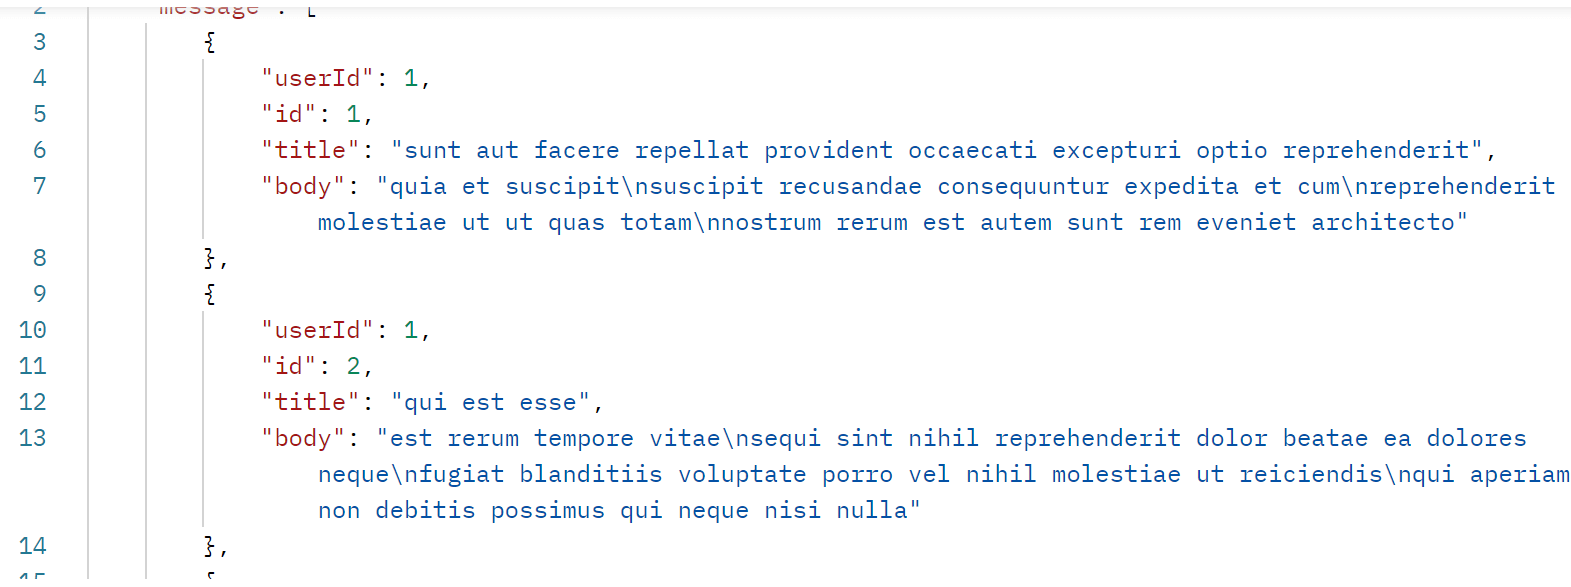
Go over to Postman and open a tab, select GET and enter the request URL as http://localhost:6060/posts. Click send to send this request.

This will fetch all the posts and send a response back to the Response section. The response comprises all posts as listed in the https://jsonplaceholder.typicode.com/posts.
11.2. Fetch a single post
Just like fetching all the posts, you can opt only to fetch a single post. This time the request URL will be http://localhost:5000/posts/id. Where the id is the id on the post you want to get.
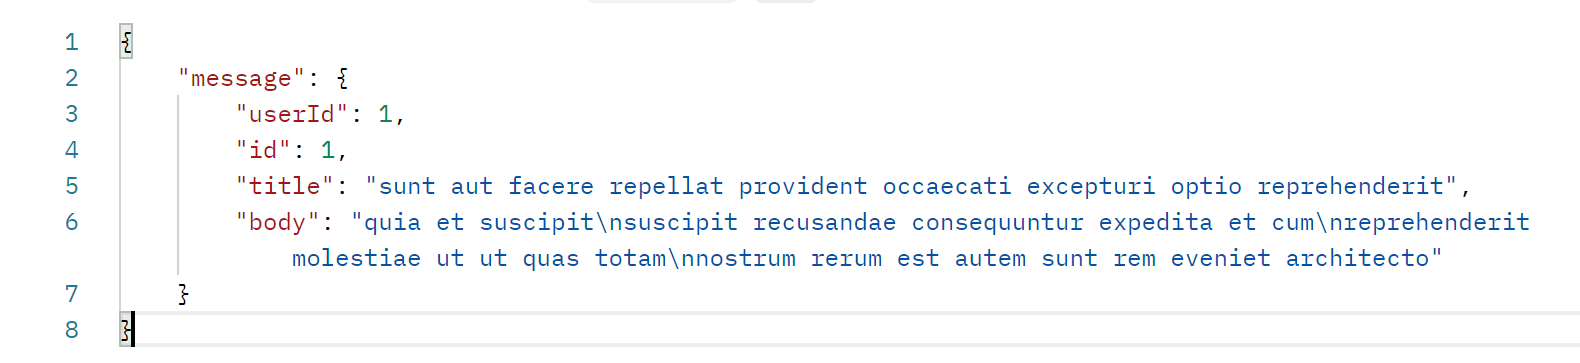
Let’s say, fetch the post where id is 1, the requesting URL will be http://localhost:6060/posts/1. This should return a response of a single post.
11.3. Update a post
Let’s say you wanted to change some values of a single post, such as the title or the post’s body. In this case, you’re sending an update request.
In the Postman methods dropdown, select PUT. Enter the requesting URL as http://localhost:6060/posts/id, where id the id of the post you want to update.
Head over to the body tab, select row and in the body tab below, click on raw and JSON on the right dropdown.
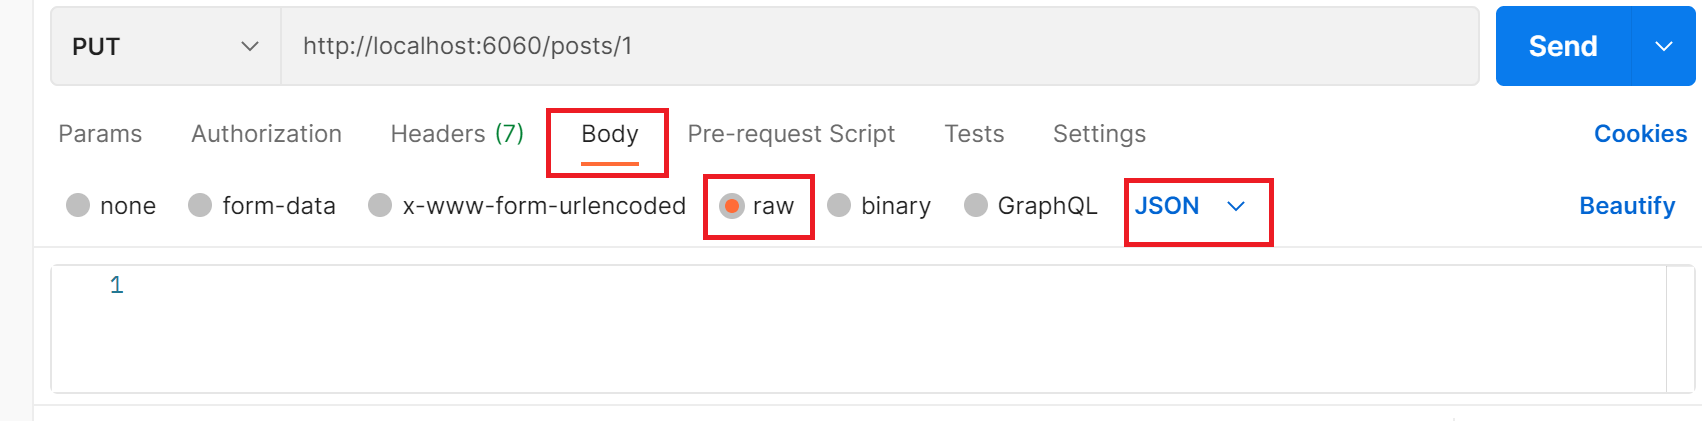
In the space provided, enter the following (Feel free to change the values for title and body), and click send.
{
    "title": "Another post title",
    "body": "Another post body"
}
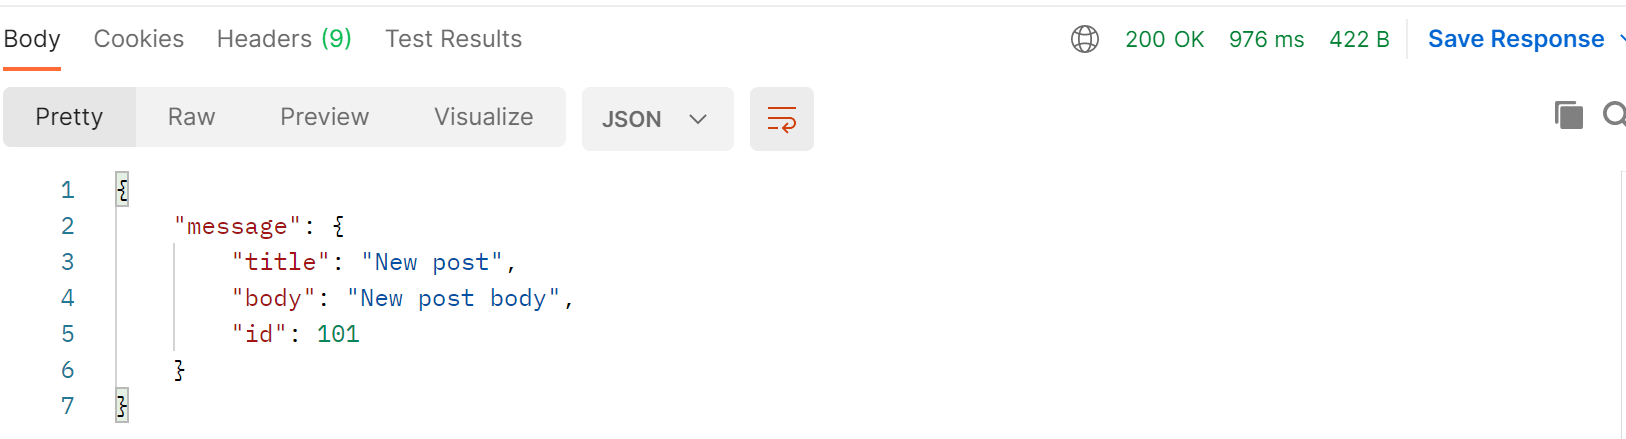
This should return a response to the Response section, as shown below.

11.4. Delete a single post
To delete a post, select DELETE in the Postman methods dropdown menu. Enter the requesting URL as http://localhost:6060/posts/id.
Where is id any id of the post you want to delete. Then click send.

This will return the following response.

11.5. Add a new post
Select POST in the Postman methods dropdown menu. In the URL section, enter http://localhost:6060/posts, in the tab below, select body, click raw, select JSON on the right end dropdown menu and enter:
{
    "title": "New post",
    "body": "New post body"
}

Feel free to change the values of title and body. Click send, and the following response should be returned back in the Response section.
12. Conclusion
Typescript is an incredible programming language. It gives developers the advantage of checking their code as they type them down. This way, they can catch errors even before runtime.
Typescript is also statically typed. This will increase overall productive time as you type and read through your code. If you haven’t started learning Typescript, be sure to read this tutorial.
That’s all for this tutorial.
Happy coding! 💻😀