
Table of Contents
- 1. Prerequisites
- 2. Creating the to-do application
- 3. Creating a Docker image
- 3.1. Step 1: Creating a Dockerfile
- 3.2. Step 2: Creating a .dockerignore file
- 3.3. Step 3: Building a Docker image
- 3.4. Step 4: Running the Docker container
- 3.5. Step 5: Verifying if the container is running
- 3.6. Step 6: Inspecting the Docker logs
- 3.7. Step 7: Testing the app on the web browser
- 3.8. Step 8: Stopping the Docker container
- 4. Debugging using Visual Studio Code
- 5. Steps when debugging the application using Visual Studio Code
- 5.1. Step 1: Configuring Visual Studio Code
- 5.2. Step 2: Placing a breakpoint to debug the code
- 5.3. Step 3: Inserting an expression to check the value of the variable
- 5.4. Step 4: Testing the app on a web browser
- 5.5. Step 5: Fixing the bug
- 5.6. Step 6: Stopping the Docker container
- 5.7. Step 7: Re-building the Docker image
- 5.8. Step 8: Re-running the Docker container
- 5.9. Step 9: Reload the web browser to confirm if a bug is fixed
- 6. Wrapping up
Debugging an application involves detecting and removing existing errors also known as bugs in a code which can cause it to work unexpectedly or even crash. Debugging allows the developers to find and resolve bugs or defects in the application to prevent incorrect and unwanted operations.
In this tutorial, we will build a Node.js application with a bug in it, run it in a Docker container and use Visual Studio Code debugging tools for Node.js to debug it. The tutorial can be used by developers as a reference when building their applications.
1. Prerequisites
To follow along with this tutorial, you are required to have the following.
- Prior knowledge of Docker containers and Node.js.
- Docker installed.
- Node.js installed.
- Microsoft Visual Studio Code installed.
- A web browser. I will be using Google Chrome.
1.1. Step 1: Creating the root directory
We will create a simple to-do list application that allows the users to add and delete tasks. We will also introduce a minor bug when coding the application and use Visual Studio Code to address the issue and fix it.
Open a new terminal window, browse to a root directory, and run the command below:
$ mkdir TodoApp
$ cd TodoApp
1.2. Step 2: Initializing the Node.js project
Initialize the project by executing the below command:
$ npm init -y
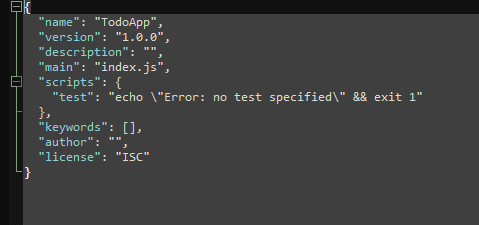
The above command will generate a file named package.json in the TodoApp folder. The package.json file contains the information related to the Node.js project. It also gives information to npm about the project’s dependencies.
The file will look like this:
2. Creating the to-do application
Next, we will build our to-do application using Express.js: a fast, popular and lightweight Node.js web framework.
Express makes the development of web applications easier.
2.1. Step 1: Installing project’s dependencies
We will install express and a few other prerequisites needed by the application by running the command below:
$ npm install express body-parser cookie-session ejs --save
2.2. Step 2: Coding the app.js file
Then we will create a file named app.js in the TodoApp directory with the code below:
const express = require('express')
const app = express()
const bodyParser = require('body-parser')
const session = require('cookie-session')
const urlencodedParser = bodyParser.urlencoded({ extended: false })
const port = 3000

app.use(session({ secret: process.env.SECRET }))
  .use(function (req, res, next) {
    next()
  })

  .get ('/todo', function (req, res) {
    res.render('todo.ejs', { todolist: req.session.todolist })
  })

  .post ('/todo/add/', urlencodedParser, function (req, res) {
    if (req.body.newtodo != '') {
      req.session.todolist.push(req.body.newtodo)
    }
    res.redirect('/todo')
  })

  .get ('/todo/delete/:id', function (req, res) {
    if (req.params.id != '') {
      req.session.todolist.splice(req.params.id, 1)
    }
    res.redirect('/todo')
  })

  .use (function (req, res, next) {
    res.redirect('/todo')
  })


  .listen(port, () => console.log(`MyTodo app is listening on port ${port}!`))
2.3. Step 3: Creating the todo.ejs file
Next we will create a file ./views/todo.ejs and paste the following code in it:
<!DOCTYPE html>

<html>
    <head>
        <title>My todolist</title>
        <style>
            a {text-decoration: none; color: black;}
        </style>
    </head>

    <body>
        <h1>My todolist</h1>

        <ul>
        <% todolist.forEach(function(todo, index) { %>
            <li><a href="/todo/delete/<%= index %>">✘</a> <%= todo %></li>
        <% }); %>
        </ul>

        <form action="/todo/add/" method="post">
            <p>
                <label for="newtodo">What should I do?</label>
                <input type="text" name="newtodo" id="newtodo" autofocus />
                <input type="submit" />
            </p>
        </form>
    </body>
</html>
2.4. Step 4: Starting the web server
Start the web server by executing the command below:
$ export SECRET=bestkeptsecret; node app.js
A success message that the server is running and listening to the specified port will be displayed on the console window.
3. Creating a Docker image
Now we have successfully created a Node.js application.
Next, we will create a Docker image for it.
A Docker container is built from a Docker image that contains the necessary information needed to deploy and run the application with Docker.
To run a Docker container, we can either create our own Docker image or download an already built Docker image. In our case, we will create our own Docker image. A Docker image is comprised of multiple layers, which are a read-only file system.
Docker works in a way that it creates a layer for every instruction contained in a Dockerfile. Each new layer resides on top of the previous layers.
For the application’s code that may change often, it’s recommended to place it towards the end of the file.
3.1. Step 1: Creating a Dockerfile
Create a file named Dockerfile in the project’s root directory with the lines of code below:
FROM node:14
WORKDIR /usr/src/app
COPY package*.json ./
RUN npm install
COPY . .
EXPOSE 3000
CMD [ "npm", "run" , "start-debug" ]
Let’s take a closer look at the file we have just created:
- FROM: Sets the base image. Everything that will be added later will be based on this image. We are going to use Node.js version 14 in this tutorial.
- WORKDIR: The working directory for the commands
COPY,RUNandCMDis set here. - RUN: It executes the
npm installcommand in a Docker container. - COPY: It copies the files to the Docker image from the build context.
- EXPOSE: It ensures that a process running in a Docker container is listening on port 3000. It helps forward the ports from the host to the container.
- CMD: It executes the
node app.jscommand inside our Docker container after the container has started.
3.2. Step 2: Creating a .dockerignore file
As we do not want to send large files to the build context and speed up the system, we use the .dockerignore file.
It is a text file similar to .gitignore which contains the name of the directories and files that should not be added to the build. The file .dockerignore will contain the following content:
node_modules
npm-debug.log
3.3. Step 3: Building a Docker image
Next, we will execute the docker build command to build our Docker image:
$ docker build -t to-do-app .
The -t flag specifies the name of the image. The path to the context points to the set of files we want to reference from our Docker file.
As discussed earlier, the docker build command adds a new layer for every command in the Dockerfile.
Docker deletes the intermediate containers once the command executes successfully.
3.4. Step 4: Running the Docker container
With our Docker image in place, we can now run it by executing the docker run command and pass it the arguments below:
-pis the port on the host. In our case, we will use port 3001 that will be forwarded to the container port 3000 and separated by:.-ewill create an environment variable. In our case, we use the nameSECRETand assign it the value tobestkeptsecret.-densures the container will execute in the background.- The name of the image in this case:
to-do-app.
The whole command will look like below:
$ docker run -p 3001:3000 -e SECRET=bestkeptsecret -d to-do-app
3.5. Step 5: Verifying if the container is running
We can verify that our Docker container is running using:
$ docker ps
The output will be similar to the one shown below:
$ docker ps

CONTAINER ID   IMAGE          COMMAND                  CREATED       STATUS          PORTS                                       NAMES
9a8a8e6a13ae   a94edd9b09fd   "docker-entrypoint.s…"   2 weeks ago   Up 49 seconds   0.0.0.0:3001->3000/tcp, :::3001->3000/tcp   nostalgic_diffie
3.6. Step 6: Inspecting the Docker logs
To inspect the logs, execute the docker logs command followed by the id of the container:
$ docker logs 9a8a8e6a13ae
The output will appear as below:
$ docker logs 9a8a8e6a13ae

MyTodo app is listening on port 3000!
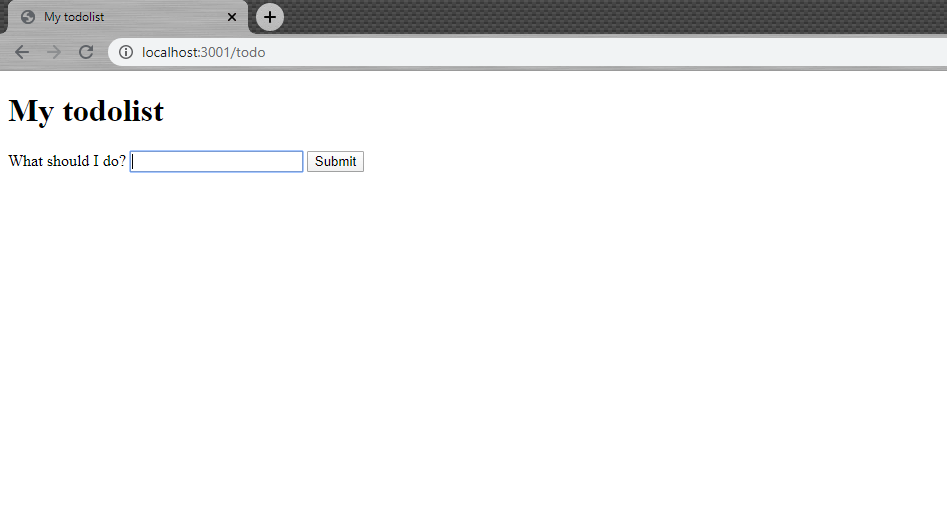
3.7. Step 7: Testing the app on the web browser
Now that our application is up and running. We can browse to the link http://localhost:3001, and we try to add a new todo. As we can be seen below, the application displays an error on the line: todolist.forEach(function(todo, index) of the todo.ejs file.
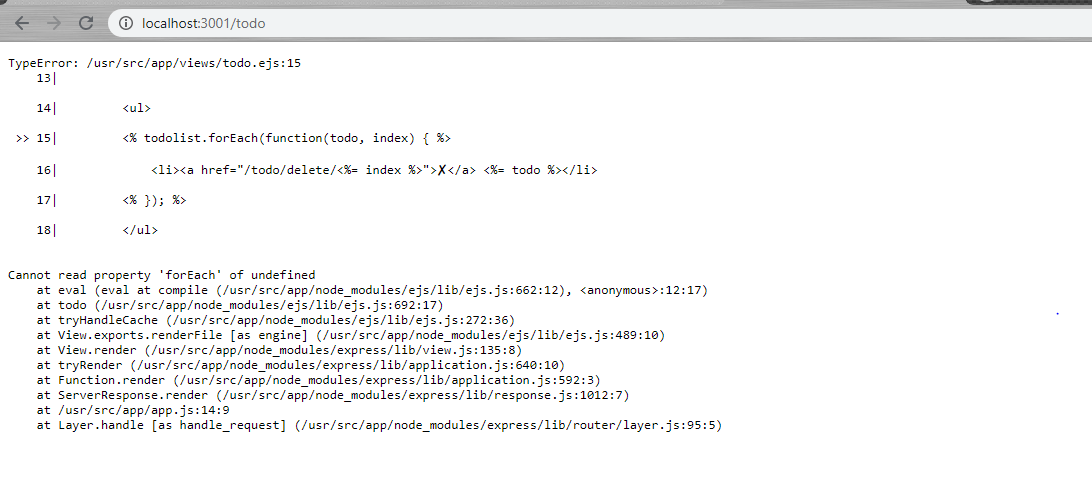
In the steps below, we will look at how to debug the error above using Visual Studio Code.
3.8. Step 8: Stopping the Docker container
First, we have to stop the container from running by executing the below command:
$ docker kill 9a8a8e6a13ae
4. Debugging using Visual Studio Code
Visual Studio Code comes loaded with debugging tools for the Node.js applications running inside a Docker container.
Below are the steps we can follow to use them:
4.1. Step 1: Updating the Dockerfile
Edit the Dockerfile by replacing the line below:
CMD ["node", "app.js"]
With:
CMD ["npm","run", "start-debug"]
Our updated Dockerfile will now look as shown as below:
FROM node:14
WORKDIR /usr/src/app
COPY package*.json ./
RUN npm install
COPY . .
EXPOSE 3000
CMD [ "npm", "run" , "start-debug" ]
4.2. Step 2: Editing the package.json file
Edit the package.json file by adding the line of code below:
"start-debug": "node --inspect=0.0.0.0 app.js"
The line of code above initializes the Node.js process to listen to a debugging client running on port 9229.
The updated package.json file will now look like this:
{
  "name": "TodoApp",
  "version": "1.0.0",
  "description": "",
  "main": "index.js",
  "scripts": {
    "test": "echo \"Error: no test specified\" && exit 1",
	"start-debug": "node --inspect=0.0.0.0 app.js"
  },
  "keywords": [],
  "author": "",
  "license": "ISC",
  "dependencies": {
    "body-parser": "^1.19.0",
    "cookie-session": "^1.4.0",
    "ejs": "^3.1.6",
    "express": "^4.17.1"
  }
}
4.3. Step 3: Building the Docker image
Note that every time the Dockerfile gets updated, we must build the Docker image again:
$ docker build -t to-do-app .
Also, note that Docker will now run the npm run start-debug command as we updated earlier.
4.4. Step 4: Running the Docker container
To debug using Visual Studio Code, we must forward port 9229.
This is done by running the command below:
$ docker run -p 3001:3000 -p 9229:9229 -e SECRET=bestkeptsecret22222 -d to-do-app
The above command will produce the following output:
$ docker run -p 3001:3000 -p 9229:9229 -e SECRET=bestkeptsecret22222 -d to-do-app

f2484b712a78084b2df7e07a8b72a8d2736fd81ed75e678459a703b4812385bb
4.5. Step 5: Inspecting the Docker logs
We can check the logs by running the docker logs command and specifying the id of the container as shown below:
$ docker logs f2484b712a78084b2df7e07a8b72a8d2736fd81ed75e678459a703b4812385bb

> TodoApp@1.0.0 start-debug /usr/src/app
> node --inspect=0.0.0.0 app.js

Debugger listening on ws://0.0.0.0:9229/6a1580dd-ef36-4db3-b7b6-40b3f37f41d1
For help, see: https://nodejs.org/en/docs/inspector
MyTodo app is listening on port 3000!
Note that the debugger is now listening to port 9229. Next, we will configure Visual Studio Code to debug our application.
5. Steps when debugging the application using Visual Studio Code
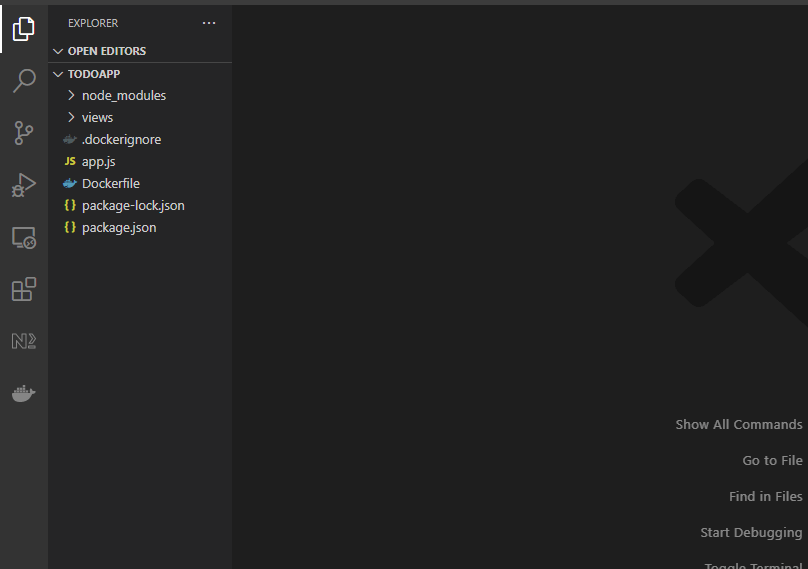
Launch Visual Studio Code and open the project directory as below:
5.1. Step 1: Configuring Visual Studio Code
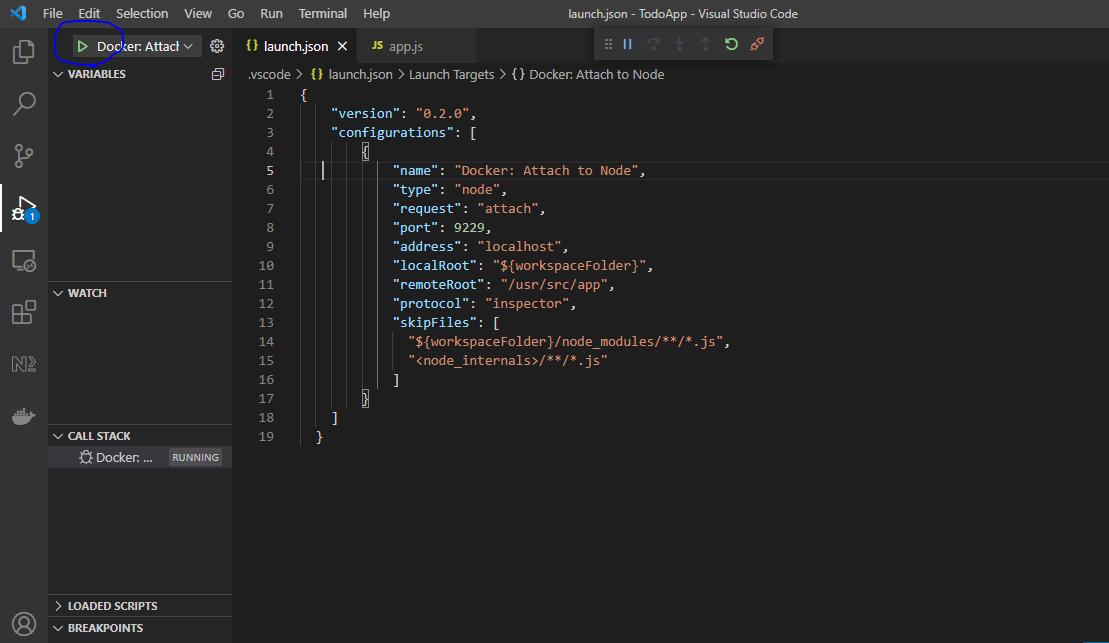
The debug configurations in Visual Studio Code are stored in a file named launch.json. To access it, press Ctrl+Shift+P and then search for Debug: Open launch.json and open it.
Edit the launch.json file to look like the code snippet below:
{
    "version": "0.2.0",
    "configurations": [
        {
            "name": "Docker: Attach to Node",
            "type": "node",
            "request": "attach",
            "port": 9229,
            "address": "localhost",
            "localRoot": "${workspaceFolder}",
            "remoteRoot": "/usr/src/app",
            "protocol": "inspector",
            "skipFiles": [
              "${workspaceFolder}/node_modules/**/*.js",
              "<node_internals>/**/*.js"
            ]
        }
    ]
  }
Since we do not want to go through the code in the node_modules directory and builtin Node.js core modules, we have included the skipFiles attribute.
5.2. Step 2: Placing a breakpoint to debug the code
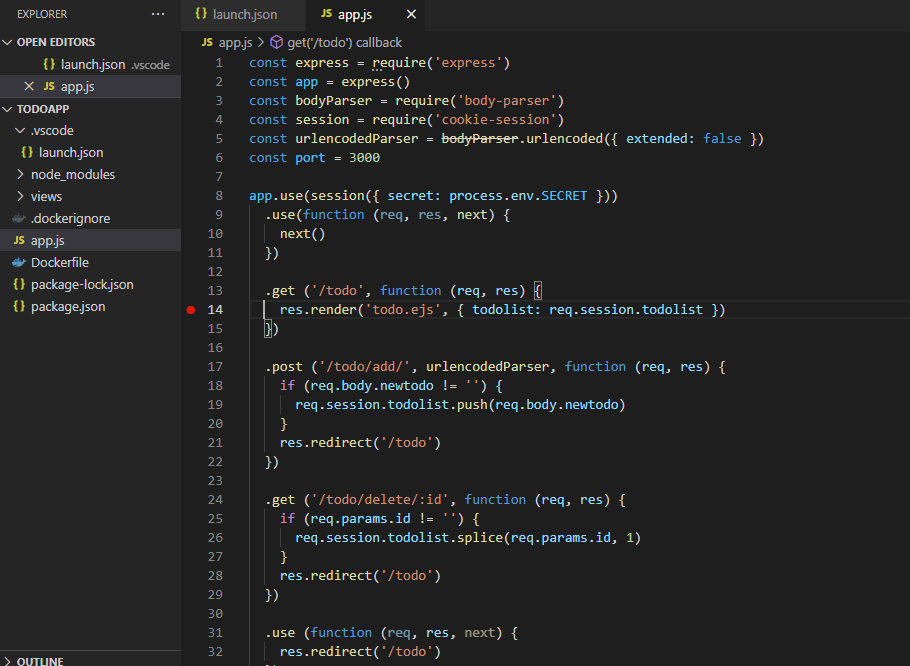
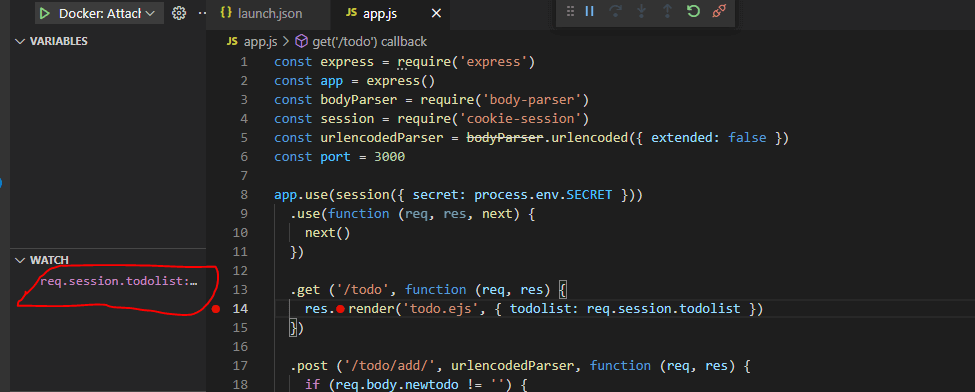
Now that we have everything set up, we can start debugging the application. If you can recall from earlier, we had an error in the view/todo.ejs file, in which the line of code below goes over the todolist array.
todolist.forEach(function(todo, index)
In the app.js file, the todo.ejs file gets rendered at this line res.render('todo.ejs', { todolist: req.session.todolist }). We will put a breakpoint at that line and check the value of the todolist variable as shown below:
5.3. Step 3: Inserting an expression to check the value of the variable
Press Shift+Ctrl+D to change to the debug view.
Then click on the Debug and Run button as shown below:
To check the value of the req.session.todolist variable, we will insert an expression to watch. It is done by selecting the + sign under watch on the sidebar of the window and then entering the name of the variable (req.session.todolist) as shown below:
5.4. Step 4: Testing the app on a web browser
Next, switch to the web browser and refresh the page http://localhost:3001/todo as shown below:
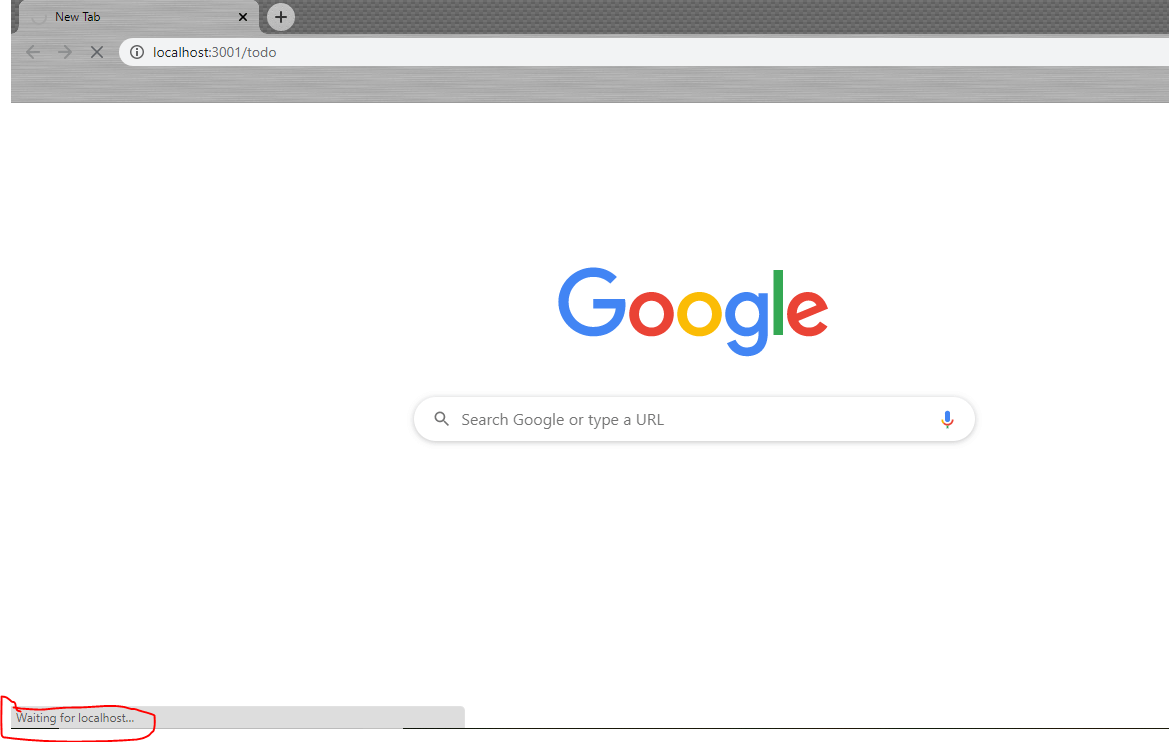
The Waiting for localhost message will appear at the bottom left of the page, meaning that the breakpoint we created has paused execution, and we can check the value of the req.session.todolist variable.
Now move back to Visual Studio Code to get the details as shown:
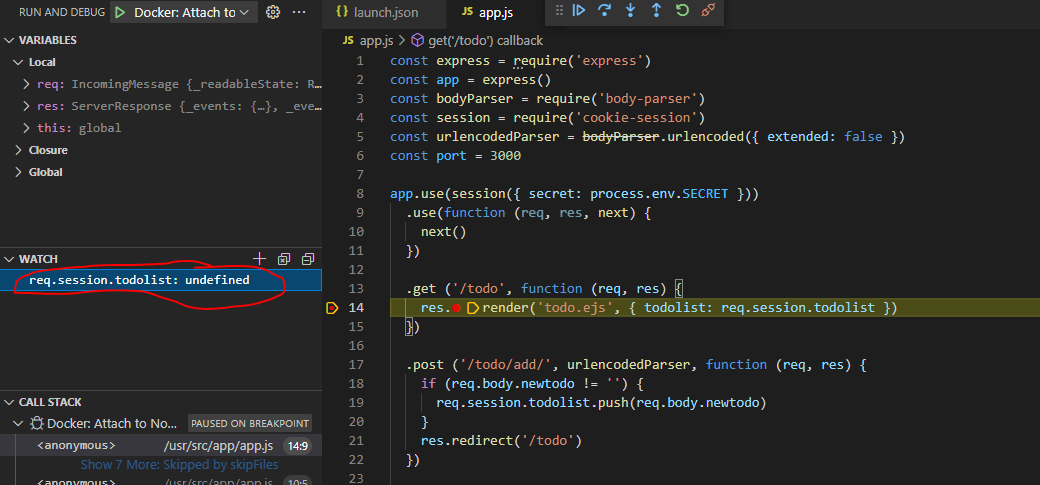
So the req.session.todolist variable is undefined. Is it possible to fix the bug?
5.5. Step 5: Fixing the bug
The ejb template goes through the todolist array and ought to be placed in the current session. However, we did not initialize the array, so it is undefined.
To fix the bug we will add the lines of code below to the .use function:
if (typeof (req.session.todolist) == 'undefined') {
  req.session.todolist = []
}
The code snippet should be added just above the next function.
Our .use function will look as below:
app.use(session({ secret: process.env.SECRET }))
  .use(function (req, res, next) {
    if (typeof (req.session.todolist) == 'undefined') {
      req.session.todolist = []
  }
    next()
  })
5.6. Step 6: Stopping the Docker container
Next we will retrieve the id of our running container by executing the docker ps command as below:
$ docker ps

CONTAINER ID   IMAGE       COMMAND                  CREATED         STATUS         PORTS                                                                                  NAMES
f2484b712a78   to-do-app   "docker-entrypoint.s…"   5 minutes ago   Up 5 minutes   0.0.0.0:9229->9229/tcp, :::9229->9229/tcp, 0.0.0.0:3001->3000/tcp, :::3001->3000/tcp   jovial_swartz
Stop the container by running the docker kill command followed by its id as below:
$ docker kill f2484b712a78

f2484b712a78
5.7. Step 7: Re-building the Docker image
To apply the changes we made earlier, we must re-run the docker build command as shown below:
$ docker build -t to-do-app .
5.8. Step 8: Re-running the Docker container
Next, run the container using the command below:
$ docker run -p 3001:3000 -p 9229:9229 -e SECRET=bestkeptsecret22222 -d to-do-app
5.9. Step 9: Reload the web browser to confirm if a bug is fixed
Reload the https://localhost:3001/todo page on the browser and check the results as shown below:
6. Wrapping up
We have successfully written a to-do list Node.js application, executed it in a Docker container, and utilized our Visual Studio Code debugging tools to identify and fix the issue.
The tutorial can be helpful to the developers who want to build their Node.js application in a Docker container and use the Visual Studio code debugging tools to debug their code.
The code snippets and files used in this tutorial can be found in this GitHub Repo.
Happy coding!