
Table of Contents
In present-day applications, data plays a pivotal role. It then becomes essential to design systems that adapt to the ever-changing needs of the application.
One of the primary functions of an API (Application Programming Interface) is to provide a consistent and reliable way to communicate between the server and the client. GraphQL is a game-changer in this field.
Quoting the official website,
GraphQL is a query language for APIs and a runtime for fulfilling those queries with your existing data. GraphQL provides a complete and understandable description of the data in your API, gives clients the power to ask for exactly what they need and nothing more, makes it easier to develop APIs over time, and enables powerful developer tools.
This article will cover two primary aspects:
- The basics of GraphQL
- How to implement a GraphQL server in Node.js
1. What is GraphQL?
GraphQL was internally developed by Facebook in 2012 and was later open-sourced to the public. As stated above, GraphQL is a query language for APIs. It gives the client the freedom to request only the data it needs from the server. It also helps in the aggregation of data in the response itself.
1.1. Features of GraphQL
- Query only specific fields and get the response from the server, hence saving on network bandwidth.
- Aggregation of data in a single request, thereby reducing network calls.
- It’s strongly typed and allows validation easily. Additionally, GraphQL IDEs (integration development libraries), such as GraphiQL, can autogenerate docs from the schema for reference.
2. Schema and Types
The schema in GraphQL is a description of how data is linked and its hierarchy. The schema defines a set of types and the relationships between those types.
In our example, detailed in a further section below, we have a blog built by using GraphQL with the two major types ArticleType and ContributorType. The resolvers are used to populate these types with data from the database.
Be sure not to confuse GraphQL schema and MongoDB schema. MongoDB schema is a representation of the database structure in MongoDB Atlas. It’s used to do database operation from the server on the database. GraphQL schema defines how queries are linked to the data and also how queries are interlinked. Both these schemas have a dependency on each other but are not the same.
3. Setting up a GraphQL Server in Node.js
Now, let’s walk through how to make your own basic GraphQL server using Node.js. Two of the many benefits of using GraphQL is that it is both language-agnostic and database-agnostic, making it extremely versatile across a variety of use cases. This is just one example of the many implementations of GraphQL.
For the data, the setup uses JavaScript, built-in arrays, and objects for the initial steps, and then MongoDB for further steps. If you are new to Node.js or MongoDB, I recommend getting acquainted with the basics to get a better understanding.
For reference, the entire GitHub repository, along with a deployed version of the project is linked at the bottom so you can take a deeper dive.
3.1. Initialize project with Express
The first step is to initialize your project:
- Create a folder for your project and open the folder in the text editor of your choice.
- Open a terminal in the project folder and initialize a JavaScript project.
npm init
Follow the prompts on the terminal to create the project, or if you want to suppress the prompts and create it with the default configuration, use:
npm init -y
- Install Express via terminal.
npm i express
- Open
index.jsor the equivalent file as per the configuration you did withnpm init. (By default, it’sindex.js.) - Import Express and initialize it.
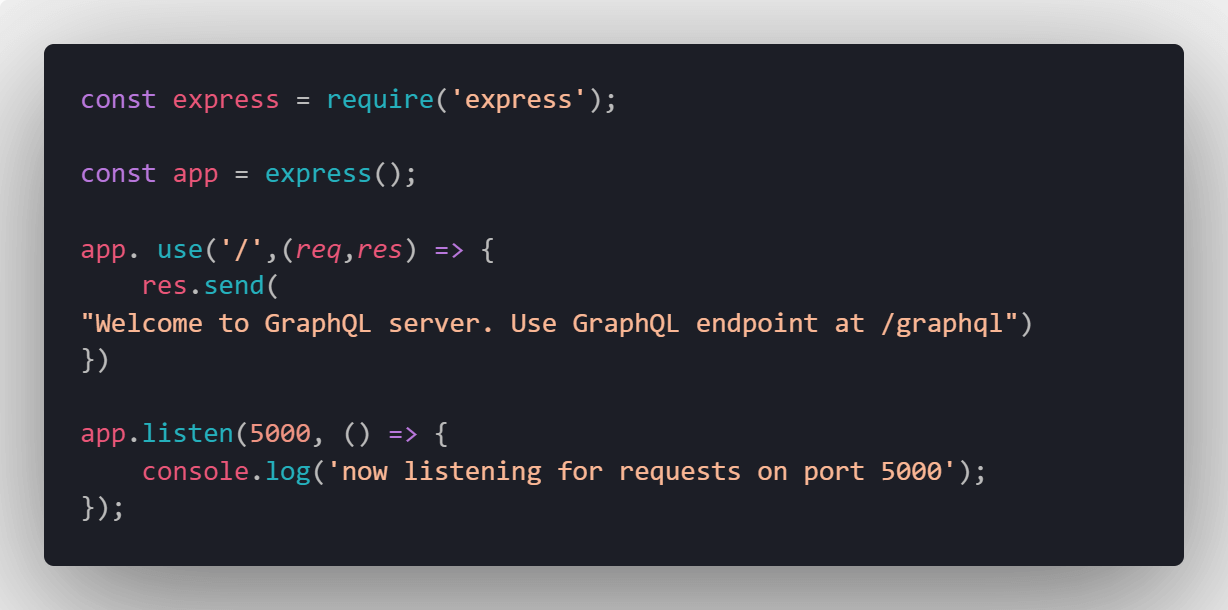
const express = require('express');

const app = express();
- Start the server to listen at PORT 5000, or as per your preference.
app.listen(5000, () => {
    console.log('now listening for requests on port 5000');
});
Add a root endpoint for the server to respond to.
app. use('/',(req,res) => {
    res.send("Welcome to GraphQL server. Use GraphQL endpoint at /graphql")
})
Once done, this is what the file should look like:
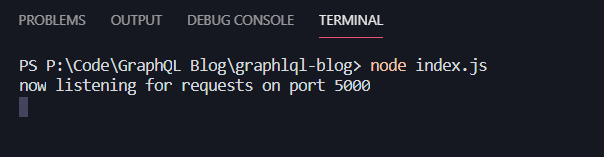
Run the server. (Throughout the setup, wherever “Run the server” is mentioned, you can do node index.js from the project folder, or you can use a NodeJS process manager like nodemon or PM2 to make sure your browser refreshes whenever your code updates.)To stop a server started using node index.js, you can use CTRL/CMD + C.Once that is done, this is what the terminal window should look like:
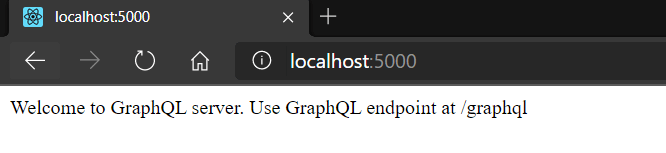
This is what the browser window will look like:
3.2. Initialize GraphQL
- Install GraphQL libraries for JavaScript via your terminal:
npm i express-graphql graphql
- The
graphqllibrary provides the JavaScript implementation of GraphQL.Theexpress-graphlibrary provides integration of the Express server with GraphQL. - Create a
schemafolder within the project folder and create aschema.jsfile inside it. - Import
graphqlinschema/schema.js
const graphql = require('graphql');
- GraphQL schema defines how various GraphQL queries and mutations are structured and inter-linked. Refer to the “Types and Schema” section in this article for a full explanation.
- Import the required GraphQL types. For the basic query, we need:
GraphQLObjectTypeGraphQLStringGraphQLIDGraphQLListGraphQLSchemaTypes in GraphQL are used to convert the JavaScript data types and custom datatypes into GraphQL-friendly types for compilation.
const { GraphQLObjectType, GraphQLString, GraphQLID, GraphQLList, GraphQLSchema } = graphql;
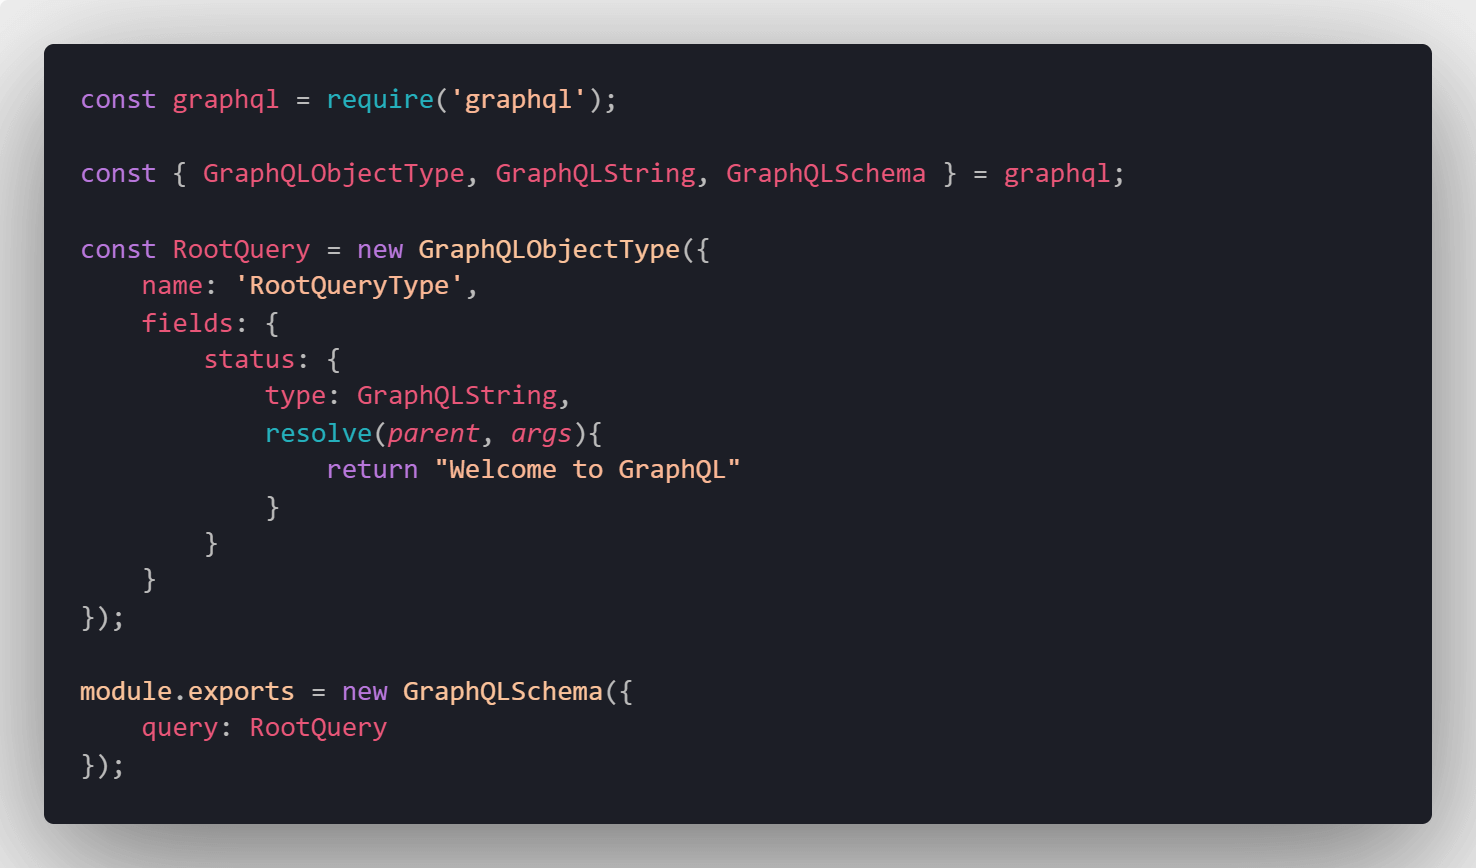
- Add a root query that will print
Welcome to GraphQLwhen the query contains a field namedstatus.
- The field
statusis of typeGraphQLString.
const RootQuery = new GraphQLObjectType({
    name: 'RootQueryType',
    fields: {
        status: {
            type: GraphQLString,
            resolve(parent, args){
                return "Welcome to GraphQL"
            }
        }
    }
});
- Export the query written above to be used in
index.js. Export the query as GraphQLSchema type so that GraphQL can parse it as its schema. The GraphQLSchema takes an object with key-value pairs. One key isquery. To this key, pass the above createdRootQueryas a value. We will use the additional key-value pairs for GraphQLSchema in a further section of this article.
module.exports = new GraphQLSchema({
    query: RootQuery
});
Once done, this is how the file should look.
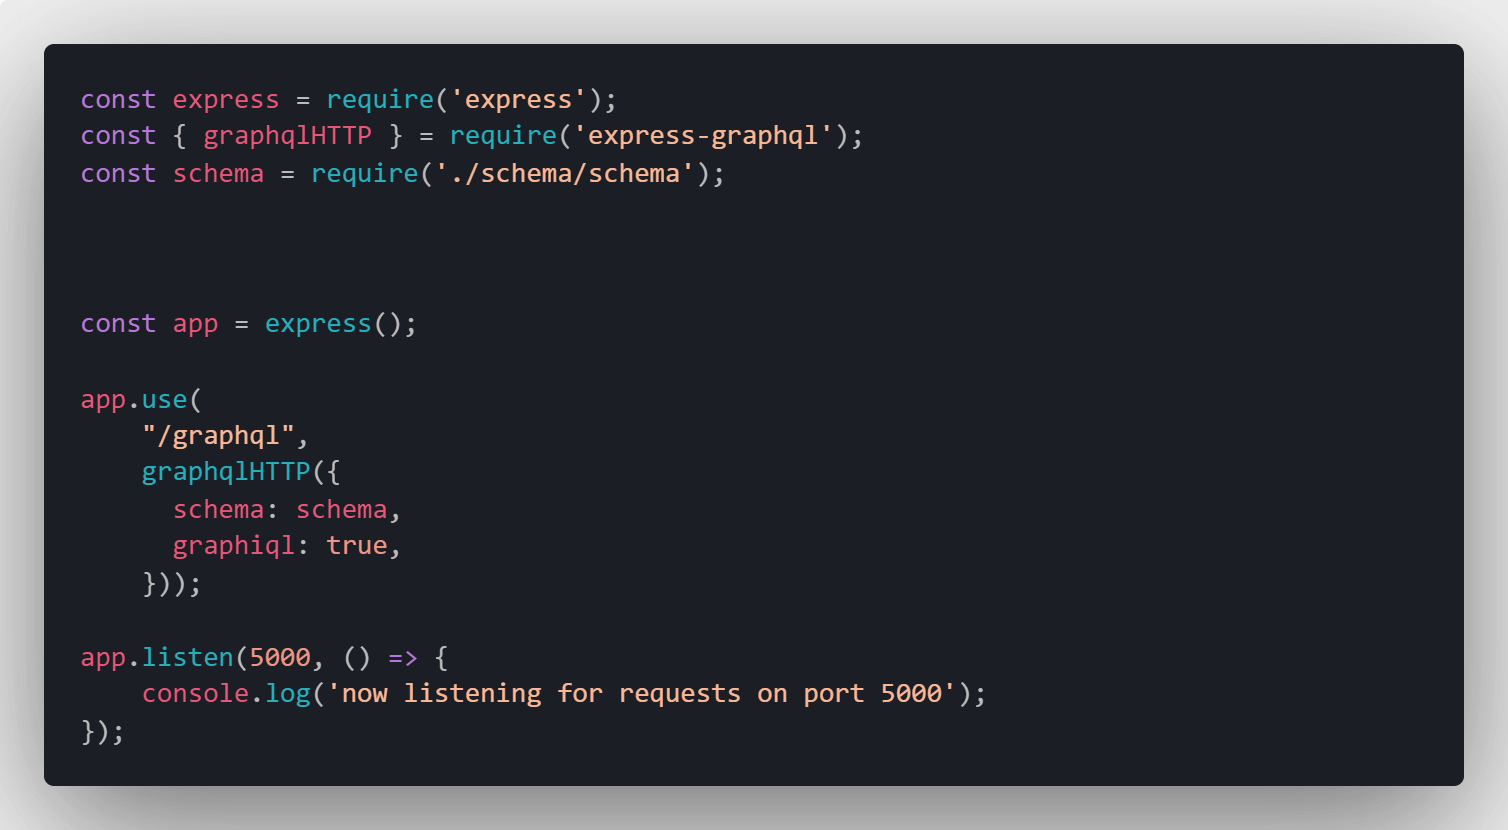
Import the schema in index.js:
const schema = require('./schema/schema');
Add GraphQL endpoint to the server. It’s a common practice to add GraphQL endpoint to /graphql but this is customizable per requirements.
To the GraphQL middleware, pass graphqlHTTP as the second argument in app.use().
graphqlHTTP takes schema as a mandatory parameter.
Pass the imported schema to graphqlHTTP with the key as schema. graphqlHTTP takes an optional parameter graphiql.
If graphiql is set to true, it provides an in-browser GraphQL query tool.
app.use(
    "/graphql",
    graphqlHTTP({
    schema: schema,
    graphiql: true,
    }));
When done, this is how the file should look.
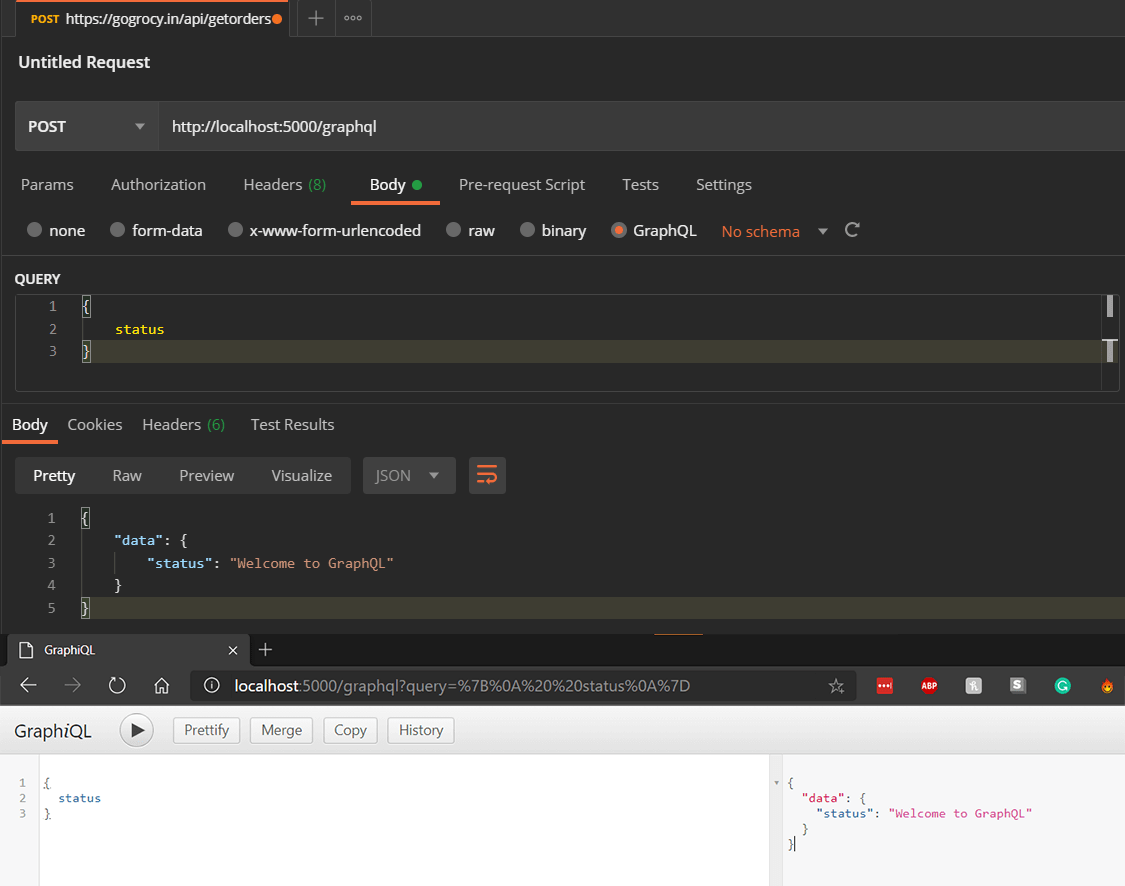
Run the server and open http://localhost:5000/graphql in the browser.Call the GraphQL server with the input as:
{
     status
}
The server can be queried via any GraphQL API client like Postman or in the browser with GraphiQL.
3.3. Adding basic queries
This section will use static data stored in arrays to be fetched via the GraphQL server. In a later section, we will replace it with MongoDB.
- Install the
lodashlibrary for JavaScript via your terminal. This library makes working with arrays and objects easy. (To get a brief idea about Lodash, read this EngEd article. Lodash is the fourth section of the article.)For more details, visit the Lodash website.
npm i lodash
- Open
schema/schema.jsand import thelodashlibrary.
const _ = require('lodash')
- Import the required GraphQL types. To fetch and show the data for the query we need, including
GraphQLObjectType, GraphQLString, GraphQLID, GraphQLList, GraphQLSchema.
const { GraphQLObjectType, GraphQLString, GraphQLID, GraphQLList, GraphQLSchema } = graphql;
- Add static data. This will be replaced with MongoDB later. The data consists of
articlesandcontributors. An article is written by a contributor. A contributor can have more than one article written under their name. Both articles and contributors have an associated ID to identify them uniquely. Articles havecontributorIdto identify the contributor.
let articles = [
    { name: 'The History of Node.js', topic: 'Node.js', date: '2020-08-25T00:00:00Z', id:"1", contributorId:"1"},
    { name: 'Understanding Docker Concepts', topic: 'Containers', date: '2020-07-23T00:00:00Z', id:"2", contributorId:"2"},
    { name: 'Linting in Node.js using ESLint', topic: 'Node.js', date: '2020-08-24T00:00:00Z', id:"3", contributorId:"2"},
    { name: 'REST APIs - Introductory guide', topic: 'API', date: '2020-06-26T00:00:00Z', id:"4", contributorId:"1"},
];

let contributors = [
    { name: 'John Doe', url: '/john-doe', major: 'Computer Science', id:"1"},
    { name: 'Jane Doe', url: '/jane-doe', major: 'Physics', id:"2"},
];
- Create a user-defined
GraphQLObjectTypefor articles and authors; these will be re-used in the code. The ID field is of typeGraphQLIDand the rest asGraphQLString.
const ArticleType = new GraphQLObjectType({
    name: 'Article',
    fields: ( ) => ({
        id: { type: GraphQLID },
        name: { type: GraphQLString },
        topic: { type: GraphQLString },
        date: { type: GraphQLString },
        contributorId: { type: GraphQLID },
    })
});

const ContributorType = new GraphQLObjectType({
    name: 'Contributor',
    fields: ( ) => ({
        id: { type: GraphQLID },
        name: { type: GraphQLString },
        url: { type: GraphQLString },
        major: { type: GraphQLString },
    })
});
- Update the
RootQueryto addarticleandcontributorto the query. AsArticleTypeandContributorTypeis already declared, it can be directly used here. Both the fields should take an argument for ID which will query the data. The argument is of typeGraphQLIDand can be referenced inresolve(parent, args)function byargs.id.lodashis used to find articles and contributors that matchargs.id.
article: {
    type: ArticleType,
    args: {id:{type: GraphQLID}},
    resolve(parent,args){
        return _.find(articles,{'id':args.id})
    }
},
contributor: {
    type: ContributorType,
    args: {id:{type: GraphQLID}},
    resolve(parent,args){
        return _.find(contributors,{'id':args.id})
    }
}
- Run the server to see it in action.
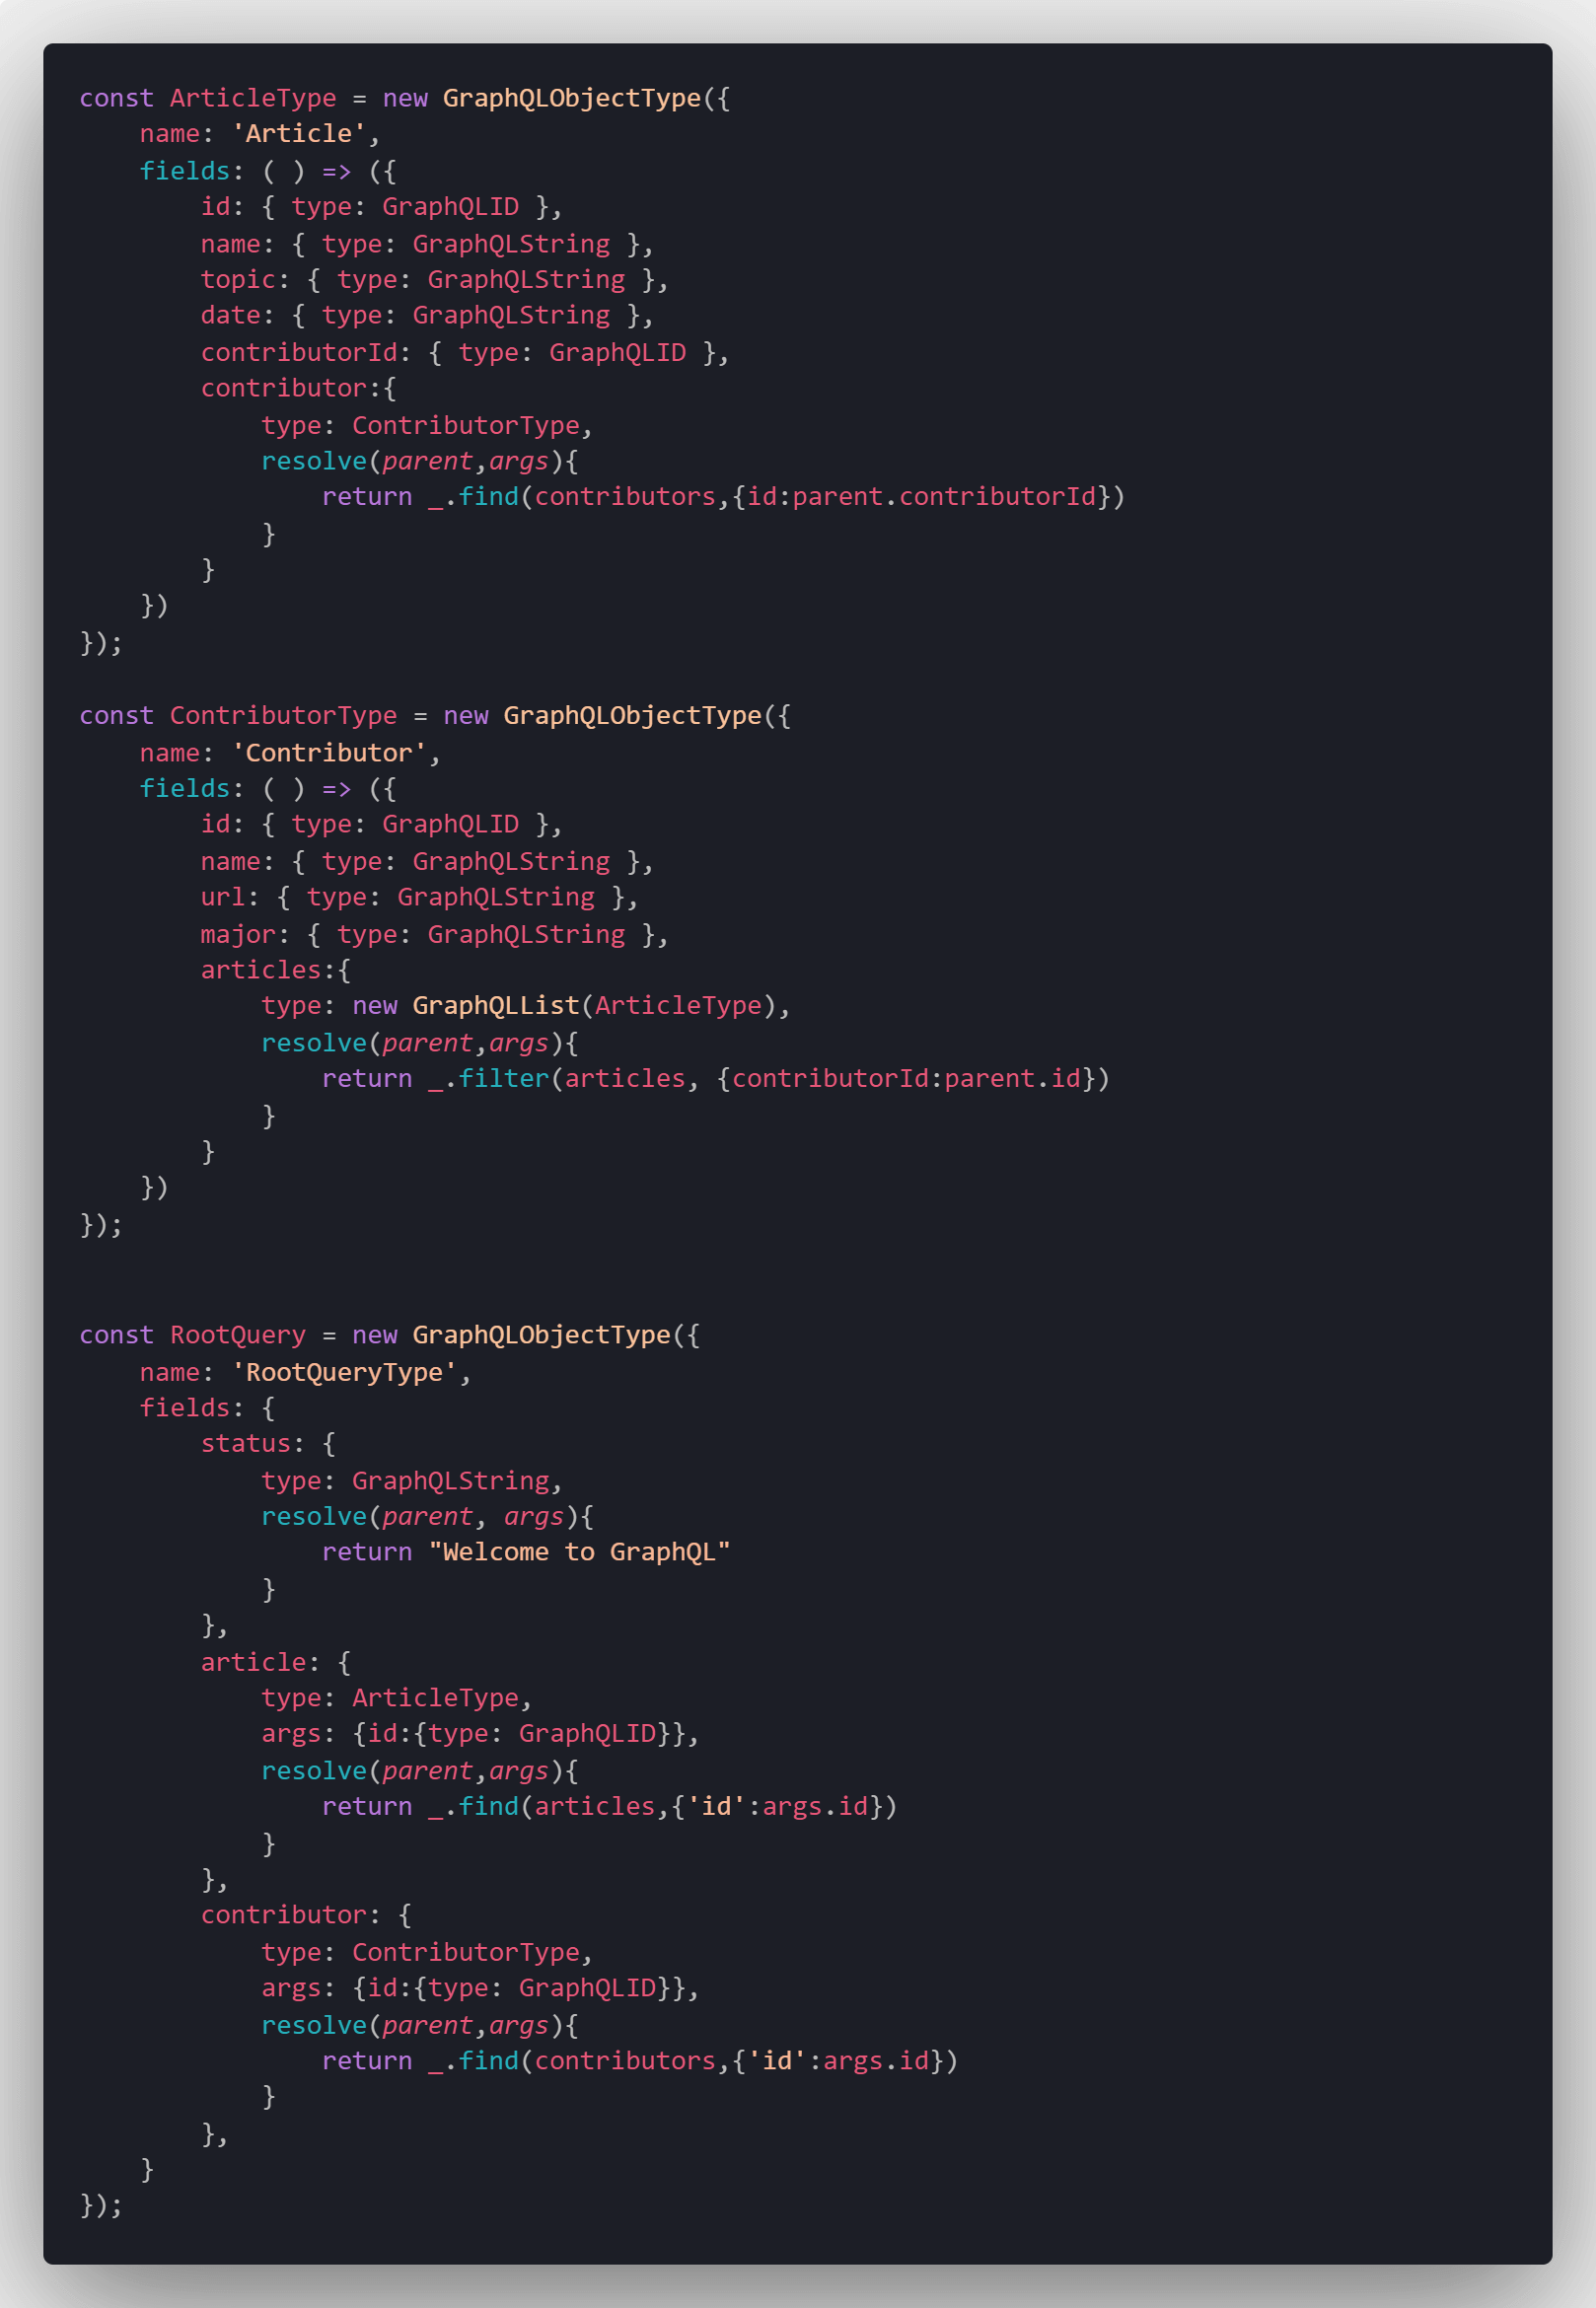
- To have data inter-linked in GraphQL, we need to modify the
ArticleTypeto include full contributor’s info of the article and also show a list of articles published by the contributor withContributorType.This can be done by addingcontributorfield of typeContributorTypeinsideArticleType. As this will be a nested query, details aboutcontributorIdcan be fetched inresolve(parent,args)byparent.contributorId.The modifiedArticleTypeshould look like this:
const ArticleType = new GraphQLObjectType({
    name: 'Article',
    fields: ( ) => ({
        id: { type: GraphQLID },
        name: { type: GraphQLString },
        topic: { type: GraphQLString },
        date: { type: GraphQLString },
        contributorId: { type: GraphQLID },
        contributor:{
            type: ContributorType,
            resolve(parent,args){
                return _.find(contributors,{id:parent.contributorId})
            }
        }
    })
});
- Do a similar step for
ContributorType. A contributor can have multiplearticles, hence thearticlesfield underContributorTypeshould be aGraphQLListof typeArticleType, asArticleTypeis only for one article.
- The
filter()function inlodashis used to return data that match the filter.
- The modified
ContributorTypeshould look like this:
const ContributorType = new GraphQLObjectType({
    name: 'Contributor',
    fields: ( ) => ({
        id: { type: GraphQLID },
        name: { type: GraphQLString },
        url: { type: GraphQLString },
        major: { type: GraphQLString },
        articles:{
            type: new GraphQLList(ArticleType),
            resolve(parent,args){
                return _.filter(articles, {contributorId:parent.id})
            }
        }
    })
});
Once done, this is how the file should look:
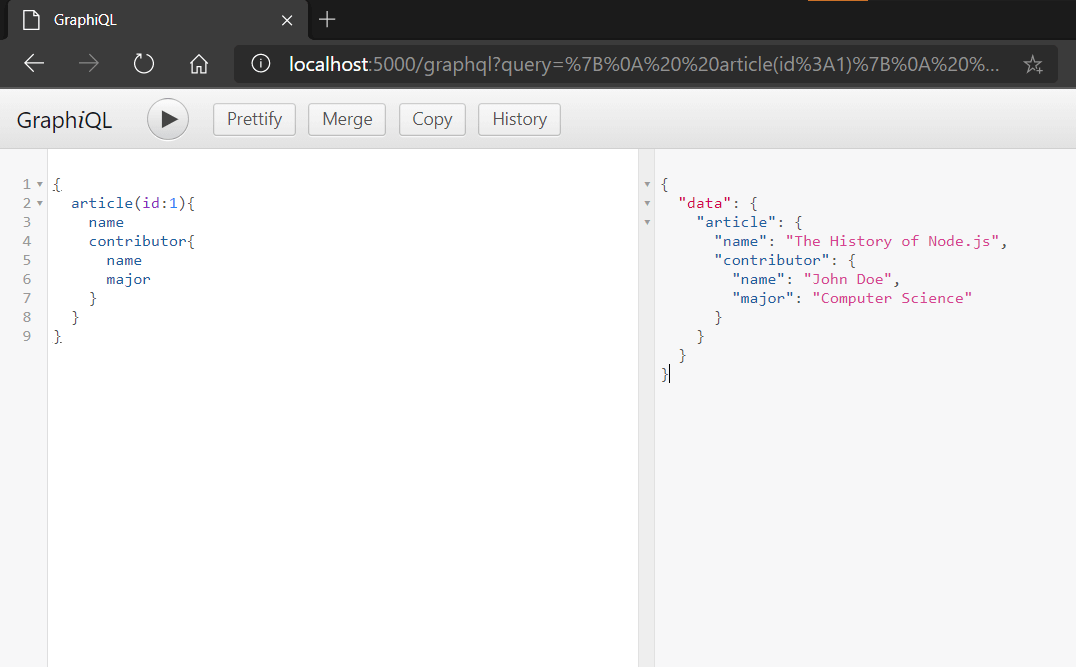
Run the server and open http://localhost:5000/graphql in the browser. Call the GraphQL server with the input query to test. Below is an example query. Notice how the GraphQL response only shows the fields that are queried and not every field.
3.4. Using MongoDB as a database
This section replaces the stored static data with a MongoDB Atlas instance.
- Install the
mongooseanddotenvlibraries for JavaScript via the terminal.mongoosefacilitates the Node.js server to connect with MongoDB and complete the database operations.dotenvloads the environment variables from a.envfile intoprocess.envto be used in code. This is more secure than directly using secrets in code. Don’t push environment variables to public domains.
npm i mongoose lodash
- Get the MongoDB connection URL with username and password from MongoDB Atlas and add it to
.env. Use the variable nameMONGODB_URL.
- It should look similar to this after adding:
MONGODB_URL=mongodb+srv://admin:<password>@cluster0.uqhv0.gcp.mongodb.net/<dbname>?retryWrites=true&w=majority
- Import the
mongooselibrary inindex.jsand connect to MongoDB using the URL from the environment variable.
const mongoose = require('mongoose');
require('dotenv').config()

const app = express();

mongoose.connect(process.env.MONGODB_URL, { useNewUrlParser: true, useUnifiedTopology: true });
mongoose.connection.once('open', ()=>{
    console.log("Connected to MongoDB")
})
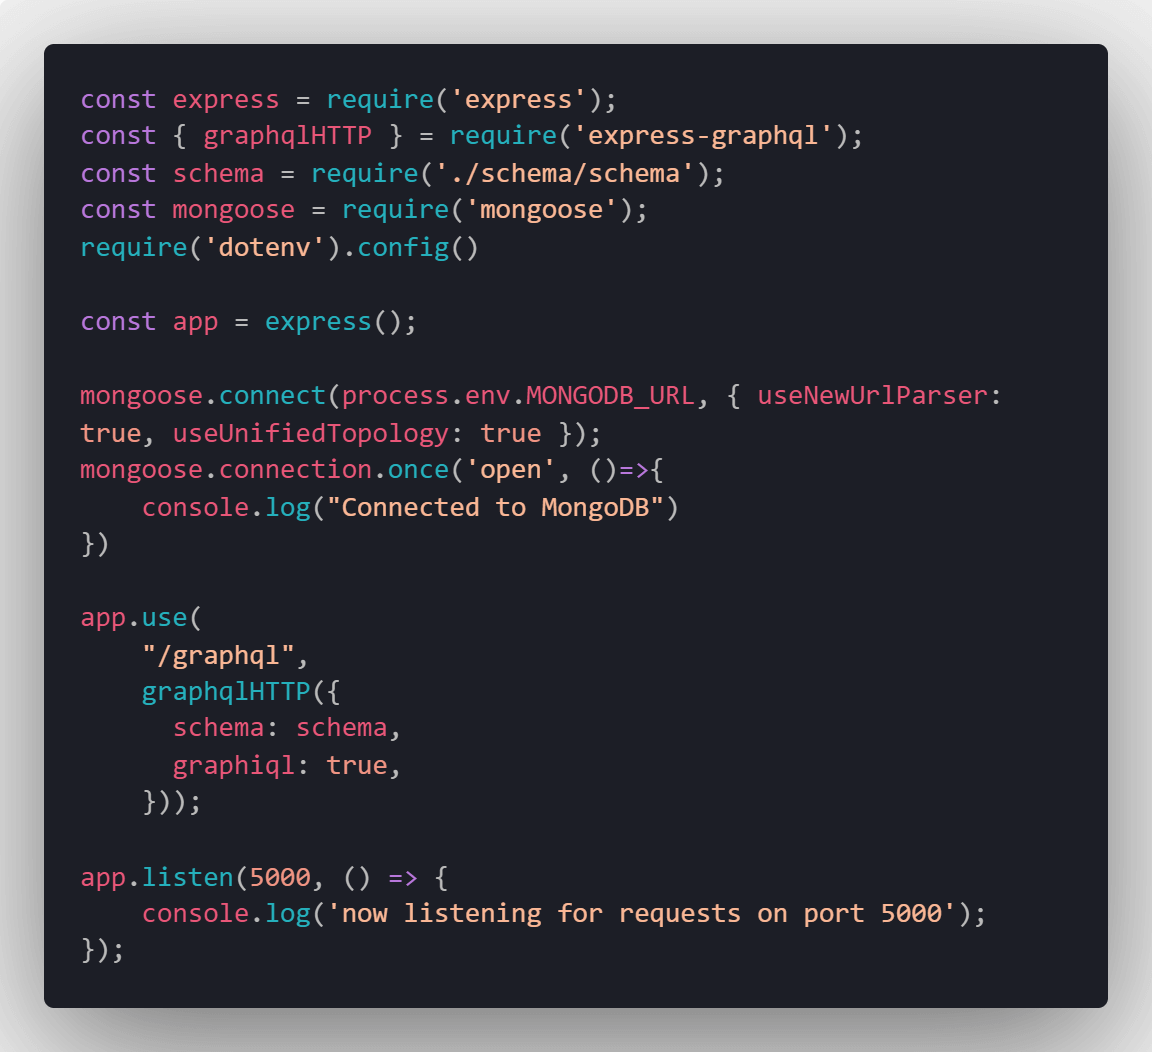
Once done, this is how the file should look:
Create a models folder to store the database schema. Create article.js for articleSchema. Import mongoose and initialize mongoose.Schema. The schema doesn’t need a definition of id field, as MongoDB by default creates an _id field for all documents. Export the model by passing it articleSchema as the parameter. This model will be used to interact with the collection from the server.
const mongoose = require('mongoose');
const Schema = mongoose.Schema

const articleSchema = new Schema({
    name: String,
    topic: String,
    date: String,
    contributorId:String
})
module.exports = mongoose.model('Article',articleSchema);
Do a similar step for contributor.js by creating the file in models.
const mongoose = require('mongoose');
const Schema = mongoose.Schema

const contributorSchema = new Schema({
    name: String,
    url: String,
    major: String
})
module.exports = mongoose.model('Contributor',contributorSchema);
The models are now ready for the server to directly interact with the database. To use them in GraphQL, replace the lodash reference with equivalent mongoose functions after importing the models.
const Article = require('../models/article');
const Contributor = require('../models/contributor');
- Replace
return _.find(contributors,{'id':args.id})withreturn Contributor.findById(args.id) - Replace
return _.filter(articles, {contributorId:parent.id})withreturn Article.find({contributorId:parent.id}) - Replace
return _.find(articles,{'id':args.id})withreturn Article.findById(args.id) - Replace
return _.find(contributors,{id:parent.contributorId})withreturn Contributor.findById(parent.contributorId)
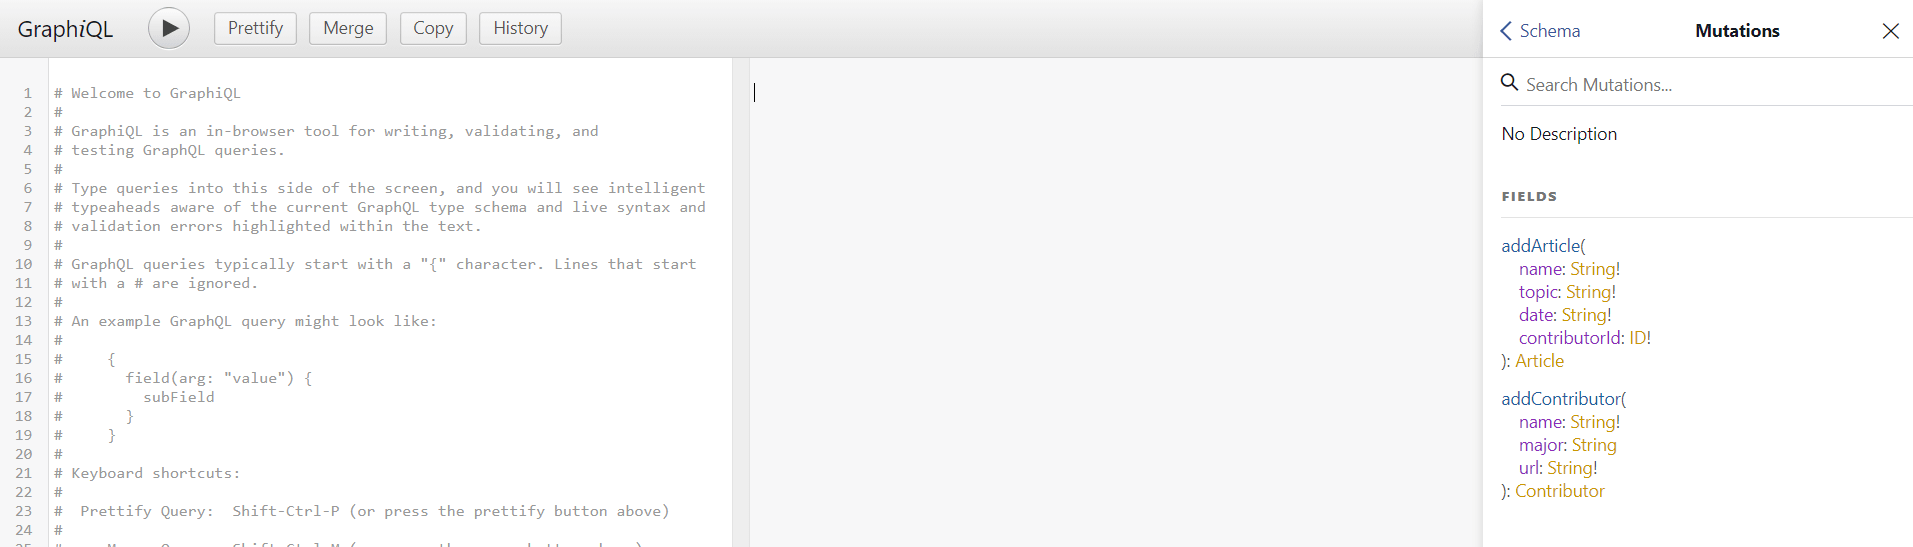
3.5. Setting up GraphQL mutations
GraphQL Mutation is used to modify the data, just like in queries, if the mutation function can return data. This is useful to fetch the latest information stored in the database after the mutation operation.
- Import the
GraphQLNonNullGraphQL type inschema/schema.js. This is useful to make sure that the fields in mutations are not left empty.
const { GraphQLObjectType, GraphQLString, GraphQLID, GraphQLList, GraphQLSchema, GraphQLNonNull } = graphql;
- Similar to
RootQuery, defineMutationas the typeGraphQLObjectType. Add two fields, one to add articles and another to add a contributor. - Write a field
addArticleof typeArticleTypeto add an article to the database. The type is wrapped withGraphQLNonNullto make sure the fields aren’t left empty when queried.Theresolve()function within the field modifies the data. Create a temporary variable of typeArticlefrom MongoDB model and useargsfromresolve(parent,args)to populate the fields.Thesave()function as part ofmongooseis used to write data to the database. On success, it returns an instance of the saved data that is returned to theresolve()function.
addArticle: {
    type: ArticleType,
    args: {
        name:{type: new GraphQLNonNull(GraphQLString)},
        topic:{type: new GraphQLNonNull(GraphQLString)},
        date: {type: new GraphQLNonNull(GraphQLString)},
        contributorId: {type: new GraphQLNonNull(GraphQLID)}
    },
    resolve(parent,args){
        let article=new Article({
            name: args.name,
            topic: args.topic,
            date:args.date,
            contributorId:args.contributorId
        })
        return article.save();
    }
},
- Do a similar step to add contributors.
addContributor: {
    type: ContributorType,
    args: {
        name:{type: new GraphQLNonNull(GraphQLString)},
        major:{type: GraphQLString},
        url: {type: new GraphQLNonNull(GraphQLString)}
    },
    resolve(parent,args){
        let contributor= new Contributor({
            name:args.name,
            major:args.major,
            url:args.url
        })
        return contributor.save();
    }
}
- Export the
Mutationinmodule.exportsalong with the query. This will make the mutations accessible from the GraphQL endpoint.
module.exports = new GraphQLSchema({
    query: RootQuery,
    mutation: Mutation
});
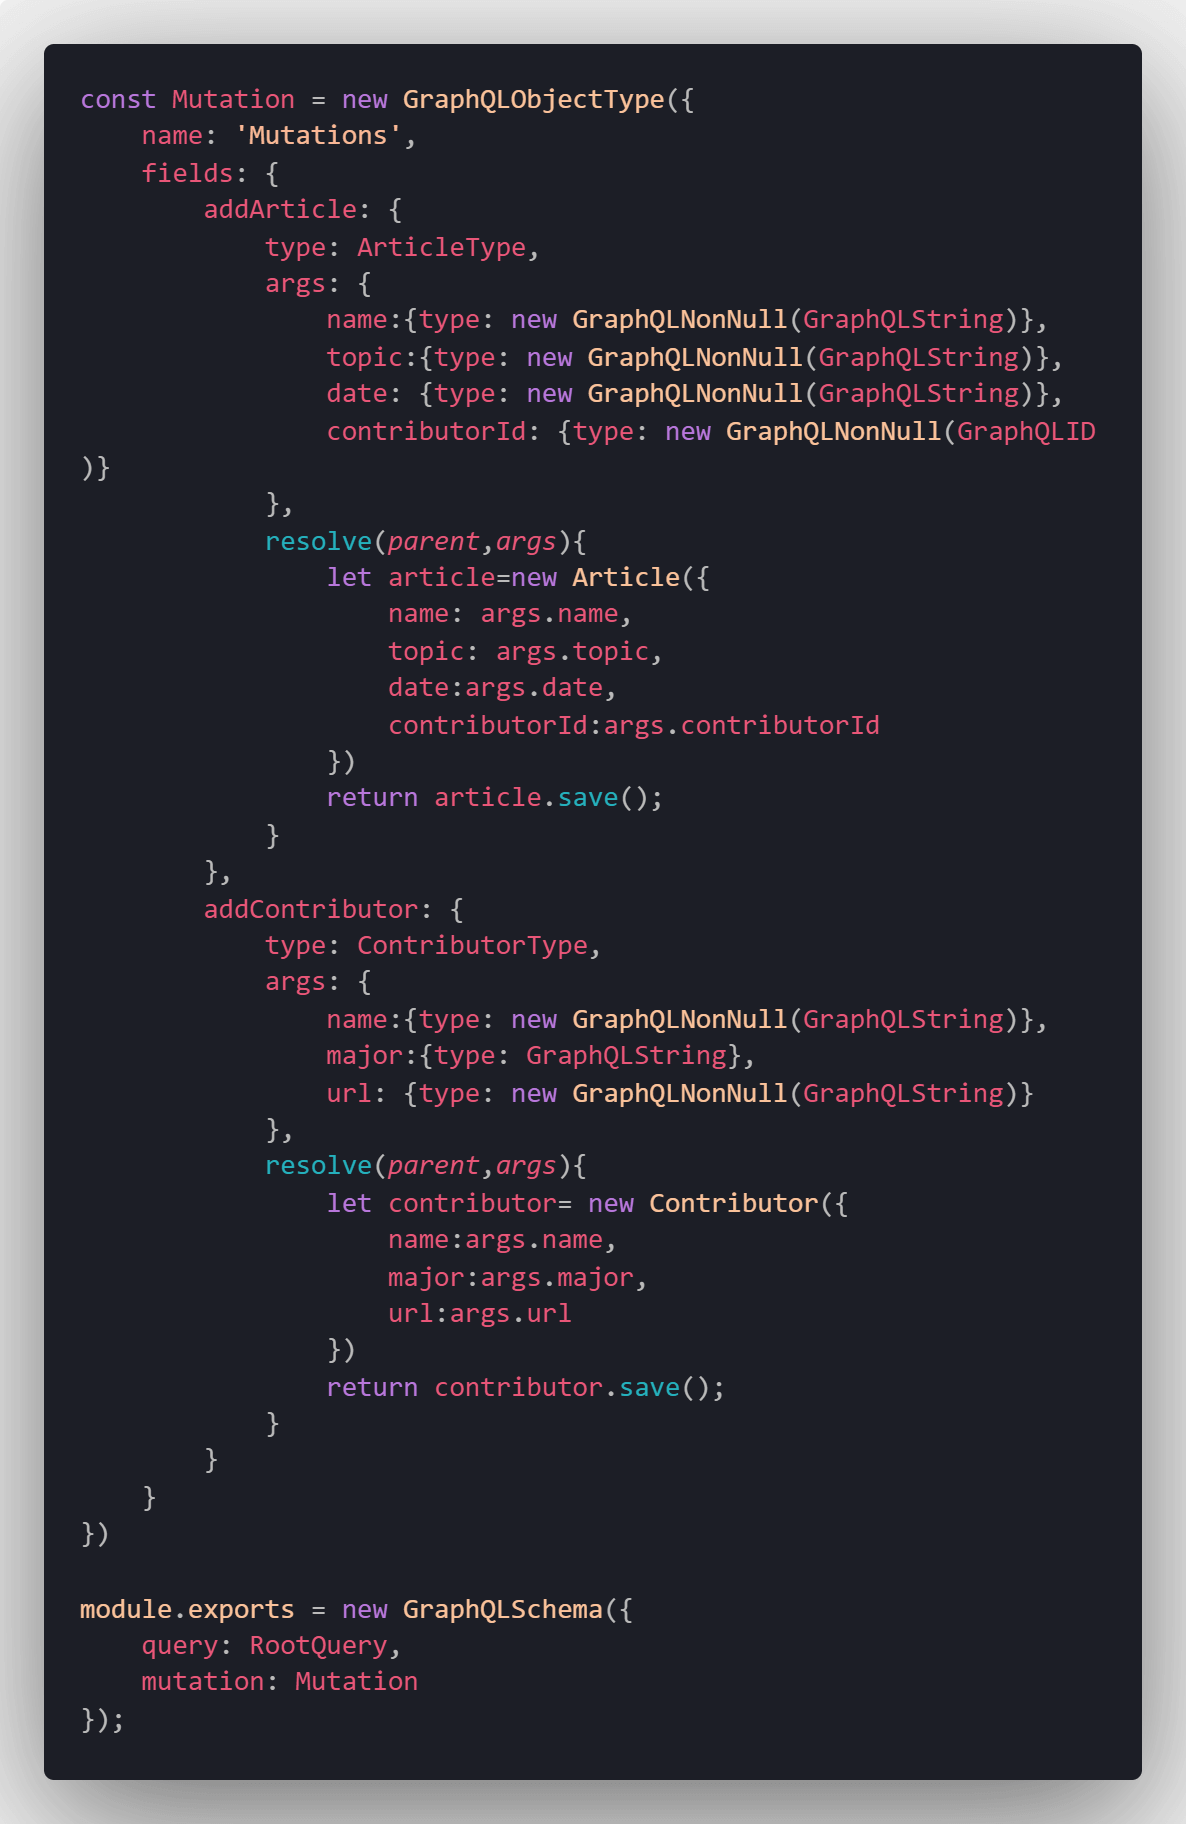
- When done, this is how the file should look:
- Run the server to see it in action. Now the server should be able to write and read from MongoDB through GraphQL queries and mutations.
4. Using a GraphQL server in production
The above example illustrates the basics of GraphQL, but there are some best practices to follow to make sure the code is optimized and secure.
4.1. Nesting queries cautiously
Although GraphQL allows nesting, reducing the depth of nested queries optimizes the query response time. A nested query depth limit is recommended to limit the client from sending deeply nested queries.
4.2. Optimizing database queries
Although GraphQL is a query language for APIs, that doesn’t mean that database queries and structure shouldn’t be optimized. Having inefficient database queries and design puts unnecessary load on the database server and increases network bandwidth.
Example
Scenario There is a field to fetch the latest three articles from the database.
- Case 1 Query database for all articles and filter the latest three articles on GraphQL server.
- Case 2 Query database for the latest three articles specifically.
Case 2 is a better option as it reduces network bandwidth and allows for a faster response time.
5. Final Note
Having gained an understanding on how we build a GraphQL server using Node.js, I hope you are better equipped to develop your GraphQL server. To gain more detailed insights, we recommend any further reading, follow-up on the keywords (listed in the article and in the section below) used here by doing a web search. Make sure you are always staying up to date with recent articles and updates to have an optimized and secure API server.
Keywords: Apollo GraphQL, nodes and edges in GraphQL, caching in GraphQL, access control in GraphQL, Relay by Facebook.
I have included a linked to the code and a demo of the example above as references. This is intended for demonstration and should not to be used in any production code.
- Codebase for the example above GitHub