
Table of Contents
- 1. Why Dockerize a React application with Docker
- 2. Goal
- 3. Prerequisites
- 3. Setup project basics
- 4. Build the back-end Node.js application
- 5. Testing the script
- 6. Build the front-end React application
- 6.1. Step 1: The client project structure
- 6.2. Step 2: Adding project dependencies
- 6.3. Step 3: Writing the React front-end logic
- 6.4. Step 4: Add the application props
- 6.5. Step 5: Add change handlers
- 6.6. Step 6: Perform request to server API using Axios
- 6.7. Step 7: Rendering the React component
- 6.8. Step 8: Adding CSS to style App.js
- 6.9. Step 9: Test
- 7. Create the Dockerfile environments
- 8. Setting up Nginx server
- 9. Setting up the docker-compose.yml
- 10. Run and test the fully containerized application instance
- 11. Conclusion
React.js is a common and famous front-end web frameworks. Yet, in most situations, a web application will require back-end services to process different transactions. React.js as a front-end framework is not complete without a back-end service to make up a complete full-stack application.
On the other hand, Docker is a perfect containerizing technology used to set up all the environments you need set up for a full-stack application. This is because Docker uses an abstract concept built on top of a low-level operating system platform that enables you to execute one or even more containerized activities or services within one or more virtualized instances.
Thus, Docker will help you deploy a full-stack React application with the back-end environments such as Node.js and Django.
1. Why Dockerize a React application with Docker
- A React full-stack application has different services, and it runs as a multi-container Docker application. Docker will allow you to spin all the services you need, and to run all the containers on a single host.
- Docker promotes the reusability of components. For example, one instance of Node.js can be used by different containers to run different services.
- Docker containers allow you to spin up an application stack and run them with a lightweight footprint, reduced overhead, and with a stable performance.
- Docker allows developers to share Docker images and files across machines. This enhances CI/CD (DevOps). Thus, making the application development and testing faster, with a more rapid deployment.
2. Goal
In this tutorial, we will build a React full-stack application with Node.js as the back-end service, MySQL as the application database, and NginX for reverse proxy. We will also dockerize this full-stack application, and deploy them as a Docker image.
We’ll use Nginx as a router in the front-end and Node.js servers, as well as an HTTP server, to deliver the built React front-end code.
We will build a simple book review application that uses React as the front-end and Node.js to spin up a server that will help us process all requests to either add, update, or delete book reviews from a database.
3. Prerequisites
- Have Node.js and Docker installed on your computer.
- Prior knowledge on how to use Docker and Docker-compose to run and manage Docker containers.
- A good understanding of using ReactJS.
- Understand how to create API services using the Node.js framework.
3. Setup project basics
This involves two major setups – a client and back-end API services.
The application involves multi-stage building. You will need to utilize several FROM statements in your Dockerfile for multi-stage builds. Then, write a docker-compose.yml file to execute all the Dockerfiles with the proper instructions to set a fully dockerized application.
To start with, create a project directory to work on. We will start by creating a Node.js back-end API with Express to expose a REST API and communicate with the MySQL database.
4. Build the back-end Node.js application
Node.js will help us to process all tractions and communication that we need to make to the database. In this case, we will use a CRUD to implement a simple Node.js Rest API.
4.1. Step 1: Project structure
Inside your project directory, go ahead and create a new folder server. We will write our back-end login inside this directory.
After you created it, cd to this folder and initialize a Node.js application using npm init -y. On execution, a package.json file will be created. Here, we can add any dependencies that we will use for the project.
4.2. Step 2: Project dependencies
We will be using the following libraries:
CORS– a technique that permits restricted resources on a web page to be accessed from a different domain (a case that occurs when you are creating an Express API).Express– a Node.js framework that enables us to create API endpoints, and to request data from the server. Express will help us write different functions that will help us process different CRUD requests.Mysql2– will allow us to write different functions that will help us access MySQL Server and execute SQL queries.
Run the following command (inside the server folder) to install the packages above.
npm install cors express mysql2
4.3. Step 3: Writing the API configurations
We will start by creating an index.js file (still inside your server directory) and start coding the API logic.
- Import the packages that we downloaded above:
const express = require('express');
const mysql = require('mysql2');
const cors = require('cors');
Add MySQL database connection. We will also be defining these environments in the docker-compose.yml file of the MySQL Docker container.
const db = mysql.createPool({
  host: 'mysql_db', // the host name MYSQL_DATABASE: node_mysql
  user: 'MYSQL_USER', // database user MYSQL_USER: MYSQL_USER
  password: 'MYSQL_PASSWORD', // database user password MYSQL_PASSWORD: MYSQL_PASSWORD
  database: 'books' // database name MYSQL_HOST_IP: mysql_db
})
Enable CORS security headers.
app.use(cors())
Add an Express method to parse the POST method.
const app = express();
app.use(express.json())
app.use(express.urlencoded({ extended: true }));
Add a home page route.
app.get('/', (req, res) => {
  res.send('Hi There')
});
To retrieve books, we will add a route that will process a Select MySQL query to retrieve all the books from the database.
//get all of the books in the database
app.get('/get', (req, res) => {
  const SelectQuery = " SELECT * FROM books_reviews";
  db.query(SelectQuery, (err, result) => {
    res.send(result)
  })
})
And an endpoint to process and INSERT SQL command.
// add a book to the database
app.post("/insert", (req, res) => {
  const bookName = req.body.setBookName;
  const bookReview = req.body.setReview;
  const InsertQuery = "INSERT INTO books_reviews (book_name, book_review) VALUES (?, ?)";
  db.query(InsertQuery, [bookName, bookReview], (err, result) => {
    console.log(result)
  })
})
Add a route that will allow us to delete a book record. This includes a bookId (unique ID for a book) to be deleted.
// delete a book from the database
app.delete("/delete/:bookId", (req, res) => {
  const bookId = req.params.bookId;
  const DeleteQuery = "DELETE FROM books_reviews WHERE id = ?";
  db.query(DeleteQuery, bookId, (err, result) => {
    if (err) console.log(err);
  })
})
Add a route that will allow us to update a book review. This includes a bookId (unique ID for a book) to be updated.
// update a book review
app.put("/update/:bookId", (req, res) => {
  const bookReview = req.body.reviewUpdate;
  const bookId = req.params.bookId;
  const UpdateQuery = "UPDATE books_reviews SET book_review = ? WHERE id = ?";
  db.query(UpdateQuery, [bookReview, bookId], (err, result) => {
    if (err) console.log(err)
  })
})
And add a port the will expose the API when the server is running. Here, we expose it to port 3001.
app.listen('3001', () => { })
5. Testing the script
Head over to the package.json file and add the following start script inside the script tags.
"start": "node index.js",
Now, you can run npm start inside the server folder. Access the home route (http://localhost:3001/) on the browser to see if it is working.

6. Build the front-end React application
Let’s now write our application front-end logic to process all the API endpoints that we have defined above.
Go to your project root directory to start a new React project. We will be running the command below to create and generate a React application boilerplate.
npx create-react-app client --use-npm
Here, npm is the package manager.
6.1. Step 1: The client project structure
Now, we have a React template, but we don’t need all the files here. So, you can go ahead and delete some files inside the public and src directories. This should be your project structure after removing the unused files.
└───client
    │
    ├───public
    │ index.html
    └───src
            App.css
            App.js
            index.js
6.2. Step 2: Adding project dependencies
Here, we will add some additional packages:
- Axios – a promise-based HTTP request library that allows us to intercept requests with REST API.
- Bootstrap and React-bootstrap – they are CSS frameworks that have custom CSS styles for elements such as Buttons, Input text, Cards, etc.
To install them, run this command inside the client application.
npm install Axios bootstrap react-bootstrap
6.3. Step 3: Writing the React front-end logic
Here, we will write down the code that will help the client React application to communicate with the server Node.js API.
Start by importing the necessary modules.
Head over to the src directory and write the following code:
import React, { Component } from 'react';
import './App.css';
import axios from 'axios';
import { Button, Container, Card, Row } from 'react-bootstrap'
Here we are:
- Importing the React Component from the React library
- Importing the
App.css. This is where we will later write some CSS to style a React page. - Importing Axios so that we can process and handle any incoming requests.
- Importing
Button,Container,Card, andRowfrom bootstrap. These elements will help us lay down our page elements using the bootstrap classes.
6.4. Step 4: Add the application props
class App extends Component {
  constructor(props) {
    super(props),
      this.state = {
        setBookName: '',
        setReview: '',
        fetchData: [],
        reviewUpdate: ''
      }
  }
}
export default App;
Moving forward, anything we write will fall under the class App.
6.5. Step 5: Add change handlers
Since we are manipulating some information by adding new records and updating some records, we need to add some states. These states will helps us handle both update operation and insert operation.
handleChange = (event) => {
  let nam = event.target.name;
  let val = event.target.value
  this.setState({
    [nam]: val
  })
}

handleChange2 = (event) => {
  this.setState({
    reviewUpdate: event.target.value
  })
}
6.6. Step 6: Perform request to server API using Axios
Here, we add the respective routes that we defined in the Node.js server API. Axios will help us intercept these requests, so that they can communicate with the back-end.
componentDidMount() {
  axios.get("/api/get")
      .then((response) => {
          this.setState({
              fetchData: response.data
          })
      })
}

submit = () => {
  axios.post('/api/insert', this.state)
      .then(() => { alert('success post') })
  console.log(this.state)
  document.location.reload();
}

delete = (id) => {
  if (confirm("Do you want to delete? ")) {
      axios.delete(`/api/delete/${id}`)
      document.location.reload()
  }
}

edit = (id) => {
  axios.put(`/api/update/${id}`, this.state)
  document.location.reload();
}
Note: How the endpoint is written here with the
/api.
This is because, in the Node.js application, we used /get, /insert, etc. We add /api in the Axios requests because Nginx will redirect /api to the requested route (for example, /get) into the Node.js application. The Nginx proxy in our container will handle this.
In this case, we will be creating Node.js as an api service in the same container that will run this React application. When Axios requests for /api/get, the Nginx server will redirect it to the endpoint /get on the back-end server.
Normally, you assign http://localhost:3001/get/ instead of /api/get, when you run the application directly from the base metals. But in this case, that won’t work, as the application is running as a virtual instance where Node.js is dockerized.
For that reason, the Node.js (server) will run as a container instance as an API on the docker-compose.yml. We will implement this logic later.
6.7. Step 7: Rendering the React component
Here, we are adding the necessary input texts and buttons that will handle the necessary states and response data.
render() {
  let card = this.state.fetchData.map((val, key) => {
      return (
          <React.Fragment>
              <Card style={{ width: '18rem' }} className='m-2'>
                  <Card.Body>
                      <Card.Title>{val.book_name}</Card.Title>
                      <Card.Text>
                          {val.book_review}
                      </Card.Text>
                      <input name='reviewUpdate' onChange={this.handleChange2} placeholder='Update Review' ></input>
                      <Button className='m-2' onClick={() => { this.edit(val.id) }}>Update</Button>
                      <Button onClick={() => { this.delete(val.id) }}>Delete</Button>
                  </Card.Body>
              </Card>
          </React.Fragment>
      )
  })

  return (
      <div className='App'>
          <h1>Dockerized Fullstack React Application</h1>
          <div className='form'>
              <input name='setBookName' placeholder='Enter Book Name' onChange={this.handleChange} />
              <input name='setReview' placeholder='Enter Review' onChange={this.handleChange} />
          </div>
          <Button className='my-2' variant="primary" onClick={this.submit}>Submit</Button> <br /><br />
          <Container>
              <Row>
                  {card}
              </Row>
          </Container>
      </div>
  );
}
6.8. Step 8: Adding CSS to style App.js
Now, we will add some CSS styling to layout the forms on. So, go ahead to the App.css file and add the following CSS code:
.App {
  text-align: center;
}
.form{
  display: inline-block;
  justify-content: center;
}
.form input{
  width: 250px;
  margin: 10px;
}
Also, on the index.html and index.js, add the following bootstrap links and execute ReactDOM rendering, respectively:
<!doctype html>
<html lang="en">
  <head>
    <meta charset="utf-8">
    <meta name="viewport" content="width=device-width, initial-scale=1">
    <link rel="shortcut icon" href="%PUBLIC_URL%/favicon.ico">
    <link
  rel="stylesheet"
  href="https://maxcdn.bootstrapcdn.com/bootstrap/4.5.0/css/bootstrap.min.css"
  integrity="sha384-9aIt2nRpC12Uk9gS9baDl411NQApFmC26EwAOH8WgZl5MYYxFfc+NcPb1dKGj7Sk"
  crossorigin="anonymous"
/>

    <title>React Fullstack Application</title>
  </head>
  <body>
    <div id="root"></div>
  </body>
</html>
import React from 'react';
import ReactDOM from 'react-dom';
import App from './App';
import 'bootstrap/dist/css/bootstrap.min.css';

ReactDOM.render(
  <App />,
  document.getElementById('root')
);
6.9. Step 9: Test
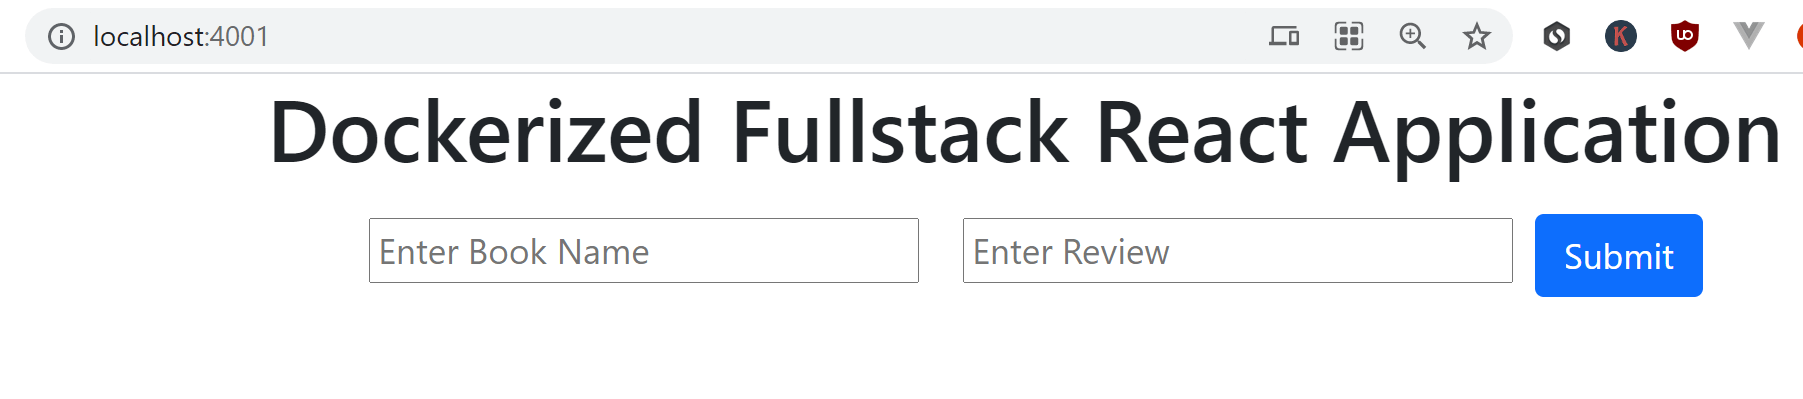
Inside the client folder, run npm start to check if this is working. Then, open http://localhost:3000/ and a page similar to this should be shown on your web browser.

7. Create the Dockerfile environments
Now that we have the full-stack application ready, we can go ahead and define the Docker environments using Dockerfile.
This application will be running on the host machine’s base metals. We need to copy the necessary file to Docker and run the necessary commands with the help of a Dockerfile.
Let’s start by defining the client application Dockfile environments:
7.1. Client dockerfile
Navigate to the client folder, create a new file and name it Dockerfile.
We will add the following to this file:
FROM node:alpine
WORKDIR /app
COPY package.json ./
COPY package-lock.json ./
COPY ./ ./
RUN npm i
CMD ["npm", "run", "start"]
Now, we need to pull the Node.js image to run this application inside a container that will then be used to create our client image to run the React application.
Inside the client image, we have defined the working directory as /app. When the image is created, this directory will also be created inside Docker. Then, we will copy the package-lock.json and package.json from the computer to /app on the client’s Docker image.
After that, we will copy everything from our client root folder to the client container’s working directory. Then, execute the npm run start command to start the React application inside the container.
Let’s now test if this Dockerfile is working.
On your terminal change directory to point to the client directory and execute this command:
docker build -f Dockerfile -t client .
The above command will create an image called client on Docker. To test it, we will create a container that will help us run this image.
Here is the command to do so:
docker run -it -p 4001:3000 client
Here, we are exposing port 3000 (the port that runs the React application) to port 4001 outside the container—run the above command. If you open http://localhost:4001 on a browser now, you will see that the React app is working inside Docker.
7.2. Server Dockerfile
FROM node:alpine
WORKDIR /app
COPY package.json ./
COPY package-lock.json ./
COPY ./ ./
RUN npm i
CMD ["npm", "run", "start"]
This looks similar to the client Dockerfile, and the same process is being carried out here to create /app working directory, copy all the necessary files, and then run the npm run start script (as defined in the package.json) to start up the server.
We can test the Dockerfile by creating a server image and a container to run the image.
To create the server image run:
docker build -f Dockerfile -t server .
To create a container to execute the server image, run:
docker run -it -p 4002:3001 server
Here, we are exposing port 3001 (the port that is running the Node.js server application) to port 4002 outside the container—run the above command.
If you now open http://localhost:4002/ on a browser, you can see that the Node.js home route is okay and the app is working inside Docker.

8. Setting up Nginx server
Before diving into what the Nginx server does, let’s look at a proxy and a reverse proxy.
A proxy server is a server that retrieves data from the Internet on behalf of a user, such as a web page. It acts as a bridge between two entities (the client and the server) and provides a service (requests and responses).
The proxy server will operate as a go-between, retrieving that web page for you. Now, when you go to a website, the proxy server receives the request from your computer, and the proxy server directly retrieves the web page on your behalf and sends it to your computer.
There are two primary proxy servers:
- Forward proxy server – handles the request to the server from different clients.
- A reverse proxy server functions in the opposite way that a forward proxy server works.
In a forward proxy server, a client connects to the server, but in reverse proxy, the server connects to the client. A forward proxy is thus for clients, while a reverse proxy is for servers.
In this case, the reverse proxy server makes requests from one or more destination servers on behalf of the client.
A reverse proxy server can be run on a Nginx instance. It enables you to have data on the public end in front of an internal server that you don’t want the public to have direct access to.
In this application, we will access both the client and the server using the Nginx proxy. Also, when using Nginx, changes made to the application will reflect immediately since the whole application is being served on a reverse proxy architecture.
Navigate to the project root directory and create an Nginx folder. Here, we will write the Nginx server proxy configurations to power up both the client and server API together. Inside the Nginx folder, create a default.conf file.
We will add the following into it:
upstream client {
  server client:3000;
}

upstream api {
  server api:3001;
}

server {
  listen 80;

  location / {
      proxy_pass http://client;
  }

  location /sockjs-node {
      proxy_pass http://client;
      proxy_http_version 1.1;
      proxy_set_header Upgrade $http_upgrade;
      proxy_set_header Connection "Upgrade";
  }

  location /api {
      rewrite /api/(.*) /$1 break;
      proxy_pass http://api;
  }
}
Here, we are:
- Adding the two apps upstreams – the client and the server API. Adding the ports assigned to each app. An upstream module is used to define a group of servers that the proxy pass can reference.
- Creating our main config, which is the Nginx server listening to port
80. - Adding the location
/./will redirect to the client-server.
Note that, we are setting
proxy_passashttp://client. The client is the name of the service that we will configure in ourdocker-compose.ymlfile to power up the client React application.
- Adding the location
/sockjs-nodefor the client to make the web sockets connection and connect to the server. We should define thesockjs-nodepath here. - Adding the location
/api. Remember we added this to the Axios requests URLs. This will redirect to the Node.js back-end. api/anythingshould redirect to the parameter/$1, which is any section of our Node.js routes such as/get.
8.1. Nginx server dockerfile
Inside the Nginx folder, add a Dockerfile and include the following to pull the Nginx image and execute the default.conf file.
FROM nginx
COPY ./default.conf /etc/nginx/conf.d/default.conf
9. Setting up the docker-compose.yml
Now, we have all the configurations for the client, the server API hooked to the Nginx server, and we are ready to spin up everything together with the docker-compose.yml, including our database.
At the root of your project, create a docker-compose.yml file.
version: '3.8'

x-common-variables: &common-variables
  MYSQL_DATABASE: books
  MYSQL_USER: MYSQL_USER
  MYSQL_PASSWORD: MYSQL_PASSWORD

services:
  mysql_db:
    image: mysql
    restart: always
    cap_add:
      - SYS_NICE
    volumes:
      - "./setup.sql:/docker-entrypoint-initdb.d/setup.sql"
    ports:
      - "9906:3306"
    environment:
      <<: *common-variables
      MYSQL_ROOT_PASSWORD: MYSQL_ROOT_PASSWORD
      MYSQL_HOST: localhost

  nginx:
    depends_on:
      - api
      - client
    restart: always
    build:
      dockerfile: Dockerfile
      context: ./nginx
    ports:
      - "3050:80"

  api:
    build:
      dockerfile: Dockerfile
      context: "./server"
    depends_on:
      - mysql_db
    volumes:
      - /app/node_modules
      - ./server:/app
    environment:
      <<: *common-variables
      MYSQL_HOST_IP: mysql_db

  client:
    stdin_open: true
    environment:
      - CHOKIDAR_USEPOLLING=true
    build:
      dockerfile: Dockerfile
      context: ./client
    volumes:
      - /app/node_modules
      - ./client:/app

  adminer:
      image: adminer:latest
      restart: unless-stopped
      ports:
        - 8000:8080
      depends_on:
        - mysql_db
      environment:
        ADMINER_DEFAULT_SERVER: mysql_db
Here, we are adding the following services:
mysql_db– this will run the MySQL server. Once the MySQL instance is executed, a databasebookswill be created and all the environments that power a MySQL server (we also added them in the Node.js database connection).
We should note we are executing a setup.sql script inside the mysql_db volumes. So, the project root directory creates setup.sql file and adds this to the SQL script:
CREATE TABLE IF NOT EXISTS `books_reviews` (
  `id` int(11) NOT NULL AUTO_INCREMENT,
  `book_name` varchar(50) NOT NULL,
  `book_review` varchar(50) NOT NULL,
  PRIMARY KEY (`id`)
) ENGINE=InnoDB AUTO_INCREMENT=9 DEFAULT CHARSET=latin1;
When the mysql_db instance has been created, this script will be executed, and a table books_reviews will automatically create the defined fields.
nginx– to power up the Nginx server. This will be exposed on port3050.api– this will power up the Node.js server. Note the name of this service isapi, just as we defined in the Nginx proxy settings.client– this will power up the React client application. Note that the name of this service isclient, just as we defined in the Nginx proxy settings.adminer– we will use Adminer as an interactive interface to access the MySQL server. This way, we will view the created database and table and see when a new item is added, updated, or deleted.
At this point, your project should at least have these files and folders.
│   docker-compose.yml
│   setup.sql
|
├───client
│   │   Dockerfile
│   │   package-lock.json
│   │   package.json
│   │
|   ├───node_modules
│   ├───public
│   │       index.html
│   |
│   └───src
│           App.css
│           App.js
│           index.js
│
├───nginx
│       default.conf
│       Dockerfile
│
└───server
    |    Dockerfile
    |    index.js
    |    package-lock.json
    |    package.json
    |
    ├───node_modules
10. Run and test the fully containerized application instance
Everything is now ready.
On your project root directory, execute the following command to run the docker-compose.yml file.
docker-compose up --build
This will build and run all the containers in Docker.

Now, you can access the Adminer using route http://localhost:8000/.
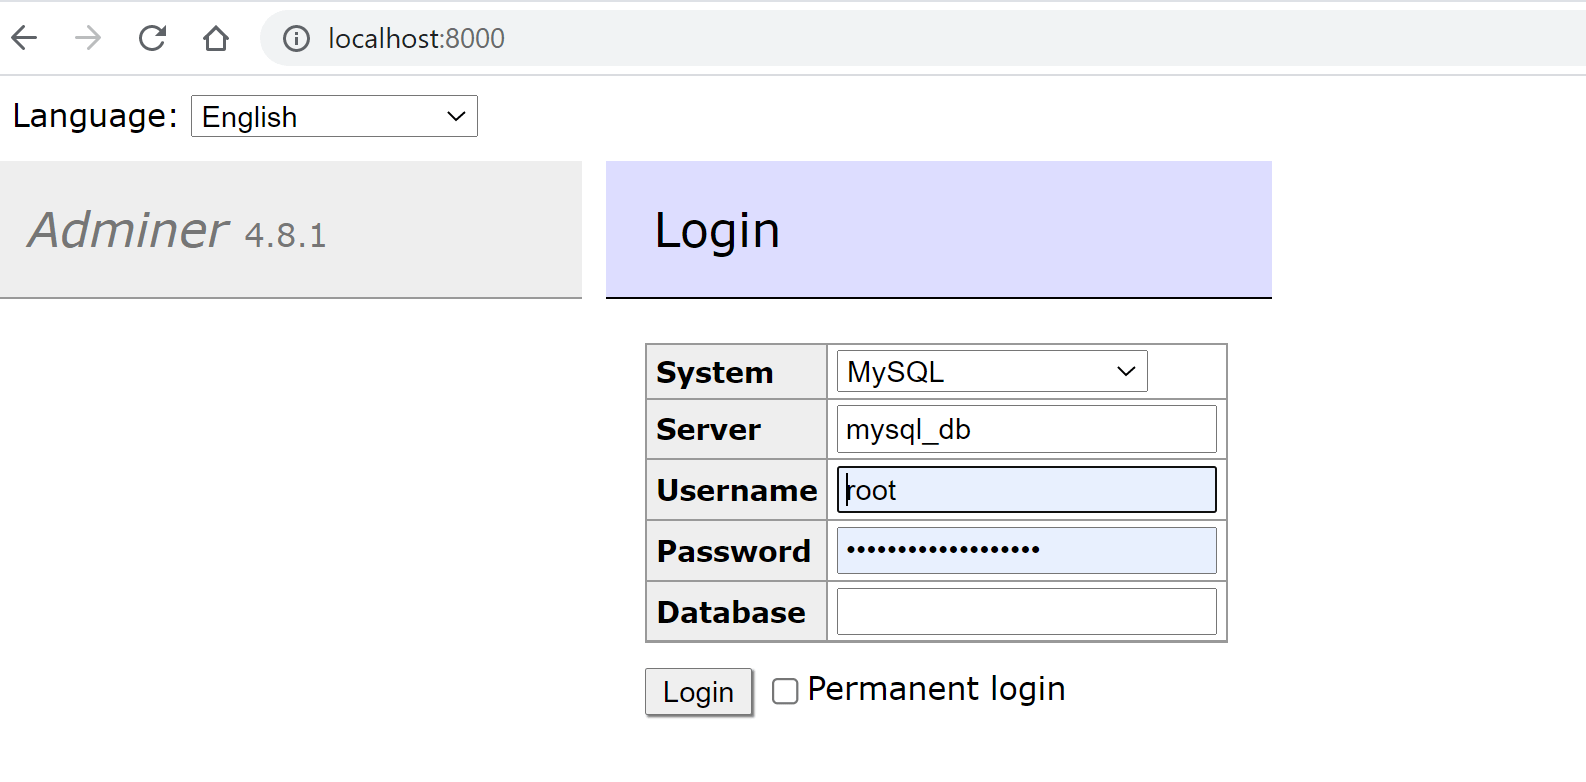
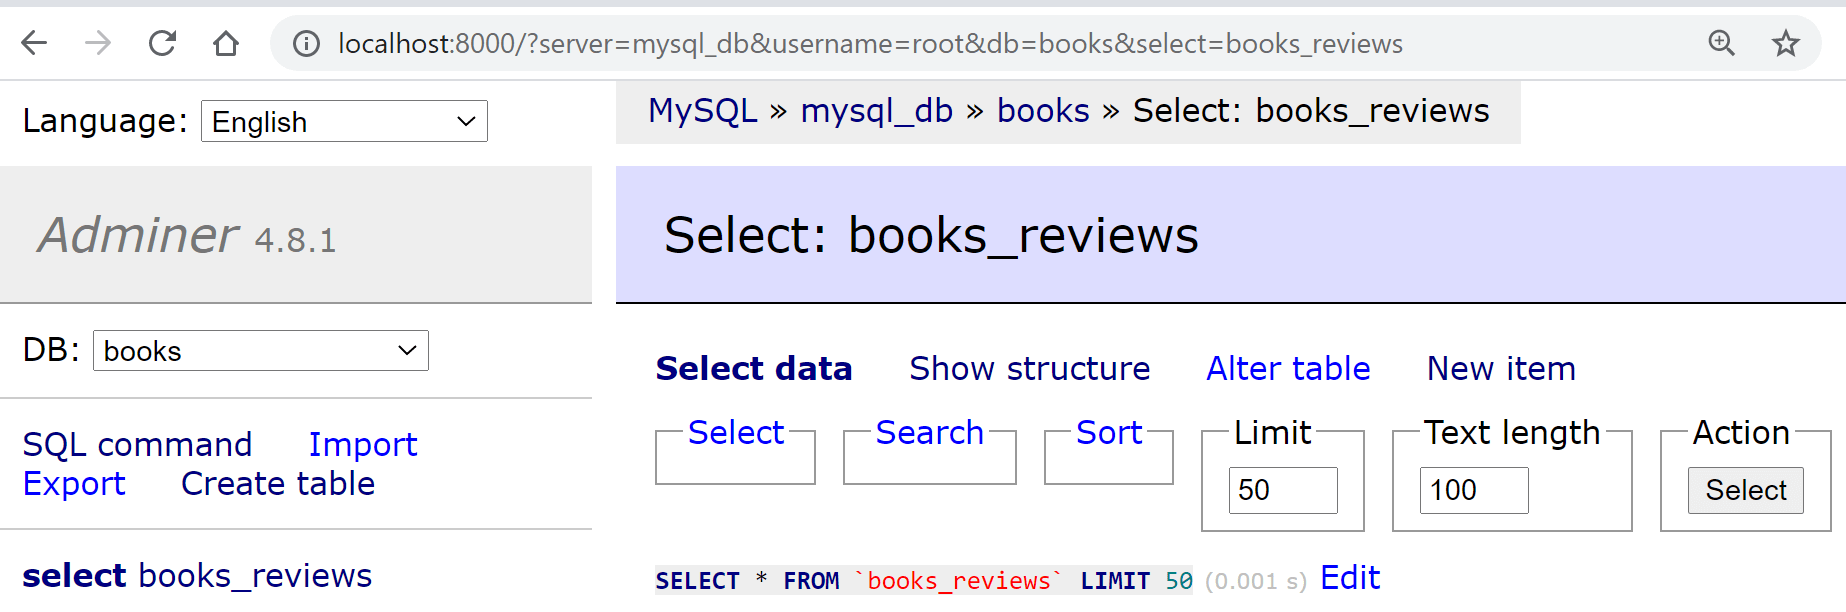
To log in, use mysql_db as the server Username as root and password as MYSQL_ROOT_PASSWORD. You can see we have database books set and table books_reviews created.
To start interacting with the application, open http://localhost:3050/ on a browser.
Now, you can start adding new records, editing book reviews, and deleting records. In addition, you can refresh the books_reviews table on Adminer to view if the changes were implemented in the database.
11. Conclusion
We have created a front-end application using React and a back-end API using Node.js. Docker has helped us create a virtual instance that allows the two to communicate interactively with the back-end database.
The code for this project can be found on GitHub.
I hope you find this tutorial informative and helpful.
Happy coding!