
Table of Contents
- 1. Goals
- 2. Prerequisites
- 3. Creating a developer account
- 4. Creating an application
- 5. Setting up the development server
- 6. Getting an access token
- 7. Sending funds to Mpesa
- 8. Accessing account mini-statement
- 9. Accessing account full-statement
- 10. Accessing account balance
- 11. Validating an account
- 12. Summary
- 13. Conclusion
Co-operative Bank is a financial service institution operating in the East African Community. As of December 2018, it had recorded over 7.8 million users.
Co-operative Bank API (Application Programming Interface) is a simple REST (Representational State Transfer) API that enables software developers to handle various financial operations provided by the bank from their applications.
1. Goals
In this article, we will consume the Co-operative Bank API.
We will implement the following operations using a Node.js REST API:
- Getting an access token.
- Sending funds to Mpesa.
- Accessing your account’s mini statement.
- Accessing your account’s full statement.
- Accessing your account balance.
- Validating your account.
2. Prerequisites
To follow along in this article, you’ll need the following:
- Node.js installed on your computer.
- Postman installed on your computer.
- A code editor such as Visual Studio Code.
- Basic knowledge of JavaScript.
- Basic knowledge of developing RESTful APIs using Express.js.
3. Creating a developer account
To create a Co-operative Bank’s developer account, follow the listed steps:
- Proceed to the developer page.
- On the top right, click Sign-up.
- Fill in all the required information on the form and then click
Sign Up. - You will be redirected to the login page, where you will enter your credentials and click
Sign in. - After successfully signing in, you will be directed to the dashboard page.
4. Creating an application
Once you are on the dashboard page, you will need to create an application. You will be subscribing to this application for all functionalities that you will be consuming.
To create an application, follow the following steps:
- On the left menu, click applications.
- On the new page, click add application.
- Enter the preferred name of the application, select
unlimitedfor thePer Token Quota, briefly describe your application, forToken TypechooseOAuth, and then clickAdd. - Having added the application successfully, you will be directed to the application page.
5. Setting up the development server
To set up the development server, clone this GitHub repository.
The development server is fully set up and now for the rest of the article we will implement the functionalities.
To install the dependencies needed, open the project from the terminal of your text editor and run the following command:
npm install
Below are the installed dependencies:
- axios: For sending requests to the co-operative bank API.
- dotenv: For loading the environmental variables.
- express: For setting up the routes and the controllers in the application.
- ngrok: For exposing our localhost server.
- nodemon: Used to listen to changes and to restart the server.
- unique-string: For generating random strings.
The next step is to get our CONSUMER KEY and CONSUMER SECRET.
To get them, follow the following steps:
- On the Co-operative Bank’s application page from the previous step, click the
Sandbox Keystab. - On the tab, click
Generate keys. This will generate both theConsumer Keyand theConsumer Secret. - Copy them and paste them appropriately in the
.envfile at the root of your project folder. - Having done that, we are set to implement the operations. We will be working from the
src/controllers/Coop.jsfile.
6. Getting an access token
An access token forms the basis of authentication while using the API. For every operation we carry out on the API, we must send an access token.
We will, therefore, implement it as a middleware. This means that we won’t be returning anything but calling the next function on the line. Express.js supports this functionality.
Modify the getAccessToken method as follows:
async getAccessToken(req,res,next){

// compose a buffer based on consumer key and consumer secret
let buff = new Buffer.from(
  `${process.env.CONSUMER_KEY}:${process.env.CONSUMER_SECRET}`
);

// encode the buffer to a base64 string
let buff_data = buff.toString("base64");

// send the request to the api.
let response = await axios
  .default({

    //ignore ssl validation
    httpsAgent: new https.Agent({
      rejectUnauthorized: false,
    }),
    method: "POST", // request method.
    url:"https://developer.co-opbank.co.ke:8243/token", // request url
    headers: {
      "Content-Type": "application/x-www-form-urlencoded", // request content type
      Authorization: `Basic ${buff_data}`, // request auth string.
    },
    data: this.data, // request data
  })
  .catch(console.log);

// set the access token to the request object.
req.access_token = response.data.access_token;

//call the next function.
return next();

};
Since it will be treated as a middleware, there is no need to implement its respective route.
7. Sending funds to Mpesa
From your Co-operative bank account, you can send funds directly to Mpesa.
This tutorial will use a simulation since we are in a sandbox environment. However, the concept would be the same in production.
Follow these steps to implement the functionality:
- From your dashboard page, click on sendToMpesa listing.
- On the right side of the new page, under
Applications, select your application, and then clickSubscribe. - Modify
sendToMpesa()method as follows:
async sendToMpesa(req,res,next){

// obtain our access token from the request object
let access_token = req.access_token;

// compose the authentication string
let auth = `Bearer ${access_token}`;

// ngrok url: TODO
let cbUrl = "";

// compose the reference no and message ref.
let refNo = uniqueString().slice(0,14);
let msgRef = uniqueString().slice(0,14);

// send the request to the api
let response = await axios.default({

    // ignore ssl validation
    httpsAgent:new https.Agent({
        rejectUnauthorized:false
    }),
    method:'POST', // request method.
    url:"https://developer.co-opbank.co.ke:8243/FundsTransfer/External/A2M/Mpesa/1.0.0/", // request URL
    data:{
        "CallBackUrl": `${cbUrl}/callback`, // callback url
        "Destinations": [
            {
            "MobileNumber": "254791569999", // any mpesa mobile no.
            "Narration": "Supplier Payment", // transaction narration
            "ReferenceNumber": refNo, // the generated refNo
            "Amount": "50" // amount to send.
            }
        ],
        "MessageReference": msgRef, // generated msgRef
        "Source": {
            "Narration": "Supplier Payment", // transaction narration
            "Amount": "50", // amount to send
            "TransactionCurrency": "KES", // currency
            "AccountNumber": "36001873000" // sandbox account no.
        }
    },
    headers:{
        'Authorization':auth // request auth string
    }
}).catch(console.log);


return res.send({
    message:response.data // response
});

};
For the above functionality to work, we have to do the following:
- Make sure that you are using the sandbox account number. Otherwise, it will result in an error.
- From your text editor, open your terminal and run the following command to start the development server:
npm run dev
- Install ngrok on your computer if you don’t have it yet.
- After successfully installing
ngrok, open a separate tab on the terminal of your text editor and run the following command to start it:
npm run ngrok
- Copy the HTTPS URL logged and set it as the value for
cbUrlvariable. - Modify the
callbackmethod as follows:
async callback(req,res,next){

console.log("...request...");

console.log(req.body);

};
- Open postman and send a
POSTrequest to:http://localhost:4000/send-to-mpesa. In case you encounter an error, revisit the above steps, otherwise your response should resemble the following:
your code here

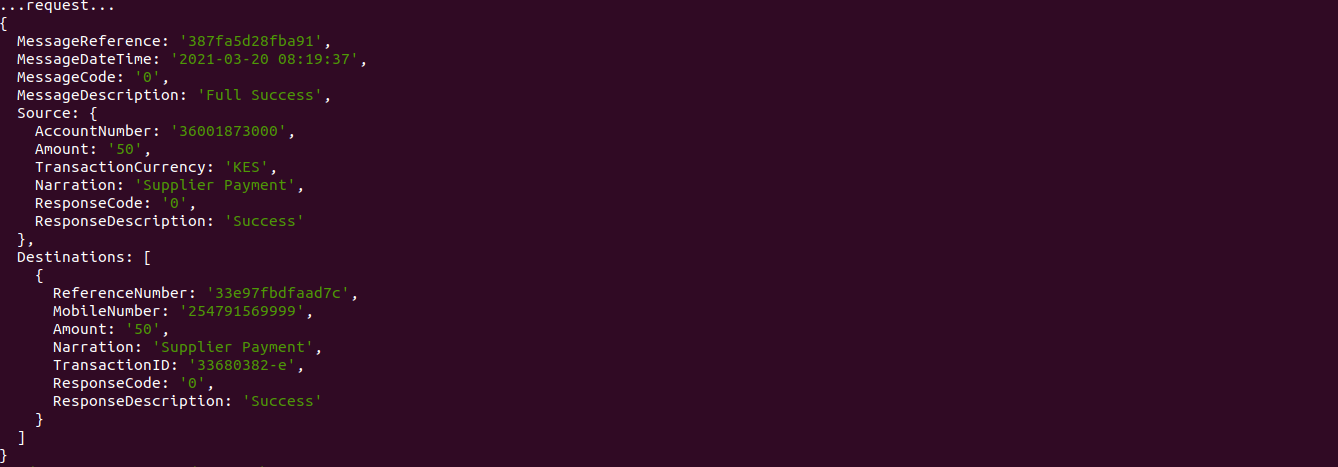
- The following should resemble the information logged on your terminal from the callback:
8. Accessing account mini-statement
An account mini-statement is used when retrieving at least five previous transactions that were carried out from your bank account.
The Co-operative Bank API supports this functionality.
To implement it, follow these steps:
- On your dashboard page, click on AccountMiniStatement listing.
- On the right side, under
Applications, select your application, and then clickSubscribe. - Modify the
accountMinistatementmethod as follows:
async accountMinistatement(req,res,next){

// url to send request to
let url = "https://developer.co-opbank.co.ke:8243/Enquiry/MiniStatement/Account/1.0.0/";

//get the access token from the request object and compose the auth string.
let access_token = req.access_token;
let auth = `Bearer ${access_token}`;

// compose the messageReference
let msgRef = uniqueString().slice(0,14);

//send a request to the server.
let response = await axios.default({

    //ignore ssl certificate
    httpsAgent:new https.Agent({
        rejectUnauthorized:false
    }),
    url, // url to send request to.
    method:'POST',// request method.
    data:{
        "MessageReference": `${msgRef}`, // randomly composed string
        "AccountNumber": "36001873000" // sandbox account no
    },
    headers:{
        'Authorization':auth // authentication string
    }
}).catch(console.log);

return res.send({
    message:response.data // response
});

};
To test this:
- Ensure that the development server is running from your terminal.
- Proceed to postman and send a
POSTrequest to:http://localhost:4000/account-mini-statement.
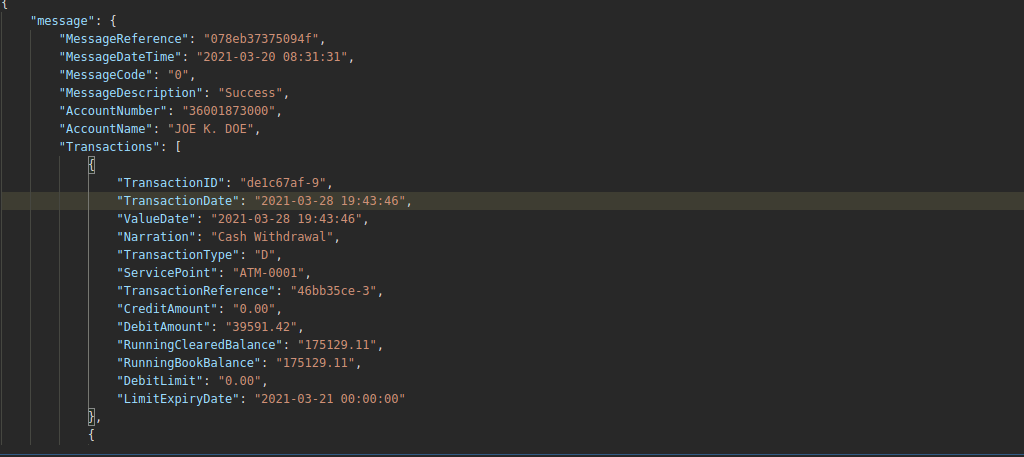
The response should resemble the following:
9. Accessing account full-statement
A full-statement provides all transactions carried out between two different specified dates.
To implement it, follow these steps:
- From your dashboard page, click on AccountFullStatement listing.
- On the right side under
Applications, select your application, and clickSubscribe. - Modify the
accountFullstatement()method as follows:
async accountFullstatement(req,res,next){

//obtain  the url
let url = "https://developer.co-opbank.co.ke:8243/Enquiry/FullStatement/Account/1.0.0/";

// get the access token from the request object and compose the auth string.
let access_token = req.access_token;
let auth = `Bearer ${access_token}`;

// generate the message ref.
let msgRef = uniqueString().slice(0,14);

// specify the start and end date.
let startDate = "2020-11-01";
let endDate = "2021-03-01";

// send a request.
let response = await axios.default({

    // ignore the ssl certificate
    httpsAgent:new https.Agent({
        rejectUnauthorized:false
    }),
    url, // url to send request to.
    method:'POST', // request method
    data:{
        "MessageReference":`${msgRef}`, // randomly generated string
        "AccountNumber":"36001873000", // sandbox account no
        "StartDate": startDate, // from when
        "EndDate": endDate // to when
    },
    headers:{
        'Authorization':auth // authentication string
    }
}).catch(console.log);

return res.send({
    message:response.data // response
});

};
To test this:
- Ensure that the development server is running.
- Head over to postman and send a
POSTrequest to:http://localhost:4000/account-full-statement.
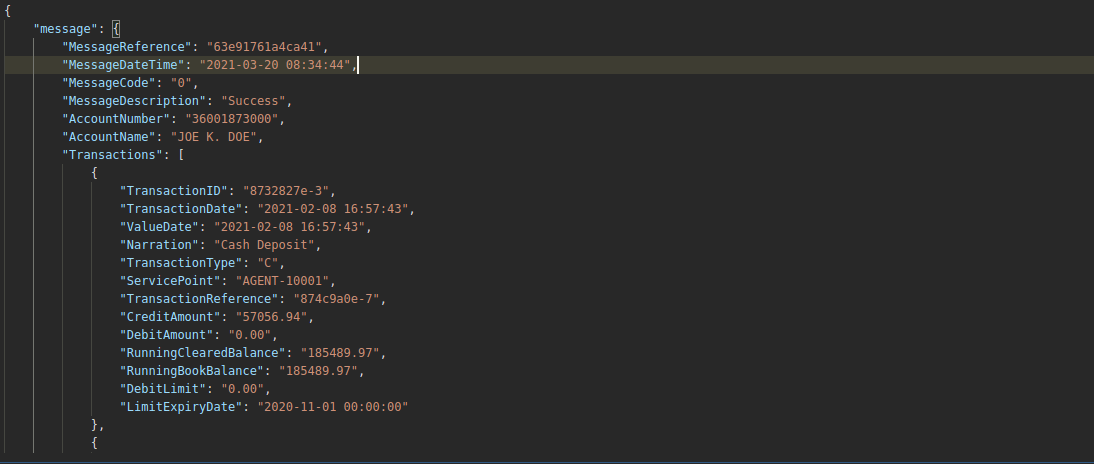
The response should resemble the following:
10. Accessing account balance
With the API, we can access the account balance from our account.
To implement the feature, we follow these steps:
- From your dashboard page, click on AccountBalance listing.
- On the right side under
Applications, select your application, and then clickSubscribe. - Modify the
accountBalance()method as follows:
async accountBalance(req,res,next){

// url to send request to.
let url = "https://developer.co-opbank.co.ke:8243/Enquiry/AccountBalance/1.0.0/";

// obtain the access token and compose the authentication string.
let access_token = req.access_token;
let auth = `Bearer ${access_token}`;

// compose the message reference
let msgRef = uniqueString().slice(0,14);

// send a request.
let response = await axios.default({

    //ignore ssl validation
    httpsAgent:new https.Agent({
        rejectUnauthorized:false
    }),
    method:'POST', // request method
    url, // url to send request to
    data:{
        "MessageReference":msgRef, // randomly generated string
        "AccountNumber":"36001873000" // sandbox account no
    },
    headers:{
        'Authorization':auth // authentication string
    }
}).catch(console.log);

return res.send({
    message:response.data // response
});

};
To test this:
- Make sure that you are using the
sandbox account number. Otherwise it will return an error. - Ensure that the development server is running from your terminal.
- Head over to Postman and send a
POSTrequest to:http://localhost:4000/account-balance.
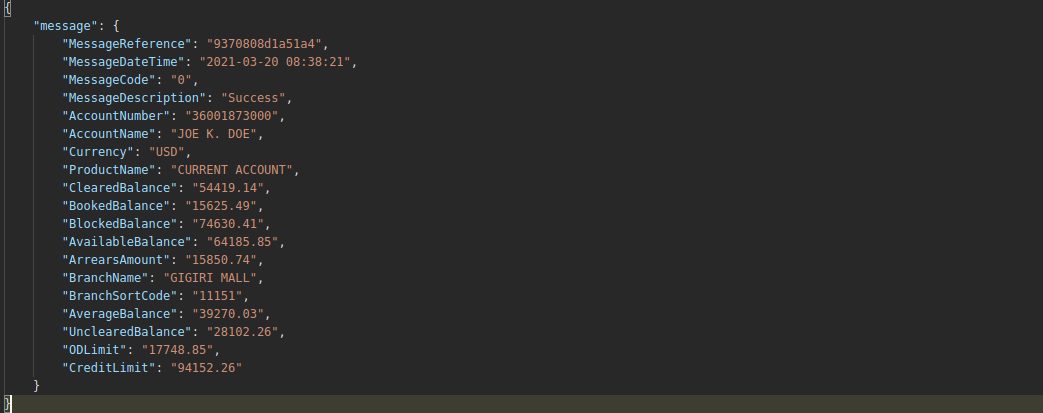
The response sent should resemble the following:
11. Validating an account
With the API, we can identify a valid Co-operative Bank account. Since we are in the sandbox environment, we are restricted to the default account number for testing. A different one will be termed invalid.
To implement it, follow these next steps:
- From your dashboard page click on AccountValidation listing.
- On the right side under
Applications, select your application, and then clickSubscribe. - Modify
accountValidation()method to be as follows:
async accountValidation(req,res,next){

// url to send request to
let url = "https://developer.co-opbank.co.ke:8243/Enquiry/Validation/Account/1.0.0/";

// obtain the access token and compose the authentication string.
let access_token = req.access_token;
let auth = `Bearer ${access_token}`;

// compose the message reference.
let msgRef = uniqueString().slice(0,14);

// send a request to the API
let response = await axios.default({

    //ignore ssl certificate.
    httpsAgent:new https.Agent({
        rejectUnauthorized:false
    }),
    url, // url to send request to
    method:'POST', // request method
    data:{
        "MessageReference": msgRef, // randomly generated string
        "AccountNumber": "36001873000" // default sandbox account no
    },
    headers:{
        'Authorization':auth // authentication string
    }
}).catch(console.log);

return res.send({
    message:response.data // response
});

};
To test this:
- Ensure that the development server is running from your terminal.
- Head over to postman and send a
POSTrequest to:http://localhost:4000/account-validation.
The response sent should look like this:

12. Summary
In this article, we have implemented the following functionalities from the Co-operative Bank’s API using Node.js:
- Generating an access token
- Sending funds to Mpesa
- Accessing account mini-statement
- Accessing account full-statement
- Accessing account balance
- Validating an account
13. Conclusion
Co-operative Bank’s API has various functionalities that previously required lengthy processes to implement. There are more features provided by the API as shown in the following listings.
In case of any query concerning Co-operative Bank’s API, or the production environment, feel free to contact the VietMX.
Happy coding!!