
Table of Contents
- 1. Key takeaways
- 2. Prerequisites
- 3. What is a chatbot
- 4. Advantages of chatbots
- 5. Disadvantages of chatbots
- 6. What is the Twitch API?
- 7. Create and set up a Twitch account and channel
- 8. Creating a demo stream
- 9. Obtain bot OAuth key
- 10. Create a simple Twitch chatting bot
- 11. Run the code to spy the chats
- 12. Make the bot responsive
- 13. Run it
- 14. Further practice
- 15. Conclusion
Twitch, is an online streaming platform that allows streamers and audiences to lively interact with each other. What begun as a small game streaming platform for gamers, soon saw a surge in popularity and is leaps ahead what it once was.
It not only supports other services but also has contents from a broad spectrum. For instance, there are cooking shows, live talk shows, daily lifestreaming, live chatting, and interactions among others.
Streamers earn from monthly subscriptions or donations from fans depending on the content and as long as the content is within the terms of service, community guidelines, and terms of sale of the company.
Due to the growth of the services, the greater need of interacting with the Twitch API to create more personalized services or functions arose. This led to the development and deployment of bots that interact with the services.
The bots created by these genius developers range from chatting bots, viewers engagement bots, monitoring, and statistical bots, polling bots, chat and content moderation bots among many others.
Some of these top Twitch bots can be found in this link.
Even though so many different bots have been created or modified, there is still a need for personalized bots depending on the issue you want to solve.
In this tutorial, we will learn about the Twitch API and how to create a simple chat bot in Node.js to interact with it.
1. Key takeaways
At the end of the tutorial, you will have learned:
- What is the Twitch API.
- Key components, basics, and how to interact with the API in Node.js.
- How to build a simple Twitch chatbot.
- How to run a Twitch chatbot in Node.js.
2. Prerequisites
Some of the basics needed to follow along with the tutorial include the following:
- Web development basics.
- Little interactions with the Twitch website. This helps to know how Twitch works, some of its services, and the interface that you would be dealing with. If you are new, you can check it out at https://www.twitch.tv/ website.
- An IDE installed on your machine. My recommendation is the Visual Studio Code IDE.
- Node.js environment installed and configured on your machine. You can get it here.
- A stable internet connection.
3. What is a chatbot
Let’s start with this interesting question.
A Chat-Bot is an application with the capability to conduct online chat via text messages, speech, or even videos. It can have preset conversations inputted and their expected outputted. They can also use AI to create new conversation depending on the context. Most are not autonomous therefore a human being is always closeby in case of any issues in which it doesn’t understand.
Even though these chatbots have not become fully autonomous, improvements are made each day to push them near to perfection.
The services of chatbots have been integrated into many different places. Two such places are in the gaming and streaming services. These have made the sites interactive and have seen higher audiences.
4. Advantages of chatbots
- Can handle multiple clients with ease once deployed, compared to the number of clients a human can handle.
- Since they are taught some main functionalities, inputs, and outputs, they provide quick repetitive answers without getting bored or tired.
- Provide answers to Frequently Asked Questions (FAQs) consistently to all customers. This prevents any discrimination.
- It is cheap to run.
- Easy to deploy.
- They can always be online, which prevents offtime and downtime to users.
Since they can be run continuously on servers, e.g. Node.js servers like those at VietMX Blog. These servers can run 24/7, and any time a user goes online on a live stream, it can always be found online. This promotes higher availability of the program.
5. Disadvantages of chatbots
Though they have some interesting and quite reasonable features, they also have another face to the coin.
These include:
- Chatbots need a lot of maintenance due to the continuous addition of more features for them to have a competitive advantage. They also need to be able coup with unanswered questions from customers.
- They cannot recognize the client’s emotions such as relief or anger. This prevents them from fully capturing the user feedback after the service or before. Their reliance on feedback forms makes them limited.
- The need for a human to supervise or be as a backup, which can be expensive.
- System failures may result in crucial services being limited.
6. What is the Twitch API?
This is the API used to access the TWITCH systems and develop new integrations. It is free of charge. You can access it using Script tags or as a module in Node.js.
In Node.js, we use the tmi.js library.
To accomplish our goal, we will do the following:
- Create a Twitch account and set up a Twitch channel.
- Create a demo stream.
- Obtain Bot OAuth key. This will be used to allow the bot to access our channel.
- Create a simple Twitch chat bot and connect it to our stream.
- Test our bot.
7. Create and set up a Twitch account and channel
Visit [www.twitch.tv] to create a new user account. You can finish setting up additional details such as Bio, Profile picture, and Profile Banner in the Settings.
Make sure your status is set to Online to avoid being seen as inactive by your stream channel subscribers.
Now, click on Channel as shown in the image below:
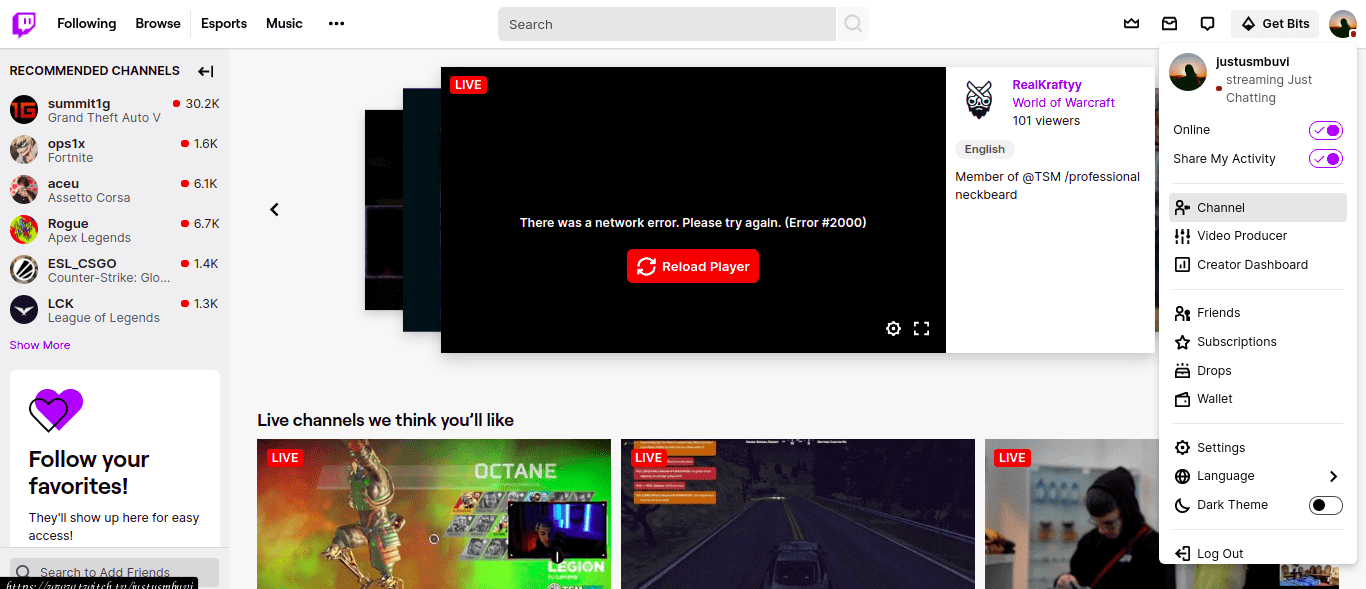
Twitch Channel
On the channel tab, you will be able to see if your channel is Live or Offline. You can also customize your channel depending on your preferences.
8. Creating a demo stream
There are many stream hosting services out there for Twitch and many other streaming platforms. In Twitch, for you to stream, you will require one. I recommend using Streamyard.
Streamyard is an online streaming service that allows you to stream your content to one or multiple platforms at once. You don’t need any installation since it is a website. It offers both free services (for small streams) and paid services (for large streams). It is simple to use with no much help needed.
Just visit it and we will do the following:
- Create a new account and log in.
- Add a destination to your stream. You can add more than one destination. Here, we add Twitch.
- Verify the account you want to stream to.
- Click on ‘Create a broadcast’, Select the destination of broadcast, and input the broadcast name.
- Input your name to be displayed. Choose whether you will use your microphone or camera during the stream. Now, click on ‘Enter Studio’. Select yourself as part of the stream.
- Click on ‘Go live’ to start the online stream.
- On another tab, open up Twitch and access your account. Navigate over to the channel tab and see what you are streaming to your viewers. You can see the chats and also explore additional features.
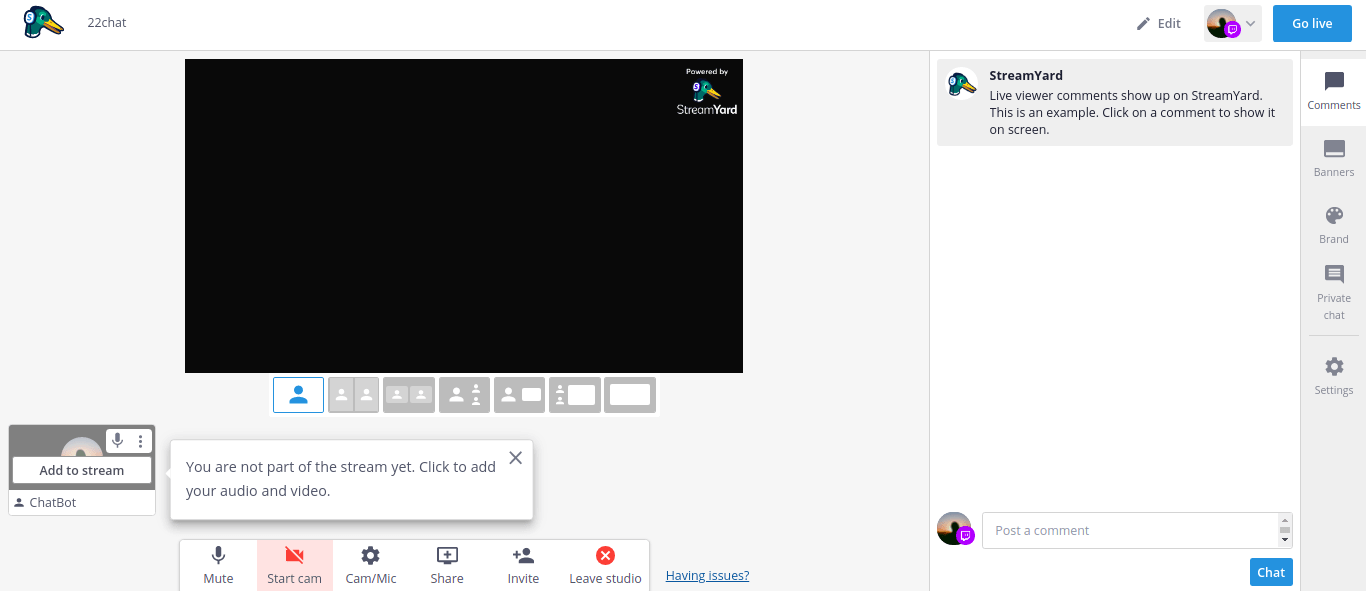
Streamyard for streaming
9. Obtain bot OAuth key
There are two ways in which our bot could access a channel:
- Anonymously: Here, the identity (username and password) are not required or specified. It is advantageous in some cases where one will not be tracked. It limits one only to view, but no reply or participate in the chats.
- OAuth token authorization: Here, the bot identity is required. It allows the bot to actively monitor and participate in the chats.
We shall handle both of these cases. Let’s obtain an OAuth token that we shall use later on in our project.
You can obtain one from https://twitchapps.com/tmi/ which I think is an easy way. You can also obtain it from https://twitchtokengenerator.com/. Make sure that this key is safe for security reasons.
10. Create a simple Twitch chatting bot
Create a root directory and name it ‘Twitch-Chatbot’.
Folder structure
The overall file structure is as shown below:
.
├── Twitch-Chatbot
    ├── node_modules
    ├── .env
    ├── app.js
    └── package.json
Here, we shall create a file named app.js which shall be our application entry point. Open the folder using Visual Studio Code and open the integrated terminal.
Initialize the project in the terminal using:
npm init -y
We shall install the required dependencies – tmi.js and dotenv using:
npm i dotenv tmi.js
tmi.jswill be used to access Twitch, whiledotenvwill be used to store our credentials safely from the main application entry point.
.env file
Create a file and name it .env. Now, we shall store our environment variables such as the username, OAuth, and channel.
Note: If you want to upload your code to GitHub, please remember to include it in the
.gitignorefile to prevent it from being uploaded and cause a security breach. I prefer you use git secrets in the repository. Make sure you also enable git guardian in your repository.
The file should look like this:
TWITCH_USERNAME= Name_of_the_chatbot
TWITCH_OAUTH= The_key_gotten_from-the _website
TWITCH_CHANNEL= Your_Chanell_Name
Copy and paste to the appropriate sections and save them.
package.json file
The package.json will contain the data shown below:
{
    "name": "Twitch-Chatbot",
    "version": "1.0.0",
    "description": "Twitch node.js chat bot",
    "main": "app.js",
    "scripts": {
        "start": "node app.js",
        "test": "echo \"Error: no test specified\" && exit 1"
    },
    "repository": {
        "type": "git",
        "url": "git+https://github.com/justusmbuvi/Twitch-Chatbot-in-Node.js.git"
    },
    "keywords": [
        "Twitch",
        "node.js",
        "chat",
        "bot"
    ],
    "author": "Justus_Mbuvi",
    "license": "MIT",
    "bugs": {
        "url": "https://github.com/justusmbuvi/Twitch-Chatbot-in-Node.js/issues"
    },
    "homepage": "https://github.com/justusmbuvi/Twitch-Chatbot-in-Node.js#readme",
    "dependencies": {
        "dotenv": "^10.0.0",
        "tmi.js": "^1.8.3"
    }
}
app.js
Open up our application entry point. And, now we will do the following:
- Require necessary node modules. We shall also configure tmi.js channel connection, reconnection and security options as shown below:
// Require necessary node modules
// Make the variables inside the .env element available to our Node project
require('dotenv').config();

const tmi = require('tmi.js');

// Setup connection configurations
// These include the channel, username and password
const client = new tmi.Client({
    options: { debug: true, messagesLogLevel: "info" },
    connection: {
        reconnect: true,
        secure: true
    },

// Lack of the identity tags makes the bot anonymous and able to fetch messages from the channel
// for reading, supervision, spying, or viewing purposes only
    channels: [`${process.env.TWITCH_CHANNEL}`]
});
Establish the connection and display any arising errors.
// Connect to the channel specified using the setings found in the configurations
// Any error found shall be logged out in the console
client.connect().catch(console.error);

// We shall pass the parameters which shall be required
client.on('message', (channel, tags, message, self) => {
    // Lack of this statement or it's inverse (!self) will make it in active
    if (self) return;

// This logs out all the messages sent on the channel on the terminal
    console.log(message);

});
11. Run the code to spy the chats
Run this code using:
npm run start
or
node app.js
The bot can join the channel stream – online or offline. This enables one to deploy it whenver needed. You are also able to quickly shut it down in case of any emerging errors.
The output should look like this to show a successful connection to the channel:
john@john:~/Tofa/Projects/Twitch/Twitch-Chatbot-in-Node.js$ node app.js
[03:30] info: Connecting to irc-ws.chat.twitch.tv on port 443..
[03:30] info: Sending authentication to server..
[03:30] info: Connected to server.
[03:30] info: Executing command: JOIN #justusmbuvi
[03:30] info: Joined #justusmbuvi
Head over to the browser and start a live stream using Streamyard, while monitoring it on another tab on your Twitch channel. You can invite others to your channel, to make the session as interactive as possible. You can also just chat on your own in case you are testing it out.
Send a message in the Chat tab and you will see it being logged out on your terminal. This proves a success.
As you can see, we can’t interact with this live Twitch chat but only fetch the conversations.
12. Make the bot responsive
Now we shall add our identity and output options.
- Delete the
console.log(message);line. - Inside the brackets, we shall add selective statements to acquire our desired user input and return an output accordingly.
- We fetch the user input using
messageand the output is returned to the chats usingclient.say();where we obtained the username usingtags. - We are also able to add another selective statement that will check the first input – upvote, cheer, or any other. If it finds the first two, it returns a result. Otherwise, it remains silent.
The code is as shown below:
// Require necessary node modules
// Make the variables inside the .env element available to our Node project
require('dotenv').config();

const tmi = require('tmi.js');

// Setup connection configurations
// These include the channel, username and password
const client = new tmi.Client({
    options: { debug: true, messagesLogLevel: "info" },
    connection: {
        reconnect: true,
        secure: true
    },

    // Lack of the identity tags makes the bot anonymous and able to fetch messages from the channel
    // for reading, supervision, spying, or viewing purposes only
    identity: {
        username: `${process.env.TWITCH_USERNAME}`,
        password: `oauth:${process.env.TWITCH_OAUTH}`
    },
    channels: [`${process.env.TWITCH_CHANNEL}`]
});

// Connect to the channel specified using the setings found in the configurations
// Any error found shall be logged out in the console
client.connect().catch(console.error);

// When the bot is on, it shall fetch the messages send by user from the specified channel
client.on('message', (channel, tags, message, self) => {
    // Lack of this statement or it's inverse (!self) will make it in active
    if (self) return;

    // Create up a switch statement with some possible commands and their outputs
    // The input shall be converted to lowercase form first
    // The outputs shall be in the chats

    switch (message.toLowerCase()) {
        // Use 'tags' to obtain the username of the one who has keyed in a certain input
        // 'channel' shall be used to specify the channel name in which the message is going to be displayed
        //For one to send a message in a channel, you specify the channel name, then the message
        // We shall use backticks when using tags to support template interpolation in JavaScript

        // In case the message in lowercase is equal to the string 'commands', send the sender of that message some of the common commands

        case 'commands':
            client.say(channel, `@${tags.username}, available commands are:
            Commands Help Greetings Hi !Website !Name

            For more help just type "Help"
            `);
            break;

            // In case the message in lowercase is equal to the string '!website', send the sender of that message your personal website
        case '!website':
            client.say(channel, `@${tags.username}, my website is www.section.io!`);
            break;

            // In case the message in lowercase is equal to the string 'greetings', send the sender of that message 'Hello @Username, what's up?!'
        case 'greetings':
            client.say(channel, `Hello @${tags.username}, what's up?!`);
            break;

            // In case the message in lowercase is equal to the string 'hi', send the sender of that message 'Username, hola'
        case 'hi':
            client.say(channel, `${tags.username}, hola!`);
            break;

            // In case the message in lowercase is equal to the string '!name', send the sender of that message the name of the chatbot
        case '!name':
            client.say(channel, `Hello @${tags.username}, my name is ChatBot! Type "help" to continue...`);
            break;

            // In case the message in lowercase is equal to the string 'help', send the sender of that message all the available help and commands
        case 'help':
            client.say(channel, `${tags.username}, Use the following commands to get quick help:
            -> Commands: Get Commands ||
            Help: Get Help ||
            Greetings: Get Greetings ||
            Hi: Get "Hola" ||
            !Website: Get my website ||
            !Name: Get my name ||
            !Upvote first_name second_name: Upvote user first_name second_name ||  Upvote first_name second_name: Upvote user first_name second_name ||
            !Cheer first_name second_name: Cheer first_name second_name || Cheers first_name second_name: Cheer first_name second_name --

            For more help just ping me up!
            `);
            break;


            // In case the message in lowercase is none of the above, check whether it is equal to '!upvote' or '!cheers'
            // these are used to  like certain users' messages or celebrate them due to an achievement

        default:
            // We shall convert the message into a string in which we shall check for its first word
            // and use the others for output
            let mymessage = message.toString();

            // We shall split the input message and check the string before the space if it is equal to '!upvote' or 'upvote'
            if ((mymessage.split(' ')[0]).toLowerCase() === '!upvote' || 'upvote') {

                // You can add some emojis which will appear in the chat using their emoji names
                // For example "PopCorn" or "TwitchLit" (fire emoji)
                // We shall then take the first and second strings after the space and display them together with the username
                // This shall output 'fireEmoji first_name second_name fireEmoji you have been UPVOTED by USERNAME'
                client.say(channel, `TwitchLit @${(mymessage.split(' ')[1] + '_' + mymessage.split(' ')[2])} TwitchLit  you have been UPVOTED by ${ tags.username }`);


                // We shall check if it is !cheer or cheers
                // If so, we shall display beer emojis (HSCheers) and messages
                // The bots output shall be 'beerEmoji first_name second_name beerEmoji you have been UPVOTED by USERNAME'
            } else if ((mymessage.split(' ')[0]).toLowerCase() === '!cheer' || 'cheers') {
                console.log(`HSCheers @${(mymessage.split(' ')[1] + '_' + mymessage.split(' ')[2])} HSCheers you have been UPVOTED by ${ tags.username }`);
            }
            break;
    }
});
You can find the full code in this repository. Just fork or clone it and contribute as necessary.
13. Run it
Run the code using:
npm run start
or
node app.js
Now, it will give outputs as you configure it.
An example is shown below:
john@john:~/Tofa/Projects/Twitch/Twitch-Chatbot-in-Node.js$ node app.js
[02:15] info: Connecting to irc-ws.chat.twitch.tv on port 443..
[02:15] info: Sending authentication to server..
[02:15] info: Connected to server.
[02:15] info: Executing command: JOIN #justusmbuvi
[02:15] info: Joined #justusmbuvi
[02:15] info: [#justusmbuvi] <justusmbuvi>: hi
[02:15] info: [#justusmbuvi] <justusmbuvi>: justusmbuvi, hola!
It will look like this:
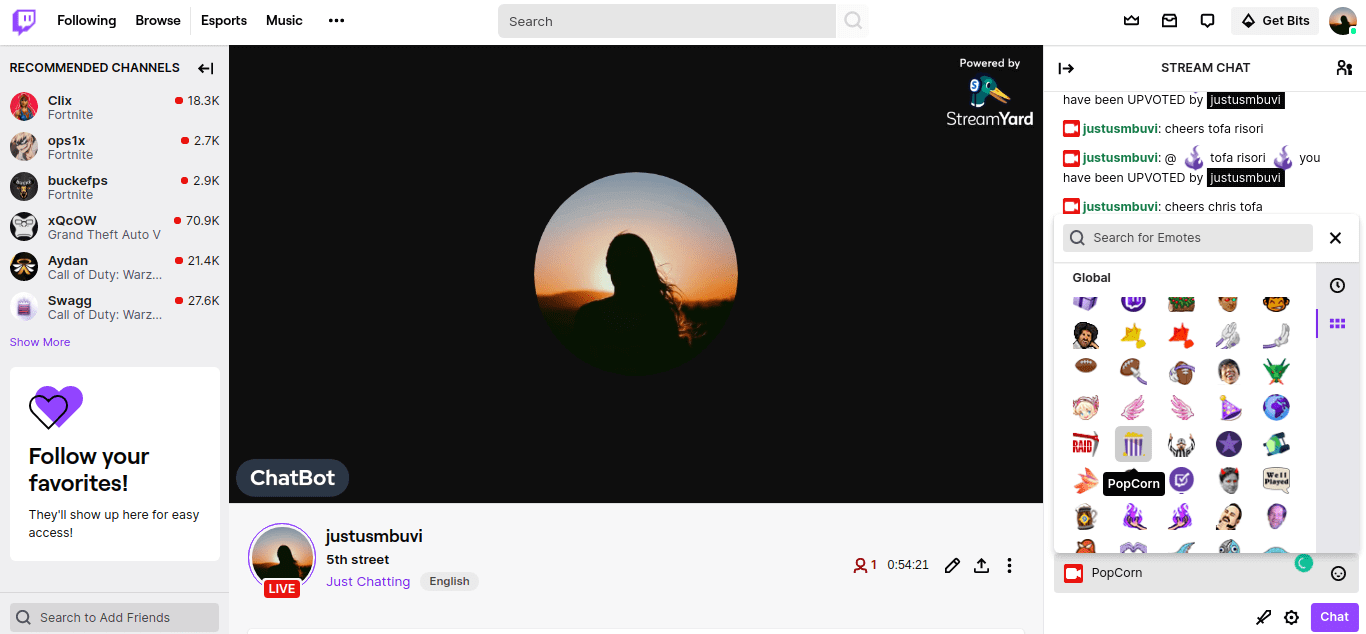
Live demo
14. Further practice
- Try to make the chatbot using other languages and frame which might suit your need.
- Launch your chatbot in remote Node.js servers over on VietMX Blog as shown here in Node.js docs.
- Integrate a local or an online database to store your chats for later viewing and display them on a webpage.
15. Conclusion
Chatbots are crucial to our lives. Though they have numerous advantages, they also have some disadvantages. They continue to surprise us with new inventions and features which mimic and even surpass human intelligence. We hope they will increase beyond human intelligence someday.
Happy coding!