
Reverse image search in the simplest form of explanation is searching for occurrences of an image online using the image to be searched for as the query parameter. We may use this search to locate the source of an image, look for one with a better resolution or get more information about the image.
1. Using the TinEye reverse image search API in Node.js
For example, an online buyer may want to verify the picture of a seller and verify his/her credibility by reverse searching, using the seller’s profile picture or the business’s logo.
1.1. Examples of reverse image search service providers
- TinEye
- Google Images
- Pixsy
In this article, we are going to talk about the TinEye Reverse Image Search and how to consume its API in Node.js. It is a RESTFUL API.
1.2. Prerequisites
To follow this article along, it will be helpful to have the following:
- A basic understanding of Node.js and JavaScript concepts.
- Node.js (NPM) installed in your system.
- Knowledge of the REST API.
1.3. Getting started
We will first install a TinEye library, tineye-api made for Node.js which we’ll use throughout the program.
Run the following command in your terminal:
npm install tineye-api
2. Testing in SandBox
TinEye gives two keys that enables us to test in the sandbox. In the sandbox, we will only search for the image below because it’s the only one allowed to be used for testing.

You can search for other images once you go live.
The following are the keys:
- Public Key:
LCkn,2K7osVwkX95K4Oy - Private Key:
6mm60lsCNIB,FwOWjJqA80QZHh9BMwc-ber4u=t^
We’ll use them in our code.
2.1. Initializing the library
We first include the library then create a variable called api for representing the API, initialize it by feeding in the TinEye REST endpoint URL together with the two keys.
let TinEye = require('tineye-api')
let api = new TinEye('https://api.tineye.com/rest/', <public_key>, <private_key>);
2.2. Performing the search from a URL
TinEye gives the option of searching the image using the image’s URL.
Create a new file called tineye.js and paste this code:
//importing the module
let TinEye = require('tineye-api')
//The public and private keys
let privateKey= '6mm60lsCNIB,FwOWjJqA80QZHh9BMwc-ber4u=t^'
let publicKey = 'LCkn,2K7osVwkX95K4Oy'
//Initializing the api
let api = new TinEye('https://api.tineye.com/rest/', publicKey, privateKey);
//The URL of the image to be searched
let url = "https://tineye.com/images/meloncat.jpg";
//An object containg options for the search
let options = {
  limit: 5,
  sort: "score",
  order: "desc",
};
//using the API
/*feeding the URL and the options for the search
then logging the response and the error
*/
api
  .searchUrl(url, options)
  .then(function (response) {
    console.log(response);
  })
  .catch(function (error) {
    console.log(error);
  });
We first import the library then create two variables, publicKey and privateKey, and initialize them with the keys. We then initialize the API and the URL of the image to be searched.
NOTE: The URL used is for the meloncat image which we’ll use for testing in the sandbox.
In the options object, we pass optional parameters to be used in the search which are:
i. limit – This one specifies the number of result images to be displayed to the user. The default is 100 and to return all images, we initialize it to -1.
ii. sort– The sort criteria in our case we’ll sort by the accuracy score of the image queried against the image returned.
We can only pass in these values:
- score
- size
- crawl_date
iii. order – Used to specify how to return the results using the sort criteria, either asc for ascending or desc for descending.
Finally, we feed the URL and the options for the search to the API then log the response and the error if there is one.
Upon running the code, we get the output shown in the screenshot below:
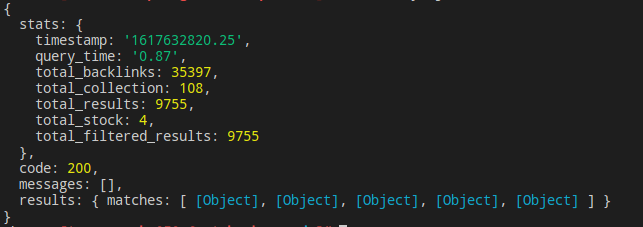
A JSON response is returned containing an object stats which shows the statistics of the search like the time and query time.
What is important for us in the object is the total_results that shows the number of returned images. total_stock shows the total number of stock images, and the total_filtered_results which, as the name suggests are the filtered results.
In the response, we also have an object called results containing an array called matches containing matching images. Ours has 5 because, in the limit option, we set 5.
We can dig further into the results object and see the images returned details.
Update the response code to this and then run the file:
console.log(response.results);
We get the following output:
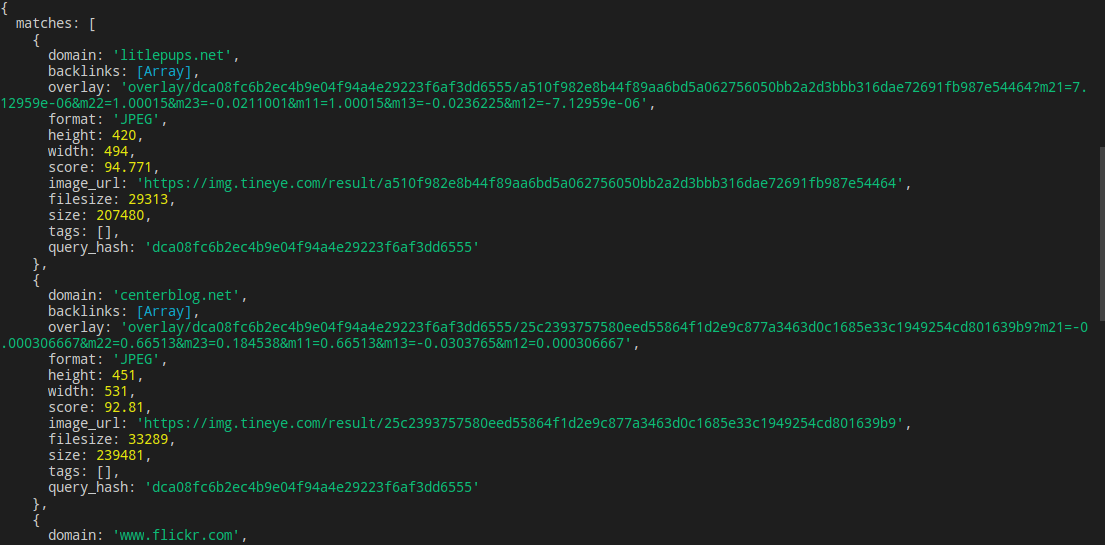
It shows the objects in the matches array in detail e.g the domain found backlinks, overlay, etc. You can use this information to display the images to the end-user.
2.3. Performing the search using a file image
One can also search for the image by uploading it from a local machine or device. The procedure is the same only that we don’t specify a URL.
We feed the image path to the readFileSync() of the file system module.
We then feed the image and the options to the API using the searchData() method.
Again, you will run into an error if you test it in the sandbox. You can only use it when live.
var fs = require('fs');
var img = fs.readFileSync("path_to_the_image");
var params = {
  offset: 0,
  sort: "size",
  order: "asc",
};
api
  .searchData(img, params)
  .then(function (response) {
    console.log(response);
  })
  .catch(function (error) {
    console.log(error);
  });
2.4. Troubleshooting common errors
Common error messages and their fixes can be found here.
2.5. Going live
Going live is a simple straightforward process. Head on to this where you will sign up, get your keys then perform a test search and you will be set to go.
NOTE: To use the API live, you will have to purchase a bundle first. The costs can be found here.
2.6. Further reading
This was just a basic introduction, but the API can be manipulated in various ways.
Follow the link below to learn more.
Have a great one.
Happy coding!