
Table of Contents
A blockchain is an open, digital, and duplicated ledger of transactions. Each new transaction history is recorded and stored in an encrypted way that is very difficult to change or modify. A copy of this recorded information is sent a cross the blockchain network. Thus, making it highly secure.
A cryptocurrency is a digitally secured currency used in most current trade. The use of cryptographic hash has played a major role is securing cryptocurrencies.
This ensures only genuine transactions are recorded and commited. Most cryptocurrencies apply a decentralized principle using blockchain technology.
In this tutorial, we will learn a little about blockchain and decentralization in detail. We will also build a simple cryptocurrency system, called thecoin.
Thecoin is one such implementation of a cryptocurrency that we are going to build in a this article.
1. Prerequisite
To keep this tutorial flowing smoothly, you’ll need to have a good understanding about:
To start with, you must have:
- Node.js installed in your machine.
- A code editor.
2. What is Blockchain?

Bitcoin image
Bitcoin and Ethereum are digital cryptocurrencies powered and adopted with a powerful technology called the blockchain. It uses cryptography to securely connect and maintain a list of records growing continuously known as blocks.

Ethereum image
Blockchain as the name states, are blocks of transaction data growing increasingly to create a chain of transaction occurrences. Valid transaction data is logged into the blockchain network following the peer-to-peer rule laid down by participants.
3. Decentralization
Usually, the data in the databases are centralized. By centralizing, we operate based on only one server. Chances of risk are paramount due to failures of the system. Alternatively, decentralization allows data to be stored everywhere, thus making it faster, more secure and a better way of storing data.
Blockchain stores its information in several locations. Whenever a new block is added to the blockchain, a copy is sent to all computers. This makes it very difficult to tamper with the blockchain, as all computers in the network must agree with the change(s) yet to be made in order for it to take place.
We’ll have a better understanding of blockchain and cryptocurrencies and their operation by the end of this article.
Let’s get into the code. I’ll name my app thecoin.
Create the app named thecoin.js and open it in your code editor.
In the development folder, let’s install the crypto library that we’re going to use, using the command:
npm install --save crypto-js
We’ll use this library to import modules in our project.
I’ll begin by creating a class BlockCypto as shown below:
const SHA256 = require('crypto-js/sha256');
class BlockCypto{
    constructor(index, current_time, info, nextHash=" "){
    this.index = index;
    this.current_time = current_time;
    this.info = info;
    this.nextHash = nextHash;
    this.hash = this.computeHash();
    }
    computeHash(){
        return SHA256(this.info + this.nextHash + this.current_time + JSON.stringify(this.info)).toString();
    }
}
I’ll explain each part of the code here:
I’ve created the class BlockCrytpo for my block and added a constructor just like any other JavaScript class.
In the constructor, we initialize its properties and assign parameters to it, as follows:
crypto-js/sha256: This is the module we’ve imported to calculate the hash of each block. We converted it to string usingtoString()method as the module will return the object.index: This is a distinctive number tracking the index of every block in the blockchain.current_time: As the name states, it keeps a record of the time when each transaction is completed.info: All completed transactions data are recorded and stored by this method.nexthash: It is pointing to the hash_key of the next block in the network chain. It’s mainly used to keep and maintain the integrity of the blockchain.computeHash: Based on properties passed to this method, it is used to calculate the hashkey of the next block in the chain.
4. The blockchain theorem
It is a type of database that stores a collection of data together in groups, with certain capacity of storage. The blocks are connected to the already created blocks, this forms a chain of a data tree.
The chain is irreversible as the system is decentralized. Here, each block is assigned a timestamp when added to the chain.
Now, let’s create a class Blockchain that will maintain this operation:
class Blockchain{
    constructor(){
        this.block1chain = [this.startGenesisBlock()];
    }
    initGenesisBlock(){
        return new BlockCrypto(0, "06/04/2021", "Initial Block in the Chain", "0");
    }
    latestBlock(){
        return this.block1chain[this.block1chain.length - 1];
    }
    addNewBlock(newBlock){
        newBlock.nextHash = this.latestBlock().hash;
        newBlock.hash = newBlock.computeHash();
        this.block1chain.push(newBlock);
    }
}
Let’s understand the code snippet above.
As usual, we have our constructor which instantiates the blockchain.
But this time, we passed it to the initGenesisBlock() method, which initializes the block in the chain. This property refers to an array of blocks in our case.
initGenesisBlock(): This is the first block created in the peer-to-peer network and has not been linked to any other. To our knowledge of indexing it’s at index0.
Notice that, we created it using the previously created
BlockCryptoclass and passed all the parameters as arguments.
latestBlock: As named, we use it for finding the last block added in the chain. As explained earlier, it helps to ensure the hash of the current block and map it to the hash of the previous block to ensure the chain integrity.addNewBlock: A new block is added to the chain using this method. The previous hash block is matched to the current hash block to ensure minimal or no tampering with the chain.
Now that our blockchain is ready to work. We are missing something that is a core blockchain principle, the blockchain integrity.
Let’s see how to verify it and test our app.
5. Verifying blockchain integrity
The main characteristic of a blockchain is that once a block has been added to the network, it can’t be changed without invalidating the entire blockchain integrity.
To perform this, we use digital security or cryptographic hash, which ensures the securing and validation of the blockchain by producing a new hash every time a change is made in the block.
We’ll loop over the entire blockchain to check whether any hash has been tampered with, taking into account the exception of the first block, which is hardcoded.
Besides, this method verifies if the cryptographic-key of each two blocks in series are pointing to one another. If the integrity of the blockchain has been compromised, it returns false; otherwise, in case no anomalies are encountered, it returns true.
We’ll create this method inside the Blockchain class:
checkValidity(){
    // Checking validity
    for(let i = 1; i < this.block1chain.length; i++) {
        const currentBlock = this.block1chain[i];
        const nextBlock= this.blockchain[i-1];
    // Checking current blcok hash

    if(currentBlock.hash !== currentBlock.computeHash()) {
        return false;
    }
    // Comparing current block hash with the next block

    if(currentBlock.nextHash !== nextBlock.hash) {
        return false;
    }
    return true;
}
Now, we can test our app and see the results:
But, before we dive into running the code, let’s create a new instance of the Blockchain class and name it thecoin, and add some blocks in the blockchain using random values.
let thecoin = new Blockchain();

thecoin.addNewBlock(new BlockCrypto(1, "06/04/2021", {sender: "Rabin Yitzack", recipient: "Loyd Eve", quantity: 20}));

thecoin.addNewBlock(new BlockCrypto(2, "07/04/2021", {sender: "Anita Vyona", recipient: "Felix Mush", quantity: 349}));

console.log(JSON.stringify(thecoin, null, 4));
6. Running our blockchain
Typing this command in our terminal node thecoin.js will result in:
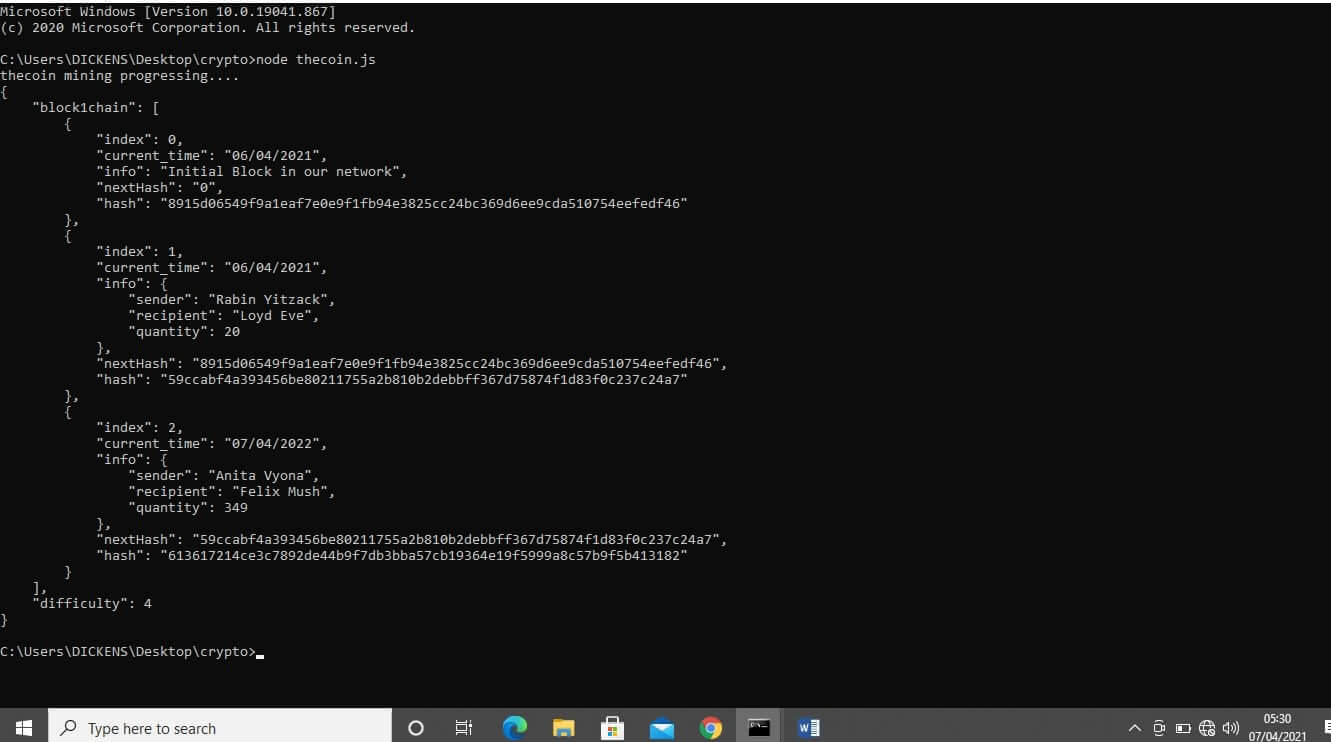
NOTE: Before running the command, make sure to navigate to the right path on your terminal.
Hint: Using the command pwd to check the path.
You can find our full source code here.
7. Conclusion
Kudos!
You have built your own cryptocurrency using Node.js. This step has brought you closer to getting you started on building pro-apps using Node.js, or rather you can just add more features to our simple blockchain and share it with the market.
Nevertheless, I hope that this tutorial has provided you with basic skill proficiency to get you going with the stimulating Node.js development.
Happy coding!