
Table of Contents
In the ever-changing world of frontend and backend frameworks, learning and building RESTful APIs is a demanding skill for any software engineer. Adonis.js allows you to master the skills and knowledge to become a full-stack developer.
1. Introduction
“A RESTful API uses HTTP requests to exchange data between parties using endpoints (routes). These HTTP requests include GET, PUT, POST and DELETE.”
We will be showing you how to create a RESTful API with Adonis.js 5. We will be building an API for a forum. We will cover aspects such as authentication and authorization. The tutorial also covers best practices in structuring and building out your HTTPS endpoint and industry-standard responses.
Adonis.js is the Laravel of JavaScript and a good grasp of it is a high-demand skill. Therefore, learning to build your first REST API with Adonis.js is a game-changer. You can read through the Ultimate Guide to Adonis.js 5 to learn more.
2. Setting up Adonis.js 5
If you’ve been working with JavaScript frameworks before, you should already have Node.js installed on your computer. If not, you can install the latest version by going through the steps here.
Adonis.js needs Node.js >=12.x.x and NPM >=6.x.x, make sure you have the required Node.js by checking the version installed on your computer.
We will assume you have the requirements, so you can go ahead to create a new Adonis.js 5 project by running this command.
npm init adonis-ts-app adonisjs-forum-api
While you run the command, if you are asked to choose a project structure, select API Server and continue by leaving the other options default.
After installing successfully, open the folder with your favorite Text Editor and run the following commands in your terminal.
cd <PROJECT_NAME>
node ace serve --watch
Open your browser and visit the URL presented, if you see hello world.
Congratulations.
3. Creating the database
Now that we have our first Hello World API created, our Forum API is incomplete without a database for storing, reading, and updating data.
Let’s set up our database right away:
You need to create a database with MySQL using any Database Clients of your choice.
To access and manipulate Databases seamlessly, let’s install the LUCID ORM used by Adonis.js with this command.
npm i @adonisjs/lucid@alpha
Then you need to configure it with the database you just created by running the invoke command and following the instructions.
node ace invoke @adonisjs/lucid
When you run the above command, you will be presented with different database options. In this tutorial, we will go with MySQL/MariaDB and then select In the Terminal for the instructions.
Read through the instructions and update your .env file with your database credentials as follows.
    DB_CONNECTION=mysql
    MYSQL_USER= //DB_USER
    MYSQL_HOST=localhost
    MYSQL_DB_NAME= //DB_NAME
    MYSQL_PORT=3306
    MYSQL_PASSWORD= //DB_PASSWORD
If you want to change the databases’ default configurations, you can always go to config/database.ts to configure some credentials.
If you encounter this error Client does not support authentication protocol requested by server; while testing your Forum API, follow these steps to solve it.
npm install mysql2
Then open config/database.ts and update the client field to mysql2.
That’s all.
4. Setting up Authorization and Authentication
In Adonis.js 5, authentication and authorization are very easy to set up. All you need to do is install the Auth package, and every other complicated authentication logic is built-in for you already.
Let’s get started:
Install the Auth package with this command.
npm i @adonisjs/auth@alpha
As always, invoke the Auth package with the invoke command to configure it.
node ace invoke @adonisjs/auth
It will ask you to select the provider, In this case, I picked Lucid and the API Token next since we are building an API.
- Type in the
UserModel for your authentication, - Then press
Ykey to create a migration for it. - Next, choose
Databaseas your provider. - Now press
Yagain to create a migration for theapi_tokens.
Now, you should have two migrations in your database/migrations folder. Update the xxxxx_users.ts file to include a name and any other columns of your choice.
Now add the auth middleware to the kernel.ts file inside start/kernel.ts:
Server.middleware.registerNamed({
  auth: "App/Middleware/Auth",
});
5. Creating migrations
We should create the remaining migrations for the Post and Forum models that will be used later.
Let’s get started.
Create a new migration using this command:
node ace make:migration posts
After running the command, open the new file in database/migrations/xxxx_posts.ts and paste the code below.
import BaseSchema from "@ioc:Adonis/Lucid/Schema";
export default class Posts extends BaseSchema {
  protected tableName = "posts";
  public async up() {
    this.schema.createTable(this.tableName, (table) => {
      table.increments("id");
      table.string("title", 255).notNullable();
      table.string("content", 255).notNullable();
      table.integer("user_id", 180).notNullable();
      table.integer("forum_id").nullable();
      table.timestamps(true);
    });
  }
  public async down() {
    this.schema.dropTable(this.tableName);
  }
}
For now, we are keeping it simple by creating our database schema for posts that will contain the following columns listed in the code without defining any database constraints.
Next, we will create the Forum schema and paste in the following codes too.
node ace make:migration forums
And the following codes.
import BaseSchema from "@ioc:Adonis/Lucid/Schema";
export default class Forums extends BaseSchema {
  protected tableName = "forums";
  public async up() {
    this.schema.createTable(this.tableName, (table) => {
      table.increments("id");
      table.string("title", 255).notNullable();
      table.string("description", 255).notNullable();
      table.integer("user_id", 180).notNullable();
      table.timestamps(true);
    });
  }
  public async down() {
    this.schema.dropTable(this.tableName);
  }
}
We will also keep this one simple by creating our database schema for posts, containing the following columns listed in the code without defining any database constraints.
The public async up and public async down are also two important methods of the BaseSchema object. While the up method is responsible for running migrations and creating database schemas, the down method is also used to drop the created schema/table.
Next, we will run the migrations to generate and create the database tables as specified in the migrations.
To run our migration, we need to stop the server and start it again:
    node ace serve --watch
    // Then
    node ace migration:run
You can set up database seeders to generate fake data or clone my repository since we have configured that already.
Cheers!
6. Creating models
Now, we will create all the models we need for this API and configure them properly to interact with our database.
    node ace make:model Forum
    node ace make:model Post
You can clone my repository to see how we map the columns and configure the relationships.
This is a preview of how the model looks like for a User model:
import { DateTime } from "luxon";
import Post from "App/Models/Post";
import Forum from "App/Models/Forum";
import Hash from "@ioc:Adonis/Core/Hash";
import {
  column,
  beforeSave,
  BaseModel,
  hasMany,
  HasMany,
} from "@ioc:Adonis/Lucid/Orm";
export default class User extends BaseModel {
  @column({ isPrimary: true })
  public id: number;
  @column()
  public email: string;
  @column()
  public name: string;
  @column({ serializeAs: null })
  public password: string;
  @column()
  public rememberMeToken?: string;
  @column.dateTime({ autoCreate: true })
  public createdAt: DateTime;
  @column.dateTime({ autoCreate: true, autoUpdate: true })
  public updatedAt: DateTime;
  @hasMany(() => Post)
  public posts: HasMany<typeof Post>;
  @hasMany(() => Forum)
  public forums: HasMany<typeof Forum>;
  @beforeSave()
  public static async hashPassword(user: User) {
    if (user.$dirty.password) {
      user.password = await Hash.make(user.password);
    }
  }
}
The above code creates the Post or Forum models, respectively, with the different columns mapped using the columns decorator. It also specifies the datatypes for each column.
Many other decorators such as hasMany for a one-to-many database relationship are defined on the model.
7. Creating controllers
In this step, we are going to create controllers for the above Models. Before that, let’s create an AuthController for the authentication.
node ace make:controller Auth
Open the file in app/Controllers/Http/AuthController.ts and paste the code below.
import { HttpContextContract } from "@ioc:Adonis/Core/HttpContext";
import User from "App/Models/User";

export default class AuthController {
  public async login({ request, auth }: HttpContextContract) {
    const email = request.input("email");
    const password = request.input("password");
    const token = await auth.use("api").attempt(email, password, {
      expiresIn: "10 days",
    });
    return token.toJSON();
  }
  public async register({ request, auth }: HttpContextContract) {
    const email = request.input("email");
    const password = request.input("password");
    const name = request.input("name");
    const newUser = new User();
    newUser.email = email;
    newUser.password = password;
    newUser.name = name;
    await newUser.save();
    const token = await auth.use("api").login(newUser, {
      expiresIn: "10 days",
    });
    return token.toJSON();
  }
}
The code above simply registers and logins a user without any complex validations and error handling. So, it is easy to understand.
Next, let’s create all the controllers for our API at once:
    node ace make:controller Post
    node ace make:controller Forum
Open the PostsController.ts file, which is inside the app/Controllers/Http folder, and add the code below.
    import { HttpContextContract } from "@ioc:Adonis/Core/HttpContext";
    import Post from "App/Models/Post";
    export default class PostsController {
         public async index({ request}: HttpContextContract)
        {
            const posts = await Post.query().preload('user').preload('forum');
            return posts
        }
        public async show({ request, params}: HttpContextContract)
        {
            try {
                const post = await Post.find(params.id);
                if(post){
                    await post.preload('user')
                    await post.preload('forum');
                    return post
                }
            } catch (error) {
                console.log(error)
            }

        }

        public async update({ auth, request, params}: HttpContextContract)
        {
            const post = await Post.find(params.id);
            if (post) {
                post.title = request.input('title');
                post.content = request.input('content');
                if (await post.save()) {
                    await post.preload('user')
                    await post.preload('forum')
                    return post
                }
                return; // 422
            }
            return; // 401
        }

        public async store({ auth request, response}: HttpContextContract)
        {
            const user = await auth.authenticate();
            const post = new Post();
            post.title = request.input('title');
            post.content = request.input('content');
            post.forumId = request.input('forum');
            await user.related('posts').save(post)
            return post
        }
        public async destroy({response, auth, request, params}: HttpContextContract)
        {
           const user = await auth.authenticate();
           const post = await Post.query().where('user_id', user.id).where('id', params.id).delete();
           return response.redirect('/dashboard');
        }
    }
The code above represents the CRUD functionalities for our API for the Post model. It contains different methods for the business logic of our app, such as deleting (destroy), updating (update), storing (store), and retrieving (index) Posts in the database.
You can clone the repository to review the other controllers that I have created.
8. Creating endpoint routes
The next step is to create the endpoints for our frontend or mobile App to consume.
To do that, open the route.ts file inside the start folder and add the following code.
//......
Route.group(() => {
  Route.post("register", "AuthController.register");
  Route.post("login", "AuthController.login");
  Route.group(() => {
    Route.resource("posts", "PostsController").apiOnly();
    Route.resource("forums", "ForumsController").apiOnly();
    Route.get("users/forums", "UsersController.forumsByUser");
    Route.get("users/posts", "UsersController.postsByUser");
  }).middleware("auth:api");
}).prefix("api");

//......
The above code creates our Routes for different endpoints that can access our forum app. The Route.group puts a list of routes into a single group with a single prefix. The middleware adds a script that will be executed before the request passes to the controller.
So far, we have created different endpoints for our Forum API.
Note that the
resourcemethod creates all the CRUD endpoints we need for our Forum API. You can learn more about it here.
9. Testing the forum API
When testing your endpoint using any HTTP clients, such as Hoppscotch, you might face the error Cannot find module 'phc-argon2'.
To resolve it, please run this command to install the package.
npm install phc-argon2
If we test the posts endpoint without authentication, we will face this error.
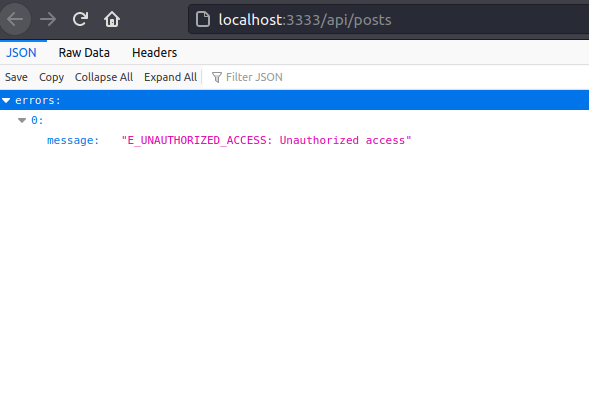
The error is eliminated if we login using the /api/login or register via the /api/register endpoint to retrieve our API Token.
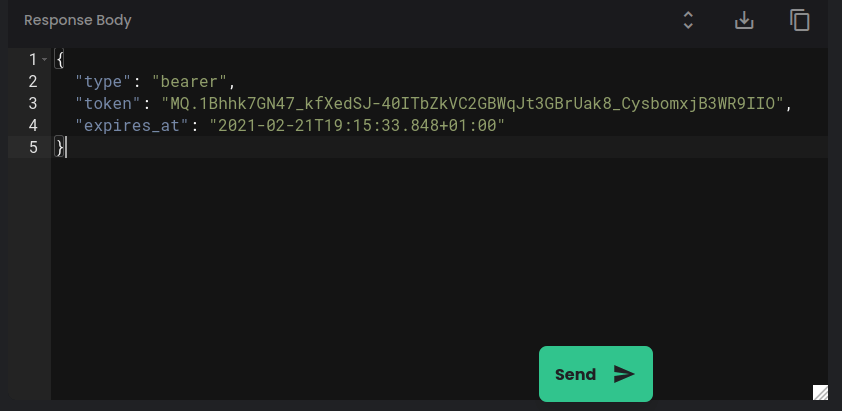
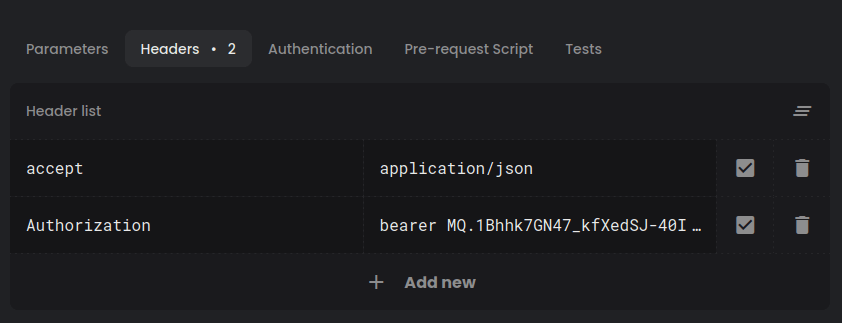
We can access the protected endpoints after inserting the token as the Authorization header value.
Follow the following video to test the API.https://giphy.com/embed/3vT9lvfexLNlKlmLkE
10. Conclusion
In this article, we covered how to build a RESTful API in Adonis.js 5. We created a simple Forum API with authentication and authorization.
You can clone the repository here.
You can now use these skills to create more productive and appealing applications.
Happy coding!