
Table of Contents
When developing web applications, you might need to render the HTML components inside your server. This will help create interactive pages on the client side once a request to access these pages is made.
There are various ways of hosting your HTML pages (website), for example:
- Rendering your client-side on its own using frameworks for such as React or,
- Rend the pages directly from the server. When the browser access a route specified in your server, the server will load these HTML pages upon users’ requests.
This guide explains how to render HTML elements and HTML pages on your server using Node.js.
1. Prerequisites
Basic knowledge of using Node.js and Express.js will be helpful to follow along.
2. Setting up
- Download Node.js and install it. Run
node -vto test if the installation was successful.
$ node -v
v12.18.3 ## installed Node.js version
- Once Node.js is successfully installed, NPM will be installed along. Run
npm -vto confirm if indeed one installed NPM.
$ npm -v
7.6.3 ## installed npm version
Check this guide to learn more about using NPM.
- Create a Node.js project directory and initialize the project within this directory. Use
npm init -yto automatically initialize this Node.js project. - Install the Express.js framework using
npm install express. Check this guide to learn more about of Express.js. - We will create a server using Express.js. It is important to hook the server with Nodemon. Nodemon is an optional package (installed globally) which automatically restarts the server after saving server-side code changes. Go ahead and install Nodemon using
npm install -g nodemon. Check this guide to learn more about Nodemon.
3. Rendering inline HTML elements as HTTP responses
Below is a simple hello world HTTP server (app.js) listening on port 3000.
File name: app.js
const express = require("express");
const app = express();

app.listen(3000, () => {
  console.log("Application started and Listening on port 3000");
});

app.get("/", (req, res) => {
  res.send("Hello world!");
});
Run
nodemonto start the server.
Whenever the server is running, and accessing the route http://localhost:3000/, it will output the plain text hello world!.
We can use the same server to render HTML elements as the server response instead of sending plain text.
Here is a list of some HTML elements. We can render them directly into our server by specifying the response to send when the default route is accessed.
const express = require("express");
const app = express();

app.listen(3000, () => {
  console.log("Application started and Listening on port 3000");
});

app.get("/", (req, res) => {
  res.send("<html> <head>server Response</head><body><h1> This page was render direcly from the server <p>Hello there welcome to my website</p></h1></body></html>");
});
Restart the server and open the route http://localhost:3000/ on the browser.

res.send is sending individual bits of HTML data to the server, but if we want to send an entire web page such as an index.html, we have to use something different.
4. Render HTML web pages as server responses
The method above can be very tiresome and may not be the type of code you want to write inside your server. In a normal web page, HTML elements are written in a .html file.
This makes it easier to write all your HTML elements, including CSS styling, to layout these elements. Thus separating the server files and the HTML elements, creating a clean code setup.
To render an HTML file into the server using Express.js, we use res.sendFile(). This reads and renders the data included in one’s HTML files.
This transfers the file to the browser upon a GET request to the server. The server submits a response status with HTML rendered web content as the message body.
Here is the res.sendFile() syntax.
res.sendFile(path [, options] [, fn])
The path specifies the location of the HTML file. It takes an array of the file name such as index.html. In some cases, primarily when the server is hosted on the cloud (when the server is not hosted locally on your computer), we use __dirname instead of the relative file path.
When the server is online, you might have no idea of your HTML file location. __dirname will return the current file path no matter where it is hosted inside your project folders.
Let’s demonstrate how __dirname works with a simple example that console.log(__dirname).
const express = require("express");
const app = express();

app.listen(3000, () => {
  console.log("Application started and Listening on port 3000");
});

app.get("/", (req, res) => {
  console.log(__dirname)
});
Open the route http://localhost:3000/ on the browser. This will print the values of __dirname into the console.

As you can see, it prints the exact path to reach your server location.
Now we can send HTML files to the server using __dirname.
To start, create an HTML form (index.html) and include some CSS styling (app.css), as shown below.
File name: index.html
<!DOCTYPE html>
<html lang="en">
<head>
  <meta charset="UTF-8">
  <meta name="viewport" content="width=device-width, initial-scale=1.0">
  <link rel="stylesheet" href="app.css">
  <link rel="stylesheet"
  href="//netdna.bootstrapcdn.com/twitter-bootstrap/2.3.2/css/bootstrap-combined.no-icons.min.css">
  <title>html form</title>
</head>
<body>
<div class="subscribe-container">
  <form method="POST">
    <input type="email" name="youremail" placeholder="Email Address" required>
    <input type="text" name="yourname" placeholder="Name" required>
    <input class="subscribe-button" type="submit" value="Subscribe">
  </form>
</div>
</body>
</html>
File name: app.css
.subscribe-container {
    max-width: 800px;
    margin: 60px auto;
    background-color: rgba(130, 184, 219, 0.5);
    border: 5px solid rgb(98, 143, 228);
}
.subscribe-container form {
    display: flex;
    flex-wrap: wrap;
}
.subscribe-container form input {
    margin: 15px;
    border: 1px solid rgb(98, 143, 228);
    padding: 0.4rem;
}
.subscribe-container form input {
    flex: 1 1 200px;
}

.subscribe-container form input[type="submit"] {
    border-radius: 3px;
    background-color: rgba(17, 228, 10, 0.5);
color: rgb(98, 143, 228);
}

.subscribe-container form input[type="email"] {
    flex: 1 1 250px;
}
Let’s render the file into the server.
const express = require("express");
const app = express();

app.listen(3000, () => {
  console.log("Application started and Listening on port 3000");
});

app.get("/", (req, res) => {
  res.sendFile(__dirname + "/index.html");
});

However, this did not load the CSS styling. app.css is a static file. To load the static server files included in the index.html use express.static as shown in the example below:
const express = require("express");
const app = express();

app.listen(3000, () => {
  console.log("Application started and Listening on port 3000");
});

// serve your css as static
app.use(express.static(__dirname));

app.get("/", (req, res) => {
  res.sendFile(__dirname + "/index.html");
});
Save the file and open http://localhost:3000/ in the browser, and the server will send a web page as expected.
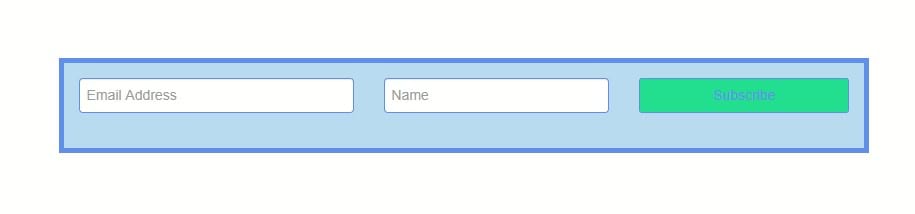
5. Parsing form data to the server using the HTML forms
The server is running. It is now returning HTML form as a response to the client (browser). Whenever this server’s route is accessed, the GET request will be executed from the browser. However, what would happen if you fill this form with the data and press the button subscribe?
Let’s try that out. This outputs the results below, an error returned by the server.
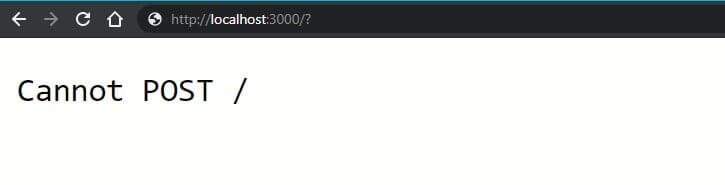
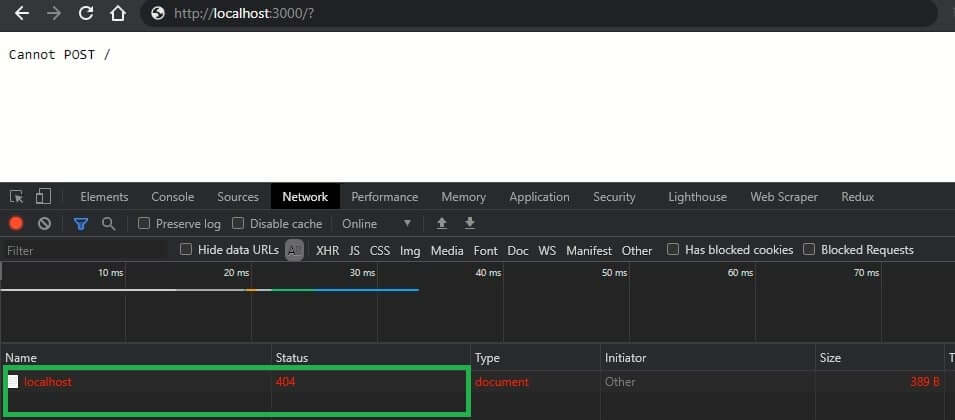
Reload the page again. Open the browser inspector tool and head to the Network tab. Fill in the form data and click the subscribe button. This will return a 404 status code. This means the client cannot send/POST data to the server.
The HTML form we have created has a POST method. This means we are sending a POST request to the server.
Our server does not have a way of processing any POST requests from the client. The server does not give the client POST permission from this route.
We can fix this by adding a POST method to the route. This will handle any POST requests that come from this route.
const express = require("express");
const app = express();

app.listen(3000, () => {
  console.log("Application started and Listening on port 3000");
});

// server your css as static
app.use(express.static(__dirname));

app.get("/", (req, res) => {
  res.sendFile(__dirname + "/index.html");
});

app.post("/", (req, res) => {
  res.send("Thank you for subscribing");
});
When you click the subscribe button, a Thank you for subscribing message will be printed on the browser. Moreover, the browser will return a 200 code upon checking the inspector network, which is okay. The client has POST permissions and can send a POST request to the server.

Everything is working great. Nevertheless, we need the server to get the form data and send the relevant results to the browser instead of sending some relative plain text such as Thank you for subscribing.
To interact with the form data, we need a body-parser package. Go ahead and install this package using npm install body-parser. Body-parser helps parse incoming request bodies in a middleware before your handlers, available under the req.body property.
Import the package using the require() function and get the server to use it via app.use.
Body-parser has a few modes such as:
bodyParser.text– pass all the requests into text.bodyParser.json– parse data into JSON format.bodyParser.urlencoded– commonly used when getting data posted from HTML forms.
In this example, we will use the bodyParser.urlencoded format to interact with the form data.
Body-parser goes into any of your routes using req.body and gets a parsed version of HTTP requests made to the server.
With the body-parser, we can access this form data and interact with it. Let try to console log req.body to get a grip of a parsed HTTP request:
const express = require("express");
const bodyParser = require("body-parser");
const app = express();

app.listen(3000, () => {
  console.log("Application started and Listening on port 3000");
});

// server css as static
app.use(express.static(__dirname));

// get our app to use body parser
app.use(bodyParser.urlencoded({ extended: true }))

app.get("/", (req, res) => {
  res.sendFile(__dirname + "/index.html");
});

app.post("/", (req, res) => {
  console.log(req.body)
});
Open http://localhost:3000/. Fill in the form inputs and click the subscribe button. Check your console.

This form data is readily available, and we can now instruct the server what to do with it.
const express = require("express");
const bodyParser = require("body-parser");
const app = express();
app.listen(3000, () => {
console.log("Application started and Listening on port 3000");
});
// server css as static
app.use(express.static(__dirname));
// get our app to use body parser
app.use(bodyParser.urlencoded({ extended: true }))
app.get("/", (req, res) => {
res.sendFile(__dirname + "/index.html");
});
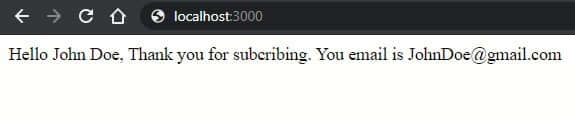
app.post("/", (req, res) => {
var subName = req.body.yourname
var subEmail = req.body.youremail;
res.send("Hello " + subName + ", Thank you for subcribing. You email is " + subEmail);
});
Fill in the form inputs and click the subscribe button.
NOTE: The information stored in variables
subNameandsubEmailcorrespond toyournameandyouremailrespectively.yournameandyournamenaming comes from thename attributeof your HTML form inputs. This way, you can use the form data and decide what happens to each of the inputs as if they were just properties of the object body.
6. Conclusion
I hope this guide helped you understand how to render HTML data into your server using Express.js.
Template engines such as pug and ejs can also be used to render dynamic HTML data into the server. They both compile down HTML using backed technologies such as Express.js.
Happy coding.