Table of Contents
A linter is a computer program that analyzes and checks source code. It flags programming errors, indentation errors, formatting errors, bugs, and suspicious constructs.
1. Introduction to Linting
Linters are tools that perform static code analysis in software testing.
Static Code Analysis is the analysis of computer software that is performed on static code. It is performed by looking at source code without running it. This process is usually done using a software or an automated tool. Static Code Analysis is done as a part of the programming phase in a typical software engineering workflow.
Linters scan source code and flag code blocks that violate rules. These rules can be aesthetic styling rules, syntactic rules, etc… Linters provide options to define rules or import style guides through a config file.
2. Advantages of a Linter
- Linters catch mistakes while writing code.
- They stop mistakes from happening earlier and reduce time used by debugging.
- It reduces costs since critical errors are caught before deployment.
- Helps enforce a style guide across a project, to keep code consistent. This is done by the use of a config file.
- Code reviews are sped up, since basic issues are fixed by the linter.
3. ESLint and Node.js
Let us now set up ESLint with Node.js to improve code quality in our projects.
First, initialize a Node.js project.
npm init
Now, install the eslint npm package.
npm i --save-dev eslint
In order to initialize an ESLint configuration, let us run the command.
./node_modules/.bin/eslint --init
This will bring up the ESLint initial setup. The program gives us choices to set up an initial configuration.
- How would you like to use ESLint? – To check syntax, find problems and enforce code style
- What type of modules does your project use? – JavaScript Modules (import/export)
- Which framework does your project use? – None of these
- Does your project use TypeScript? – No
- Where does your code run? – Node.js
- Would you like to use a style guide for your project? – Use a popular style guide. (Select the Google Style Guide)
- What format do you want your config file to be in? – JSON
ESLint is installed as a developer dependency. Now, let us check the working of ESLint. Create a file called index.js, and enter the following code.
const express = require("express")
The code above is analyzed by ESLint and throws the following errors.

This error is because it isn’t good practice to declare and assign a variable and not use it.

The Google Style Guide recommends the use of single quotes.

It is good practice to use semi-colons at the end of a line.
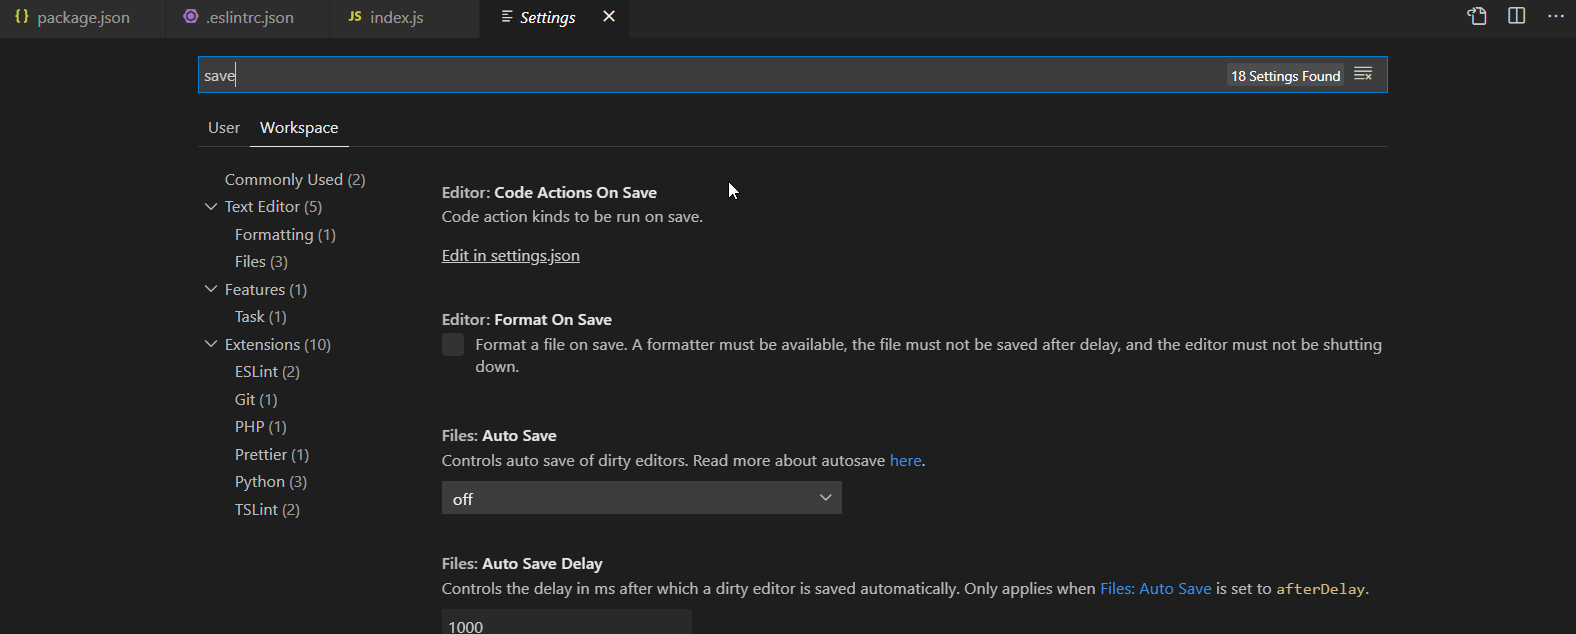
Now, to fix the errors we can set up ESLint to automatically fix errors when we save the file. In Visual Studio Code, go to Settings -> Workspace and search for save

There will be an option, Editor: Code Actions on Save. Click on Edit in settings.json and enter the following config.
{
    "editor.codeActionsOnSave": {
      "source.fixAll.eslint": true
    },
    "eslint.validate": ["javascript"]
}
Save the file and you’re good to go! Whenever we click on save, ESLint will automatically fix the errors in our project.
4. Airbnb Style Guide
A style guide defines rules and conventions on how code should be written and organized. Style guides help to maintain a common standard for writing code in projects.
The Airbnb JavaScript Style Guide is a set of standards launched by Airbnb. It is based on the standards prevalent in JavaScript with some modifications.
To install the latest Airbnb style guide in ESLint,
npx install-peerdeps --dev eslint-config-airbnb
This installs the config as a peer dependency.
Now, we should extend the style guide in our ESLint Configuration. In .eslintrc.json,
{
    "extends": [
        "airbnb"
    ],
 }
You project will be analyzed according to the Airbnb Style Guide.
5. Further Reading
- NPM – Airbnb ESLint
- ESLint Basic Configuration – Medium
- ESLint Configuration – Docs
- ESLint Rules and Options

