
Table of Contents
Assume you have an app running in a production environment with millions of daily users that earns thousands of dollars. There are a variety of reasons why an application could have a bug, and as a developer, you need to find out why and fix it. No one wants to use an app that’s buggy and fixing errors can cost time and money.
How could you solve that problem? Perhaps by going back to the code and to check if every line of code runs as expected. This is easier with a small application, but even then, trying to trigger the same kind of error as a user can be difficult. Imagine how hard this would be in a large application.
Suppose there is an instance where the app collects some user’s information and saves them into a database.
If the application fails, the server will return a system error to the end user. It would be best if you caught these instances and solved these errors. In such a case, how would you know that user a or user b ran into an individual system error? These errors can be triggered by a bug in the code, corrupt files, bad logic, or data type mismatch.
If you need to avoid such frustrations, you cannot avoid logging. A log is the first place to look as a programmer, to track down errors and flow of events, especially from a server. A log tells you what happens when an app is running and interacting with your users. A great use case for logging would be if, for example, you have a bug in your system, and you want to understand the steps that led up to its occurrence.
Logging is a process of recording information generated by application activities into log files. Messages saved in the log file are called logs. A log is a single instance recorded in the log file.
Structuring application logging in Node.js is critical. When running an app locally, you can hook it to a debugger, which is excellent, to find problems when running the app. During development, you would typically use console.log to get the application logs.
But when an application goes to production and the user starts interacting with it, you can’t console.log any more. If something went wrong and the app crashed, you cannot check that with the console. It would help if you had a concise, clean, and quality logging middleware such as Winston.
Winston processes your app activities and generate useful information into a log file or a database. Afterwards, you can check all activities generated by your application.
This guide will explain logging within the context of Winston.
1. Why bother with logging
- The only way to know if something went wrong on the production app is to create logs. Log recreate and save that issue for you. If something is wrong or something is not working, the log will tell you.
- To know how the system is behaving. Logging will generate information on how the system interacts with the users and what comes in and out of the system.
- Keep track of your system activities. Logs go to the extent of showing when an instance happened and what triggered the log.
Generally, the critical values of logging are:
- Error tracking.
- Debugging.
- Application performance.
2. Why choose Winston for logging
Winston, is one of the best logging middlewares, has about 4,000,000 weekly downloads. The following properties make Winston an overall universal logging middleware.
- It’s simple to use and is configurable.
- Log levels (priorities). Winston provides logging levels. They indicate the log priority; this gives you the ability to sort out critical logs from logs requiring less attention. For example:
{error: 0, warn: 1, info: 2, verbose: 3, debug: 4, silly: 5}. In this case, anerrorlog is given priority over averboselog. - Logging channels (transports). A good logger has a different way of choosing your log output destination. With Winston, you can send and save logs in different ways, such as files, databases, emails, and console.
- Log formats. Winston provides you with several log formats. For example, when saving a log to a Mongo database, the log format needs to be in JSON format. Winston solves that for you.
- Log profiling. Winston helps you profile a block of code and measure the time the code takes to be successfully executed.
3. Using Winston
To get started, make sure you initialize a Node.js project using npm init -y. Here’s a guide that will help you understand NPM in detail.
Install the Winston package using the command npm install winston.
Logging with Winston is simple, with just four steps, as shown in the example below, and you have your log recorded.
- Add the Winston module with a
require()function.
const winston = require('winston');
- Creating Winston configuration object. Winston requires at least one transport to create a log. A transport is where the log is saved.
const logConfiguration = {
    'transports': [
        new winston.transports.Console()
    ]
};
- Creating a logger and pass it to the Winston configuration object.
const logger = winston.createLogger(logConfiguration);
- Log your message.
// Log a message
logger.log({
// Message to be logged
    message: 'Hello, Winston!',

// Level of the message logging
    level: 'info'
});
// Log a message
logger.info('Hello, Winston!');
The above example shows you how to log to the console. Add the code blocks to a file (logger.js). Run node logger.js, and the following logs will be shown on your console.
{"message":"Hello, Winston logger a warning!","level":"warn"}
{"message":"Hello, Winston logged an error!","level":"error"}
4. Winston transporters
One of the properties of Winston is that it supports various transports such as file transport. This will save a generated log message to a log file. The file is specified within your system. If the application creates its first log instance, the file will automatically be generated. Afterwards, any log will be saved to the created file.
To do this, the logger configuration object needs to point to a file (file transporter). Simply by replacing the transport configuration object .transports.Console() in new winston.transports.File with .transports.File() as shown below.
transports.File({
    filename: 'logs/example.log'
})
This specifies that any log generated will be saved under the log folder into the example.log file.
The transport configuration will be:
// Logger configuration
const logConfiguration = {
    'transports': [
        new winston.transports.File({
            filename: 'logs/example.log'
        })
    ]
};
Go to the example.log file in the logs folder to view the log.

Winston allows you to implement multiple logging transports, i.e., a log can be recorded to a file, console, or database.
The Logger configuration below logs to a console and a file. We’ll add a transport array to the log configuration object. Later in this guide, we’ll show you how to log and record the log instances to a database.
const logConfiguration = {
    transports: [
        new winston.transports.Console({
            level: 'warn'
        }),
        new winston.transports.File({
            level: 'error',
            // Create the log directory if it does not exist
            filename: 'logs/example.log'
        })
    ]
};

const logger = winston.createLogger(logConfiguration);

// Log some messages
logger.error("Hello, Winston logger, the first error!");
logger.warn("Hello, Winston logger, the first warning!");
logger.warn("Hello, Winston logger, the second warning!");
logger.error("Hello, Winston logger, the second error!");
logger.info("Hello, Winston logger, some info!");
logger.debug("Hello, Winston logger, a debug!");
This specifies that:
- Logs will be shown in the console output.
- Only the log that falls under level
errorwill be recorded in theexample.logfile.
With Winston, you can specify the default format to save your logs.
For example, let’s say we want to log in JSON format we can specify that with Winston.format, and log instances will be saved in JSON format.
format: winston.format(
)
The format takes additional log form properties such as
ms()– time in milliseconds since the last log was recorded.label()– adds a label to the logged message.timestamp()– the time stamp the log message was received.splat()– provides string interpolation.
To apply this in your logs, you need to use format.combine, as shown in the example below.
const logConfiguration = {
    transports: [
        new winston.transports.Console()
    ],
    format: winston.format.combine(
        winston.format.label({
            label: `Label🏷️`
        }),
        winston.format.timestamp({
           format: 'MMM-DD-YYYY HH:mm:ss'
       }),
        winston.format.printf(info => `${info.level}: ${info.label}: ${[info.timestamp]}: ${info.message}`),
    )
};

const logger = winston.createLogger(logConfiguration);

// Log a message
logger.info("Hello, Winston logger, some info!");
Output:
info: Label🏷️: Nov-18-2020 08:10:44: Hello, Winston logger, some info!
5. Configuring Winston with a server
Let’s create a simple Express server that we can do some logging using Winston. This will be a small project to get you on your feet using Winston to record logs from server requests and responses.
Go ahead and install the Express library with npm install express.
This is the structure of our small project:
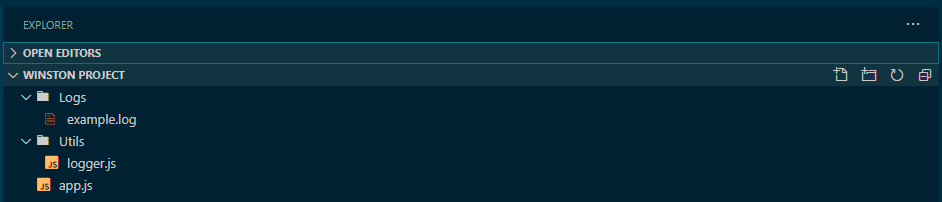
- 📂Logs – will save the log files generated by the Winston file transport.
app.js🗄️ – will be our server app.- 📂Utils – will hold Winston
logger.js🗄️ where we will add configurations such as Winston transport and formatting.
Logger.js:
const { createLogger, format, transports } = require('winston');

module.exports = createLogger({
transports:
    new transports.File({
    filename: 'logs/server.log',
    format:format.combine(
        format.timestamp({format: 'MMM-DD-YYYY HH:mm:ss'}),
        format.align(),
        format.printf(info => `${info.level}: ${[info.timestamp]}: ${info.message}`),
    )}),
});
Will do some logging from an Express server that listens to port 3000.
App.js:
const express = require('express');

// Require logger.js
const logger = require('./utils/logger');
const app = express();
const port = 3000;
const host = "localhost";

// Dummy Express GET call
app.get('/',(req,res) => {
    res.send("Hello World!");
    logger.info("Server Sent A Hello World!");
})

// Introduce error by using undefined variable 'y'
app.get('/calc',(req,res) => {
    const x = y + 10;
    res.send(x.toString());
})

// Capture 500 errors
app.use((err,req,res,next) => {
res.status(500).send('Could not perform the calculation!');
   logger.error(`${err.status || 500} - ${res.statusMessage} - ${err.message} - ${req.originalUrl} - ${req.method} - ${req.ip}`);
})

// Capture 404 erors
app.use((req,res,next) => {
    res.status(404).send("PAGE NOT FOUND");
    logger.error(`400 || ${res.statusMessage} - ${req.originalUrl} - ${req.method} - ${req.ip}`);
})
// Run the server
app.listen(port, () => {
    console.log("Server started...");
    logger.info(`Server started and running on http://${host}:${port}`)
})
Run node app.js to start the server.
From the above example:
- Every time the server starts, Winston will record a log to the
server.logfile.
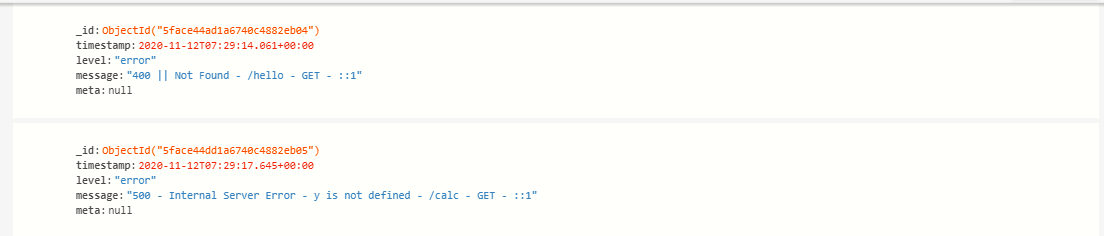
When the server is running, accessing the following pages will create a log every time the link is invoked.
- http://localhost:3000/ – the server will send a hello world message. We want Winston to capture that and record it in our log file.
- http://localhost:3000/calc – we’re trying to add variable
yto variablex. In this case, variableyis not defined. This will generate an error, and we want Winston to capture this instance for us. - http://localhost:3000/hello – the server we have created has no such URL. We want Winston to inform us when a link that points to our IP address is accessed but can’t be found; that is a
404error.
Go to the server.log file in the logs folder to view the log.
Output:
info: Nov-12-2020 10:07:59: 	Server started and running on http://localhost:3000
info: Nov-12-2020 10:08:02: 	Server Sent A Hello World!
error: Nov-12-2020 10:08:05: 	500 - Internal Server Error - y is not defined - /calc - GET - ::1
error: Nov-12-2020 10:08:10: 	400 || Not Found - /hello - GET - ::1
Like we said earlier, Winston is well suited to configure different log destinations. In our small app, let’s create another transport. This time, I want to save the logs to a database, MongoDB to be concise. On the logger.js file, replicate the following code block. Make sure you install Winston MongoDB, i.e., npm install winston-mongodb.
How to use MongoDB?
- Download and Install the MongoDB Community Server.
- Navigate to your environment variables (for Windows users), under user variables, select Path → Edit → New, add
C:\Program Files\MongoDB\Server\4.4\bin(4.4may vary depending on the MongoDB version installed on your computer). - Open a command prompt and type
mongo. This checks if you have successfully installed MongoDB.MongoDB shell versionwill be printed on your terminal, meaning your installation was successful. - Enter
use logsto create databaselogs. - Enter
db.createCollection("server_logs")to create a collection.
If you are new to MongoDB, here’s a guide that will help you get started.
Replicate the following code blocks into the logger.js file.
const { createLogger, format, transports } = require('winston');

// Import mongodb
require('winston-mongodb');

module.exports = createLogger({
transports:[

// File transport
    new transports.File({
    filename: 'logs/server.log',
    format:format.combine(
        format.timestamp({format: 'MMM-DD-YYYY HH:mm:ss'}),
        format.align(),
        format.printf(info => `${info.level}: ${[info.timestamp]}: ${info.message}`),
)}),

// MongoDB transport
    new transports.MongoDB({
        level: 'error',
        //mongo database connection link
        db : 'mongodb://localhost:27017/logs',
        options: {
            useUnifiedTopology: true
        },
        // A collection to save json formatted logs
        collection: 'server_logs',
        format: format.combine(
        format.timestamp(),
        // Convert logs to a json format
        format.json())
    })]
});
Run node app.js to start the server and access the following URLs to trigger server responses and requests.
- http://localhost:3000/
- http://localhost:3000/calc
- http://localhost:3000/hello
Logs will be recorded into the server.log file. Open server.log to view the recorded logs.
Any error logs will be recorded in a MongoDB database.
Enter db.server_logs.find() to view the logs.
Note: MongoDB transport takes a JSON format. To save these logs in a Mongo database, we need to convert them to a JSON format. It’s the only format to insert a record into a Mongo database collection.
6. Creating a custom logger
We have discussed how to use the default Winston logger to generate app logs. Winston allows you to create custom loggers. This gives you the power to control and customize specific loggers based on your application services.
For example:
const { createLogger, format, transports, config } = require('winston');

const usersLogger = createLogger({

   levels: config.syslog.levels,
   format: combine(
       timestamp({
            format: 'YYYY-MM-DD HH:mm:ss'
}),

   transports: [
        new transports.File({ filename: 'users.log' })
     ]
});
const transactionLogger = createLogger({
   transports: [
        new transports.File({ filename: 'transaction.log' })
     ]
});

module.exports = {
    usersLogger: usersLogger,
    transactionLogger: transactionLogger
};
In the example above, the application has two services, users and transactions. Creating different loggers for such services will be relevant. These distinguish an issue for various application services.
For example, assuming a user.js file that processes user services’ properties, the following example will apply for a simple log.
// Require logger.js
const {usersLogger, transactionLogger} = require('./logger');

...........// Your users' code setups.................

// What to record to users.log
usersLogger.info('New user created');
usersLogger.error(`Unable to find user: ${err}`);
In an actual application, we can create the following logs when a new user is created or when a new transaction takes place in the system. The attributes will be extracted and recorded in the log file.
User.js:
// Require logger.js
const {usersLogger, transactionLogger} = require('./logger');
...........// Your users' code setups.................
usersLogger.info('User created!',
     {user_id: `${res._id}`,
     user_name: `${res.name}`,
     user_email: `${res.email}`,
);
usersLogger.error(`Unable to find user: ${err}`);
Transaction.js:
// Require logger.js
const {usersLogger, transactionLogger} = require('./logger');

...........// Your Transaction' code setups.................

// Transaction logs
transactionLogger.info('Session connected', { session_id: `${req.id}`}, {user_id: `${res._id}`);
transactionLogger.info('Transaction Initiated', { transaction_id: `${req.transaction_id}`}, {user_id: `${res.user_id}`);
transactionLogger.info('Transaction completed',  {user_id: `${res.user_id}`, {`${req.transaction_amout}`, `${req.transaction_code}`});
transactionLogger.error('Transaction Failed', `{${err}`,session_id: `${req.id}`}, {user_id: `${res._id}`);
This makes it easier to manage your logs because there are separated for specific issues and user and transaction attributes are provided to help narrow it down to a specific user or transaction.
7. Other logging middleware
This guide discusses logging using Winston. However, there are other quality middleware logger packages worth mentioning.
They include:
- Morgan
Morgan is used for logging HTTP web servers. It combines Node.js with Express. Morgan logs responses and requests from an HTTP server. Its log entries are based on the HTTP request and error loglines.
The Logger function access objects such as req and res.
res– HTTP response object.req– HTTP request object.
The function will return a string log entry to the logline.
Morgan is designed to log errors the way servers like Apache and Nginx carry out to the access-log or error-log.
Here is an example of a Morgan logger:
const express = require('express')
const fs = require('fs')
const morgan = require('morgan')
const path = require('path')
const app = express()

// Create a write stream (in append mode)
const accessLogStream = fs.createWriteStream(path.join(__dirname, 'access.log'), { flags: 'a' })

// Setup the logger
app.use(morgan('combined', { stream: accessLogStream }))

app.get('/', (req, res) => {
    res.send('Hello World!')
})
app.listen(3000, () => {
    console.log("Server Listening on port 3000");
})
View source code Morgan module: Code Source
Run the app and hit http://localhost:3000/ on your browser. Morgan will record the following log on the access.log file.
::1 - - [12/Nov/2020:09:19:46 +0000] "GET / HTTP/1.1" 304 - "-" "Mozilla/5.0 (Windows NT 10.0; Win64; x64) AppleWebKit/537.36 (KHTML, like Gecko) Chrome/86.0.4240.183 Safari/537.36"
- Bunyan
Bunyan records log entries in JSON format. The format is automatically generated with essential fields such as timestamp and hostname.
Like the Winston logger, create a logger instance, and log your message.
const bunyan = require("bunyan");
const log = bunyan.createLogger({ name: "myapp" });
log.info("hi");
log.warn({ lang: "fr" }, "au revoir");
Output:
{"name":"myapp","hostname":"Doe","pid":14244,"level":30,"msg":"hi","time":"2020-11-12T08:22:41.398Z","v":0}
{"name":"myapp","hostname":"Doe","pid":14244,"level":40,"lang":"fr","msg":"au revoir","time":"2020-11-12T08:22:41.4
00Z","v":0}
- Log4js
The following Log4js example will record error logs to both the file (log4.log) and the console appenders.
// Require Log4js
const log4js = require('log4js');

// Logger configuration
log4js.configure({
    appenders: {
        fileAppender: { type: 'file', filename: './logs/log4.log' },
        console: { type: 'console' }
    },
    categories: {
        default: { appenders: ['fileAppender', 'console'], level: 'error' }
    }
});

// Create the logger
const logger = log4js.getLogger();

// Log some messages
logger.trace('Trace, log4js!');
logger.debug('Debug, log4js!');
logger.info('Hello, log4js!');
logger.warn('Heads up, log4js!');
logger.error('Danger, log4js!');
logger.fatal('Fatal, log4js!');
Output:
[2020-11-12T11:27:21.278] [ERROR] default - Danger, log4js!
[2020-11-12T11:27:21.291] [FATAL] default - Fatal, log4js!
8. Final notes
Logging is the best approach to adopt for your production application but before logging consider:
8.1. When to log
When an application is up and running, there are many different logging approaches you could use, depending on your app’s functionality. Logging can combine one or more logging instances.
Some of the standard logging instances include:
- Log when there is an error or the app encounters unexpected exceptions.
- Log when a system event takes place.
- Log request and responses
- Do some logging during debug mode.
8.2. What to log
This primarily depends on what your application does.
For example, where users interact with the system’s component by creating a user account, many users will invoke a log instance. In such a case, you need to stream your logs with the information that will help you track the log source, such as:
- Including a timestamp to every log to trace when the request or response was made.
- User IDs. To be able to distinguish logs of user a and user b. In such a case, if the user encounters a system error and contacts the system admin, it will be easier for a developer to check the issues. The developer will only need the user ID to find what went wrong when the user was making a request from the server or when the system was returning a response to the user.
8.3. Logging best practices
- Logging should be meaningful and have a purpose.
- Adopt logging at the early stage of app development.
- Divide logs into several log files in case you have an application with massive traffic.
- Logging should be structured and done in levels.
I hope this guide helps you to understand logging and be able to apply Winston in your projects!