
Table of Contents
A push notification is a message that pops on the screen when a mobile or a web application is performing another activity. In modern web applications, push notifications have a wider place.
1. Introduction
Push notifications engage the users and draw their attention to a new activity occurring in the web application even when they are not using the application.
The benefits of push notifications include:
- Increased application engagement as users get engaged even when they are not using the app.
- Boost user retention by sending them personalized offers and advertisements.
- Track user metrics to determine the level of success of an application.
- Enhances the user experience by conveniently providing vital information to the user.
2. Goal
In this article, we will go over a step-by-step implementation of push notifications using service workers in a Node.js application.
3. Prerequisites
- You will need to have Node.js installed on your computer. The installation procedure can be found here.
- A basic understanding of Node.js
- A code editor. I will be using Visual studio code. You can download it here.
4. Creating the Node.js application
4.1. Init the application
Set up the Node.js application by running the following command:
npm init -y
This command will create an empty package.json file for our application. The package.json will hold the project’s metadata that includes dependencies, scripts, and versions.
4.2. Install dependencies
Next, we will install the required dependencies.
We will use
expressas our backend framework for Node.js,body-parserto parse HTTP request body, andweb-pushto send the messages triggered by the application’s backend.
To install these dependencies, run the following command in your terminal.
npm install –save express, body-parser, web-push
5. Building the server side
5.1. Import the dependencies
We are all set. Now, let’s start the implementation by creating the server-side of our application. We will create the application’s entry point which will also be our server.
In the root directory, we will create a new file and name it index.js. In this file, we will bring in our installed dependencies as shown below:
//Express
const express = require('express');

//web-push
const webpush = require('web-push');

//body-parser
const bodyParser = require('body-parser');

//path
const path = require('path');

//using express
const app = express();

//using bodyparser
app.use(bodyParser.json())
5.2. Generate VAPID Keys
Next, we will create a set of Vapid keys for the application. The VAPID (Voluntary Application Server Identification) keys will allow us to send push messages without having to set up a messaging service. They also identify who is sending the push notification.
You can find more about vapid keys here. Vapid keys occur in pairs. One private key and another public key.
To generate the VAPID Keys. Run the command below in the terminal:
./node_modules/.bin/web-push generate-vapid-keys
The command should give the keys like below:
=======================================
Public Key:
BKd0FOnmkngVtRSf7N3ogMcnnDQGtu5PSMcbzmt_uvrcDTpL424TE6W92qpnMGZPeh1XqHi1rA_MT0iUL0gBXuY

Private Key:
GyXqHJJVtw7uXgCx9mXw9QK65SsCnALClWNHpPHy2pQ

=======================================
Note that your Vapid Keys will be different from mine.
5.3. Setting the VAPID Keys with web push
To set the VAPID Keys, we first store our keys in variables, then call the setVapiddetails method of the web-push module. In the index.js file we will add the following block of code.
//storing the keys in variables
const publicVapidKey = 'Your public vapid key';
const privateVapidKey = 'Your private vapid key';

//setting vapid keys details
webpush.setVapidDetails('mailto:mercymeave@section.com', publicVapidKey,privateVapidKey);
5.4. Creating the subscribe route
We will need a route where the client sends the post requests. We will call this route the subscribe route. It will send the notification to the service worker. The block of code below specified how to set up the route.
//subscribe route
app.post('/subscribe', (req, res)=>{
    //get push subscription object from the request
    const subscription = req.body;

    //send status 201 for the request
    res.status(201).json({})

    //create paylod: specified the detals of the push notification
    const payload = JSON.stringify({title: 'Section.io Push Notification' });

    //pass the object into sendNotification fucntion and catch any error
    webpush.sendNotification(subscription, payload).catch(err=> console.error(err));
})
6. Coding the client side
6.1. Setting the static path
Now we have set up our server. Next, is coding the client-side from where the post request is sent.
First, we will set up our static folder path in the index.js file. Under the dependencies, we will include the piece of code below to specify that our static folder is called client.
//set the static path
app.use(express.static(path.join(__dirname, "client")));
6.2. Creating the required files
Next, in the root folder, create a folder named client as specified above. In the client folder, we will create three files. The index.js will have our frontend code, a client.js for our client, and a service.js for our service worker.
In the index.html file, we will add the code below for our frontend:
<!DOCTYPE html>
<html lang="en">
<head>
    <meta charset="UTF-8">
    <meta http-equiv="X-UA-Compatible" content="IE=edge">
    <meta name="viewport" content="width=device-width, initial-scale=1.0">
    <title>Push Notification using Node</title>
</head>
<body>
    <h1>Section.io push Notification</h1>

    <script src="client.js"></script>
</body>
</html>
6.3. Setting up the service worker
A service worker is a script run by the browser in the background separate from the web page and bridges the browser and the network. It usually intercepts requests made by the document in the browser and redirects requests to cache memory to allow offline access.
To find more about service workers, check out this resource.
To set up our service worker, in the client.js file, we will import our public vapid key.
const publicVapidKey = 'Your public key';
Next, since we are using the VAPID key in a web application, we use the function below to convert the public key to a Uint8Array to pass into the subscribe call.
function urlBase64ToUint8Array(base64String) {
    const padding = "=".repeat((4 - base64String.length % 4) % 4);
    const base64 = (base64String + padding)
      .replace(/\-/g, "+")
      .replace(/_/g, "/");

    const rawData = window.atob(base64);
    const outputArray = new Uint8Array(rawData.length);

    for (let i = 0; i < rawData.length; ++i) {
      outputArray[i] = rawData.charCodeAt(i);
    }
    return outputArray;
}
Next, we will check if the service worker is enabled in the current browser and trigger the send method.
//check if the serveice worker can work in the current browser
if('serviceWorker' in navigator){
    send().catch(err => console.error(err));
}
In the send method, we will register the service worker, and then trigger the send notification functionality as below:
//register the service worker, register our push api, send the notification
async function send(){
    //register service worker
    const register = await navigator.serviceWorker.register('/worker.js', {
        scope: '/'
    });

    //register push
    const subscription = await register.pushManager.subscribe({
        userVisibleOnly: true,

        //public vapid key
        applicationServerKey: urlBase64ToUint8Array(publicVapidKey)
    });

    //Send push notification
    await fetch("/subscribe", {
        method: "POST",
        body: JSON.stringify(subscription),
        headers: {
            "content-type": "application/json"
        }
    });
}
We will code the next step in the worker.js file. We will add an event listener to the push and specify the options for the push notification such as title, body, image, and icon. We will add the block of code below in the worker.js file.
self.addEventListener("push", e => {
    const data = e.data.json();
    self.registration.showNotification(
        data.title, // title of the notification
        {
            body: "Push notification from section.io", //the body of the push notification
            image: "https://pixabay.com/vectors/bell-notification-communication-1096280/",
            icon: "https://pixabay.com/vectors/bell-notification-communication-1096280/" // icon
        }
    );
});
7. Running the server
To test out the application, add the block of code below in the index.js file. Then run the command npm start in your terminal.
const port = 3000;
app.listen(port, ()=>{
    console.log(`server started on ${port}`)
});
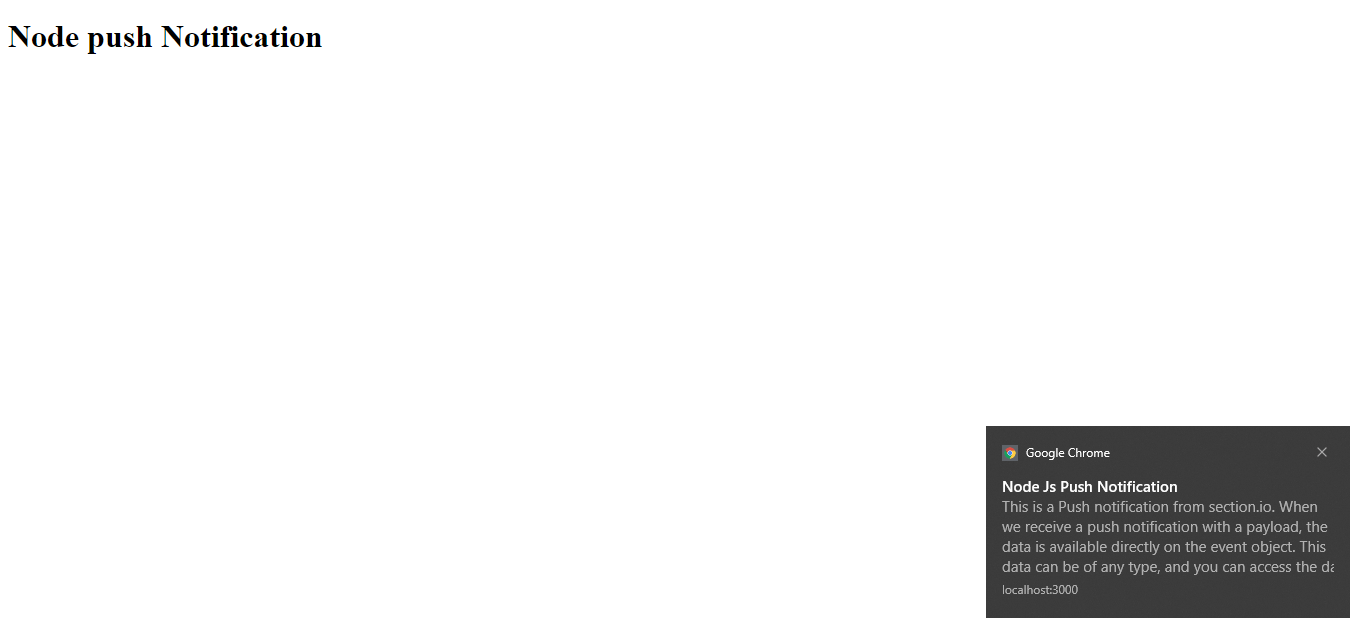
Now the application will send the push notification every time you refresh the browser as shown below:
8. Conclusion and further reading
In this article, we learned how to use service workers to implement push notifications in a web application. You can find the complete code of the implementation here.
To find more about the topic, you can check the resources in the following links:
Happy coding!