
Table of Contents
CI/CD (Continuous Integration and Continuous Deployment & Delivery) is a modern method in the software development cycle that reduces the repetitive process of testing and deploying software. Github Actions is one of the services we can use to achieve CI/CD. In this article, Aleem Isiaka explains how you can deploy a basic NodeJS application to Heroku, automate and schedule a deployment to run at certain intervals of the day, and use other actions from the Github Actions community.
Before the invention of CI/CD (Continuous Integration and Continuous Deployment & Delivery), software was generally developed by writing the code using a computer whenever it was time to move the software to production. The RedHat website defines CI/CD to be “a method to frequently deliver apps to customers by introducing automation into the stages of app development. The main concepts attributed to CI/CD are continuous integration, continuous delivery, and continuous deployment.”
In other words, CI/CD is a process that replaces the traditional/manual ways of building and deploying software applications. The CI/CD process is automated and executed once a trigger is met. The trigger is mostly attached to a new git commit to ensure that the latest version of a repository’s code is built and deployed with minimal effort to the developer.
1. Handling Continuous Integration & Delivery With GitHub Actions
To further understand how continuous integration and delivery work, we will focus on deploying a URL shortener application API server on Heroku using Github Actions. The application is a NodeJS server and supports:
- Shortening a URL by making a POST request to
/shortenwith a request body containing thecodeto identify the URL and aurlas the URL to redirect to. If no code is sent, it simply generates a random code and returns it as part of the response. - Visiting a shortened link by making a GET request to
/:code; the code is the unique code identifier used when shortening the URL. - Monitoring analysis by making a GET request to
/analysis/:code; the:codeis the unique code identifier used when shortening the URL.
We don’t necessarily have to create a new application since we can deploy a private repository that our Github account has access to, but we can also deploy a public repository. The workflow will check out the code from the application repository, add Heroku git remote URL, and finally deploy the application to Heroku.
1.1. About github actions
Github Actions is one of the services offered by Github Inc. According to the release note:
“GitHub Actions is an API for cause and effect on GitHub: orchestrate any workflow, based on any event, while GitHub manages the execution, provides rich feedback, and secures every step along the way. With GitHub Actions, workflows and steps are just code in a repository, so you can create, share, reuse, and fork your software development practices.”
Github Actions is one of the many options that could be used to implement continuous software deployment and delivery(CI/CD) by ensuring that a new version of a software is shipped to the production or testing area as soon as possible.
1.2. Components of github actions
Github Actions consists of six main components:
- Runners,
- Workflows,
- Events,
- Jobs,
- Steps,
- Actions.
1.2.1. Runners
These are hosted virtual operating systems that could run commands to carry out a build process. Github Actions Runners can be self-hosted or picked from one of the free runners made available by Github which are based on Microsoft Azure’s Standard_DS2_v2 virtual machines.
1.2.2. Workflows
These are laid out instructions that give the Github Action application on a runner. Workflow instructions are defined in a YAML file and live inside of the .github/workflows folder in a git repository. The name of a workflow file does not have a correlation with the intention of the file, as Github parses and runs every file inside of the .github/workflows folder.
1.2.3. Events
For a Workflow file to be processed and executed, an event is required. An event could be a new push or pr merge, Github actions can listen to a list of events triggered by a repository. As a basic example, we could have a workflow file that listens to the push event of a repository to process a new build of our application.
1.2.4. Jobs
Once an event is triggered, the series of steps carried out for that workflow is a step. A job could list a series of steps that run parallel to each other, also they could be configured to run in sequential order.
1.2.5. Steps
These are the single elements that make up a job. A step groups the actions that are carried out on a runner.
1.2.6. Actions
An action is an element of a step and is basically a command. It is an action that gets executed on the runner, and as such, is the heart of Github Actions. We can have our own custom action such as npm install or leverage on existing actions created by the community such as the checkout action.
1.3. Configuring a workflow for a node.js application
In this section, we will deploy a NodeJS application to a remote server. For this case, we will use Heroku as our deployment server hence, we have to create an account and then an application.
1.3.1. Signing Up And Creating An Account On Heroku
Signup for a Heroku account from here and proceed to log in to your account. From the dashboard click on the new button and then create new app. Enter a unique name for the app, and click on the create button.

Log in to your Github account or create a new one if you don’t have one, then create a new Github repository for our app named aleem-urls and clone it locally using git clonegit@github.com:{your-username}/aleem-urls.git.
From the root of our application, create a folder named .github/workflows that will contain all the GitHub action workflows inside this folder create a file named action.yml, this file will hold the instructions for our deployment process to Heroku through our code on Github. We will run the below code in our terminal to achieve this process.
$ cd path/to/repo
$ mkdir .github/workflows
$ touch .github/workflows/action.yml
Next, we will make the .github/workflow/action.yml file have the below content:
name: "Clone URL Shortener Github Actions"

on:
  push:
jobs:
  deploy-url-shortener:
    runs-on: ubuntu-latest
    steps:
      - name: "Checkout limistah:url-shortener"
        uses: actions/checkout@v1
        with:
          repository: "limistah/url-shortener"
          ref: "master"
The above YAML snippet is a typical Github Action workflow, and in that workflow, we have set the name of the workflow in the first line to be “Clone URL Shortener Github Actions” and also listen to a push event on line 3 which will make the workflow to be triggered once a new push is being made to the repository on Github.
The focal point of a Github Action workflow is steps — that could be found under the jobs specification. The above workflow specifies a deploy-url-shortener job, and within it, we have defined where we want the job to run using the runs-on field, and have the commands to be executed inside of the steps fields.
The steps declaration has some sub-items:
namefield that distinguishes the step;usesfield which could be used to import actions from the community;withaccept items that stand as arguments to the current action.
In our example workflow, we have a step which we are using to check out a repository that we want to deploy to Heroku. We could have pulled the code to our new repository since Github action can do this for us, we should leverage on that. As we are not forking the repository or using our own personal repository, we are restricted to the features provided by the repository, we can’t make updates or fixes to our deployment except the author of the repository does the update.
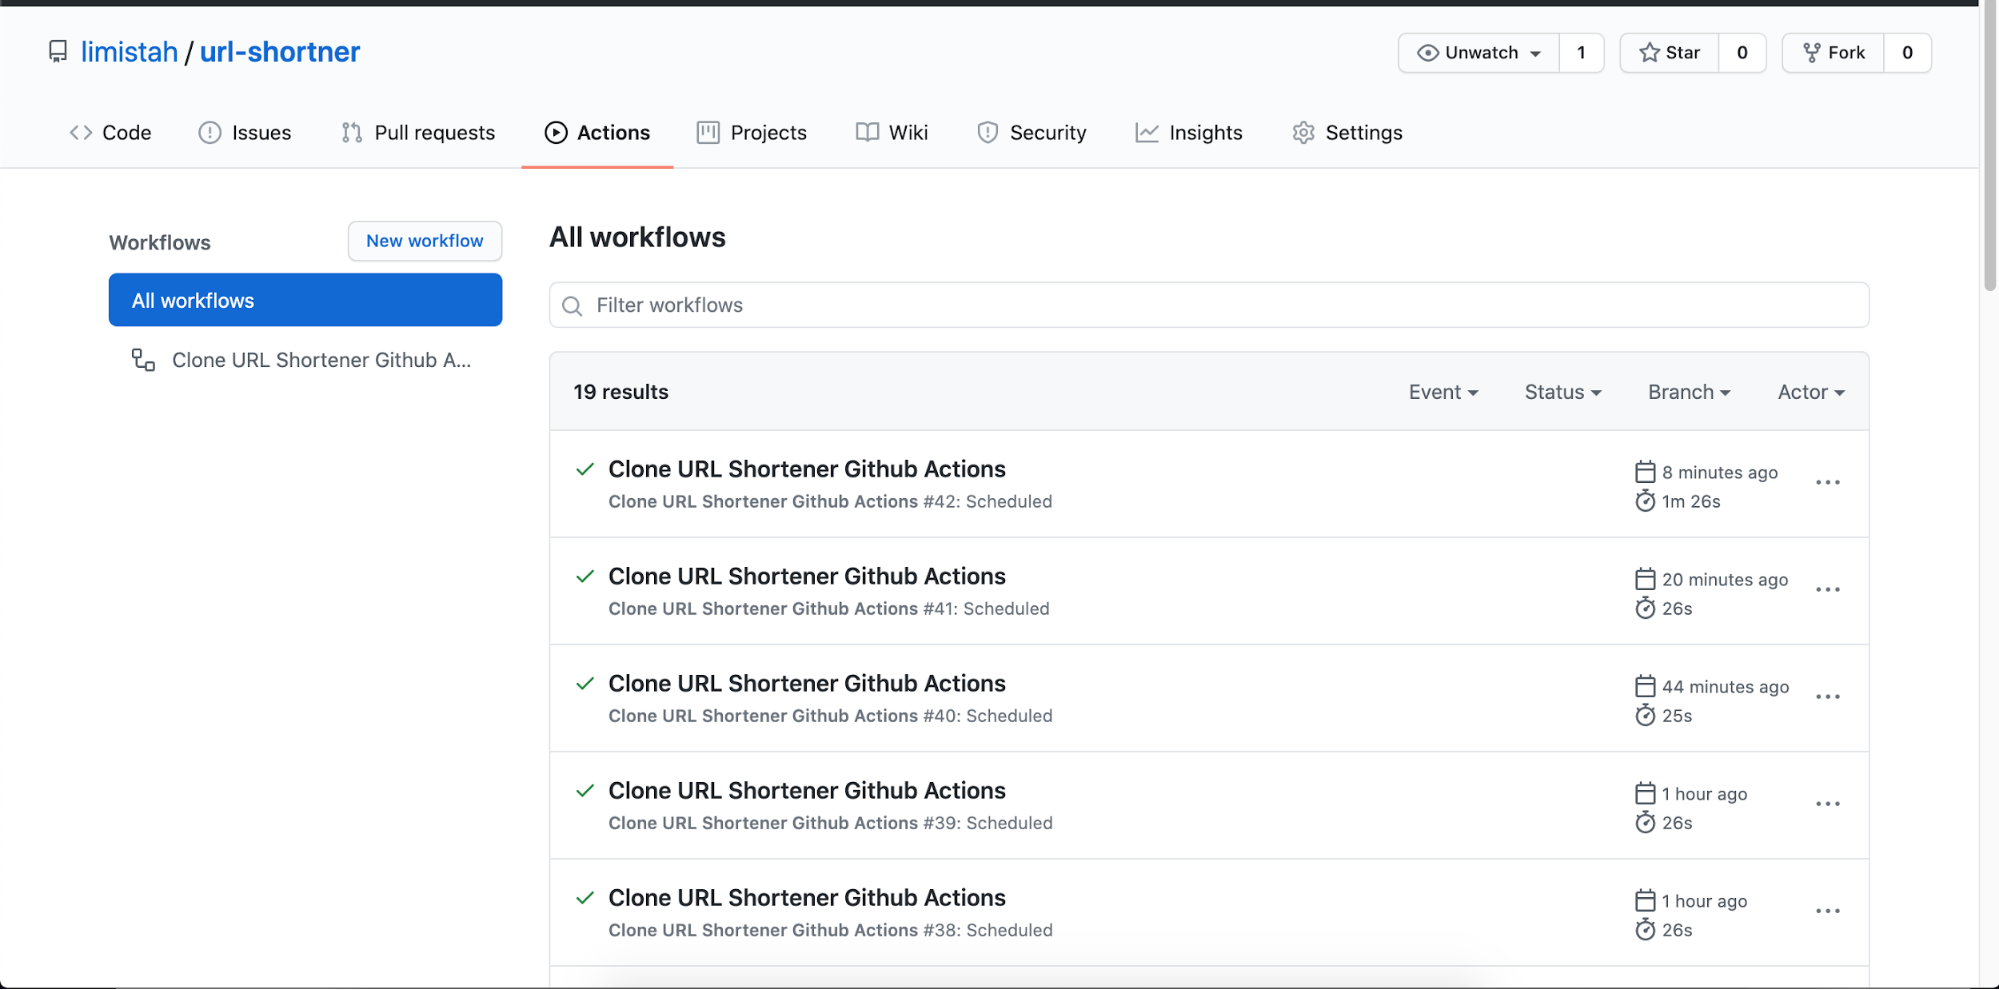
To test the workflow, we will commit the change we have (a new file in the .github/workflows/action.yml), and check the Action tab of our repository on https://github.com/{your-username}/easy-urls/actions.

On the Actions page of the repository, we will find all the workflows that we have in it. We can view the details of the workflow by clicking on the name of the workflow.

To the right on a workflow details page, we will find the jobs listed for the particular workflow. We will click on the deploy-url-shortener to find the logs on the runner for the commit push we made. Click on the name of a job(deploy-url-shortener) to list all the steps for the job, also click on the name of a job to see the details of the step.

Looking closely, and inspecting the Checkout limistah:url-shortener step reveals that the current runner has access to the url-shortener code we want to deploy to Heroku.
1.3.2. Authenticating Heroku
To deploy to Heroku, we have to authenticate Heroku on the runner for our deployment workflow. We can use the Auth Token method of authentication by Heroku which stores the email and an auth-token to a .netrc file in the current user’s home directory.
Firstly, ensure that you have Heroku CLI installed, open a shell/terminal/cmd, and use the command heroku login. This should pop a page on your default browser to log in to Heroku by providing your email and password.
Once you are logged in, a file .netrc should have been created in the home directory of the current user attached to the shell, use cat ~/.netrc command to view the content of the file it should follow the format:
machine api.heroku.com
  login me@example.com
  password c4cd94da15ea0544802c2cfd5ec4ead324327430
machine git.heroku.com
  login me@example.com
  password c4cd94da15ea0544802c2cfd5ec4ead324327430
Now, we can get the auth token using heroku auth:token which should output same string as the password in the .netrc file c4cd94da15ea0544802c2cfd5ec4ead324327430.
With this token, we can do authenticated action from any machine and even on our Github Action runner.
1.3.3. Using Secrets To Store Confidential Information

We can store secrets and confidential information without exposing them to the public in our repository by using Encrypted Secrets, we will do this with our Heroku auth token.
From the repository page, click on Settings, then Secrets from the left menu-list, finally, click on Add New Secret. The New Secret page contains a form with Name and Value inputs, enter HEROKU_AUTH_TOKEN as the name and the string provided from the output of heroku auth:token as the value and click on the Add secret button to save the secret. Accessing Secrets
By default, secrets are not made available to workflows and jobs, to have access to secrets, we have to explicitly request for them at the steps that they are required.
In our case, we are deploying to Heroku we have to create a .netrc file for every run of our workflow. We will use the cat command to create the file and have the secret embedded as an environment variable within the content of the file.
`cat >~/.netrc <<EOF
          machine api.heroku.com
              login $EMAIL
              password $HEROKU_AUTH_TOKEN
          machine git.heroku.com
              login $EMAIL
              password $HEROKU_AUTH_TOKEN
          EOF`
We can update our action.yml to look like this:
name: "Clone URL Shortener Github Actions"

on:
  push:
jobs:
  deploy-url-shortener:
    runs-on: ubuntu-latest
    steps:
      - name: "Checkout limistah:url-shortener"
        uses: actions/checkout@v1
        with:
          repository: "limistah/url-shortener"
          ref: "master"
      - name: "Create .netrc for Heroku Auth"
        shell: bash
        run: |
          `cat ≶~/.netrc <<EOF
          machine api.heroku.com
              login $EMAIL
              password $HEROKU_AUTH_TOKEN
          machine git.heroku.com
              login $EMAIL
              password $HEROKU_AUTH_TOKEN
          EOF`
        env:
          EMAIL: me@gmail.com
          HEROKU_AUTH_TOKEN: ${{ secrets.HEROKU_AUTH_TOKEN }}
The env field seems new; it is a method for setting the environment variables that a runner step will have access to. The env var can be any valid string, and could be sourced from the secrets stored in a repository’s settings.
We are setting the HEROKU_AUTH_TOKEN to use the secrets, which we are accessing through the secrets variable provided by Github Actions to access any secret specified for the repository in its Secret Settings.
1.3.4. Adding Heroku To The Remote
Now that we can authenticate a runner, we can carry out authenticated actions using Heroku CLI. We will add Heroku git remote URL to the URL-shortener repository we had pulled in the checkout action through the command heroku git:remote --app app-name for the particular app we have created.
We will append our steps to include the below configuration:
- name: "Add remote"
        shell: "bash"
        run: |
          heroku git:remote --app aleem-urls
Note: The value for aleem-urls should the unique name for the app we created on Heroku.
1.3.5. Deploying The Master Branch
Finally, we can add a step to push the master branch to Heroku for deployment, we will append our workflow steps to include:
- name: "Push to heroku"
        shell: "bash"
        run: |
          git push heroku HEAD:master
The final configuration for the Heroku deployment should look like the below:
name: "Clone URL Shortener Github Actions"

on:
  push:
jobs:
  deploy-url-shortener:
    runs-on: ubuntu-latest
    steps:
      - name: "Checkout limistah:url-shortener"
        uses: actions/checkout@v1
        with:
          repository: "limistah/url-shortener"
          ref: "master"
      - name: "Create .netrc for Heroku Auth"
        shell: bash
        run: |
          `cat >~/.netrc <<EOF
          machine api.heroku.com
              login $EMAIL
              password $HEROKU_AUTH_TOKEN
          machine git.heroku.com
              login $EMAIL
              password $HEROKU_AUTH_TOKEN
          EOF`
        env:
          EMAIL: aleemisiaka@gmail.com
          HEROKU_AUTH_TOKEN: ${{ secrets.HEROKU_AUTH_TOKEN }}
      - name: "Add remote"
        shell: "bash"
        run: |
          heroku git:remote --app aleem-urls
      - name: "Push to heroku"
        shell: "bash"
        run: |
          git push heroku HEAD:master
1.3.6. Testing The Deployment
In order to verify whether our workflow is correct, we have to commit the changes and push the new commit to the repository. We can visualize the processes that were carried out with following steps:
- On the repo page, Click on the
Actionstab; - On the Actions page, click the name of our workflow (which should be
Clone URL Shortener Github Actions); - On the Workflow page, click on the name of the job (i.e.
deploy-url-shortener); - On the Job page, you will find the workflows that were run. Click on the name of your commit for the deployment to check the output of the action.

If any of the processes have failed, we can click on the name of the step in order to inspect the logs. We are more interested in the Push to heroku step since that’s the one that informs us whether there has been a successful deployment, and provide us with a URL to access the application.
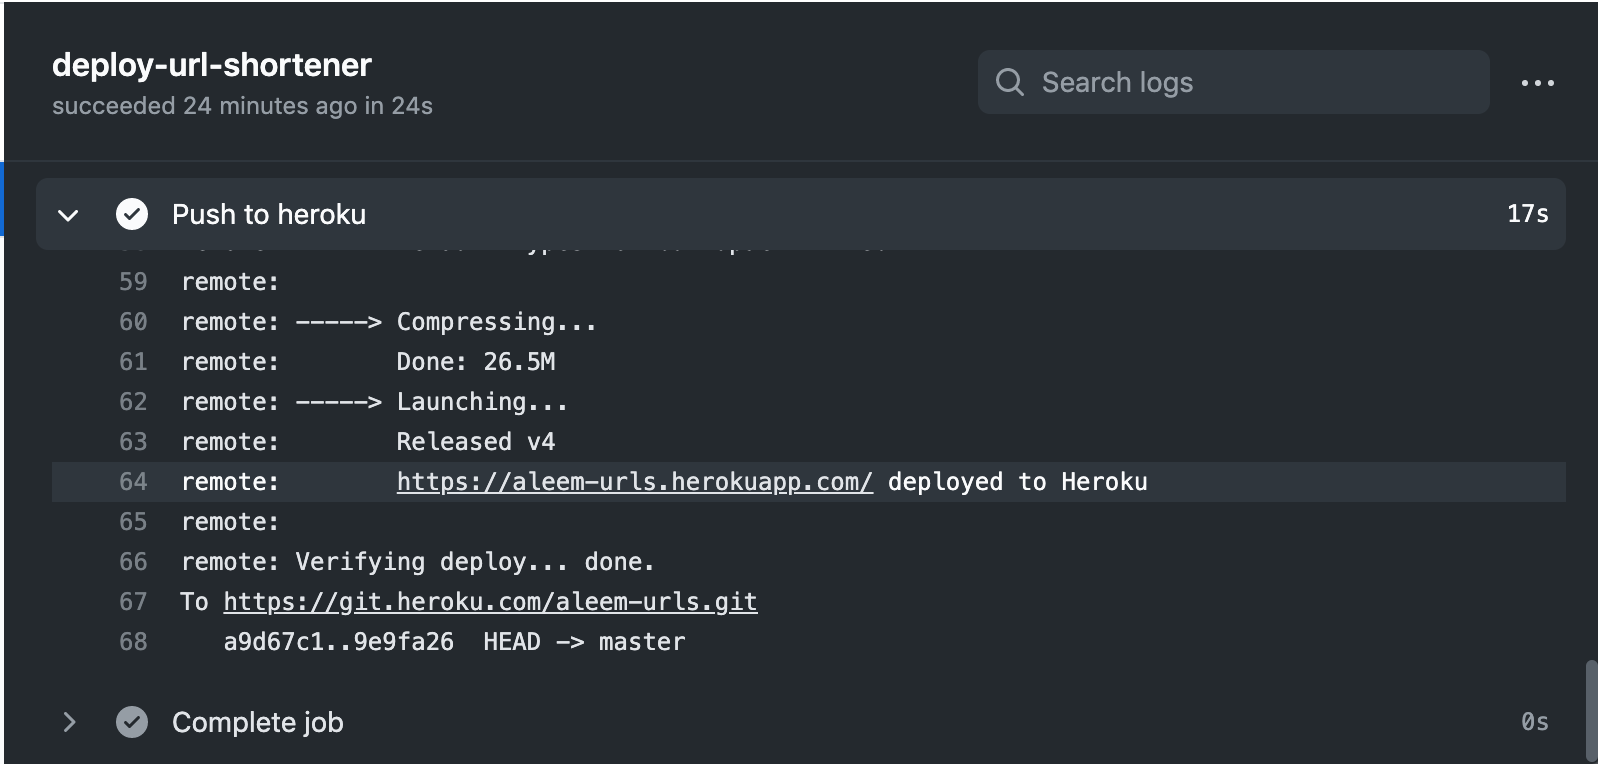
Visiting the URL https://aleem-urls.herokuapp.com/ should load a status page of the URL-shortener application. Voilà!
1.4. Scheduling actions
Github Action can also serve as a cron, which runs workflows at a specific time of the day. We can use this feature to automate the deployment of our application at a certain time of the day, we can achieve this by adding a few instructions to our workflow YAML file.
From the last full version that we had, we need to update the on key item and add a child property, schedule. The schedule item accepts a child item cron which should be set to a value that matches the POSIX cron syntax.
The POSIX cron syntax follows the format:
┌───────────── minute (0 - 59)
│ ┌───────────── hour (0 - 23)
│ │ ┌───────────── day of the month (1 - 31)
│ │ │ ┌───────────── month (1 - 12 or JAN-DEC)
│ │ │ │ ┌───────────── day of the week (0 - 6 or SUN-SAT)
│ │ │ │ │
│ │ │ │ │
│ │ │ │ │
*  *  *  *  *
We can also use * in place of the numeric value for every unit if we want that section to match every possible value. For example, we can set a cron to run every day using 0 24 * * *, so we can translate the time format to mean:
0 | The exact second 0 for the matched time. |
24 | The 24th hour from the start time. |
* | Matches every possible day in the month. |
* | Matches every possible month in a year. |
* | Matches every day of a week. |
Another cool feature we can achieve with POSIX cron time format is that we can instruct a cron to run at a fraction of a time unit. For example, we can have a cron to run every 2 minutes (the format would be */2 * * * *) or have it run every day of a month (the format would be 0 0 */1 * *). The */fractional-unit helps to create repeated cron tasks that run when a fraction of the specified time unit is matched. Github has great documentation on the possible formats we can have using cron to schedule our workflows. We can also create and verify a cron syntax using crontab.guru.
For our use case, we want to deploy our application every 10 minutes. Our cron time format would then be */10 * * * *, so the final workflow file should look like this:
name: "Clone URL Shortener Github Actions"

on:
  push:
  schedule:
    - cron: "*/10 * * * *"
jobs:
  deploy-url-shortener:
    runs-on: ubuntu-latest
    steps:
      - name: "Checkout limistah:url-shortener"
        uses: actions/checkout@v1
        with:
          # Repository name with owner. For example, actions/checkout
          # Default: ${{ github.repository }}
          repository: "limistah/url-shortener"
          ref: "master"
      - name: "Create .netrc for Heroku Auth"
        shell: bash
        run: |
          `cat >~/.netrc <<EOF
          machine api.heroku.com
              login $EMAIL
              password $HEROKU_AUTH_TOKEN
          machine git.heroku.com
              login $EMAIL
              password $HEROKU_AUTH_TOKEN
          EOF`
        env:
          EMAIL: aleemisiaka@gmail.com
          HEROKU_AUTH_TOKEN: ${{ secrets.HEROKU_AUTH_TOKEN }}
      - name: "Add remote"
        shell: "bash"
        run: |
          heroku git:remote --app aleem-urls
      - name: "Push to heroku"
        shell: "bash"
        run: |
          git push heroku HEAD:master
At this point, we will commit and push this change, then head over to Github to monitor this workflow by clicking on the Actions, then clicking the name of the workflow (Clone URL Shortener Github Actions), then the name of the job we want to inspect (deploy-url-shortener) and finally click on an action from the list of actions for the current job.

We can monitor the result of this scheduled process from the Github Action dashboard where we will see the logs of our scheduled action running at the specified time we had set using the POSIX time syntax.
1.5. Leveraging on the readily available actions
In the last section of this post, we deployed a NodeJS application to Heroku although we could have other applications following this workflow process with just a few changes. The changes that we could have are the following:
- The name of the app on Heroku;
- The repository where the code to deploy lives.
Copying the workflow file over many repositories for deployment could become repetitive, also, the original workflow we would be duplicating could have an error, making us copy errors over our workflows and deployments.
We can avert the scenario above by reusing our actions or leverage on the actions created by the community. In fact, we had used a community developed action in our workflow file named checkout.
We can do this to deploy our application to Heroku by using a community developed action named Deploy to Heroku.
To import this action, we have to update the steps section of our deploy job to have the below code:
- uses: akhileshns/heroku-deploy@v3.5.7 # This is the action we are importing
  with: # It accepts some arguments to work, we can pass the argument using `with`
    heroku_api_key: ${{secrets.HEROKU_AUTH_TOKEN}} # This is the same as the auth key we generated earlier
    heroku_app_name: "aleem-urls" #Must be unique in Heroku
    heroku_email: "me@email.com" # Email attached to the account
We don’t want double deploys; we would rather update the deploy action of our workflow with this new version using reusable action.
The final workflow file would look like this:
name: "Clone URL Shortener Github Actions"

on:
  push:
  schedule:
    - cron: "*/30 * * * *"
jobs:
  deploy-url-shortener:
    runs-on: ubuntu-latest
    steps:
      - name: "Checkout limistah:url-shortener"
        uses: actions/checkout@v1
        with:
          # Repository name with owner. For example, actions/checkout
          # Default: ${{ github.repository }}
          repository: "limistah/url-shortener"
          ref: "master"
      - name: "Create .netrc for Heroku Auth"
        uses: akhileshns/heroku-deploy@v3.5.7 # This is the action we are importing
        with: # It accepts some arguments to work, we can pass the argument using `with`
          heroku_api_key: ${{secrets.HEROKU_AUTH_TOKEN}} # This is the same as the auth key we generated earlier
          heroku_app_name: "aleem-urls" #Must be unique in Heroku
          heroku_email: "aleemisiaka@gmail.com" # Email attached to the account
We will commit this new change and then push, then wait for the scheduled time for our cron to verify the result of our action.
Using reusable actions does not only make our workflow more readable; it also ensures it functions in a predictable manner and we have just a few places to look out for errors in any case we run into unexpected results.
Aside from the many available custom actions from the community which could be found at the Github Actions Marketplace, we can also create our own by following the guide by Github on how to create custom actions for each use case that is available.
2. Conclusion
In this tutorial, we have explored CI/CD and used Github Actions as our CI/CD provider to deploy a NodeJS application from a Github repository to Heroku.
We could have achieved this same process with other CI/CD providers but Github has some features that make it a great choice for developers. Aside from being a part of software development tools, Github Actions was created to follow the open-source idea of Github by ensuring that reusable actions can be shared across the community, which in turn reduces the time it takes to deploy a CI/CD pipeline for an application.
The scheduled event trigger is another edge that makes Github Action stand as a good choice, a unique utilization of this is a weather repository by ruanyf which sends the weather report for the day directly to an email at a specific time of the day. (This is possible by using a scheduled event trigger.)
Aside from the setup being very simple through a structured YAML file, Github Action is a great CI/CD option considering the level of flexibility it provides its users.