
Table of Contents
React is a JavaScript library used to build user interfaces and develop single-page applications using reusable UI components. React is used for building frontend apps that can communicate with the backend server.
1. Introduction
This guide will develop a simple React App and connect it to the server build using Node.js server. We will bootstrap the React App using the create-react-app command then connect it to Node.js by setting up a proxy.
2. Prerequisites
To follow this article along it will be helpful to have the following:
- A prior experience of Node.js, Express, npm, and React.js.
- Node.js installed.
- A text editor, preferably VS Code.
- A web browser, in this case, Google Chrome.
3. Setting up the folder structure
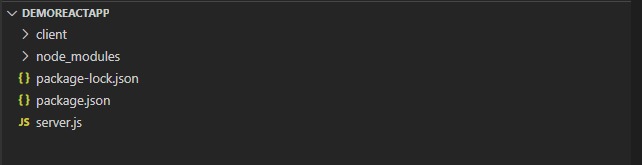
The first step would be to create a root folder for our case, demoreactapp, to hold all of our App’s files. Then we will have the client directory that will hold all the React App files.
The node_modules folder will contain all NPM packages for our server.js file. The node_modules folder will be auto-generated when we install NPM packages.
Next will need to create a server.js file. The file will contain an Express server that will act as our backend. The package.json file is auto-generated when the npm init -y command is run in the terminal.
4. Creating the React app
From the terminal, browse to the root directory using the cd command and run the below commands:
$cd demoreactapp
$npx create-react-app client
The above commands will create a react app with the name client inside the root directory.
5. Setting up the Express server
The next step involves creating an Express server in the file server.js.
Browse to the root directory from the terminal and run the command mentioned below:
$npm init -y
The command will auto-generate the package.json file. Next will will need to run the command below to install Express and it will be saved as a dependency inside the package.json.
$npm install express --save
Now edit the file server.js as shown below:
const express = require('express'); //Line 1
const app = express(); //Line 2
const port = process.env.PORT || 5000; //Line 3

// This displays message that the server running and listening to specified port
app.listen(port, () => console.log(`Listening on port ${port}`)); //Line 6

// create a GET route
app.get('/express_backend', (req, res) => { //Line 9
  res.send({ express: 'YOUR EXPRESS BACKEND IS CONNECTED TO REACT' }); //Line 10
}); //Line 11
Line 1 and 2 – requires Express and allows us to use it inside our server.js file.
Line 3 – It will set the Express server on which port it will run on.
Line 6 – will display a message on the console that the server is working as expected.
Line 9 to 11 – It will set a GET route that we will, later on, fetch from our client-side React App.
6. Setting up the proxy
In this step, the Webpack development server was auto-generated when we ran the create-react-app command. Our react App is running on the Webpack development server on the frontend.
We can proxy the API requests from the client-side to the API on the server-side. The API on the server-side (Express server) will be running on port 5000.
Webpack Development Server (WDS) is a tool that helps the developers make changes to the web app’s frontend and renders them to the browser with no need to refresh the browser.
It’s unique compared to other tools that do the same in the way that the bundle contents are not written out as files on the disk but are stored in the memory. This advantage is vital when one is trying to debug the code and styles.
First, set up the proxy to navigate the client directory and locate its package.json file. Add the line below to it.
“proxy”: “http://localhost:5000”
The modified package.json file will look as shown below:
{
  "name": "client",
  "version": "0.1.0",
  "private": true,
  "dependencies": {
    "@testing-library/jest-dom": "^5.11.10",
    "@testing-library/react": "^11.2.6",
    "@testing-library/user-event": "^12.8.3",
    "react": "^17.0.2",
    "react-dom": "^17.0.2",
    "react-scripts": "4.0.3",
    "web-vitals": "^1.1.1"
  },
  "scripts": {
    "start": "react-scripts start",
    "build": "react-scripts build",
    "test": "react-scripts test",
    "eject": "react-scripts eject"
  },
  "proxy": "http://localhost:5000"
}
The modified package.json file will let the webpack proxy the API requests to the Express backend server running on port 5000.
7. Calling Express backend server from React
First is to browse into client/src and edit the file App.js to appear as below:
import React, { Component } from 'react';
import logo from './logo.svg';
import './App.css';

class App extends Component {
state = {
    data: null
  };

  componentDidMount() {
    this.callBackendAPI()
      .then(res => this.setState({ data: res.express }))
      .catch(err => console.log(err));
  }
    // fetching the GET route from the Express server which matches the GET route from server.js
  callBackendAPI = async () => {
    const response = await fetch('/express_backend');
    const body = await response.json();

    if (response.status !== 200) {
      throw Error(body.message)
    }
    return body;
  };

  render() {
    return (
      <div className="App">
        <header className="App-header">
          <img src={logo} className="App-logo" alt="logo" />
          <h1 className="App-title">Welcome to React</h1>
        </header>
        <p className="App-intro">{this.state.data}</p>
      </div>
    );
  }
}

export default App;
Inside of componentDidMount(), the function callBackendAPI() is called. This function will fetch the route previously created in the Express server and then set{data: null} to the fetch request-response.
On the line that contains this.state.data inside the render function, it renders new data to the DOM
8. Running the app
We navigate to the root directory demoreactapp and run the command below:
$cd demoreactapp
$node server.js
After running the file server.js, next we will go to our browser, “http://localhost:5000/express_backend”, and the message below will be displayed:
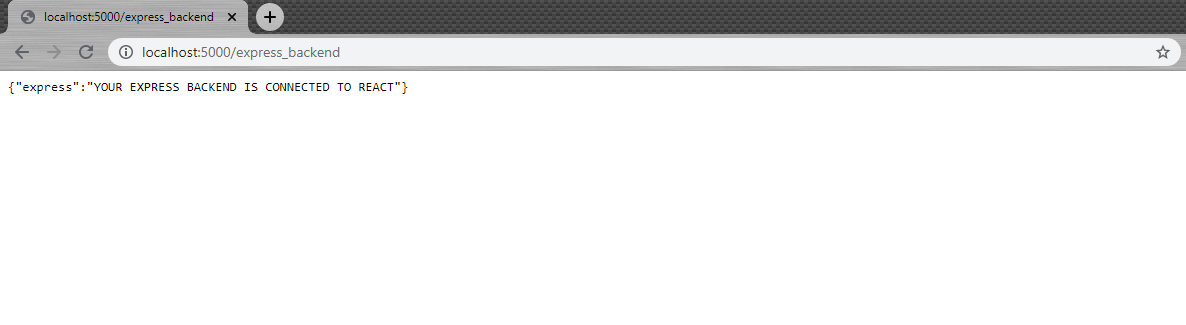
The above shows that our Express server is working as expected and that the GET route we created is working, and it is possible to fetch the route from the client-side.
Also, note the URL path is the same as the path we set in our GET route in the server.js file.
Next, browse to the client directory in the terminal, and run the below commands:
$cd client
$npm start
The commands above will run the React Dev server, which runs on port 3000, and automatically open in the web browser.
The screen below with a message will be displayed:
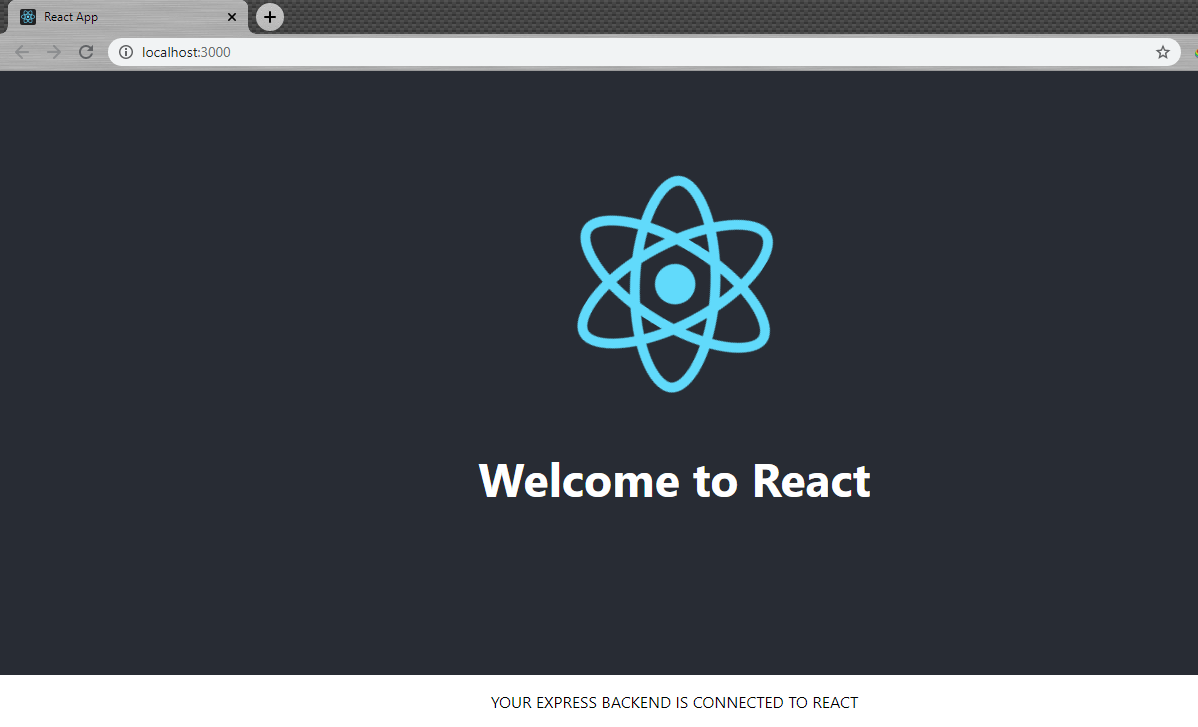
Finally, we have rendered the data fetched from the GET route in server.js to our frontend React App, as demonstrated above.
If the Express server is disconnected, the React server will continue running. However, the connectivity to the backend will be lost, and nothing will be displayed.
9. Conclusion
A lot can be done with Express backend, like make calls to the database, but on this guide, we have concentrated on how to quickly connect to the backend Express server from client-side React App.
The code snippets and files used in this guide can be accessed at the GitHub repository here.
Happy coding!