
Table of Contents
- 1. Prerequisites
- 2. Background
- 3. Setting up the MySQL server
- 4. Setting up Node.js
- 5. Creating a connection to the MySQL server
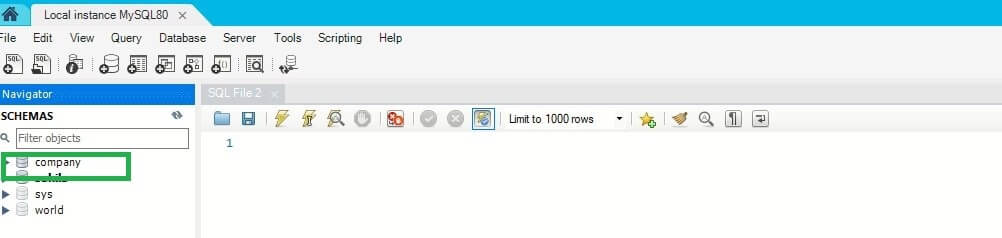
- 6. Creating a database
- 7. Creating a table and adding rows
- 8. Inserting into a database
- 9. Fetching from a database
- 10. Making a selection from the server
- 11. Updating
- 12. Deleting
- 13. Closing the connection
- 14. Connection pooling
If you are new to MySQL with Node.js, this guide will help you learn the basics and understand what you need to get started with MySQL and how to use it conjuction with Node.js.
1. Prerequisites
To get along with this guide, you need:
- Basic knowledge of how to write SQL queries.
- Basic understanding of Node.js.
2. Background
MySQL is a fast and easy to use Relational Database Management System (RDBMS). A DBMS is a collection of systems that allows us to access the relational database and manipulate data. It is written in C and C++. MySQL is based on Structured Query Language (SQL) that is used to interact with relational databases.
Here are the reasons why you should use MySQL:
- It is an open-source and scalable database and is suitable for both small and large applications.
- MySQL is very powerful because it can handle large datasets.
- It supports numerous operating systems and a wide list of programming languages such as JavaScript, PHP, and JAVA.
- It has excellent performance in terms of speed.
- MySQL is secure and efficient to use.
3. Setting up the MySQL server
The first step to use MySQL is to setup a MySQL development server and MySQL workbench to host and manage databases.
3.1. MySQL Windows installation
- Download the MySQL Installer for Windows and double click the installer file to start the installation.
- Choose the setup type to install, as shown in the screenshot below.
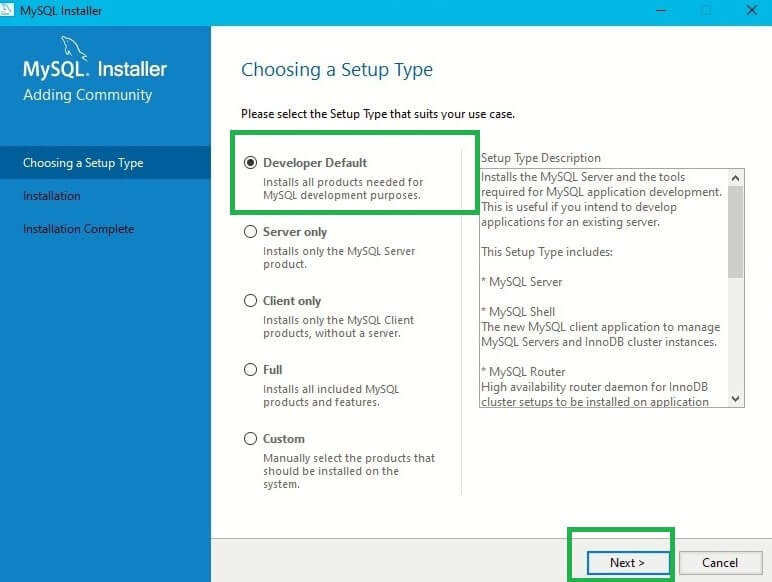
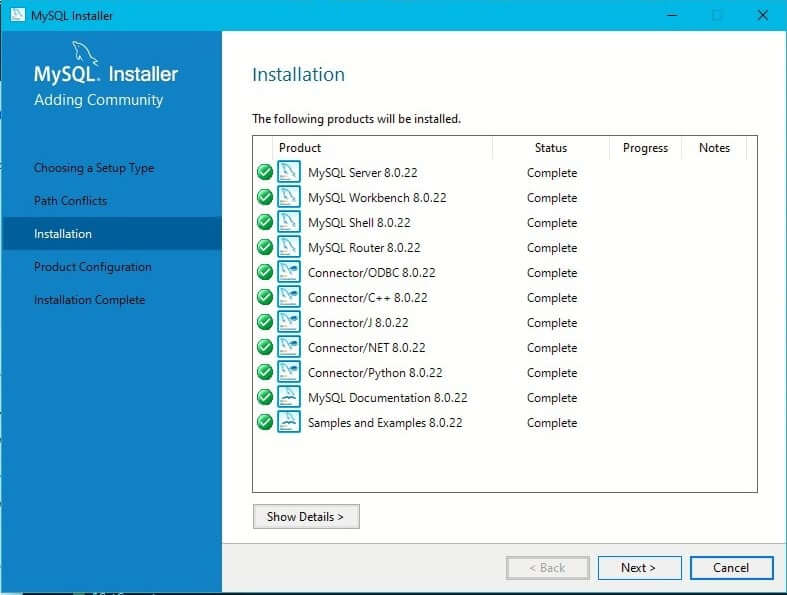
- Click next without changing the default settings. This will install the MySQL products provided by the installation catalog.
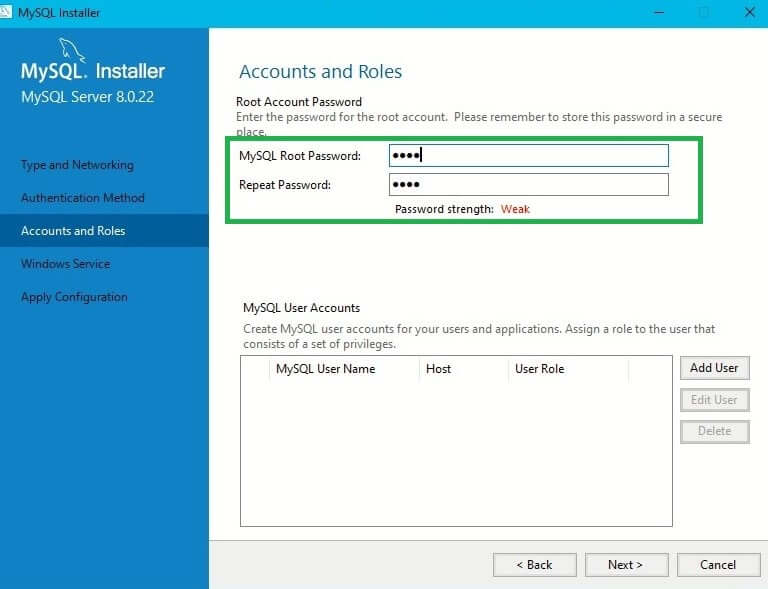
- Click next until prompted to provide MySQL root password. Enter a password that you can remember. The password will be used to establish a connection to your MySQL server.
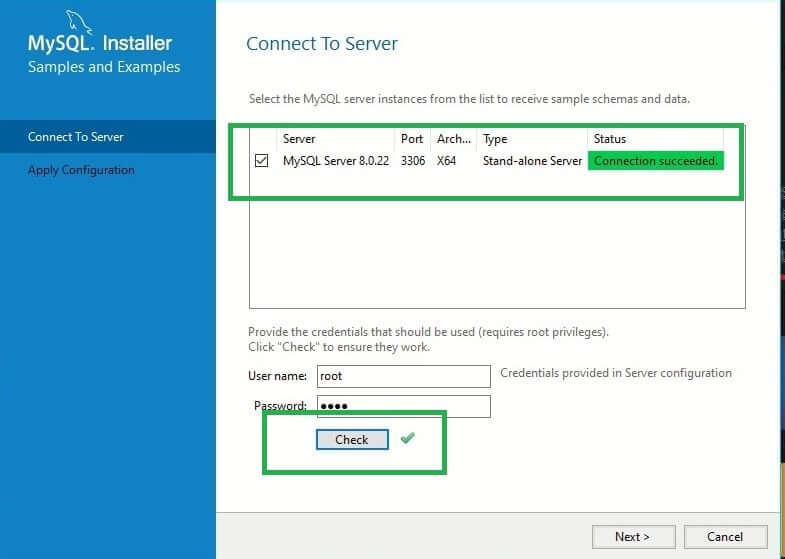
- That’s the server setup, and now you need to check if the server is working by providing the password you provided above.
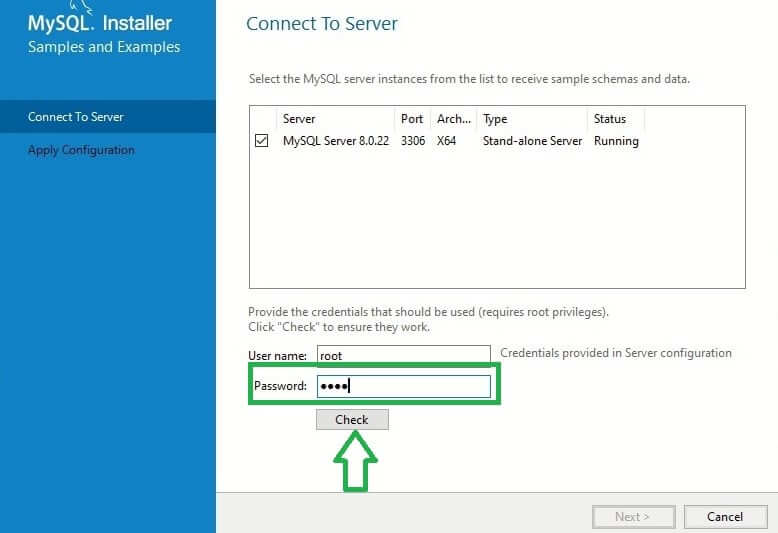
- This confirms that the server is up and running.
- Finally, click
Finishto complete the installation process.
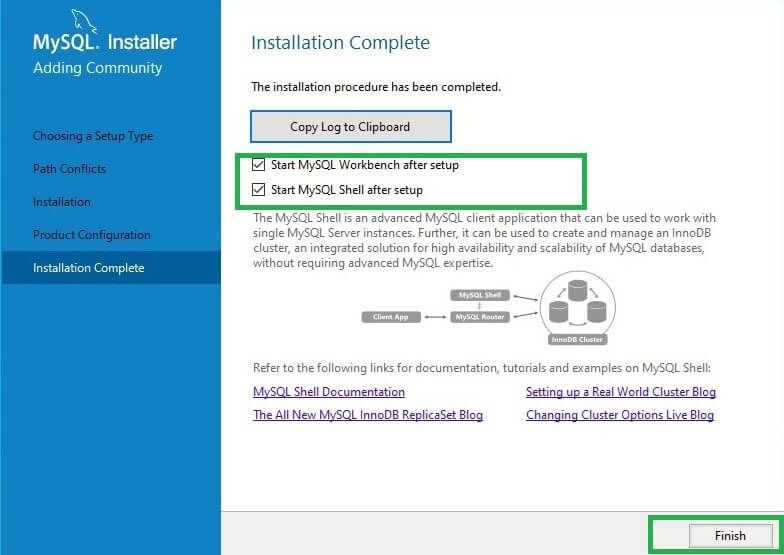
- This will automatically launch MySQL workbench.
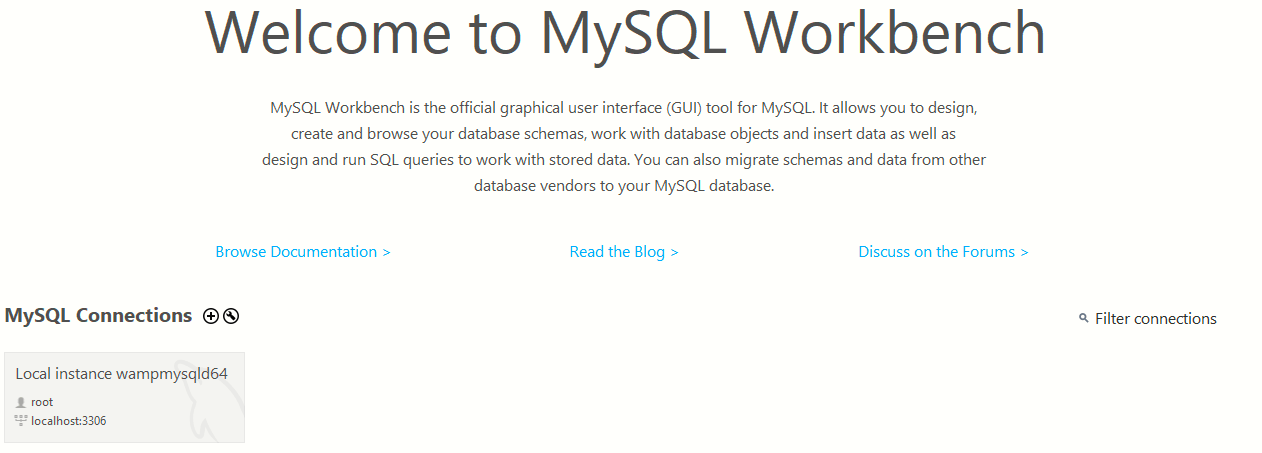
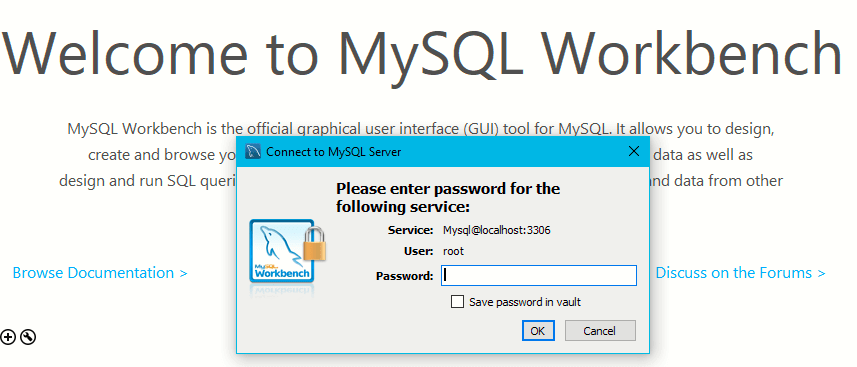
- MySQL Workbench already has a server setup with the password that we provided.

- Under MySQL connections, click the connection as highlighted in the screenshot above. You will be prompted to enter the root password you set previously.
For other operating systems, visit the MySQL Mac and Ubuntu installation docs.
Other options that will work include using WAMP and XAMPP. They both run a Database Management System (DBMS) using Apache.
4. Setting up Node.js
Since we are using Node.js, you will need it installed on your computer.
Download it here.
Once installed, create a project folder and initialize the project with npm init -y. Here’s a guide that will help you to understand NPM in more detail.
To connect Node.js with an SQL database, you need the MySQL package installed.
Run npm install mysql to install the package. Then create a .js file to work on, for example, app.js.
5. Creating a connection to the MySQL server
Before carrying out any database operation, you first need to create a connection to the MySQL server.
In just a few steps mentioned below, you’ll establish a connection to the database.
- Import MySQL using the
require()function.
let mysql = require("mysql");
- Create a connection object with
createConnection().
The object specifies your database server’s details, such as password, username, and host. In this case, I am using the default values provided by the MySQL server.
let dbconnection = mysql.createConnection({
    host: "localhost",
    user: "root",
    //MySQL root password
    password: "",
});
- Establishing a connection to the server.
To make a connection, use the variable dbconnection we have created above and call the connect() function.
dbconnection.connect((err) => {
    //check connection errors
    if (err) {
        return console.error("ERROR: " + err.message);
    }
    // execute queries related to the database after a successful connection
    console.log("connection established...");
});
The connect() function allows us to execute the database queries whenever a connection to the server is established. If a connection was not successful, the server would log an error that describes what went wrong while establishing the connection.
Run node app.js to check if the connection is established.

If you run into an error similar to the one shown below.

Follow these steps.
- Run the following query in MySQL Workbench.
ALTER USER 'root'@'localhost' IDENTIFIED WITH mysql_native_password BY 'password'
Where root is the user, localhost is the URL, and password is the password. In this case, the password you provided earlier will be overridden, and thus your new password will be password.
- Run
flush privilegesto refresh privileges.
We need to create a database that will be queried by the connection we have created.
6. Creating a database
Next, we need to create a database to store our information. To start, create a function called createDB(). We will use this function to create a new database. After making a successful connection, call the function createDB() as shown below.
let mysql = require("mysql");
let dbconnection = mysql.createConnection({
    host: "localhost",
    user: "root",
    password: "",
});

//check connection errors
dbconnection.connect((err) => {
    if (err) {
        return console.error("ERROR: " + err.message);
    }
    // call createDB() after the connection is established
    createDB();
});

function createDB() {
    let sqlQuery = "CREATE DATABASE IF NOT EXISTS Company";
    dbconnection.query(sqlQuery, (err, result) => {
        if (err) throw err;
        console.log(result);
        console.log("Database created...");
    });
}
Calling createDB() will create a new database named Company, if it does not already exist.
Run node app.js.

Go ahead and check that your database was successfully created.
Now that we have a database, we need to specify that inside createConnection() as shown below.
host: "localhost",
user: "root",
password: "",
// include the database we have just created
database: "Company"
7. Creating a table and adding rows
Next, we need to add a table and rows to our database. Instead of manually creating tables and rows, let’s write some code that will create a table and automatically insert some rows.
A relational database comprises tables of related data. Data in a table is stored in rows and columns. Rows specify an entry recorded in a table. Columns hold data of the same kind, for example, first names.
To visualise a database table, think of an ordinary table with some data. In this case, each column of this table has a specific data type, and each row is a record of that table.
Back to Node.js. Let’s create a table with some rows in it.
Again, remember relational databases uses SQL queries to execute a command to a database. For example.
CREATE TABLE `offices` (
  `officeCode` int(11) NOT NULL,
  `city` varchar(50) NOT NULL,
  `phone` varchar(50) NOT NULL,
  `addressLine1` varchar(50) NOT NULL,
  `addressLine2` varchar(50) DEFAULT NULL,
  `state` varchar(50) DEFAULT NULL,
  `country` varchar(50) NOT NULL,
  `postalCode` varchar(15) NOT NULL,
  `territory` varchar(10) NOT NULL,
  PRIMARY KEY (`officeCode`)
) ENGINE=InnoDB DEFAULT CHARSET=latin1;
We will be using such queries alongside Node.js to perform the operations we want within the database we’ve created.
let mysql = require("mysql");
let dbconnection = mysql.createConnection({
    host: "localhost",
    user: "root",
    password: "",
    database: "Company"
});

//check connection errors
dbconnection.connect((err) => {
    if (err) {
        return console.error("ERROR: " + err.message);
    }

    // call createTableOffices() after the connection is established
    createTableOffices();
});

function createTableOffices() {
    //Sets up the Database Table and Rows
    const createTable = `CREATE TABLE IF NOT EXISTS offices( officeCode int AUTO_INCREMENT,city varchar(50) NOT NULL,
  phone varchar(50) NOT NULL,
  addressLine1 varchar(50) NOT NULL,
  addressLine2 varchar(50) DEFAULT NULL,
  state varchar(50) DEFAULT NULL,
  country varchar(50) NOT NULL,
  postalCode varchar(15) NOT NULL,
  territory varchar(10) NOT NULL,
  PRIMARY KEY (officeCode))`;

    //Execute tables creation query
    dbconnection.query(createTable, (err, results, fields) => {
        if (err) {
            return console.error(err.message);
        }
        console.log("Table and rows created...");
    });
}
Call createTableOffices() after the connection is established and run node app.js to execute the query. You may need to refresh the MySQL workbench to reflect the changes.

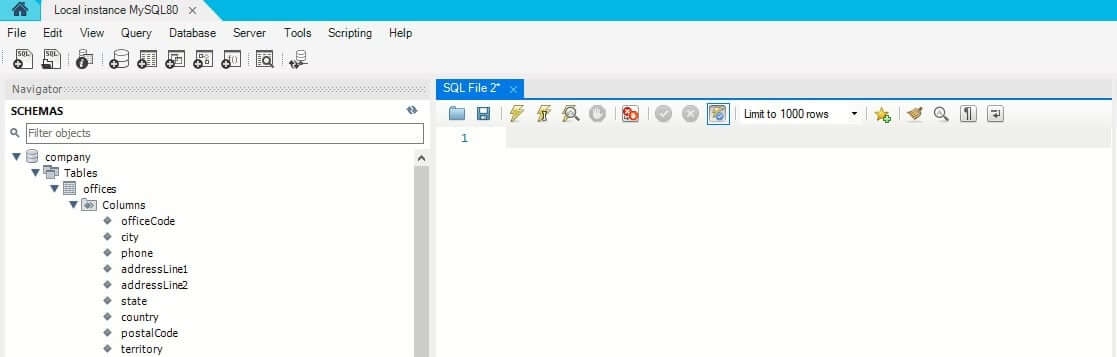
In the code above: we’ve created a table called offices, included several rows and an officeCode was set to auto-increment. Every time we insert a record in this table, the officeCode will auto-increment without specifying that during the data insertion.
When working with relational databases, you need to specify a primary key in each table. A primary key is a unique value found in every record. The primary key forms a column in a table, and each table has only one primary key. The choice of a primary key depends on the table preference to meet the users’ preferences.
For example, Uber drivers can uniquely be identified with their driver’s licenses.
When executing such SQL queries, remember to set the correct data types such as integers, varchar, date, or time to enhance data consistency.
8. Inserting into a database
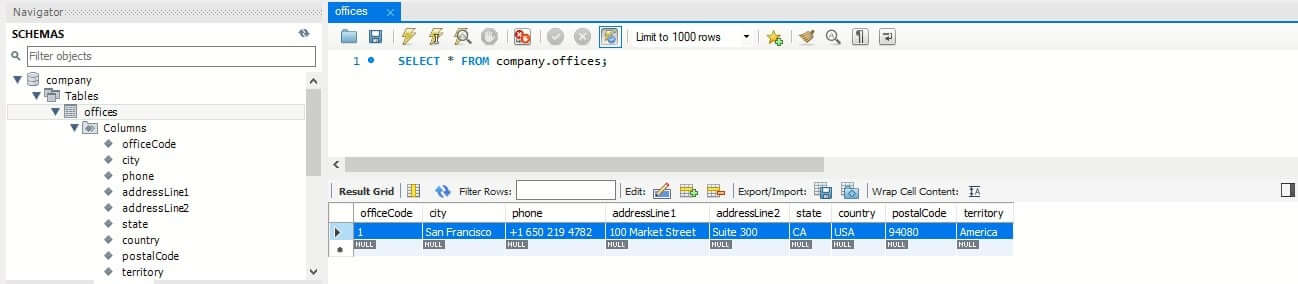
Now, we have a table and rows set, it’s time to insert some data into our table. Inserting into a table involves specifying the data to insert into the rows.
function insertOffices() {
    let office = {
        city: "San Francisco",
        phone: "+1 650 219 4782",
        addressLine1: "100 Market Street",
        addressLine2: "Suite 300",
        state: "CA",
        country: "USA",
        postalCode: "94080",
        territory: "America",
    };
    let sqlQuery = "INSERT INTO offices SET ?";
    let query = dbconnection.query(sqlQuery, office, (err, result) => {
        if (err) throw err;
        console.log(result);
        console.log("an office added...");
    });
}
We specify the data we want to insert by performing an insertion command. Specify the row name followed by the data you want to insert.
Call insertOffices() after the connection is established and run node app.js to execute the query.
Go back to MySQL workbench. Hover over the office table and click the small icon on the far end to open the table and view the row you have inserted.

Try inserting another office record.
function insertOffices() {
    let office = {
        city: "NYC",
        phone: "+1 212 555 3000",
        addressLine1: "523 East 53rd Street",
        addressLine2: "",
        state: "NY",
        country: "USA",
        postalCode: "9401002280",
        territory: "America",
    };

    let sqlQuery = "INSERT INTO offices SET ?";
    let query = dbconnection.query(sqlQuery, office, (err, result) => {
        if (err) throw err;
        console.log(result);
        console.log("an office added...");
    });
}
addressLine2 is set to null. Meaning there is an instance that the column will be null. You need to specify that with “”. Otherwise, the program will throw an error.
Go ahead and try adding more offices to the offices table.
9. Fetching from a database
Fetching data allows displaying data to end-users.
To fetch from a database, specify a select operation while specifying the rows you want to display. Let’s do that from the data we have inserted.
There are several ways you can use select to fetch data from a table.
- To select all rows from the table, specify wildcards as shown below.
function showOffices() {
    let sqlQuery = `SELECT * FROM offices`;
    let query = dbconnection.query(sqlQuery, (err, result) => {
        if (err) throw err;
        console.log(result);
        console.log("fetched:");
    });
}
- When selecting, you can opt to fetch specific columns using a where clause. It allows you to select the rows and columns that you need by meeting particular conditions.
let sqlQuery = `SELECT officeCode, phone, state, postalCode, territory FROM offices WHERE country ="USA"`;
- You can order your section depending on the columns you have in a table.
let sqlQuery = `SELECT * FROM offices ORDER BY officeCode DESC`;
- When you want to select a specific number of records, LIMIT will help you return the numbers of records you wish to display.
let sqlQuery = `SELECT * FROM offices LIMIT 3`;
- You can combine them all in one selection.
let sqlQuery = `SELECT officeCode, phone, state, postalCode, territory FROM offices WHERE country="USA" ORDER BY officeCode DESC LIMIT 2`;
Now let’s learn how to write SQL queries using Node.js. I want to introduce Express.
Express is a fast, unopinionated, minimalist web framework for Node.js with various HTTP utility methods and middleware at your disposal.
Check this guide to get started with Express.
Web services are based on HTTP requests and responses. When building a web application, you want to capture responses based on a server request. Usually, you want to get server responses and initiate an interaction between the server and a database. With a few examples, we will demonstrate how to create an Express server to communicate with the MySQL server to manage and manipulate our database information.
You may want to use Nodemon. It is an optional package (installed globally) which automatically restarts the server after saving any changes in server-side code. Check this guide to learn more about Nodemon.
npm install -g nodemon
Go ahead and install Express.
npm install express
Then, create a file called server.js and import MySQL and Express using the require() function.
let express = require("express");
let mysql = require("mysql");
Then setup a simple Express server using the code below:
let express = require("express");
let mysql = require("mysql");
let app = express();

app.listen(3000, () => {
    console.log("Application started and Listening on port 3000");
});
Run nodemon to start the server and then type localhost:3000 in your browser. If you get the error Cannot GET /, you are good to go.
Next, we need to create routes to run the SQL queries but for our server to start communicating with the database, we first need to create a database connection, as we explained above.
let express = require("express");
let mysql = require("mysql");
let app = express();
let dbconnection = mysql.createConnection({
    host: "localhost",
    user: "root",
    password: "",
    database: "Company",
});

dbconnection.connect((err) => {
    if (err) {
        return console.error("ERROR: " + err.message);
    }
});
app.listen(3000, () => {
    console.log("Application started and Listening on port 3000");
});
10. Making a selection from the server
We have already done a couple of selects. In this example, I want the select offices base on the officeCode. To do this, we will create and set a route and specify the officeCode of the office we want to select.
let express = require("express");
let mysql = require("mysql");
let app = express();
let dbconnection = mysql.createConnection({
    host: "localhost",
    user: "root",
    password: "",
    database: "Company",
});

dbconnection.connect((err) => {
    if (err) {
        return console.error("ERROR: " + err.message);
    }
});

app.get("/offices/:officeCode", (req, res) => {
    let sqlQuery = `SELECT * FROM offices WHERE officeCode = ${req.params.officeCode}`;
    const querry = dbconnection.query(sqlQuery, (err, result, fields) => {
        if (!err) res.send(result);
        else console.log(err);
    });
});

app.listen(3000, () => {
    console.log("Application started and Listening on port 3000");
});
Open localhost:3000/offices/1 to get the result, where 1 is the officeCode representing the office we want to select.
We specify the officeCode while making a request to the server. The server returns a response equal to the request we sent. The server communicates with the database. The server will return the database results where the officeCode is equal to the officeCode we specified.
11. Updating
The next thing we are going to do is update or change specific values in our table.
When managing data, at times, you may need to change some data. With a relational database, an update command allows you to change and update specific row’s values and update it with the news values.
Let’s see that with an example.
// Update office
app.get("/updateoffice/:officeCode", (req, res) => {
    let newaddressLine = "25 Old Broad Street";
    let newState = "WD";
    let sqlQuery = `UPDATE offices SET
    addressLine1 = '${newaddressLine}',state = '${newState}' WHERE officeCode = ${req.params.officeCode}`;
    let query = dbconnection.query(sqlQuery, (err, result) => {
        if (err) throw err;
        console.log(result);
        res.send("office updated...");
    });
});
Open localhost:3000/updateoffice/1 to get the results and then open the offices’ table to confirm the changes.
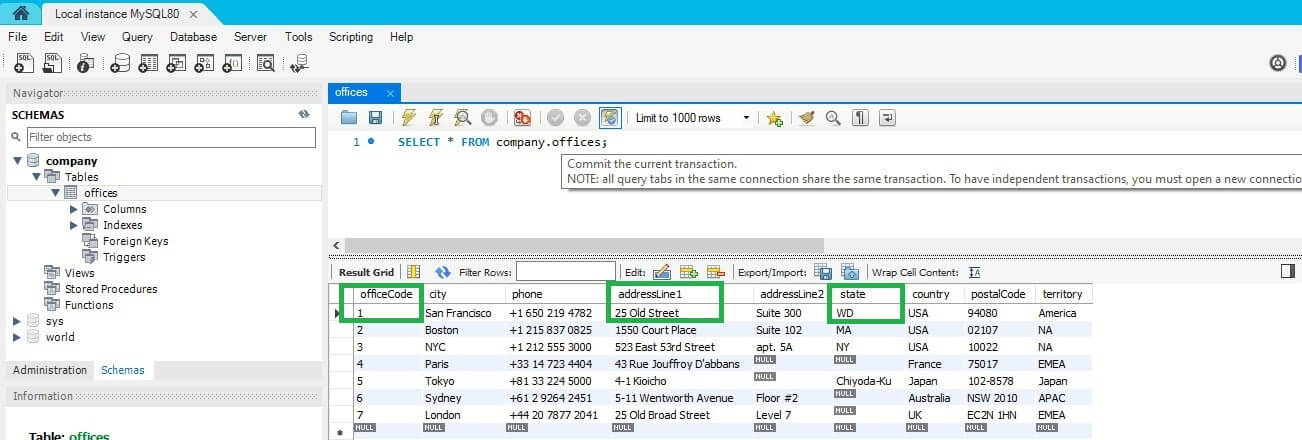
SQL uses a set command to tell a MySQL server which values to update by setting the updating values. The SET value is followed by a WHERE condition to match the record we want to update.
12. Deleting
Perhaps you want to delete one or multiple records in a database. The DELETE command is available to do this while observing some condition from where a deletion should be performed.
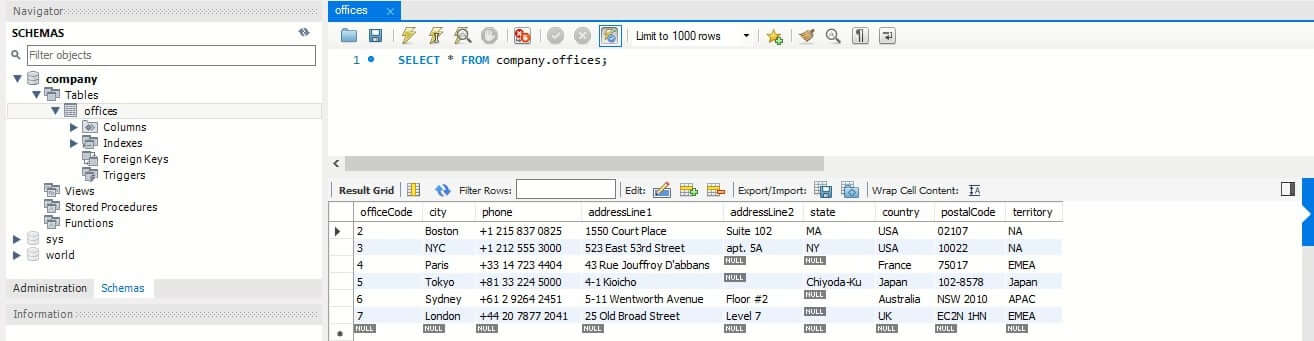
// Delete office
app.get("/deleteoffice/:id", (req, res) => {
    let sqlQuery = `DELETE FROM offices WHERE officeCode = ${req.params.id}`;
    let query = dbconnection.query(sqlQuery, (err, result) => {
        if (err) throw err;
        console.log(result);
        res.send("An office deleted...");
    });
});
Open localhost:3000/deleteoffice/1 to get the results and then open the offices’ table to confirm changes.
13. Closing the connection
Once the queries are executed, you need to close/terminate the connection. This ensures that all queries are executed and sends the quit packet to the MySQL server.
There are a few different methods to close a MySQL database connection.
- Using a
end()function.
This end() function terminates a connection when the queued queries finished executing before sending a COM_QUIT message to the server.
dbconnection.end((err) => {
  // The connection is terminated now
});
If an error occurs, the error result is sent to a callback, and the connection is terminated.
- Using
destroy().
When called, destroy() closes all the connections without waiting for an executing query to finish.
dbconnection.destroy();
14. Connection pooling
Connection pooling is a concept that creates multiple connections to execute queries in parallel. In our examples, we’ve used createConnection(), which creates a connection once. Whenever executing another query, a connection to the server has to be established again.
With createPool(), a new connection doesn’t have to be established multiple times, as a connection is created in a pool.
Connection pooling comes into play when an application has, for example, many users. Execution happens in parallel. It maintains a cache of database connections for executing queries. This saves the time and resources needed to create a new connection for each user.
Here is a basic example of connection pooling:
const {createPool} = require("mysql");

// create pool connection
const pool = createPool({
    host: "localhost",
    user: "root",
    password: "",
    database: "Company",
    connectionLimit: 10,
});

//execute query
pool.query(`select * from offices`, (err, result, fields) => {
    if (err) {
        return console.log(err);
    }
    return console.log(result);
});
This creates multiple connections to execute the queries in parallel. A new connection doesn’t have to be established, as a connection is created in a pool.
I hope this guide helps get you started writing SQL queries and executing them within the Node.js application.