
Table of Contents
In this article, we shall take a look at how to harness the power of TypeScript to create an API. Microsoft introduced typeScript as a superset of JavaScript. It takes the versatility of JavaScript and improves it with type definitions. Type definitions are used to enforce types on a variable. For example, the value 5 is a number.
A number is a type definition in TypeScript. TypeScript is used with a lot of popular frameworks like React.js and React Native to build enterprise applications.
1. Prerequisites & pre-reading material
To follow this article along, the reader will need the following:
- A basic understanding of HTTP Requests and APIs.
- Fundamental concepts of Node.js.
- TypeScript basics.
2. Project setup
To get started, let’s create a working directory for our project:
# Create a directory 'node-typescript'
mkdir node-typescript

# Choose the new directory as the current directory
cd node-typescript
Let’s initialize a Node.js project:
# The -y option initializes the project with default settings
npm init -y
Express is a framework built on Node.js. It is used to build backend servers and APIs. To learn more about Express, visit their official docs.
Let us install Express:
# Install express
npm install express
Now, to use TypeScript within our web API, we need to install TypeScript as a developer dependency.
This can be done as follows:
# The -D option installs typescript as a developer dependency
npm install -D typescript
TypeScript contains static type definitions, which enables catching errors during compile time. This is one of the reasons developers prefer TypeScript over JavaScript.
It is easier to fix errors during development rather than during production. To learn more about static typing, check out this article.
Now, let’s install type definitions for Node.js and Express:
# Type definitions are hosted in the @types npm namespace
npm install -D @types/node @types/express
We also need a tsconfig.json file. This file is used to explain the project structure to the TypeScript compiler.
Let’s initialize the config:
# Initializes a tsconfig file
npx tsc --init
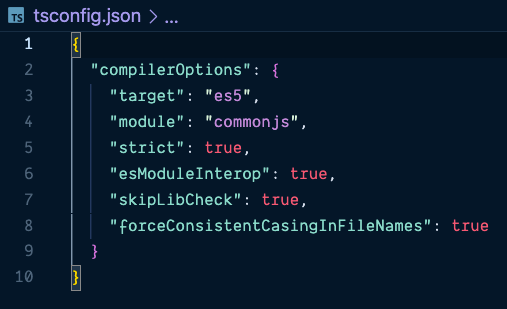
Image: TypeScript Configuration File
3. Let’s code!
3.1. Creating a configuration to store routes
TypeScript is an Object-Oriented Programming (OOP) Language. An OOP language uses objects and classes to represent entities. You can read more about OOP here.
Let’s write an abstract class that defines the skeleton for our route configuration.
Create a new folder called src, and a file routes.config.ts within src:
mkdir src
cd src

# Create the routes config file
touch routes.config.ts
‘routes.config.ts’
// The express package is imported
import express from "express";

// We define this as an abstract class
// This contains the abstract method: config()
export abstract class RoutesConfig {
  // app is of the TypeScript type: Application, which is defined in @types/express
  app: express.Application;

  // name is the name of the route
  name: string;

  constructor(app: express.Application, name: string) {
    // Initializing the member variables
    this.app = app;
    this.name = name;
    this.config();
  }

  // Name Getter Method
  getName = () => {
    return this.name;
  };

  // config() is defined as an abstract function
  abstract config(): express.Application;
}
You may be wondering why the class above is defined as abstract. This is because abstract classes cannot contain the implementation of their methods. This routes configuration defines a basic skeleton and can be extended to create different routes.
3.2. Defining the routes
Now, let’s define the various routes.
Create a new file called apiRoutes.ts.
touch apiRoutes.ts
‘apiRoutes.ts’
// The configuration file that we wrote is imported
import { RoutesConfig } from "./routes.config";
import express from "express";

// Defining data as an array of objects
let data: Object[] = [];

// The ApiRoutes class inherits the RoutesConfig class
export class ApiRoutes extends RoutesConfig {
  constructor(app: express.Application) {
    super(app, "ApiRoutes");
  }

  // The config function contains the routes
  config() {
    // The express.Request and express.Response types are defined in @types/express
    this.app
      .route("/api")
      .get((req: express.Request, res: express.Response) => {
        // The response is sent back
        res.send(`GET Request successful!`);
      });
    // :id defines a query param
    this.app
      .route("/api/:id")
      .get((req: express.Request, res: express.Response) => {
        // The parameter is sent back as a response
        res.send(
          `GET Request successful. Parameter passed is: ${req.params.id}`
        );
      });
    // Post request
    this.app
      .route("/api/post")
      .post((req: express.Request, res: express.Response) => {
        let putData = {
          // The parameter is taken from request.body
          id: req.body.id,
          time: new Date(),
        };
        // the posted data is added to the data array
        data.push(putData);
        res.json(putData);
      });
    return this.app;
  }
}
PUT and DELETE requests follow the same format as the POST request. Instead of this.app.route.post, we use this.app.route.put.
3.3. Writing the entry point file
Now, let’s define the app.ts, which serves as the entry point into our API.
‘app.ts’
import express from "express";
import * as http from "http";
// Importing the base route config file
import { RoutesConfig } from "./routes.config";
// Importing the defined routes
import { ApiRoutes } from "./apiRoutes";

// Initializing the express app
const app: express.Application = express();
// Creating an API server
const server: http.Server = http.createServer(app);
const port = 3000;
// This array holds all the routes
const routes: Array<RoutesConfig> = [];

// Parses the response as JSON
app.use(express.json());

// All the defined routes are pushed into the routes array
routes.push(new ApiRoutes(app));

// Sample get request to check if server is running
app.get("/", (req: express.Request, res: express.Response) => {
  res.status(200).send(`Server is running!`);
});

// The server listens to requests in port 3000
server.listen(port, () => {
  console.log(`Server running locally at port: ${port}`);
});
Our API is now ready.
3.4. Set the TSConfig
To compile TypeScript into JavaScript and enable type checking, we need to update our tsconfig:
‘tsconfig.json’
{
  "compilerOptions": {
    "target": "es2016",
    "module": "commonjs",
    "outDir": "./dist",
    "strict": true,
    "esModuleInterop": true,
    "inlineSourceMap": true
  }
}
Here, the outDir key defines that the output .js files should be stored in a directory called dist. We can also create an npm script that compiles the .ts file and also starts the server.
‘package.json’
"scripts": {
    "start": "tsc && node ./dist/app.js",
    "test": "echo \"Error: no test specified\" && exit 1"
},
The test script runs the tsc compile command and also starts the server.
4. Testing the API
To test the API, let us first run the server:
npm run start
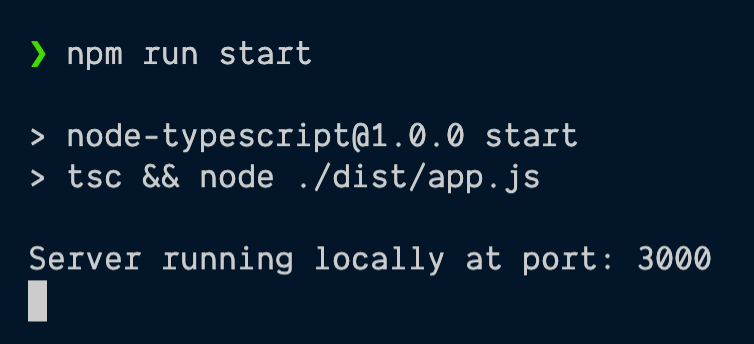
Image: Starting the API server
Now, open a separate terminal. We can test our API by the use of the curl command. cURL is a command line tool that is used to transfer data using the HTTP protocol and test APIs. cURL stands for client URL.
curl --request GET 'localhost:3000/api'

curl --request GET 'localhost:3000/api/10'

# The -H option is used to specify content-type and -d is used to specify the json data
curl --request POST -H "Content-Type: application/json" -d '{"id": "5"}' localhost:3000/api/post
As you see in the output, our basic API works perfectly.

The post response is as follows:

Image: API Response Output
5. Summary
- We set up a Node.js project and configured it to work with TypeScript.
- We installed the required dependencies and their corresponding type definitions.
- Abstract classes and inheritance were heavily used to make the API extensible. This pattern makes it easier to write new routes.
- We tested the API using cURL.
- The entire source code for this article can be found in this GitHub repository.
Happy coding!
6. Index & abbreviations
- HTTP: HyperText Transfer Protocol
- API: Application Programming Interface
- TS: TypeScript
- JS: JavaScript
- OOP: Object-Oriented Programming