
You can create an executable JAR file, and run the Spring Boot application by using the Maven or Gradle commands as shown below −
For Maven, you can use the command given below −
mvn clean install
After “BUILD SUCCESS”, you can find the JAR file under the target directory.
For Gradle, you can use the command as shown −
gradle clean build
After “BUILD SUCCESSFUL”, you can find the JAR file under the build/libs directory.
Run the JAR file by using the command given here −
java –jar <JARFILE>
Now, the application has started on the Tomcat port 8080 as shown.

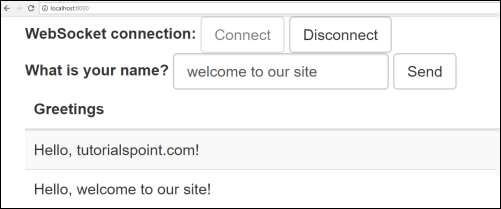
Now, hit the URL http://localhost:8080/ in your web browser and connect the web socket and send the greeting and receive the message.
Batch Service is a process to execute more than one command in a single task. In this chapter, you are going to learn how to create batch service in a Spring Boot application.
Let us consider an example where we are going to save the CSV file content into HSQLDB.
To create a Batch Service program, we need to add the Spring Boot Starter Batch dependency and HSQLDB dependency in our build configuration file.
Maven users can add the following dependencies in pom.xml file.
<dependency>
   <groupId>org.springframework.boot</groupId>
   <artifactId>spring-boot-starter-batch</artifactId>
</dependency>
<dependency>
   <groupId>org.hsqldb</groupId>
   <artifactId>hsqldb</artifactId>
</dependency>
Gradle users can add the following dependencies in build.gradle file.
compile("org.springframework.boot:spring-boot-starter-batch")
compile("org.hsqldb:hsqldb")
Now, add the simple CSV data file under classpath resources – src/main/resources and name the file as file.csv as shown −
William,John
Mike, Sebastian
Lawarance, Lime
Next, write a SQL script for HSQLDB – under the classpath resource directory – request_fail_hystrix_timeout
DROP TABLE USERS IF EXISTS;
CREATE TABLE USERS  (
   user_id BIGINT IDENTITY NOT NULL PRIMARY KEY,
   first_name VARCHAR(20),
   last_name VARCHAR(20)
);
Create a POJO class for USERS model as shown −
package com.maixuanviet.batchservicedemo;
public class User {
   private String lastName;
   private String firstName;

   public User() {
   }
   public User(String firstName, String lastName) {
      this.firstName = firstName;
      this.lastName = lastName;
   }
   public void setFirstName(String firstName) {
      this.firstName = firstName;
   }
   public String getFirstName() {
      return firstName;
   }
   public String getLastName() {
      return lastName;
   }
   public void setLastName(String lastName) {
      this.lastName = lastName;
   }

   @Override
   public String toString() {
      return "firstName: " + firstName + ", lastName: " + lastName;
   }
}
Now, create an intermediate processor to do the operations after the reading the data from the CSV file and before writing the data into SQL.
package com.maixuanviet.batchservicedemo;

import org.slf4j.Logger;
import org.slf4j.LoggerFactory;
import org.springframework.batch.item.ItemProcessor;

public class UserItemProcessor implements ItemProcessor<User, User> {
   private static final Logger log = LoggerFactory.getLogger(UserItemProcessor.class);

   @Override
   public User process(final User user) throws Exception {
      final String firstName = user.getFirstName().toUpperCase();
      final String lastName = user.getLastName().toUpperCase();
      final User transformedPerson = new User(firstName, lastName);

      log.info("Converting (" + user + ") into (" + transformedPerson + ")");
      return transformedPerson;
   }
}
Let us create a Batch configuration file, to read the data from CSV and write into the SQL file as shown below. We need to add the @EnableBatchProcessing annotation in the configuration class file. The @EnableBatchProcessing annotation is used to enable the batch operations for your Spring Boot application.
package com.maixuanviet.batchservicedemo;

import javax.sql.DataSource;
import org.springframework.batch.core.Job;
import org.springframework.batch.core.Step;

import org.springframework.batch.core.configuration.annotation.EnableBatchProcessing;
import org.springframework.batch.core.configuration.annotation.JobBuilderFactory;
import org.springframework.batch.core.configuration.annotation.StepBuilderFactory;
import org.springframework.batch.core.launch.support.RunIdIncrementer;
import org.springframework.batch.item.database.BeanPropertyItemSqlParameterSourceProvider;
import org.springframework.batch.item.database.JdbcBatchItemWriter;
import org.springframework.batch.item.file.FlatFileItemReader;
import org.springframework.batch.item.file.mapping.BeanWrapperFieldSetMapper;
import org.springframework.batch.item.file.mapping.DefaultLineMapper;
import org.springframework.batch.item.file.transform.DelimitedLineTokenizer;
import org.springframework.beans.factory.annotation.Autowired;
import org.springframework.context.annotation.Bean;
import org.springframework.context.annotation.Configuration;
import org.springframework.core.io.ClassPathResource;

@Configuration
@EnableBatchProcessing
public class BatchConfiguration {
   @Autowired
   public JobBuilderFactory jobBuilderFactory;

   @Autowired
   public StepBuilderFactory stepBuilderFactory;

   @Autowired
   public DataSource dataSource;

   @Bean
   public FlatFileItemReader<User> reader() {
      FlatFileItemReader<User> reader = new FlatFileItemReader<User>();
      reader.setResource(new ClassPathResource("file.csv"));
      reader.setLineMapper(new DefaultLineMapper<User>() {
         {
            setLineTokenizer(new DelimitedLineTokenizer() {
               {
                  setNames(new String[] { "firstName", "lastName" });
               }
            });
            setFieldSetMapper(new BeanWrapperFieldSetMapper<User>() {
               {
                  setTargetType(User.class);
               }
            });
         }
      });
      return reader;
   }
   @Bean
   public UserItemProcessor processor() {
      return new UserItemProcessor();
   }
   @Bean
   public JdbcBatchItemWriter<User> writer() {
      JdbcBatchItemWriter<User> writer = new JdbcBatchItemWriter<User>();
      writer.setItemSqlParameterSourceProvider(new BeanPropertyItemSqlParameterSourceProvider<User>());
      writer.setSql("INSERT INTO USERS (first_name, last_name) VALUES (:firstName, :lastName)");
      writer.setDataSource(dataSource);
      return writer;
   }
   @Bean
   public Job importUserJob(JobCompletionNotificationListener listener) {
      return jobBuilderFactory.get("importUserJob").incrementer(
         new RunIdIncrementer()).listener(listener).flow(step1()).end().build();
   }
   @Bean
   public Step step1() {
      return stepBuilderFactory.get("step1").<User, User>chunk(10).reader(reader()).processor(processor()).writer(writer()).build();
   }
}
The reader() method is used to read the data from the CSV file and writer() method is used to write a data into the SQL.
Next, we will have to write a Job Completion Notification Listener class – used to notify after the Job completion.
package com.maixuanviet.batchservicedemo;

import java.sql.ResultSet;
import java.sql.SQLException;
import java.util.List;

import org.slf4j.Logger;
import org.slf4j.LoggerFactory;

import org.springframework.batch.core.BatchStatus;
import org.springframework.batch.core.JobExecution;
import org.springframework.batch.core.listener.JobExecutionListenerSupport;
import org.springframework.beans.factory.annotation.Autowired;
import org.springframework.jdbc.core.JdbcTemplate;
import org.springframework.jdbc.core.RowMapper;
import org.springframework.stereotype.Component;

@Component
public class JobCompletionNotificationListener extends JobExecutionListenerSupport {
   private static final Logger log = LoggerFactory.getLogger(JobCompletionNotificationListener.class);
   private final JdbcTemplate jdbcTemplate;

   @Autowired
   public JobCompletionNotificationListener(JdbcTemplate jdbcTemplate) {
      this.jdbcTemplate = jdbcTemplate;
   }
   @Override
   public void afterJob(JobExecution jobExecution) {
      if (jobExecution.getStatus() == BatchStatus.COMPLETED) {
         log.info("!!! JOB FINISHED !! It's time to verify the results!!");

         List<User> results = jdbcTemplate.query(
            "SELECT first_name, last_name FROM USERS", new RowMapper<User>() {

            @Override
            public User mapRow(ResultSet rs, int row) throws SQLException {
               return new User(rs.getString(1), rs.getString(2));
            }
         });

         for (User person : results) {
            log.info("Found <" + person + "> in the database.");
         }
      }
   }
}
Now, create an executable JAR file, and run the Spring Boot application by using the following Maven or Gradle commands.
For Maven, use the command as shown −
mvn clean install
After “BUILD SUCCESS”, you can find the JAR file under the target directory.
For Gradle, you can use the command as shown −
gradle clean build
After “BUILD SUCCESSFUL”, you can find the JAR file under the build/libs directory.
Run the JAR file by using the command given here −
java –jar <JARFILE>
You can see the output in console window as shown −
