
Table of Contents
Let’s get a more in-depth look at DOM nodes.
In this chapter we’ll see more into what they are and learn their most used properties.
1. DOM node classes
Different DOM nodes may have different properties. For instance, an element node corresponding to tag <a> has link-related properties, and the one corresponding to <input> has input-related properties and so on. Text nodes are not the same as element nodes. But there are also common properties and methods between all of them, because all classes of DOM nodes form a single hierarchy.
Each DOM node belongs to the corresponding built-in class.
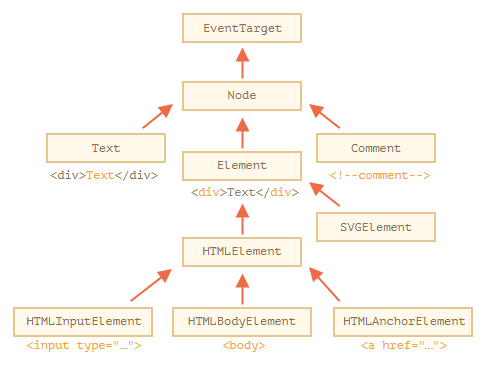
The root of the hierarchy is EventTarget, that is inherited by Node, and other DOM nodes inherit from it.
Here’s the picture, explanations to follow:
The classes are:
- EventTarget – is the root “abstract” class. Objects of that class are never created. It serves as a base, so that all DOM nodes support so-called “events”, we’ll study them later.
- Node – is also an “abstract” class, serving as a base for DOM nodes. It provides the core tree functionality:
parentNode,nextSibling,childNodesand so on (they are getters). Objects ofNodeclass are never created. But there are concrete node classes that inherit from it, namely:Textfor text nodes,Elementfor element nodes and more exotic ones likeCommentfor comment nodes. - Element – is a base class for DOM elements. It provides element-level navigation like
nextElementSibling,childrenand searching methods likegetElementsByTagName,querySelector. A browser supports not only HTML, but also XML and SVG. TheElementclass serves as a base for more specific classes:SVGElement,XMLElementandHTMLElement. - HTMLElement – is finally the basic class for all HTML elements. It is inherited by concrete HTML elements:
- HTMLInputElement – the class for
<input>elements, - HTMLBodyElement – the class for
<body>elements, - HTMLAnchorElement – the class for
<a>elements, - …and so on, each tag has its own class that may provide specific properties and methods.
- HTMLInputElement – the class for
So, the full set of properties and methods of a given node comes as the result of the inheritance.
For example, let’s consider the DOM object for an <input> element. It belongs to HTMLInputElement class.
It gets properties and methods as a superposition of (listed in inheritance order):
HTMLInputElement– this class provides input-specific properties,HTMLElement– it provides common HTML element methods (and getters/setters),Element– provides generic element methods,Node– provides common DOM node properties,EventTarget– gives the support for events (to be covered),- …and finally it inherits from
Object, so “plain object” methods likehasOwnPropertyare also available.
To see the DOM node class name, we can recall that an object usually has the constructor property. It references the class constructor, and constructor.name is its name:
alert( document.body.constructor.name ); // HTMLBodyElement
…Or we can just toString it:
alert( document.body ); // [object HTMLBodyElement]
We also can use instanceof to check the inheritance:
alert( document.body instanceof HTMLBodyElement ); // true
alert( document.body instanceof HTMLElement ); // true
alert( document.body instanceof Element ); // true
alert( document.body instanceof Node ); // true
alert( document.body instanceof EventTarget ); // true
As we can see, DOM nodes are regular JavaScript objects. They use prototype-based classes for inheritance.
That’s also easy to see by outputting an element with console.dir(elem) in a browser. There in the console you can see HTMLElement.prototype, Element.prototype and so on.
console.dir(elem) versus console.log(elem)
Most browsers support two commands in their developer tools: console.log and console.dir. They output their arguments to the console. For JavaScript objects these commands usually do the same.
But for DOM elements they are different:
console.log(elem)shows the element DOM tree.console.dir(elem)shows the element as a DOM object, good to explore its properties.
Try it on document.body.
IDL in the spec
In the specification, DOM classes aren’t described by using JavaScript, but a special Interface description language (IDL), that is usually easy to understand.
In IDL all properties are prepended with their types. For instance, DOMString, boolean and so on.
Here’s an excerpt from it, with comments:
// Define HTMLInputElement
// The colon ":" means that HTMLInputElement inherits from HTMLElement
interface HTMLInputElement: HTMLElement {
  // here go properties and methods of <input> elements

  // "DOMString" means that the value of a property is a string
  attribute DOMString accept;
  attribute DOMString alt;
  attribute DOMString autocomplete;
  attribute DOMString value;

  // boolean value property (true/false)
  attribute boolean autofocus;
  ...
  // now the method: "void" means that the method returns no value
  void select();
  ...
}
2. The “nodeType” property
The nodeType property provides one more, “old-fashioned” way to get the “type” of a DOM node.
It has a numeric value:
elem.nodeType == 1for element nodes,elem.nodeType == 3for text nodes,elem.nodeType == 9for the document object,- there are few other values in the specification.
For instance:
<body>
  <script>
  let elem = document.body;

  // let's examine what it is?
  alert(elem.nodeType); // 1 => element

  // and the first child is...
  alert(elem.firstChild.nodeType); // 3 => text

  // for the document object, the type is 9
  alert( document.nodeType ); // 9
  </script>
</body>
In modern scripts, we can use instanceof and other class-based tests to see the node type, but sometimes nodeType may be simpler. We can only read nodeType, not change it.
3. Tag: nodeName and tagName
Given a DOM node, we can read its tag name from nodeName or tagName properties:
For instance:
alert( document.body.nodeName ); // BODY
alert( document.body.tagName ); // BODY
Is there any difference between tagName and nodeName?
Sure, the difference is reflected in their names, but is indeed a bit subtle.
- The
tagNameproperty exists only forElementnodes. - The
nodeNameis defined for anyNode:- for elements it means the same as
tagName. - for other node types (text, comment, etc.) it has a string with the node type.
- for elements it means the same as
In other words, tagName is only supported by element nodes (as it originates from Element class), while nodeName can say something about other node types.
For instance, let’s compare tagName and nodeName for the document and a comment node:
<body><!-- comment -->

  <script>
    // for comment
    alert( document.body.firstChild.tagName ); // undefined (not an element)
    alert( document.body.firstChild.nodeName ); // #comment

    // for document
    alert( document.tagName ); // undefined (not an element)
    alert( document.nodeName ); // #document
  </script>
</body>
If we only deal with elements, then we can use both tagName and nodeName – there’s no difference.
The tag name is always uppercase except in XML mode
The browser has two modes of processing documents: HTML and XML. Usually the HTML-mode is used for webpages. XML-mode is enabled when the browser receives an XML-document with the header: Content-Type: application/xml+xhtml.
In HTML mode tagName/nodeName is always uppercased: it’s BODY either for <body> or <BoDy>.
In XML mode the case is kept “as is”. Nowadays XML mode is rarely used.
4. innerHTML: the contents
The innerHTML property allows to get the HTML inside the element as a string.
We can also modify it. So it’s one of the most powerful ways to change the page.
The example shows the contents of document.body and then replaces it completely:
<body>
  <p>A paragraph</p>
  <div>A div</div>

  <script>
    alert( document.body.innerHTML ); // read the current contents
    document.body.innerHTML = 'The new BODY!'; // replace it
  </script>

</body>
We can try to insert invalid HTML, the browser will fix our errors:
<body>

  <script>
    document.body.innerHTML = '<b>test'; // forgot to close the tag
    alert( document.body.innerHTML ); // <b>test</b> (fixed)
  </script>

</body>
Scripts don’t execute
If innerHTML inserts a <script> tag into the document – it becomes a part of HTML, but doesn’t execute.
5. Beware: “innerHTML+=” does a full overwrite
We can append HTML to an element by using elem.innerHTML+="more html".
Like this:
chatDiv.innerHTML += "<div>Hello<img src='smile.gif'/> !</div>";
chatDiv.innerHTML += "How goes?";
But we should be very careful about doing it, because what’s going on is not an addition, but a full overwrite.
Technically, these two lines do the same:
elem.innerHTML += "...";
// is a shorter way to write:
elem.innerHTML = elem.innerHTML + "..."
In other words, innerHTML+= does this:
- The old contents is removed.
- The new
innerHTMLis written instead (a concatenation of the old and the new one).
As the content is “zeroed-out” and rewritten from the scratch, all images and other resources will be reloaded.
In the chatDiv example above the line chatDiv.innerHTML+="How goes?" re-creates the HTML content and reloads smile.gif (hope it’s cached). If chatDiv has a lot of other text and images, then the reload becomes clearly visible.
There are other side-effects as well. For instance, if the existing text was selected with the mouse, then most browsers will remove the selection upon rewriting innerHTML. And if there was an <input> with a text entered by the visitor, then the text will be removed. And so on.
Luckily, there are other ways to add HTML besides innerHTML, and we’ll study them soon.
6. outerHTML: full HTML of the element
The outerHTML property contains the full HTML of the element. That’s like innerHTML plus the element itself.
Here’s an example:
<div id="elem">Hello <b>World</b></div>

<script>
  alert(elem.outerHTML); // <div id="elem">Hello <b>World</b></div>
</script>
Beware: unlike innerHTML, writing to outerHTML does not change the element. Instead, it replaces it in the DOM.
Yeah, sounds strange, and strange it is, that’s why we make a separate note about it here. Take a look.
Consider the example:
<div>Hello, world!</div>

<script>
  let div = document.querySelector('div');

  // replace div.outerHTML with <p>...</p>
  div.outerHTML = '<p>A new element</p>'; // (*)

  // Wow! 'div' is still the same!
  alert(div.outerHTML); // <div>Hello, world!</div> (**)
</script>
Looks really odd, right?
In the line (*) we replaced div with <p>A new element</p>. In the outer document (the DOM) we can see the new content instead of the <div>. But, as we can see in line (**), the value of the old div variable hasn’t changed!
The outerHTML assignment does not modify the DOM element (the object referenced by, in this case, the variable ‘div’), but removes it from the DOM and inserts the new HTML in its place.
So what happened in div.outerHTML=... is:
divwas removed from the document.- Another piece of HTML
<p>A new element</p>was inserted in its place. divstill has its old value. The new HTML wasn’t saved to any variable.
It’s so easy to make an error here: modify div.outerHTML and then continue to work with div as if it had the new content in it. But it doesn’t. Such thing is correct for innerHTML, but not for outerHTML.
We can write to elem.outerHTML, but should keep in mind that it doesn’t change the element we’re writing to (‘elem’). It puts the new HTML in its place instead. We can get references to the new elements by querying the DOM.
7. nodeValue/data: text node content
The innerHTML property is only valid for element nodes.
Other node types, such as text nodes, have their counterpart: nodeValue and data properties. These two are almost the same for practical use, there are only minor specification differences. So we’ll use data, because it’s shorter.
An example of reading the content of a text node and a comment:
<body>
  Hello
  <!-- Comment -->
  <script>
    let text = document.body.firstChild;
    alert(text.data); // Hello

    let comment = text.nextSibling;
    alert(comment.data); // Comment
  </script>
</body>
For text nodes we can imagine a reason to read or modify them, but why comments?
Sometimes developers embed information or template instructions into HTML in them, like this:
<!-- if isAdmin -->
  <div>Welcome, Admin!</div>
<!-- /if -->
…Then JavaScript can read it from data property and process embedded instructions.
8. textContent: pure text
The textContent provides access to the text inside the element: only text, minus all <tags>.
For instance:
<div id="news">
  <h1>Headline!</h1>
  <p>Martians attack people!</p>
</div>

<script>
  // Headline! Martians attack people!
  alert(news.textContent);
</script>
As we can see, only text is returned, as if all <tags> were cut out, but the text in them remained.
In practice, reading such text is rarely needed.
Writing to textContent is much more useful, because it allows to write text the “safe way”.
Let’s say we have an arbitrary string, for instance entered by a user, and want to show it.
- With
innerHTMLwe’ll have it inserted “as HTML”, with all HTML tags. - With
textContentwe’ll have it inserted “as text”, all symbols are treated literally.
Compare the two:
<div id="elem1"></div>
<div id="elem2"></div>

<script>
  let name = prompt("What's your name?", "<b>Winnie-the-Pooh!</b>");

  elem1.innerHTML = name;
  elem2.textContent = name;
</script>
- The first
<div>gets the name “as HTML”: all tags become tags, so we see the bold name. - The second
<div>gets the name “as text”, so we literally see<b>Winnie-the-Pooh!</b>.
In most cases, we expect the text from a user, and want to treat it as text. We don’t want unexpected HTML in our site. An assignment to textContent does exactly that.
The “hidden” attribute and the DOM property specifies whether the element is visible or not.
We can use it in HTML or assign it using JavaScript, like this:
<div>Both divs below are hidden</div>

<div hidden>With the attribute "hidden"</div>

<div id="elem">JavaScript assigned the property "hidden"</div>

<script>
  elem.hidden = true;
</script>
Technically, hidden works the same as style="display:none". But it’s shorter to write.
Here’s a blinking element:
<div id="elem">A blinking element</div>

<script>
  setInterval(() => elem.hidden = !elem.hidden, 1000);
</script>
10. More properties
DOM elements also have additional properties, in particular those that depend on the class:
value– the value for<input>,<select>and<textarea>(HTMLInputElement,HTMLSelectElement…).href– the “href” for<a href="...">(HTMLAnchorElement).id– the value of “id” attribute, for all elements (HTMLElement).- …and much more…
For instance:
<input type="text" id="elem" value="value">

<script>
  alert(elem.type); // "text"
  alert(elem.id); // "elem"
  alert(elem.value); // value
</script>
Most standard HTML attributes have the corresponding DOM property, and we can access it like that.
If we want to know the full list of supported properties for a given class, we can find them in the specification. For instance, HTMLInputElement is documented at https://html.spec.whatwg.org/#htmlinputelement.
Or if we’d like to get them fast or are interested in a concrete browser specification – we can always output the element using console.dir(elem) and read the properties. Or explore “DOM properties” in the Elements tab of the browser developer tools.
11. Summary
Each DOM node belongs to a certain class. The classes form a hierarchy. The full set of properties and methods come as the result of inheritance.
Main DOM node properties are:
nodeType
We can use it to see if a node is a text or an element node. It has a numeric value: 1 for elements,3 for text nodes, and a few others for other node types. Read-only.
nodeName/tagName
For elements, tag name (uppercased unless XML-mode). For non-element nodes nodeName describes what it is. Read-only.innerHTMLThe HTML content of the element. Can be modified.
outerHTML
The full HTML of the element. A write operation into elem.outerHTML does not touch elem itself. Instead it gets replaced with the new HTML in the outer context.
nodeValue/data
The content of a non-element node (text, comment). These two are almost the same, usually we use data. Can be modified.
textContent
The text inside the element: HTML minus all <tags>. Writing into it puts the text inside the element, with all special characters and tags treated exactly as text. Can safely insert user-generated text and protect from unwanted HTML insertions.
hidden
When set to true, does the same as CSS display:none.
DOM nodes also have other properties depending on their class. For instance, <input> elements (HTMLInputElement) support value, type, while <a> elements (HTMLAnchorElement) support href etc. Most standard HTML attributes have a corresponding DOM property.
However, HTML attributes and DOM properties are not always the same, as we’ll see in the next chapter.